It's every other Saturday and that means it's time for a new Compendium of Curiosities III Challenge! This week, turn to page 49 in your books and check out the technique and products used in Layering Stencil: Texture Paste. This is such a fun technique and adds some very cool dimension to your art. The Curiosity Crew has some really amazing samples of this technique waiting for you; so be sure to check them out!

My inspiration for this project was a little Tim Holtz Ruler Binding that I had laying around. I think these are so cute and are interesting bindings for mini books. So, I created this mini journal out of chipboard, manila cardstock and various Tim Holtz products.
Here is a list of items I used to create this little mini journal:
Two 3 3/8" x 6 1/2" black chipboard pieces, two 3 3/8" x 6 1/2" manila cardstock, two 3 3/8" x 6 1/2" scrap pieces (from French Industrial Paper Stash), Distress Inks: Peacock Feathers, Rusty Hinge, Vintage Photo, Scattered Straw, Pumice Stone, Black Soot, Gathered Twigs, Embossing Pastes: Crackled Paste, White Paste and Silver Paste, Remnant Rubons - Words, Stamp Sets: Purveyor, Typography and Mercantile, Ideaology: Long Fasteners, Texture Hammer, Ruler Binding, Philosophy Tag "Imagine", Heart Charm, Link Chain, Swivel Clasp, Jump Rings, Hinge Clip, Silver Eyelet, Stencils: Arrows, Clockwork, Dot Fade, Stars, Splatters, Latticework, Harlequin, Borders Industrious Stickers, Collage Glue Stick, White Fire Treasure Gold, Old paper cut into 6 3 1/4" x 1/4" pieces, Crop A Dile, Big Bite Crop A Dile, French Industrial Paper Stash, Tim Holtz Marker Spritzer

To begin, I cut my black chipboard and then I cut two pieces of manila cardstock to cover the chipboard and create the outside covers for my journal. I began by layering various Tim Holtz Stencils: first Clockworks using Rusty Hinge and Vintage Photo Distress Inks. Then I layered the Dot Fade Stencil on top of that and applied Pumice Stone Distress Ink.

I added even more stencils to the background. First Splatters using Pumice Stone. Next I stamped the gentleman from Tim's Purveyor stamp set followed by the little starlike images next to the man from Tim's Mercantile stamp set. These are stamped with Jet Black Archival. I then added the stencil letters from Tim's Cargo Stencil with Black Soot.
I have to be honest here ... after I added the stenciled letters, I didn't really like them. So, I decided to cover them up. I love Tim's style of art because typically, there are no mistakes, only "happy accidents!" In this case, I decided to cover up the letters with torn and distress paper. Sometimes torn papers layered on top of each other create the coolest vintage look! So, that is what I decided to do here and I really love the way the project finished out! Here's how I did it ...

I distressed a manila tag by tearing the edges, adding Vintage Photo and lightly stamping the background letters from Tim's Typography stamp set. Next I added more stenciled Splatters with Peacock Feathers Distress Ink. I stamped the writing fluid bottle on a separate piece of manila cardstock and colorized it using a Detailer Water Brush and Distress Inks. Then I glued the bottle in place (allowing room for the ruler binding) and added some of Tim's Words "JOURNAL" and "curiosity" (on the man's forehead) from Remnant Rubons.

Finally I added the little Long Fasteners and banged them with Tim's Texture Hammer and I added the Embossed Silver Arrow using Wendy Vecchi's Silver Embossing Paste and Tim's Arrows Stencil. One thing I will caution you on here is that Wendy's metallic embossing pastes are a tad bit thinner than her white embossing paste. So, you don't need to use as much of the metallic pastes when working with stencils. Remember a little goes a long way and you won't have the paste oozing out from underneath the stencil if you use it sparingly.
I added some shadowing around the man's head and some journaling thoughts on the perimeter of his head and shoulders using a fine point black permanent pen. The embossing adds even more dimension to several already layered stages. Very cool! I really like this cover much better than the one with the black letters!
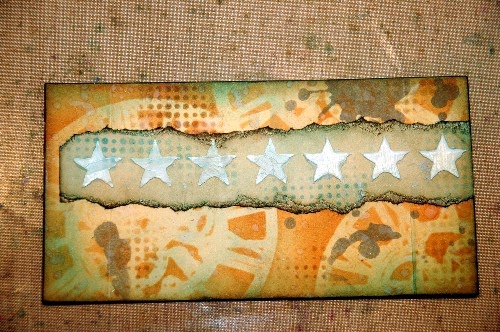
Here is the back after adding a strip of torn and distressed Manila cardstock to cover the letters. I first distressed the cardstock with Vintage Photo and Peacock Feathers Distress Inks. Then I added some Dot Fade Stenciling to the strip using Peacock Feathers. The stars are added thanks to Tim's Stars Stencil and Wendy Vecchi's Crackled Texture Paste.

I added some Peacock Feathers Distress Ink to the stars after they dried using a Detailer Water Brush. Then I lightly created a shadow effect around them using a Stabilo Black Pencil and the Water Brush. I also added two more arrows using Tim's Arrows Stencil and the Silver Embossing Paste. When dry, I added more Words Rubons; "OBSERVATIONS" and "DESTINATION" to the back as well as a metallic trim strip from Tim's Borders Industrious Stickers.

So here are the front and back covers; all layered with stencils and embossing paste added. The specific techniques for this are on page 49 of Tim's Compendium of Curiosities Book.
Now that the outside covers were almost finished, it was time to create the inside for the covers.
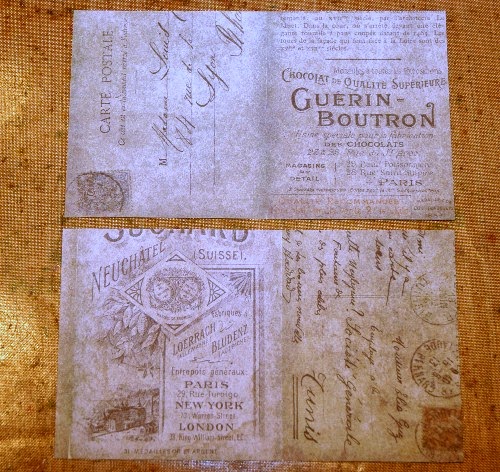
I began with these two pieces of cardstock cut from Tim's French Industrial Paper Stash.

The first layer consists of distressing with Rusty Hinge and Vintage Photo. Next I added some more Splatters using Peacock Feathers Distress Ink.

Through the magic of Tim's layered stencil and embossing paste technique, these plain cardstock pieces are transformed into a more artistic and interesting look.

Here you can see the richness of color, the many subtle patterns and the texture. As a finishing touch, I also added some White Fire Treasure Gold Guilding Wax over the embossed harlequins and around the edges. I also added White Fire Treasure Gold to the exterior covers around the edges.

Here are the finished interior papers once I attached them to the outside covers.

Now that the covers were ready, I needed to line them up according to the holes in the ruler binding and punch the holes using my Crop A Dile. Then I cut lots of papers to fill the journal with. These papers have a vintage feel to them.


Here is the finished back of the mini journal. Don't you love all of the layers of stencils pattern and the added embossed images?


To begin, I cut my black chipboard and then I cut two pieces of manila cardstock to cover the chipboard and create the outside covers for my journal. I began by layering various Tim Holtz Stencils: first Clockworks using Rusty Hinge and Vintage Photo Distress Inks. Then I layered the Dot Fade Stencil on top of that and applied Pumice Stone Distress Ink.
I added even more stencils to the background. First Splatters using Pumice Stone. Next I stamped the gentleman from Tim's Purveyor stamp set followed by the little starlike images next to the man from Tim's Mercantile stamp set. These are stamped with Jet Black Archival. I then added the stencil letters from Tim's Cargo Stencil with Black Soot.
I have to be honest here ... after I added the stenciled letters, I didn't really like them. So, I decided to cover them up. I love Tim's style of art because typically, there are no mistakes, only "happy accidents!" In this case, I decided to cover up the letters with torn and distress paper. Sometimes torn papers layered on top of each other create the coolest vintage look! So, that is what I decided to do here and I really love the way the project finished out! Here's how I did it ...
I distressed a manila tag by tearing the edges, adding Vintage Photo and lightly stamping the background letters from Tim's Typography stamp set. Next I added more stenciled Splatters with Peacock Feathers Distress Ink. I stamped the writing fluid bottle on a separate piece of manila cardstock and colorized it using a Detailer Water Brush and Distress Inks. Then I glued the bottle in place (allowing room for the ruler binding) and added some of Tim's Words "JOURNAL" and "curiosity" (on the man's forehead) from Remnant Rubons.
Finally I added the little Long Fasteners and banged them with Tim's Texture Hammer and I added the Embossed Silver Arrow using Wendy Vecchi's Silver Embossing Paste and Tim's Arrows Stencil. One thing I will caution you on here is that Wendy's metallic embossing pastes are a tad bit thinner than her white embossing paste. So, you don't need to use as much of the metallic pastes when working with stencils. Remember a little goes a long way and you won't have the paste oozing out from underneath the stencil if you use it sparingly.
I added some shadowing around the man's head and some journaling thoughts on the perimeter of his head and shoulders using a fine point black permanent pen. The embossing adds even more dimension to several already layered stages. Very cool! I really like this cover much better than the one with the black letters!
Here is the back after adding a strip of torn and distressed Manila cardstock to cover the letters. I first distressed the cardstock with Vintage Photo and Peacock Feathers Distress Inks. Then I added some Dot Fade Stenciling to the strip using Peacock Feathers. The stars are added thanks to Tim's Stars Stencil and Wendy Vecchi's Crackled Texture Paste.
I added some Peacock Feathers Distress Ink to the stars after they dried using a Detailer Water Brush. Then I lightly created a shadow effect around them using a Stabilo Black Pencil and the Water Brush. I also added two more arrows using Tim's Arrows Stencil and the Silver Embossing Paste. When dry, I added more Words Rubons; "OBSERVATIONS" and "DESTINATION" to the back as well as a metallic trim strip from Tim's Borders Industrious Stickers.
So here are the front and back covers; all layered with stencils and embossing paste added. The specific techniques for this are on page 49 of Tim's Compendium of Curiosities Book.
Now that the outside covers were almost finished, it was time to create the inside for the covers.
I began with these two pieces of cardstock cut from Tim's French Industrial Paper Stash.
The first layer consists of distressing with Rusty Hinge and Vintage Photo. Next I added some more Splatters using Peacock Feathers Distress Ink.
Through the magic of Tim's layered stencil and embossing paste technique, these plain cardstock pieces are transformed into a more artistic and interesting look.
Here you can see the richness of color, the many subtle patterns and the texture. As a finishing touch, I also added some White Fire Treasure Gold Guilding Wax over the embossed harlequins and around the edges. I also added White Fire Treasure Gold to the exterior covers around the edges.
Here are the finished interior papers once I attached them to the outside covers.
Now that the covers were ready, I needed to line them up according to the holes in the ruler binding and punch the holes using my Crop A Dile. Then I cut lots of papers to fill the journal with. These papers have a vintage feel to them.
You simply stack the back ruler binding, the back cover, add the long screws, stack the inside paper, add the top cover, add the washers then the top wing nuts. Here is the interior of the journal after it is assembled. See the little jump ring on the back cover? I will explain that next.
I wanted to add a closure to my book. So, I used an idea that I originally saw on a Kathy Orta book; an assemblage of several Tim Holtz products: a Hinge Clip attached to a Swivel Clasp and a silver eyelet.
Here is the closure assemblage from the back. I used my Big Bite Crop A Dile to punch a hole inside of the back cover and added the silver eyelet. Next I removed the jump ring from the Swivel Clasp and threaded the chain through the eyelet and then added the Jump Ring back in place, anchoring the chain. I then added two charms using Tim's Link Chain and some Jump Rings. The charms are a Heart Charm and ...
A Philosophy Tag. I swiped Spiced Marmalade Distress Paint over the entire surface of the Philosophy Tag and then wiped the paint off of the tag surface, leaving it down in the letters and numbers.
Here is the closure from the front, charms hanging from the Hinge Clip thanks to the Link Chain and the Jump Rings.
Here is the finished back of the mini journal. Don't you love all of the layers of stencils pattern and the added embossed images?
And again ... here is the finished front. I think the added torn paper to cover my mistake and extra stamping and stenciling really added some character to this cover. Happy accidents are the best, aren't they??
I hope you enjoyed this tutorial and it has inspired you to join in our challenge. Remember to share what inspired you to create your piece and be sure to mention our challenge with a link on your blog post. Then link up to our challenge and you could be the lucky winner of our fabulous prize packages from Tim and Mario and also our very generous sponsors, Inspiration Emporium and The Funkie Junkie Boutique.
This week our prize is a $25.00 gift certificate from ...
and a generous prize package full of Tim Holtz products from Tim and Mario!!
Good luck and have fun with this challenge! It's lots of fun!