Tuesday, January 3, 2012

HAPPY BIRTHDAY TIM HOLTZ/GRUNGY MONDAY

What fun is this???  Check out my friend, Linda Ledbetter's blog at GRUNGY MONDAY.  She's throwing a birthday party for ... guess who ... TIM HOLTZ!  His birthday is January 7th and Grungy Monday is celebrating with a birthday card (for Tim) challenge this week!  Hop on over to Grungy Monday and leave a card for Tim!

Here is the card I just finished for him and am posting to Grungy Monday's challenge.


I know Tim loves Mickey Mouse.  And for some reason, the idea of using Tim's Weathered Clock as a vintage Mickey Mouse clock popped into my head.  So I set out to find a vintage image of Mickey online.  I loved this one and altered it just a bit, to remove his arms.  Then I used Claudine Hellmuth's technique of transferring pictures on to metal using Matte Multi Medium.  My "tin" is a piece of Ranger's Foil Adhesive Sheet.  It is the coolest technique!  It makes pictures look like old tin types.  I love it!
The picture doesn't pick it up that well, but Mickey looks like an old tin type on the metal background.  I then fitted the tin transfer to the center of Tim's Weathered Clock die cut, so that Micky could be the center of my vintage clock.  I distressed the edge just a little with Gathered Twig Distress Ink.  I love how the Distress Inks are transparent enough that the old tin look still comes through the distressing.

Next I distressed the Weathered Clock (cut out of Grungeboard) with Black Soot Distress Ink.  I then coated the Weathered Clock in Embossing Powder and lightly sprinkled some Black Embossing Powder, followed by Queen's Gold Embossing Powder randomly over the clock face.  I wanted to give it that aged, metal peeling feel.  I did the same thing with the Weathered Clock hands.  Then I heat set everything.

I found the little Micky hands on line as well and sized them to fit my Mickey.  I covered them in Clear Embossing Powder and heat set them.  Then I glued Mickey's hands to the ends of the clock hands and fastened them on Mickey with a Long Fastener.  They will really move. It's so fun to play with Mickey's hands and move them around the clock!


Here is more of a closeup of the results of sprinkling Embossing Powder .  I also rubbed the edges of the vintage red insert on the cover of the card with Embossing Powder and sprinkled Queen's Gold Embossing Powder around the edges.  I brushed some of it away with a dry paint brush and then heat set the rest.  I love this technique for adding interest to edges of things.

The clock is telling everyone it's time for a party!!  I got the letters "PARTY TIME" from Tim's Seasonal Salvage Stickers and popped them on the card front using black pop dots.
Then I hot glued the Weathered Clock in place around the center rim.  Finally, I placed Mickey Mouse in the center and pop dotted it as well with the black pop dots.


I have not signed the card yet, but here is the interior of the card.  I distressed the edges with a little bit of Gathered Twig and used the January calendar from Tim's Lost and Found Salvage Stickers.  I circled Tim's birthday, in case he forgets (smile).  Finally, I stamped my sentiment.  I thought it was perfect for this card!  It speaks to the child in all of us when it comes to birthdays, parties and blowing out candles.  Oh ... and Mickey Mouse! 

SO HAPPY BIRTHDAY, TIM!!!  I hope you have a MAGICAL day!


Monday, January 2, 2012

I'M A RANGER GIRL THROUGH AND THROUGH!!

Yippee and YaWhoooEeee!  Why am I so excited you ask?  

Well... one of the samples that I made for CHA's summer show in Chicago last July is being featured on RANGER'S BLOG right now!  I made the slideshow on their home page!  Check it out! 
HERE is the link to go to the actual project. 


It's a BINGO Pocket Tag.  

See Rangers' blog for the complete list of supplies and instructions to make this easy and fun project!  With Ranger products, you can't go wrong!  I LOVE them!  They make crafting so much fun because you KNOW what your results will be when you use them.
Thank you, Ranger Industries for featuring one of my projects.  I'm still pinching myself.

I hope your 2012 will be a year full of fun, friends and lots and lots of creativity!  After all....
CREATIVITY IS CONTAGIOUS!!

Sunday, January 1, 2012

SOMETHING OLD...SOMETHING NEW...

Happy New Year Everybody!  
  
Let me take this opportunity to thank everyone who has followed my blog and also my contributions to Simon Says Stamp and Show.  I really appreciate all of your support and wonderful comments that you leave.  They inspire me and encourage me.  My wish for you is that your life will be so richly blessed in 2012.

And now...for the first challenge of 2012...
Simon Says Show "Something Old ... Something New..." 

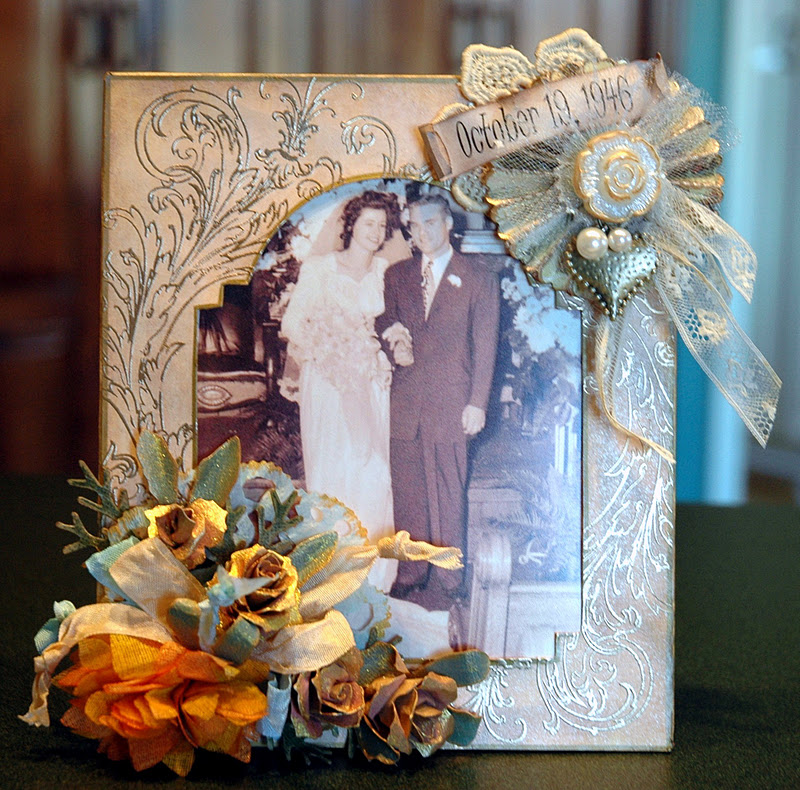
When I saw that, the first thing I thought of was a wedding.  You know...Something old, Something new, Something borrowed, Something blue.  One of my passions is taking something brand new and making it look really old.  So, my challenge piece this week mimics one of those ornate pages from an old photo album and I made a vintage frame out of it.


I started with a piece of Ranger's Manila Cardstock and cut it into a 6" x 7" piece.  In the center of that, I die cut Tim Holtz' Vintage Cabinet Card (to create my opening).  I then cut a back for my frame out of chipboard and another piece of Manila Cardstock 7" x 8".


I cut the manila cardstock an inch larger so that I could cover the chipboard and leave a 1/2" border all the way around.  That would allow me to make nice covered edges and miter the corners.


Next I distressed the Manila Cardstock with a mixture of Brushed Corduroy, Wild Honey and Picket Fence Distress Stains.  Then I lightly distressed the edges with Brushed Corduroy Distress Ink.  When the was dry, I lightly misted the front and back of the frame with Pearl Perfect Pearls Mist.  I love the sheen that the pearl mist gives.  It's subtle but really amazing! Next I used a Gold Metallic Pen and edged the Vintage Cabinet Card cut out and the outside edge of the picture frame.  Finally, to add the intricate design work to the frame, I used the larger flourish from Tim Holtz' Fabulous Flourishes stamp set and Ranger's Queen's Gold Embossing Powder.


Before I began embellishing the picture frame, I needed to add a backing.  The perfect solution for this is Tim Holtz' Small Easel Die Cut.  I cut it out of chipboard and colorized it using Brushed Corduroy Distress Stain.  Then I hot glued it onto the back of my frame.

I attached the frame front to the back using 1/2" Wonder Tape on the sides and the bottom.  I left the top open so I could slide pictures in and out of the frame.  


Let the embelllishing begin!!  I began by cutting three vintage pink Tattered Pine Cones from Tim Holtz' Kraft Core Nostalgic Paper Stack.  Instead of pine cones, I made little sweetheart roses.  I also cut greenery from the Tattered Pine Cone die cut.  I also used the mum looking flower from Tim Holtz' Tattered Flowers die cut.  I used two different greens from the Nostalgic Paper Stack on the greenery.  


Behind the roses is something blue.  This is made from Tim Holtz' Distressed Doily On The Edge die cut.  I cut the doily out of white crepe paper that I then sprayed with my own concoction of Tumbled Glass Distress Ink Refill, Biscotti Perfect Pearls and Water in a Mini Mister.  I used that color combination on the doily and also on the "vintage" ribbon you see mixed in with the roses.  

I also cut a mum Tattered Flower out of white crinoline and sprayed three layers with my concoction of Dried Marigold Reinker, Sunflower Sparkle Perfect Pearls and water. I also tipped the distressed doily with that orange-ish color and accented some of the greenery by dragging them through the color spray.  The other three layers of the mum are sprayed with my concoction of Mustard Seed Reinker, Sunflower Sparkle Perfect Pearls and water.  I alternated the layers of color on the mum and distressed some of the edges with Brushed Corduroy Distress Ink.  I smushed the mum up and glued it on to the lower left corner of the frame.  Then I added the blue "vintage ribbon" and also a ribbon sprayed with Sunflower Sparkle Perfect Pearls Mist.  I created a double bow and stuck them in place above the mum and among the sweetheart roses.  I also sprayed the roses with a touch of the Dried Marigold color spray to highlight their delicate edges.  Then I glued all of the roses in place.  


I added an old piece of lace in the upper right hand corner with a Rosette partially resting on top of it.  I highlighted the edges of the Rosette by heat embossing them with Queen's Gold Embossing Powder.  Layered on top of the Rosette is a gathered piece of blue tulle.  On top of the tulle is an adornment made out of a Tim Holtz' Accoutrements Fanciful Button (highlighted by a Gold Paint Dabber), Tim Holtz' Baubles and Tim Holtz' Heart Charm from his Adornments Ideaology.  The heart is distressed with a Gold Paint Dabber.  All of those elements are put together with Tim Holtz' Jump Rings.  I added a little more vintage lace, reminiscent of a bridal bouquet and a date of October 19, 1946 on a little banner at the top.

OH...and that beautiful bride and groom that is in the center of my frame...that is my parents on their wedding day.

Now it is YOUR turn to create "Something Old...Something New".  Stop by Simon Says Stamp and Show to see all of the absolutely beautiful ideas my Design Team buddies have created for you this week.  Then enter your piece in our weekly challenge.  If you are the lucky winner of our random drawing, you will be awarded a fabulous 


If your work is voted as one of the top three, you will receive that special recognition on our blog and you will also receive a TOP THREE BLINKIE to proudly display on your blog.

Here's to a creative 2012!!!  I can't wait to see your entries!!


Sunday, December 18, 2011

SIMON SAYS CREATE SOME TIM HOLTZ INSPIRED TAGS

Can you believe that Christmas is less than a week away?  Where has this year gone?  And...can you believe that Tim Holtz' long anticipated 12 Tags of Christmas are already finished for another year? 

Simon Says Stamp and Show wanted to keep the creative juices from the 12 Tags of Christmas flowing!!  So, let's create some Tim Holtz inspired Christmas tags!!

My Design Team buddies have created some really unique and beautiful Christmas tags for you to see over on Simon Says Stamp and Show's blog.  Hopefully they will inspire you to get out those art supplies and create some magic!


I created three tags to share with you...each has their own style.


Peace is a gentile tag that makes me feel tranquil just to look at it.  I began with a manila tag that I colored with Stormy Sky, Tumbled Glass and Picket Fence Distress Stain.  I used Tim's technique from his Day 4 Tag to create the background by swirling the tag through the colors that were randomly placed on my craft sheet.  


Next I ran the tag through my Vagabond using Tim's Tall Pines Texture Fade.  I further colorized the pines using Evergreen Bough from Tim's New Winter Seasonal Ink Pack.  I colorized the trunks with Frayed Burlap Distress Ink.  While I had the Frayed Burlap out, I randomly stamped some music on the tag from Tim's A Joyful Song stamp set.   Next, I created snow using a Snow Cap Paint Dabber and lightly touched the tree branches and the ground.  Then I sprinkled some Art Institute White Glitter on top of the wet paint.  I distressed the edges of the tag using a Paper Distresser followed by inking the edges with Frayed Burlap.  I added the "Star in the East" by heat embossing a Gold "star" and adding a bling center.  "PEACE" is created from Tim Holtz' Newsprint Alpha Parts and then topped with a Gold Paint Dabber.  


Finally, I added the little family of reindeer from two of Tim Holtz' Reindeer Die Cuts.  They were cut out of Grungeboard and Natural Sticky Back Canvas.  I distressed them with a Tonic Scratching Tool and Frayed Burlap Distress Ink.  I added a little bit of gold tinsel and a gold jingle bell to the momma deer's neck.


The more traditional Christmas tag in the center was first stamped using Black Archival Ink on a Manila Tag.  Almost of the images are from Tim Holtz' Mini Holidays stamp set,randomly stamped into a collage. "Merry Christmas" is from Tim's Mini Holidays 3 stamp set.  The background was colorized using Tim's new Winter Seasonal Distress Ink Pack plus Scattered Straw Distress Ink.  Then the tag was sprayed with Pearl Perfect Pearls Mist for that really shimmer "frosted" finish.  

 
I added Tim Holtz' Holiday Lamppost die cut from Grungeboard and heat embossed it with Black Embossing Powder.  The holly leaves are coated with Picket Fence Stickles, as is the snow on the top of the lamppost and on Santa.  I added a piece of Mica for the glass in the lamppost and fashioned a "flame" out of Goldenrod Stickles.  I really liked the vintage feel that added..something as simple as a flame.  The spruce greenery on the lamppost is from Tim's Tattered Pine Cone die cut.  I added the Goldenrod Stickles on those as well.  Then I added a little golden bell.


Santa is colorized using colored pencils.  I flocked his beard and fur trim on his hood.  I then matted him on a scrap of black cardstock and edged it with a Gold Paint Dabber.  I added some gold tinsel behind Santa and hot glued him in place next to the lamppost.


Merry Christmas was stamped in black in and then sprinkled with Gold Embossing Powder then heat set.  I edged it with Frayed Burlap and pop dotted it in place.


The Snowflake Christmas Adornment at the top of the tag was originally silver.  I lightly hit the high spots of the metal tag with Gold Paint Dabber on my finger and turned it antique gold...it goes with my tag much better!

Finally, I added the red ribbon to the top of the tag and to the holly on the lamppost.  Both started out as white Hug Snug and I colorized them with Festive Berries from Tim's New Winter Seasonal Distress Ink Pack.


The Shabby Chic Snowman is a favorite of mine.  I truly LOVE the vintage roses that you can make from Tim's Tattered Pine Cone die cut.  More about that in a minute...


This manila tag was first colorized with Iced Spruce and Evergreen Bough Distress Inks (both from Tim's new Winter Seasonal Distress Ink Pack).  Next, I dry embossed the tag with Tim's Vintage Holiday Texture Fade and dabbed a Gold Paint Dabber on all of the embossed images. Then I misted the tag with Pearl Perfect Pearls Mist and LOVED the result!  I distressed the edge of the tag with a Paper Distresser and inked it with Frayed Burlap Distress Ink.  I returned to Tim's Day 4 tag as my inspiration for the wonderful crackled snowman! First I painted some Grungeboard with a Snow Cap Paint Dabber and then (when dry), die cut the snowman from Tim's Winter Wonder die cut.  I used Tim's Mini Hearts die cut to create the heart in the snowman's tummy.  Next, I painted the snowman's hat with black paint and then crackled the surface of the snowman using Distress Rock Candy Crackle Paint.  Once crackled, I added some Tumbled Glass Distress Stain and then some Frayed Burlap Distress Ink to further colorize the snowman. I found a Santa image that I loved in Tim's Seasonal Paper Stash and glued him underneath the snowman.  Then I completely covered the Santa image with Glossy Accents and let it dry.  


I created my sentiment, "All Hearts Come Home For Christmas" on my computer and cut it out using the medium size of Tim's Tattered Banners.  I distressed it with Frayed Burlap and Black Soot Distress Ink just on the edge.  Then I smeared Rock Candy Stickles all over the banner.  I added a piece of vintage lace at the bottom of the tag. 

I created the vintage roses out of some paper from Tim's Distress CoreDinations Paper Pack....probably Victorian Velvet in color.  Then I tapped the edges with a Gold Paint Dabber and lightly misted them with Pearl Perfect Pearls Mist.  The Greenery is also from Tim's Tattered Pinecones. It was cut from a goldish paper and then I added the snow highlights.


I hot glued everything in place and added the Baubles and Heart Adornment at the top of the tag.  The ribbons are colored from Victorian Velvet Distress Ink.  I also just sprayed some white ribbon with Sunflower Sparkle Perfect Pearls Mist and combined them on the tag.  There is also a little white tulle that is torn and tucked in with the vintage roses and also around the snowman's neck.  Finally, the snowman's hat has a holly sprig that has some snow on it and then berries made from Fruit Punch Stickles. 


Now I can't wait to see your Christmas Tag Creations!  Link them up to SIMON SAY STAMP AND SHOW!  Our amazing sponsor is offering their very generous prize of a 


$50.00 CREDIT VOUCHER to their randomly chosen winner!  How wonderful is THAT?
In addition...if your entry is voted on as one of the TOP THREE, you will be recognized on our blog and also given a TOP THREE BLINKIE to proudly display on your blog.

So, pull out those tags, inks, die cuts and whatever else you need to create some Christmas magic!!

Sunday, December 11, 2011

SIMON SAYS MAKE SOMETHING WITH DEPTH

Hello bloggers!  Can you believe it's already the LAST DAY of Tim's 12 Tags of Christmas?  Wow!  That went by so fast!  I had such fun with his tags this year.  I think half of the fun is meeting with friends and making tags!!  We had the BEST time, learned some new techniques and had fun gabbing as were were creating!  Thank you Tim for your inspiration, your techniques, your always positive creative energy and for bringing people together!!!

And now, it's Monday and time for yet another Simon Says Stamp and Show Challenge!  This week, we're asked to travel through the looking glass and create something with depth or dimension.  If you're having trouble with that concept, be sure to stop by the Simon Says Stamp and Show blog.  My Design Team buddies have created some BEYOND GORGEOUS things for you this week!  Each is so different, so festive and just waiting for you to see!!!  Seriously...they ROCKED the challenge this week! 

Since Christmas is getting closer and closer and we all know that Santa is getting ready to make his magical Christmas Eve flight, I decided maybe Santa would like a new sleigh!  So my dimensional piece for this challenge is a fairly simple thing to make .....


A "vintage" Santa's sleigh.

Ever since I saw Tim's Holtz' Vintage Noel die cut, I've wondered if it could be used as a sleigh runner.  Answer:  Yes!  It can!  

And my little sleigh only required one compartment from a Configurations Box.  So, if you're not in the mood to do a whole box, you can just use one or a couple of compartments and create you own "mini magic"!


I started with a 2" x 3" empty compartment from a Configurations Box.  I painted the interior and exterior of the box with a Cranberry Paint Dabber.  Then I cut a 2" x 8" strip of cranberry card stock and glued it to the bottom and sides of the Configuration Box; to create the shape for my sleigh.  To hide the seam that showed between the Configuration Box and the card stock, I hot glued a piece of thin tinsel garland over the seam.  


Next I cut 2 of the NOELs out of heavy chipboard and using Tim's technique in his Day 1 Christmas Tag,  I applied Glue N' Seal to the chipboard and glittered them with Martha Stewart White Gold Glitter.  (NOTE:  One of the NOELs has to be reversed in order for them to match when you glue them to the sleigh bed. Be sure that you are glittering the correct sides.)  Then I sat those aside to let them dry.


I found a page of vintage Santas that I love in Tim's Seasonal Paper Stash.  I picked the one I wanted to use as the back on my sleigh and cut him out.  Then I smeared Rock Candy Stickles over it, for that added vintage subtle glittery effect.  Then I edged the Santa picture and around the top of the Configuration Box with some Antique Gold Rub N' Buff.  Then I glued the Santa on to the cranberry cardstock and gave it a curl by rolling it over a glue stick.  To add a decorative top to my sleigh, I added a piece of Tim's new Vintage Lace die cut that is also glittered with Martha Stewart's White Gold.


The other end of the sleigh also curls.  On this edge, I used a Martha Stewart Deep Edge Snowflake Punch.  Then I added some Antique Gold Rub N' Buff for just a hint of that antique gold coloring.  Then I edged all of the cranberry card stock that was the shape of my sleigh with Platinum Stickles.  I also included the top of the Configuration Box.


Now that my sleigh was taking shape, I needed to embellish the front and back of it.  On the back, I made what sort of resembles a license plate.  It says "BELIEVE" from Tim's Mini Holidays 2 stamp set.  It was heat embossed and also edged with Super Fine Detail Silver Embossing Powder.  I also heat embossed the Snowflakes from Tim's Mini Holidays stamp set in the silver.  Around "BELIEVE" are different Holly Leaves cut from Tim Holtz' Holiday Lamppost die cut.  Some I put Rock Candy Stickles on and some I edged with Platinum Stickles.  I also added some berries using Candy Cane Stickles.  Next I added three little jingle bells on wires and a cute little red bow made out of a tinsel pipe cleaner.  I pop dotted that on the back end of Santa's sleigh.


The front of Santa's sleigh says "Merry Christmas" (from Tim Holtz' Mini Holidays 2 stamp set), stamped and heat embossed with the silver embossing powder.  Again, I added the holly leaves and berries around it and pop dotted in place.  


Before I added the NOEL runners to the sides, I felt like the top of the sleigh needed something else.  So, I sprayed a piece of ruffled elastic trim from Tim Holtz' Trimmings.  I sprayed it with my own mix of Fired Brick Reinker, water and Sunflower Sparkle Perfect Pearls in a Mini Mister.  I hot glued a piece on to each side.  You can see that on the picture below.


Then I lined up my NOEL runners...one side reading "NOEL" the other side reversed so that the runners' curl would be the same.  They really DO look like runners when they get glued into place!!


Finally, I added some long golden reins for Santa to guide his reindeer and a soft, cushion for Santa to sit on during his long Christmas Eve flight.  The cushion is sitting on top of two 3/4" wooden blocks that are glued together and painted with Cranberry Paint Dabber.  I cut a piece of chipboard a bit shorter than the width of the interior of the sleigh and covered it with some quilt batting.  Next, I covered the chipboard and the batting with a piece of striped material and hot glued it on the underneath side.  Then I hot glued it to the wooden blocks.


There is another of Tim's vintage Santa pictures at the front end of the sleigh.  It is also taken from that same sheet of wonderful vintage Santa images as the one that graces the back of the sleigh.  


It was my intention to cut out a couple of the leaping reindeer from Tim Holtz' Reindeer Flight die cut and hook them up to the sleigh.  However, I thought they were a little small for the sleigh. So, I improvised with some adorable little furry reindeer that I have.  I also added a vintage Santa ornament to take his place in the sleigh.  I have to say, I love how they all look together!

Now it's your turn to create something with dimension or depth and enter it into our weekly challenge.  If you are the lucky winner of our sponsor's random drawing, you will win a wonderful $50.00 CREDIT VOUCHER TO SIMON SAYS STAMP!!  


If you are chosen as one of the TOP 3 creations for the week, you will be recognized on our blog and also receive a TOP THREE BLINKIE for your blog.


So come join the fun and join Simon Says Stamp and Show's challenge!  I can't wait to see your dimensional creation!


Monday, December 5, 2011

VINTAGE SANTA BLOCKS

I just finished making some vintage SANTA blocks and wanted to share them with you.

They began as 3 1/2" plain wooden blocks that I painted with a metallic vintage-ish red on all of the edges.  Then I cropped and sized vintage Santa images from vintage postcards and glued them on the sides.  Each side has a different vintage Santa image.


Next I created the fronts for each of my blocks using a 2" chipboards letters painted with the same vintage red color.  I smeared Rock Candy Stickles over the letters and edged them with Platinum Stickles.  Behind the letters is gathered cream crepe paper that I smeared with Fruit Punch Stickles and then edged with the Platinum Stickles.  Behind the crepe paper is a large glittery snowflake that I found at a local craft store.

Next I stickled all of the vintage Santas and added either Rock Candy to the beards or in some cases, I flocked the Santa's beards.  Below are a couple of closeup pictures of the flocked and stickled Santas.


When all of the sides of the blocks were finished, I began embelllishing the tops of my blocks with vintage Santas that I had.  Below are pictures of each of the block and their tops.


Finally, here is a view of the back side of the blocks so you can see the back and also see some of the different vintage Santas.


Christmas is my favorite time of the year.  I have always have a loved Santa and every year, I try to make at least one new decoration for my home.  I hope you are enjoying your December so far!