Tuesday, November 1, 2016

MIXED UP MAGAZINE ~ NOVEMBER ISSUE NOW AVAILABLE ONLINE!!

Hello everyone!!  I have some exciting news to share!


Mixed Up Magazine's November 2016, Issue 2 is now on sale!  Go HERE to check it out and get your subscription!  If mixed media fascinates you, then you will love this magazine with fabulous articles and ideas from some amazing talent!

I am so honored that Katy Leitch of Mixed Up Magazine asked me to create a piece for her magazine focusing on DecoArt's Liquid Glass product.  


Here is a sneak peek of the vintage piece I created for Mixed Up Magazine.  I titled it "When You Wish Upon A Star".  I'll be back in a short bit with the complete pictorial tutorial!  In the meantime, grab your copy of Mixed Up Media magazine now!  

See you back here soon!

Friday, October 28, 2016

WITCHY WOMAN THREAD CONE DOLL

It's October ... a gorgeous autumn month and home to the Halloween holiday!
I love creating and decorating for Halloween.  

I hope that you've been enjoying the very creative and original "Witchy Woman" pieces especially for you from my Creative Cohorts at Creative Carte Blanche

Our adventure for this month was inspired by an old Eagles song, "Witchy Woman", I thought this would be an open ended creative adventure whether you are a fan of Halloween or just of women with an attitude!


I am wrapping up the month sharing my creation with you....my Halloween Witch Doll that started out by my using an old dark brown, drab thread cone.  I used it for the lower body and went from there.

Let's get started on the steps to create this fun gal.  She's easy to do and wouldn't she be fun to have sitting out next to your Halloween candy you'll be passing out to trick or treaters?  A real one of a kind original Halloween decoration!

Let's go through the steps now so you can create your own Witchy Woman!


First, you're going to need a vintage picture with a face worthy of being transformed into a witch.  Wha-lah!  Here she is!  I found this lovely lady a long time ago on the internet.  She is someone's daughter, mother, relative or friend. I mean no disrespect.  She just had the perfect face for my doll!

 If you right click on the photograph, you can save it to your computer. 


As I stated, I began with an old thread cone.  


I had some old black lace and soft black netting laying around.  They would be perfect for covering the thread cone.  So I cut off enough of the lace and the netting to gather and use for a "skirt".  


Using a needle and black thread, I gathered the black lace first and made a skirt.  Then I gathered the black netting, leaving enough for a fairly full skirt.  I gathered it at the top, measured how large I would need to leave the opening at the top, pulled the netting to that measurement and then stitched it together, creating a ring around the cone top.  Then I hot glued the black lace and then the netting into place, leaving the top of the cone open to later insert the doll's soft upper body.


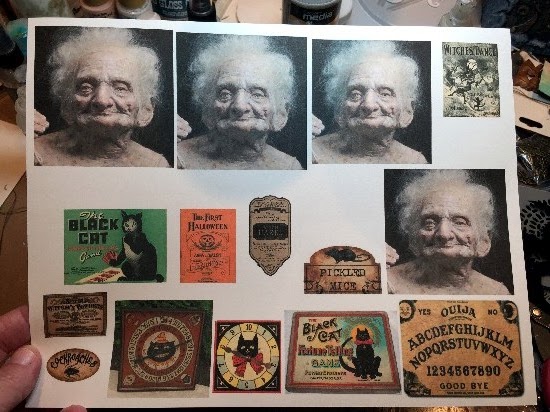
Next I generated a face and several other elements I might want to use on my doll.  I sized them to be correct size for the doll's body and then printed them out on an ink jet computer and heavy white cardstock.

I brushed over the cardstock with DecoArt Media Matte Medium to seal all of the images.  It goes on clear and dries to a matte finish.


I cut out all of the elements and backed several of them with black chipboard for strength and also as part of the piece.  For example, the black chipboard backing on the Ouija Board and Black Cat game board look very natural.


I created a little box for the Black Cat game using kraft cardstock. I laid the Black Cat game cover down and then measured 1/4" all the way around it.  This would allow for the sides of the box.  I cut it out, folded it into a box shape, clipped the four edges so that they could be folded under, glued and create the lid of the box.  I repeated this for the game box bottom (minus the Black Cat label).  I distressed the edges using a Black Sepia Cats Eye Ink Pad to instantly age the box.


Now it was time to start working on my witch's body.  I glued her head onto a piece of black chipboard for strength.  I also left a little piece at the top that would later be hidden by her witch's hat.


Next I determined how big the brim for her hat needed to be and made a circle measuring 3 1/4" across on a piece of black cardstock.  I cut it out, folded it in the center and cut a slit for her head to poke through.  I glued her head in place with a little bead of Glossy Accents to hold the brim in place.  I'd finish the hat later but now ... on to the soft body.


I fashioned a "body" out of a piece of white cardstock to lay under the head for the purpose of getting the correct size body for my doll (plus a little extra length that would be gathered and shoved down into the thread cone opening).

I laid some old looking black fabric right sides together, drew out a pattern for the body and arms and cut it out.


Then I sewed a small seam all the way around the body; leaving the neck, sleeve holes and bottom open for stuffing.


Next I placed the material body over a long craft stick that I had added wire arms to and glued in place.  I left a piece of the stick sticking out at the top to represent a neck and help support the head once it was glued in place on the stick.  The wire would represent arms that could bend and move.  I gathered some fluff fill and began filling the body, using a pencil eraser end to move the fluff down the sleeves with the inserted wire first.  Then I moved to the main body and stuffed around the craft stick in the center.


I wanted to create some wild gray hair for my witchy woman so I took some of the white fluff fill and sprayed it with DecoArt Media's White and Black Shimmer Sprays.  I kept lightly spraying until I got a cool gray color.  I then kept dabbing off the excess color with paper towels until the "hair" was dry.  Next I hot glued the back of the witch head to the craft stick and then covered that up with the gray hair.  Perfect!


Time to add some skeleton hands (from some cheap little plastic skeletons I get at the craft stores around Halloween). I kept part of the skeleton's arm attached to the hands and then hot glued them up inside of the sleeves.  I then added some decorative gathered black netting (the same as on the skirt) around the neck and sleeves.  I sewed them into place.


Next I gathered up the bottom of the witch's soft body and wired it tighter.  Then I hot glued around the inside opening of the thread cone and shoved the body in place.  I added a long piece of black ribbon (wrapped around the body twice) and tied it in a bow in the back of the doll.  Then I added a spooky cape made out of the same black netting; tore it on the ends and then tied it in place.  I added a couple of hot glue drops under her hair in the back and under the tied knot in the front to hold the cape in place.  I love how she is draped in the black netting.  It gives her a spooky vintage yet not scary appearance.


Now she is really coming together!! Time to finish the witch's hat!  I created a cone shape for the top of the hat using a piece of black cardstock. I glued the cone in place using 1/4" Scor Tape double sided adhesive tape.  Then I cut the bottom of the cone to the length of hat I wanted.  I hot glued the top of the hat into place on the brim.  


I added some more soft netting to the top of the hat and around the brim to hide where I had glued the hat together.  Then I added Black Diamond Stickles to give the hat a magical glow.


The basic cone doll was finished now and I just needed to add the embellishments.  I hot glued the Ouija Board and Witches' Dance sheet music to the right hand and the Black Cat box and game board to the left hand.  


Here are closer up photos of the embellishments for better detail ...


I hot glued "Happy Halloween" to the hat and one of Tim Holtz Ideaology Spider Charms to the bodice of her dress.  I still have little labels if I would decide to add little bottles or other things around her but for now ... I really love how she turned out!


Thanks for stopping by and I hope that you've been inspired to join in on the fun over at Creative Carte Blanche with our "Witchy Woman" theme this month!  It's still not too late to join us!  Please link your creation to our blog so that everyone can see your creativity and your process in creating your piece.

Next month, the lovely and talented Annette Green will be hosting our next adventure!

Have a safe and Happy Halloween!  It'll be Thanksgiving before you know it!


Monday, September 5, 2016

GOD ONLY KNOWS ALTERED PLAYING CARD

Hello Creative Carte Blanche Community and every one else who's stopping by my blog today!  I'm so glad you're here.

This month, the lovely Linda Ledbetter is hosting our unique adventure.  For your inspiration, please check out THIS VIDEO on Youtube.  It's an amazing conglomeration of visual delight and various talented musical artists coming together to recreate that old Beach Boys 1966 classic "God Only Knows".

We are asking you to stretch your imagination and use this musical video as your inspiration to create something; anything related to the song and link it up to our blog.  It will be fascinating to see everyone's personal "take" on the lyrics, the sights and the sounds you will view on this video.

As I was viewing this video, I was overwhelmed with the bright colors, the whimsical flowers, hot air balloons and cloud like images that seemed to be pouring out of my computer screen. Combined with the wonderful lyrics, the song began to take on a whole new meaning for me and I tried to express that through the symbolism of my card.

For me, it's not so much a song about love between two people but the love we should have for all people.  In this modern world, we are all so interdependent on each other and wouldn't the world be a far better place if we thought about how "God only knows what I'd be without you"?  Thus the symbolism of my piece.

This was my first time to alter a playing card.  I had so much fun!  This is one of those pieces that came together in no time.  It's a small work surface so that helped but I tried to create a lot of meaning, detail and dimension in that small space that shared the feelings I experienced while viewing the video. That was a bit more challenging.  But I did it and here is my finished altered playing card ...


I used primarily DecoArt Media products but you can use whatever acrylic paints and other mediums you choose.  Here's the steps in creating this altered playing card:


I began with a regular playing card, a die cut of Tim Holtz' Vintage Globe (cut from plain Grungeboard) from his Movers and Shapers Vintage Fan and Globe set, and some die cut mini people from Tando Creations.   


I painted a healthy coat of DecoArt media Gesso over the surface of the playing card and also over the surface of the die cut globe. 


I heat set the Gesso on the playing card and purposefully got the card a little too hot to make the Gesso bubble on the surface.  I liked the texture it created!


Once the Gesso was dry, I added DecoArt Media Modeling Paste to the continents of the globe to create dimension and more texture.  Then I let that air dry.  
Note:  Clean your brushed immediately after using the Gesso and Modeling Paste!


Next I began to create the outer space realm for my planet to rest on.  I used brush and lightly painted on a combination of DecoArt Media Fluid Acrylics Cerulean Blue and Titanium White.


For more depth, I wiped just Cerulean Blue onto the card using a baby wipe.


To begin to pull the color into the center and create a definite darker blue edge to the card, I added Phthalo Blue around the edges using a baby wipe.


Finally, to further define the edges of the card, I added a touch of Paynes Grey using my fingers around the edges.


While the playing card was drying, I painted six of the mini people in different colors; representing different races and genders and orientations. Let dry.


Now it was time to bring "life" to planet Earth. I began by painting the oceans with combinations of Titanium White, Primary Cyan, Prussian Blue Hue and Cerulean Blue.

The water was created, now it was time to create the land masses and give them more of a realistic appearance.  The first layer was Yellow Oxide followed by shadows of Burnt Umber and highlights of Titan Buff.  Let all of this dry.


I added a bit more white to the background of the playing card behind the area that planet Earth would sit.  Then I glued the globe in place followed by the six mini people.


I painted Diarylide Yellow followed by Primary Yellow onto a piece of heavy white cardstock and gently heat set it.  Then I drew little flowers of varying sizes onto the yellow and cut them out to create layered flowers to add to my altered playing card.


I dabbed a bit of Glossy Accents onto the bigger flower and let it dry.  Then I added the top flower (using a dab of Glossy Accents on the back) to create a little bit of dimension. I then glued the flowers onto the green stems and let them dry.


For more detail and a "cloud like effect", I added a little Glossy Accents onto the card surface and sprinkled White Flocking over the glue then shook off the excess.  It left little puffy white clouds!


Across the bottom of the card, I glued my flower stems in place.  These would soon be covered by a "cloud" cut out of white cardstock and coated with the White Flocking.


Here you can see the added cloud and the computer generated "God Only Knows" title along with some little musical notes I drew onto the card.  Finally, I added Glossy Accents to the centers of the flowers and over the mini people to add a bit of gloss and also dimension.

Throughout the month, my insanely talented and creative cohorts will be posting their unique art to our Creative Carte Blanche blog.  You won't want to miss those! 

Thanks so much for stopping by today! I hope that my little altered playing card has inspired you to join us at Creative Carte Blanche for our September art adventure.  Just add your creation to our community by using the Inlinkz button.


Thursday, September 1, 2016

MARGIE KEMPER, YOUR SUNGLASSES ARE READY!

Hello everyone and welcome to my blog!

Last summer I had the pleasure of traveling to New York City with my daughter and a dear friend.  While there, I got to hook up with my super talented art buddy and one of the nicest people on the planet, Marjie Kemper.  

She met up with us and we toured some of the city, stopping for lunch at the Boat House in Central Park.  While there, Marjie's "very expensive" (being sarcastic) pair of sunglasses popped a lens.  She trashed them but little did she know I fished them out of the trash because I had a sinister plan for them!

Well, I was FINALLY able to put the plan into action a few days ago.  I completely transformed Marjie's poor old broken trashed sunglasses into a new, improved pair of rockin' steampunk shades!

Since Marjie is also a member of the DecoArt Media team, I thought it would be appropriate to share them on the DecoArt Media Blog and give a complete pictorial step by step tutorial.  Now, you can use the simple techniques I share for these sunglasses to alter anything!  Just a few simple steps and you're on your way!


So Marjie....this one's for you!  Rock those glasses, girlfriend!


Check out the entire frames HERE.

Thanks for stopping by!  Your comments here and on DecoArt's Media blog are always appreciated!


Friday, August 5, 2016

THE SUN, MOON AND STARS VINTAGE CARD

Good day blogging friends!

It's a new theme at Creative Carte Blanche brought to you
 by the lovely and very talented Yvonne Blair.

This month's theme is "Sun, Moon and Stars".  So many possibilities!!


I have created a sweet little vintage card using a couple of my favorite things:  the sentiment from Tim Holtz' Life Quotes stamp set, the sweet image of the little boy and my DecoArt Media line products.

My whole inspiration for this card was from the sentiment.  While Tim Holtz did not originate this sentiment, I really liked the font he used on his stamp.  When I thought of "moon", I thought of Tim Holtz' Crescent Moon and Stars die cut. Perfect for this theme and perfect for my card design!


Here are the basic things I used to create my design for the card.  Pretty simple but through the magic of color, amazing things can happen!


Here is the little boy image I used for my card.  You can just right click on him to save him to your computer.  Isn't he adorable?

Now let's move on to the tutorial as to how to create this card.  

I am listing the actual products that I used but you can substitute products you have on hand or prefer.  Totally up to you.  Let's begin ...


Begin with a piece of 5 3/4" x 5 3/4" white cardstock and apply DecoArt Media White Gesso over the entire surface using a palette knife.  Heat set to dry.


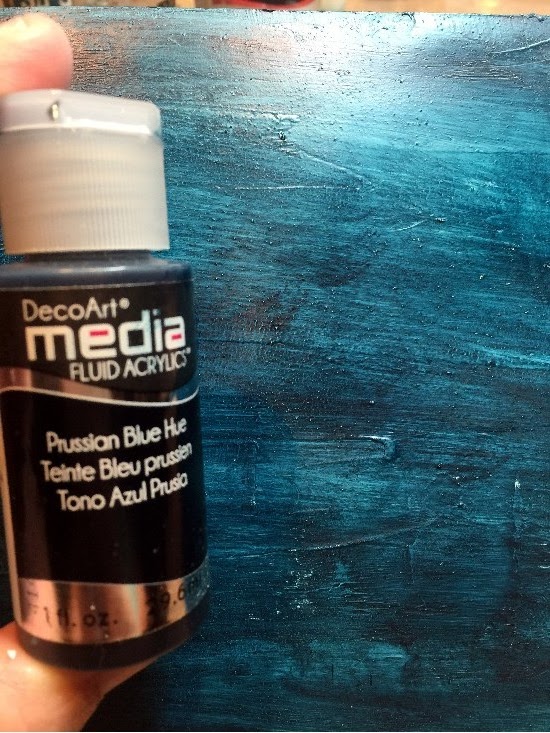
Paint over the gesso'd surface with DecoArt Media Prussian Blue Hue Fluid Acrylics.  Let dry or heat set.


To lighten the Prussian Blue Hue, add a touch of DecoArt Media Tinting Base to the paint and randomly add this color over the surface of the cardstock to create a "night sky" effect.


To give a bit of a shimmer or a "star shine", lightly add some DecoArt White Pearl Dazzling Metallics to the surface.  Let dry.

Now that the background is in good shape, let's move onto the design of the card.


Die cut the moon and stars from Tim Holtz' Plain Grungeboard.  Cover the surface of the moon using DecoArt Media Texture Sand Paste to give a rougher, dimensional texture to the lunar surface.  Let dry or gently heat set.


Paint the surface of the Grungeboard stars with a mix of DecoArt Media Yellow Oxide and Hansa Yellow Media Fluid Acrylics. Let dry.  Then using your finger, give a light coating of Mercury Glass then Stardust Stickles to the surface of the stars.  Let the Stickles dry between coatings.  This will add a bit of a starry shimmer and give the stars more of a vintage look. 


Once the Texture Sand Paste is dry, brush on a layer of DecoArt Media Yellow Oxide Fluid Acrylics.


For a deeper, richer lunar surface, randomly add DecoArt Media Raw Sienna around the perimeter and center of the lunar surface.


Next add touches of DecoArt Media Quinacridone Gold randomly at the perimeter edges and along some of the ridges of the lunar surface. I even used some of the Quinacridone Gold to create a subtle "blush" effect on what would be cheeks if the moon have a face.


Finally to better define the edges and some of the detail of the surface, add touches of DecoArt Media Burnt Umber Fluid Acrylics.  Let dry.


To create a shimmer from the glow of the stars in the night sky, add touches of DecoArt Media Metallic Silver and Gold to the ridges and edges of the moon's surface by using your fingers to lightly apply the paint.  I also added Silver and Mercury Glass Stickles around the outside edges of the moon top better define the edges and give it more of a vintage look.

Now to colorize the sweet little vintage boy ...


Using Neocolor II Watercolor Crayons, apply color to the little boy.  He was originally printed out using an inkject printer and semigloss photo paper.  The color was applied with a Tim Holtz Detailer Water Brush.  The color was brushed from the crayon tip then applied to the surface of the photo paper.  Let dry then cut out the boy and use a Black Distress Marker to blacken the white edges around the boy.


Lay out the little boy, the moon and the stars on the card top to get spacing.  Glue everything in place (minus the boy) using Glossy Accents.  Leave an open section on the moon's edge where the little boy will be placed.


Add a narrow decorative metallic gold Dresden trim around the perimeter of the card front using 1/4" Scor Tape to secure the trim in place.  


Next secure the little boy in his place sitting on the moon by adding adhesive pop dots on his backside.  Then position him and glue in place.


Paint a light coating of DecoArt Media Metallic Gold Fluid Acrylics onto a piece of scrap white cardstock.  Heat set.  Heat emboss the sentiment onto the gold surface by stamping the sentiment onto the cardstock with clear Embossing Powder.  Sprinkle Fine Black Embossing Powder over the Embossing Ink, remove the excess powder and heat set.  Cut out the individual words, ink the white edges with a black Distress Marker, lay out and glue in place using Glossy Accents.


Add an antique gold brad to each corner and pound them to give them a vintage look using Tim Holtz' little hammer and pad.  Set the card top to the side.


Cut a piece of cardstock to create the greeting card.  I used a piece of taupe cardstock that was cut in a 6" x 12" strip.  Fold the card in the center.  Using your finger, add a strip of DecoArt Media Metallic Gold Fluid Acrylics to the outer edge of the card.  

Add 1/4" Scor Tape to the back outer edges of the vintage card top you've created and glue it in place evenly on the greeting card surface; centering the top onto the backing. I left the inside of the card blank so that a personal thoughts and message could be written.


And here is the finished vintage card!

Thanks so much for stopping by my blog and checking out my "Sun, Moon and Stars" piece for Creative Carte Blanche!  

I hope that this has inspired you to come join us by creating anything your heart desires as long as it follows the theme.  Then link it to The Creative Carte Blanche website so that your art and your process can inspire and educate all of the lovely artists in our community!

Sending hugs out to all ...