I hope everyone had a wonderful and blessed Thanksgiving.
Speaking of blessed ... here at Simon Says Stamp and Show, we are honored to have Jim The Gentleman Crafter as our Guest Designer this week! I am such a fan of his work! He's always coming up with something utterly amazing! And just when you think you've seen it all ... he comes up with something else to knock your socks off! Check out his blog and his very cool piece he's created especially for us this week. Or you can click on the Simon Says Stamp and Show link above to see The Gentleman Crafter's creation as well as the other beautiful pieces made by my Design Teammates, just for YOU!
This week, our theme is "A project with heart".
Since it is now officially the Christmas season, I decided to create a sweet little vintage Christmas box using a plain paper mache heart shaped box as my base.

Here is my finished top; complete with snowman, snowflakes, poinsettias and a Merry Christmas wish!

I began with a plain paper mache heart shaped box with embossed hearts on the side.

I painted the box with a basecoat of Claudine Hellmuth's Modern Red acrylic Studio Paint. Then I sponged a little of Claudine's Dash of Red Studio Paint over the entire box.

I wasn't quite sure where I was going with this project when I started. But, I knew I wanted it to have a vintage feeling. So, I added gold highlights to the box. I mixed Sunflower Sparkle Perfect Pearls Powder with a little water to create a "paint" and then I carefully painted over all of the embossed areas. Next I lightly dry brushed some perfect pearls powder over the entire box. Finally, I added even more gold highlights with a Gold Paint Dabber by randomly swiping it over the box.

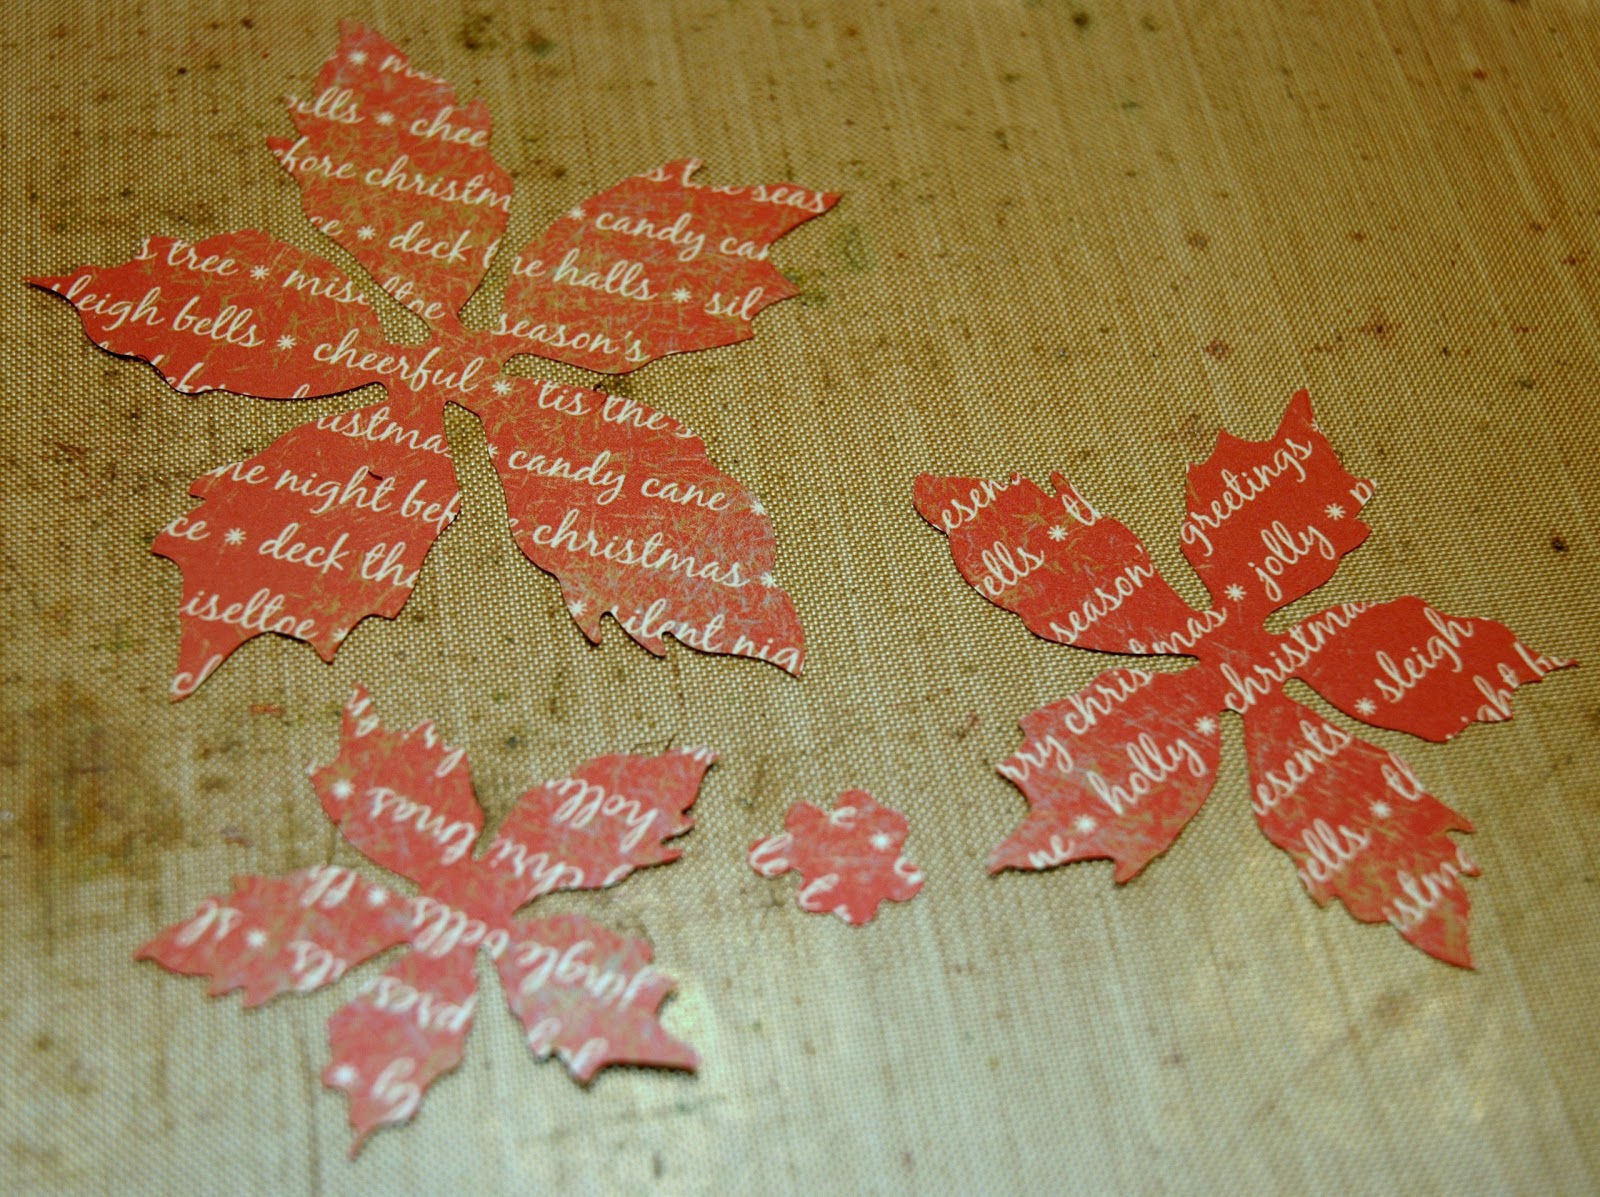
I got so engrossed with this project that I forgot to take a picture of the paper that I used to cover the top of the box. It is from the new Kaiser 6.5 x 6.5 Turtle Dove Paper Pad. Those papers are amazing....very vintage and beautiful! The one that I used has a semi metallic gold sheen with red metallic sheet music on it....beautiful! I hated to cover it up! Then I die cut Tim Holtz' new Tattered Poinsettia out of some Kaiser Christmas paper that I already had.

I added some gold paint dabber to leaves and edges and then edged the leaves with Platinum Stickles. When that dried, I glued them together and placed a Turtle Dove Giant Rhinestone in the center. I tucked some cream colored tulle underneath, tearing it into strips and then tearing the edges. (You can also see bits of that beautiful Kaiser paper peaking out from underneath the poinsettia).

Here is another poinsettia that I created using Tim's new die cut. This time, I did not use the largest set of leaves in the flower. I used sheet music to cut this flower and then inked it with Fired Brick and Evergreen Bough Distress Inks. Then I edged the leaves with the Platinum Stickles. In the center of this flower is a small bronze metallic button from Tim Holtz' Accoutrements. It is located in the upper right side of the heart, tucked underneath the "Merry Christmas" tag. Again, ou can see the beautiful Kaiser paper that I used to cover the top of this box.

The "Merry Christmas" tag was heat embossed using Queen's Gold Embossing Powder onto manila cardstock that was lightly inked with Fired Brick Distress Ink. I then colored inside of the letters using a Peeled Paint Distress Ink Marker. Finally, I lightly swiped an embossing ink pad around the edges of the tag and sprinkled the Queen's Gold Embossing Powder over it. I brushed away the excess with a regular small paint brush and then heat embossed the edges using a Heat It Craft Tool. I love the "Merry Christmas" design of this stamp. It is also from the Kaiser Turtle Dove collection.

The snowflakes are die cut using Grungeboard and Tim Holtz' Mini Snowflakes. I covered them with DecoArt Snow-Tex to give them a white texture. I then lightly sprinkled them with Martha Stewart's Crystal Fine Glitter. When that was dry, I lightly sprayed them with a honey stain spray to "age" them a little bit. Then I edged them with Platinum Stickles.

My festive little snowman is Tim Holtz' Winter Wonder Sizzix die cut. He it cut out of plain grungeboard. I also cut the Mini Heart in his tummy and added the vintage picture of Santa and a little child (taken from a vintage Christmas post card). The snowman was texturized the same way as were the snowflakes. I used Platinum Stickles around the mini heart. Mr. Snowman's face was created using Black Diamond Stickles for his eyes and mouth. His little carrot nose was colored in using a Spiced Marmalade Distress Marker and topped with a touch of snow. His arms were colored in using a Frayed Burlap Distress Marker and then I added a little snow. The scarf he is wearing was an old piece of vintage ribbon that I've had forever. I thought it looked really cute on him...very festive. The Tim Holtz Tattered Banner that he is holding is stamped using Jet Black Archival ink onto manila cardstock distressed with Fired Brick Distress Ink. The edges of the banner are highlighted with Platinum Stickles. The stamp is part of the Kaiser Turtle Dove matching stamp collection.

Here is a look at the finished side of the box. I added some gold metallic Dresden trim to the top of the box and also the bottom of the box. I love the vintage feeling that it added.

And here is a better dimensional view of the completed box. Very vintage, very Christmasy and very fun to make!
Now it's your turn to put on your creative thinking caps and enter our projects with heart challenge. You could be the lucky winner of our most generous sponsor's

$50.00 credit voucher! You could also be selected as one of our TOP THREE PICKS for the week....a very nice recognition!
Thanks for stopping by my blog and remember to take time to play! It's SOUL FOOD!
Here are all of the products available at Simon Says Stamp that I used in this project:

Speaking of blessed ... here at Simon Says Stamp and Show, we are honored to have Jim The Gentleman Crafter as our Guest Designer this week! I am such a fan of his work! He's always coming up with something utterly amazing! And just when you think you've seen it all ... he comes up with something else to knock your socks off! Check out his blog and his very cool piece he's created especially for us this week. Or you can click on the Simon Says Stamp and Show link above to see The Gentleman Crafter's creation as well as the other beautiful pieces made by my Design Teammates, just for YOU!
This week, our theme is "A project with heart".
Since it is now officially the Christmas season, I decided to create a sweet little vintage Christmas box using a plain paper mache heart shaped box as my base.

Here is my finished top; complete with snowman, snowflakes, poinsettias and a Merry Christmas wish!

I began with a plain paper mache heart shaped box with embossed hearts on the side.

I painted the box with a basecoat of Claudine Hellmuth's Modern Red acrylic Studio Paint. Then I sponged a little of Claudine's Dash of Red Studio Paint over the entire box.

I wasn't quite sure where I was going with this project when I started. But, I knew I wanted it to have a vintage feeling. So, I added gold highlights to the box. I mixed Sunflower Sparkle Perfect Pearls Powder with a little water to create a "paint" and then I carefully painted over all of the embossed areas. Next I lightly dry brushed some perfect pearls powder over the entire box. Finally, I added even more gold highlights with a Gold Paint Dabber by randomly swiping it over the box.
I got so engrossed with this project that I forgot to take a picture of the paper that I used to cover the top of the box. It is from the new Kaiser 6.5 x 6.5 Turtle Dove Paper Pad. Those papers are amazing....very vintage and beautiful! The one that I used has a semi metallic gold sheen with red metallic sheet music on it....beautiful! I hated to cover it up! Then I die cut Tim Holtz' new Tattered Poinsettia out of some Kaiser Christmas paper that I already had.

I added some gold paint dabber to leaves and edges and then edged the leaves with Platinum Stickles. When that dried, I glued them together and placed a Turtle Dove Giant Rhinestone in the center. I tucked some cream colored tulle underneath, tearing it into strips and then tearing the edges. (You can also see bits of that beautiful Kaiser paper peaking out from underneath the poinsettia).

Here is another poinsettia that I created using Tim's new die cut. This time, I did not use the largest set of leaves in the flower. I used sheet music to cut this flower and then inked it with Fired Brick and Evergreen Bough Distress Inks. Then I edged the leaves with the Platinum Stickles. In the center of this flower is a small bronze metallic button from Tim Holtz' Accoutrements. It is located in the upper right side of the heart, tucked underneath the "Merry Christmas" tag. Again, ou can see the beautiful Kaiser paper that I used to cover the top of this box.

The "Merry Christmas" tag was heat embossed using Queen's Gold Embossing Powder onto manila cardstock that was lightly inked with Fired Brick Distress Ink. I then colored inside of the letters using a Peeled Paint Distress Ink Marker. Finally, I lightly swiped an embossing ink pad around the edges of the tag and sprinkled the Queen's Gold Embossing Powder over it. I brushed away the excess with a regular small paint brush and then heat embossed the edges using a Heat It Craft Tool. I love the "Merry Christmas" design of this stamp. It is also from the Kaiser Turtle Dove collection.

The snowflakes are die cut using Grungeboard and Tim Holtz' Mini Snowflakes. I covered them with DecoArt Snow-Tex to give them a white texture. I then lightly sprinkled them with Martha Stewart's Crystal Fine Glitter. When that was dry, I lightly sprayed them with a honey stain spray to "age" them a little bit. Then I edged them with Platinum Stickles.

My festive little snowman is Tim Holtz' Winter Wonder Sizzix die cut. He it cut out of plain grungeboard. I also cut the Mini Heart in his tummy and added the vintage picture of Santa and a little child (taken from a vintage Christmas post card). The snowman was texturized the same way as were the snowflakes. I used Platinum Stickles around the mini heart. Mr. Snowman's face was created using Black Diamond Stickles for his eyes and mouth. His little carrot nose was colored in using a Spiced Marmalade Distress Marker and topped with a touch of snow. His arms were colored in using a Frayed Burlap Distress Marker and then I added a little snow. The scarf he is wearing was an old piece of vintage ribbon that I've had forever. I thought it looked really cute on him...very festive. The Tim Holtz Tattered Banner that he is holding is stamped using Jet Black Archival ink onto manila cardstock distressed with Fired Brick Distress Ink. The edges of the banner are highlighted with Platinum Stickles. The stamp is part of the Kaiser Turtle Dove matching stamp collection.

Here is a look at the finished side of the box. I added some gold metallic Dresden trim to the top of the box and also the bottom of the box. I love the vintage feeling that it added.

And here is a better dimensional view of the completed box. Very vintage, very Christmasy and very fun to make!
Now it's your turn to put on your creative thinking caps and enter our projects with heart challenge. You could be the lucky winner of our most generous sponsor's
$50.00 credit voucher! You could also be selected as one of our TOP THREE PICKS for the week....a very nice recognition!
Thanks for stopping by my blog and remember to take time to play! It's SOUL FOOD!
Here are all of the products available at Simon Says Stamp that I used in this project:
 |  |  |  |
 |  |  |  |
 |  |  |  |
 |  |  |  |
 |  |  |  |
 |  |  |  |
 |
Another beautiful make Candy.
ReplyDelete.full of gorgeous vintage yumminess!! I this !trace x
Very pretty, Candy.
ReplyDeleteVery pretty, Candy.
ReplyDeleteStunning Candy, I love the red painted heart box and the added gold highlights, really adds to that vintage feel and I love the Dresden trim too, perfect finishing touch. The poinsettias are gorgeous, I need that die. I love how you edge each section of the poinsettia with Stickles, a small touch but big on impact. The textural snowman is fantastic and I always love cutting pieces from his body and the heart s just perfect with the vintage image added behind. A beautiful home decor piece. Tracy x
ReplyDeleteOh so gloriously holiday vintage! And what will you put inside? A gift for someone special? That's just stunning!
ReplyDeleteThis is so pretty Candy! I LOVE the snowy texture on the snowman and the snowflakes. All the glitter is gorgeous and adds so much to the vintage and festive feel of the project. Lovely papers and images.
ReplyDeleteSimply gorgeousness here! Love it, love it, love it!
ReplyDelete~Linda
You knock my socks off!!! You are always coming up with projects that amaze!!! Gorgeous box, love the touches of gold, but I have to say the heart shaped picture in the snowman caught my eye! I've done words, numbers, but never a photo or shape...duh rings to mind...it's so perfect!!! Love it!
ReplyDeleteCandy, diese bezaubernde Herzdose macht mioh ganz sprachlos, so wunderschön ist sie geworden. Sie ist excellent gestaltet und die goldgeprägten Bordüren an den Seiten sind noch ein besonderes Highlight.
ReplyDeleteEin großes Dankeschön für die lieben Kommentare auf meinem Blog und einen schönen Abend.
Beautifully decorated box Candy, your work is awesome, x
ReplyDeleteHi Candy,
ReplyDeletethis is absolutely wonderful.
I like the texture of the snowman and the snowflakes.
The poinsettias are so beautiful and with the stickles they get a wonderful frosty look.I love it.
Anke x
Love the heartshaped box a lot, Candy! You've altered it to perfection! So much details! Stunning! Hugs, Sandra
ReplyDeleteHi Candy, what an absolutely stunning box! I love the gorgeous snowman with the picture in his tummy and he is so beautifully textured. That poinsettia die is definitely on my wish list as are those fabulous Kaiser papers. I love the way you have coloured the box and all your embellishments make up the most wonderful vintage piece. I have just tried to do a vintage piece too but next to yours mine is a bit dismal.....I must try harder!! A truly fabulous piece Candy. Hugs, Anne x
ReplyDeleteOh Candy, you really outdid yourself on this one! So adorable! I love the heart in the snowman's tummy with the vintage photo in it. I thought it was a valentine candy box recycled at first sight. Very cleverly done! Hearts for Christmas, who'd have thunk!
ReplyDeleteAnother gorgeous creation! This box is altered so beautifully. I can't stop looking at it.
ReplyDeleteHow do you consistently out do yourself? Awesome! Again!
ReplyDeleteI am totally in love with this box! It is just beautiful and the details are outstanding. Thanks for the step-by-step!
ReplyDeleteAbsolutely delicious, Candy! The two poinsettias are absolute showstoppers - what gorgeous papers, edging and sparkle, and I love the layered elements on the lid of your beautiful altered box... wonderful inspiration, as always!
ReplyDeleteAlison x
beautiful, I really love the snowman....
ReplyDeleteBeautiful work!!!
ReplyDeleteHey Candy, truly beautiful, I love your holiday vintage heart box. x
ReplyDeleteThis is stunning Candy! I love the red and the gorgeous gold border. You can send it to me at, lol, Just Kidding. I Do Love It though.
ReplyDeleteTons of Hugs, Dangina
CANDY!! This project is stunning...someone very lucky might just get this as a present :) It's perfectly embellished and I love the added texture on the snowman :)
ReplyDelete*mwah*
Steph
Simon Says Stamp!
Gorgeous vintage Christmas box Candy and so beautifully pieced together. THank You so much for sharing the 'how to' It is really appreciated.
ReplyDeleteHUgs
Annie x
Gorgeous box Candy! Love all the details, as usual!
ReplyDeleteHey there my sweet friend, I love your box, wowwzers you did a great job on this one, Love the red color and the hearts out of gold on the side wowwww It is another stunner and the detaill are AMAZING just as you are. Hugs Terry xxxx
ReplyDeleteBeautiful Beautiful! Every little piece of this is gorgeous. Love the sweet snowman with the snow texture and the heart. I didn't realize this was a box until I came over. Love it!
ReplyDelete