BOO! Can you believe it? Halloween is only THREE DAYS away! This year is flying by!
Speaking of flying ... here is my this week's creation for our "Anything Goes" theme at Simon Says Stamp Monday Challenge ...


I made my first little vintage plane for Christmas in March with my crafting buddies. It was so much fun to make that I decided I needed one for all of the holidays that I love to decorate for. This vintage Halloween plane was even more fun to create than the Christmas one! I got more creative with the embellishments and characters.
Here is what you will need to create this vintage plane:
- One 2" x 3" compartment from a Tim Holtz Configurations Box
- One 1 1/2" x 3" compartment from a Tim Holtz Configurations Box
- Four "wings" cut from Chipboard using Tim Holtz' rounded house from his Artful Dwellings die cut
- Chipboard or Grungeboard Circles - Two 1" circles and Two 1 3/4" circle-one of those to be cut in half and will be used to create the two back flaps of the plane
- Painted (with Pitch) Bamboo Skewer cut into eight 1" sections
- Steampunk Spells 6" x 6" and 8" x 8" Paper Pads
- Two 1 3/4" x 3/4" pieces of chipboard to be used as wing supports
- Paper pieces - Two 2 3/4" x 1 3/8" panels for the front compartment; One 1 3/4" x 1 1/2" for the front panel of the front compartment; Two 1 1/2" x 2 3/4" panels for the sides of the back compartment, One 1 1/2" x 1 1/4" panel for the back of the back panel (or use one of the 1 1/2" x 2" images that resemble playing cards from the 8" x 8" paper pad; One 1" circle to cover the chipboard circle for the front of the plane; Three 1" circles to cover the back wheel and the front circle for the front of the plane; Four of two sets of papers to cover the wings (top and bottom-both sides); Two 1 3/4" x 1 1/2" pieces that match the sides of the front compartment - score 1/4" on both long sides of the paper (used on the wing supports)
- Four of the images that resemble playing cards from the 8" x 8" paper pad used as decorations on the wings of the plane; One little 1 3/4" x 1/2" paper to cover the hole in the front "windshield" Ideaology Label Pull, Manila Cardstock scrap for the Tattered Banner, the Boo banner and the Witch Hazel label on the bottle
- Ideaology pieces - Round Faucet Knob for the front of the plane and a square one for the steering wheel; long Game Spinner, Hitch Post, three Gears for the front of the plane and one on either side of the rear wheel; Two Pulley Wheels; Halloween Adornments - the bat for the front of the plane and the skull and crossbones for the rear of the plane; Clock Key, Three round File Tabs for supporting the back flaps and bottom wheel; Label Pull as a windshield
- Hot Glue and Glue Gun
- Sanding Block
- Sepia Black Cats Eye Ink Pad to distress edges of the paper (or some other black ink)
~ Let's Get Started Putting It All Together ~
Before you begin, here is something to remember throughout the construction of the plane...always ink the edges of the papers with a black ink to give them a more vintage look. When applying papers to chipboard, all edges will first be sanded with a sanding block and then distressed.
2. Cover all of the exteriors of the compartments, circles and wings with patterned cardstock.

In this photo, you can all of the pieces needed for the front of the plane. You can also see the progression of the construction of the wings, starting from just the chipboard and painted edges to covering both sides with paper and sanding the edges to inking the edges and adding the holes for the bamboo skewers.
3. Creating the wings - Measure 1/4" in from the side and 1/2" down from the straight edge of the chipboard covered wing and punch a hole using the larger hole in a CropADile. Repeat this for the other side of the wing. Next, measure in 1/4" from the side and 2 1/4" from the straight edge of the chipboard wing. Punch another hole and repeat for the other side. Use this wing as a pattern to mark and punch the holes for the other wings. (If you are adding the playing card type images to the wings, do that now to the wings that will be underneath and punch the holes through them as well. DO NOT add the playing card images to the top wings yet.)

4. Find the two small chipboard rectangles and the two pieces of patterned cardstock that will be used as wing supports. Apply 1/4" Scor Tape to the bottom and the two scored sides of the patterned pieces of cardstock. Place the cardstock on top of the chipboard piece, leaving the two scored pieces of paper. Distress the edges. Then place the chipboard just inside of the rear of the first compartment and glue in place. (You may want to measure where you are placing this piece so that they will match on both sides of the plane).
5. Add the bottom wing by joining the scored piece of cardstock to the top of the chipboard covered wing. Also add a bead of Glossy Accents to the chipboard wing connecting to the base of the plane for added support. Now add the top wing by placing it on top of the chipboard support and gluing the scored piece of cardstock to the underside of the wing.
6. This next part is a bit tricky but not hard. It just takes a little patience to let the Glossy Accents dry for a minute. Add a little Glossy Accents to the bottom four 1" pieces of painted bamboo skewer. Place them in the bottom holes of the wing. Now put some Glossy Accents on the top of the skewers and slide them up into the holes of the wing above. Hold the wings with the skewers in place between them until they are semi set. (This only takes a minute or so). Then add a touch of Glossy Accents around the top of the skewers as added strength. When that is dry, add the playing card type images to the wing tops and glue into place. (This will also help hide the bamboo skewer tops if you don't want them visible).

This photo shows the wing connected to the side of the plane using the chipboard/cardstock support and then gluing the skewers in place.

Photo of the wing assemblage. Repeat for the other side.

7. Find the one 1 3/4" circle that was cut in half. This will become the back flaps for the plane. They should already be covered with paper, edges sanded and distressed. Find an Ideaology File Tab and bend it at a 90 degree angle, adhesive side to the outside. Use Glossy Accents to add extra glue to the top of the File Tab and glue it to the center of the underside of the back flap. Measure down 1/4" from the top of the back compartment and come in slightly from the back side edge of the compartment. Add Glossy Accents to the bottom circle of the File Tab and a little to the straight edge of the chipboard back flap. Glue in place. Repeat for the other side.

9. You can glue the two compartments together now or wait until you complete the front compartment; that is totally up to you.

10. Glue the large circle onto the front of the plane. Next add the round Faucet Knob to the center of the circle using a hot glue gun.
** NOTE - add hot glue to the center of the chipboard circle and then place the Faucet Knob in place. Don't add glue to the metal pieces first because the hot glue hardens so quickly. It is always better to put the hot glue on anything other than metal when gluing metal to something).
11. Put Glossy Accents on the underside of an Ideaology gear and glue in place on to of the chipboard circle that should already be covered in patterned cardstock and distressed). Hot glue the 1" chipboard circle to the center of the Faucet Knob.
12. Glossy Accents a Hitch Fastener on top of a large Game Spinner and let dry. When dry, glue on top of the gear using Glossy Accents.
13. Slightly bend the two sides of the Label Pull and glue using Glossy Accents to the front top of the front compartment. Add a strip of cardstock to cover the hole in the Label Pull using Glossy Accents.
14. Hot glue the front of the compartment and add the Halloween Adornments bat above the Faucet Knob.

15. Glue the square Faucet Knob on top of a painted bamboo skewer. Measure a piece of painted bamboo skewer to the length you want it to be and cut it off. Angle the bottom of the skewer and hot glue it in place. You will need to hold the wheel or prop it in place until the hot glue is set.
16. The back of the plane - You should have either glued a piece of patterned cardstock or one of the playing card images onto the back panel of the back compartment. The Clock Key is also in place.


16. The back of the plane - You should have either glued a piece of patterned cardstock or one of the playing card images onto the back panel of the back compartment. The Clock Key is also in place.

17. To add the skull chains - leave about a 4" piece of chain at the top of the chain and wrap it through the first link once so that the link won't move. Run the wire through the links; however many you want to have. Slide a small skull (purchased at a craft store) through the wire and curl the remainder of the wire up to secure the skull in place.

18. Wrap the front end of the wire around the lower circle of the Clock Key several times to secure it. I put two flying chains on the bottom Clock Key circle and one on the top Clock Key circle. Glue the Halloween Adornments Skull and Cross Bones above the Clock Key by adding hot glue to the compartment and then pressing the Skull and Crossbones in place.

Photo of the back of the plane.
19. Measure and mark the placement for the Pulley Wheels approximately 1 1/4" back from the front edge of the front compartment. Add hot glue to the compartment bottom and then push each wheel in place.

The front of the plane with a purchased small black crow hitching a ride.

Here is the plane, ready for take off but WAIT!!! There aren't any passengers!!
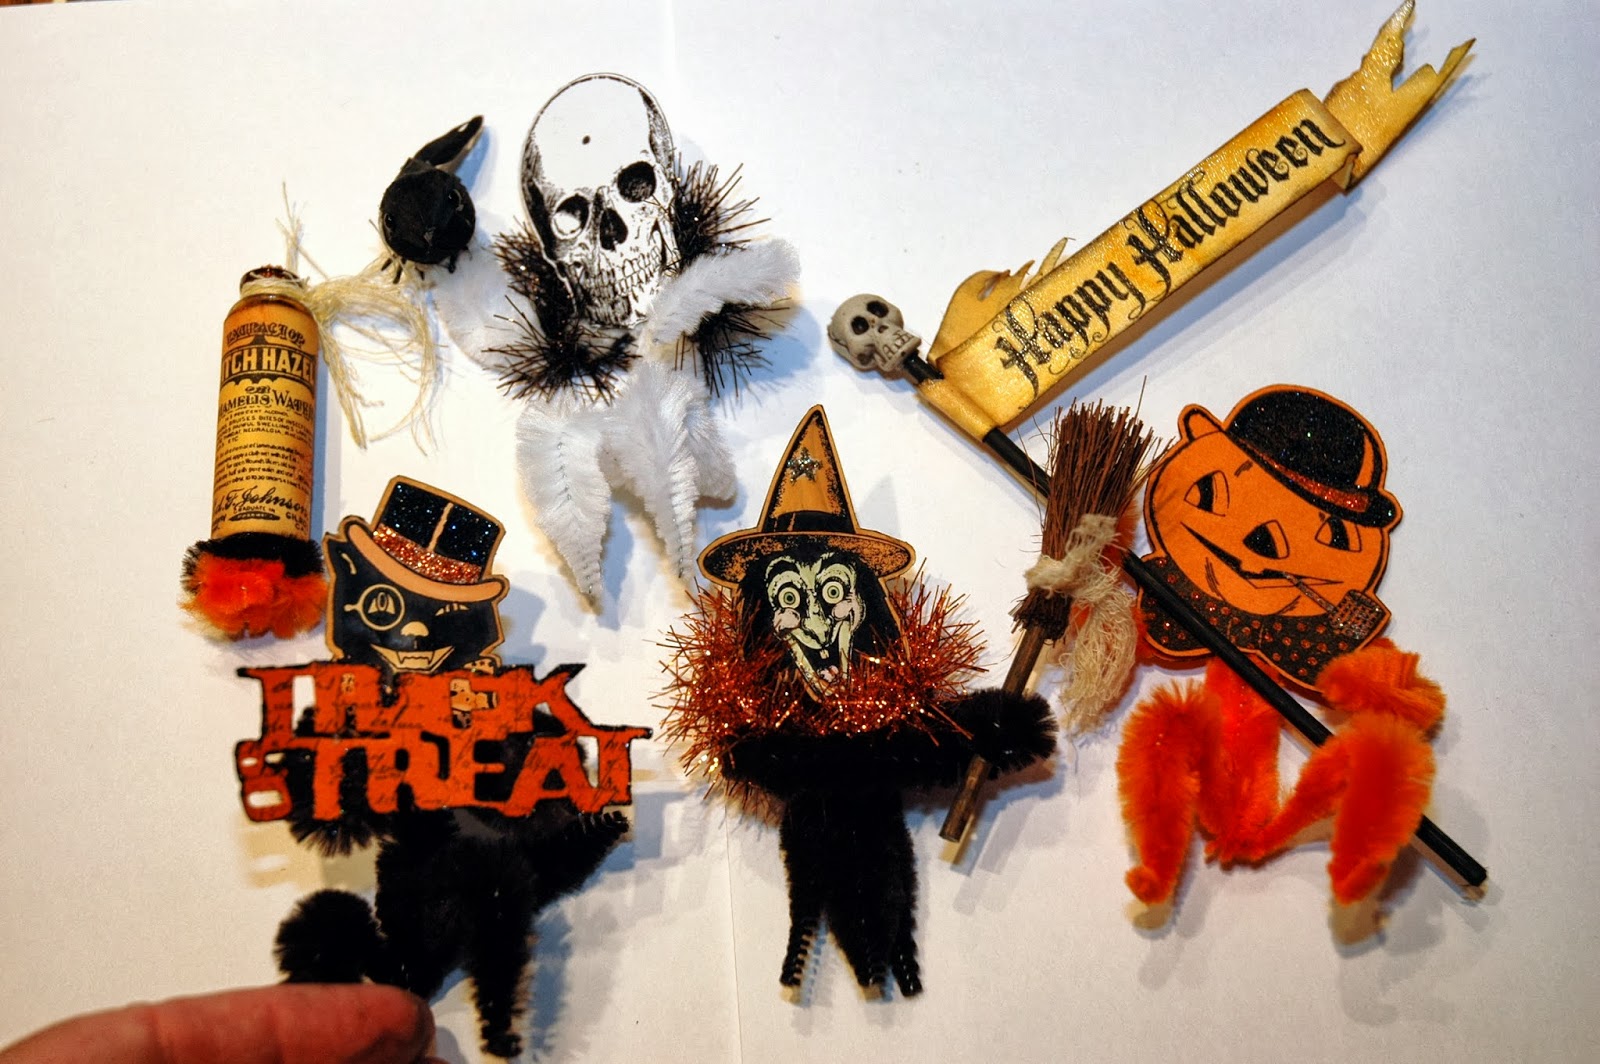
Enter the cast of characters! All of the characters were made using chenille pipe cleaners for their bodies and various stamps to create their heads.

The pumpkin pilot was stamped using Jet Black Archival Ink on orange cardstock. He is from Artistic Outposts' Halloween Treats retro style stamp set. The sparkly additions are thanks to Black Diamond (hat and face), Paprika (orange dots and hat band) and Platinum Stickles (pipe).

He is holding the large Tattered Banner (that I shortened) cut from Manila Cardstock and distressed with Spiced Marmalade and edged with Black Soot). It is also covered with Rock Candy Distress Crackle Paint and wrapped onto a black bamboo skewer. The little skull at the top was purchased. In the final photos, I also added a bit of distressed cheesecloth at the top.

I ended up not using the skeleton; just not enough room, but I still think he's cute and I'm sure he will find a place somewhere. His head is from Tim Holtz' Mini Halloween 3. He also picked up a little hitch hiker black crow.

The witch is from Tim Holtz' Mini Halloween 2. She is stamped onto Specialty Stamping Paper and colored using a Detailer Water Brush and Distress Inks: Peeled Paint for the face, Mowed Lawn for they eyes, Tattered Rose for the cheeks and tongue, Scattered Straw for the the eyes and tooth and Spiced Marmalade and Rusty Hinge for the hat. There is a Platinum Stickles star in the center of her hat.

And my favorite....the black cat. He is from Artistic Outposts' Halloween Treats and is stamped on Specialty Stamping Paper. I brushed his face with Spiced Marmalade and Rusty Hinge Distress Inks. I added Paprika Stickles to his hat band. "TRICK OR TREAT" is from Tim Holtz' Halloween Shadows and cut onto orange cardstock. I randomly stamped the text from Mini Halloween 3 onto the letters. After I hot glued the letters on the black cat's hands, I edged the letters with Black Diamond Stickles.

After the characters were finished, I decided to add a bottle of Witch Hazel and some other little purchased sparkly pumpkins. The Bottle is 7 Gypies amber colored bottle and the distressed label is from Tim Holtz' Mini Halloween 2. The label is stamped on Manila cardstock with Jet Black Archival Ink, distressed with Spiced Marmalade and Rusty Hinge and edged with Black Soot.

And finally ... a very distressed and hopefully spooky looking "BOO" banner. Fashioned on natural colored Sticky Back Canvas, the banner is distressed with Spiced Marmalade and Ripe Persimmon. It is edged with Black Soot. I added some cheesecloth over the top of it and spot glued it in place with some clear drying glue. I used Emboss It ink and Black Embossing Powder to stamp "BOO" to both sides of the banner. I then added Black Diamond Stickles to the front of the banner.
I hope that you have enjoyed this tutorial and it has inspired you to create something really fun for our "Anything Goes" challenge. Then post it to our challenge. You could be the winner of our random weekly drawing of a


So, good luck and let's see what you can come up with!
And while you're checking out Simon Says Stamp, click on the link below to magically transported to our sister blog for more inspiration and creativity!
 |  |  |  |  |
 |  |  |  |  |
 |  |  |  |  |
 |  |  |  |  |
 |  |  |  |  |
 |  |  |  |  |
 |  |  |  |  |
 |
Wow! Your plane is fabulous! So many details. Thanks for the great step by step of your process. Awesome job!
ReplyDeleteWow Candy! Your airplane is marvelous! Love the shimmery detail! Obviously a labor of love!
ReplyDeleteHa Ha, this put a smile straight onto my face, Love those papers and such an out of the box make. love the skulls and so many other beautifully cool touches. Always a Trick or treat ;) x
ReplyDeleteOnce again you have blown me away! This is amazing - detailed, clever and beautifully designed. WOW!
ReplyDeletewow its an amazing construction and so full of fun Candy am sure the grandchildren will love it for Halloween, hugs Annette x
ReplyDeleteWords fail me on this! I want to go for a ride! The plane itself is fantastic and then you made all the vintage figures to ride along and it was just over the top!
ReplyDeleteAnother amazing work!!!!
ReplyDeleteSTUNNING!!! Love the flying skulls at the back. Very clever (:o)
ReplyDeleteOh wow candy, this is so awesome! Great I use of the boxes. There is so much detaile at first I couldn't tell what I was looking at. I love it!!!!!
ReplyDeleteOMG, Candy! I'm speechless! Drooling over this masterpiece. Your creativity know no bounds and you have the patience of a saint, not only to create such a wonder, but to so articulately give us the deets in that fabulous tut! xxD
ReplyDeleteTotally, totally AWESOME! LOVE this to pieces. It's one of my favorite collections and you did it PROUD! BRAVO!
Delete~Linda
Oh WOW Candy, this is absolutely amazing!! I love the plane with the clever construction and all the special details you are so good at. Love the bat at the front and the skulls on the wires at the back and the little crow. And all the passengers are fantastic!! Love how you created them! Super fabulous project!!
ReplyDeleteIt's a Wow from me too Candy, love how your adorable plane is made from configuration boxes. I love how the wings are made too , very clever. There is so much detail in this piece. I love the papers and those skulls trailing behind. Love the characters taking a flight in the pane too along with the fabulous BOO banner. Very creative and fantastically executed. Tracy x
ReplyDeleteFabulous Halloween plane, Candy! The passengers are so much fun. And it's really beautifully decorated! So much details! Love the tutorial! Hugs, Sandra
ReplyDeleteWhat a cool Halloween decoration! Fun characters ready to fly into the holiday!! Love all the detail and thought put into it, it looks awesome :)
ReplyDelete*mwah*
Steph
Simon Says Stamp!
/This is absolutely one of the cutest things I have ever seen. Thanks so much for sharing and also for all of the pics and directions!
ReplyDeleteThis might possibly be my most favorite project EVER! I just sat and stared and loved every single detail of this! I am a fan of whimsy and this little plane is overloaded with it! So creative and oozing with gorgeousness and fun! I especially liked how you used wire to make the skulls look like they were blowing back in the wind. You are quite remarkable and this piece is the best of the best, in my opinion.
ReplyDeleteOn a totally unrelated side note, I LOVE the projects you did for Rocky Mountain Memories! I would've loved to have attended your classes as RMM is one of my favorite haunts in the Fall, but we didn't make it up there this year. But isn't Cheryl the best? I've taught in her shop, too, and love the creativity that her shop cultivates. I thought it was so neat when I saw your name among her superstar class teachers! You go, girl!
OH. MY. GOODNESS!! This is amazing!! I am in awe of your creativity ~ so much so I am now a follower of your blog!
ReplyDeleteAmazing project with a great tutorial. Thank you so much for sharing.
ReplyDeleteOh wow Candy, you really did have fun making this, it's superb. I love all the elements you have used and the plane is such a great idea.
ReplyDeletehugs {brenda} x0x
Love love love this airplane, I think I like it even more than the Santa plane. Great Job :) :)
ReplyDeleteOh My God! I'm in love with your plane! This project is stunning! I love everything, the details, the colors and your ability to design and manufacture is truly amazing! BArbarayaya
ReplyDeleteWOW Candy,
ReplyDeletea new breathtaking project it looks so funny I was immediatly thrilled by this incredible unique masterpiece! Your ideas an your know how are virtually boundless.
Wish you a nice day,
admiring greetings Anja
Wow... Candy, this is such a fun project! I love the cute pumpkin pilot and witch. All the elements are amazing! Very creative! :)
ReplyDeleteYou've blown me away again Candy! This reminds me of 'Mad Max' - a fabulously fun chunky aircraft. BRILLIANT the way you inserted the wire to hold out the fliying skulls. Thank-you so much for being so inspiring. Nicola x
ReplyDeleteStill picking my jaw up off the floor Candy....this is truly amazing. So wonderfully creative :-)
ReplyDeleteYour talent and creativity is endless.
Have a wonderful time at Halloween.
Hugs
Annie x
You have hit the jack pot again with your second airplane. So brilliant Candy, such a creative mind you have.
ReplyDeleteLove it, love it!!! Love all the elements you used to create this, wish I had your creative mind!!
ReplyDeleteWow Candy, this is a wonderful piece of art. Lol...I love the look on the witches face and the skulls at the back. Thanks for sharing. Karen.x
ReplyDeleteOh candy this is AMAZING!!!! I love how it is filled to the brim with vintage, Halloween goodness!
ReplyDeleteWow BREATHTAKING, SPECTACULAR, like I said your artwork is is unique, creative, your creativity is boundless, and you are wonderful to share it with us, do you realize how many people you inspire with your talent, too many to count. I loooooove and admire your work Miss Candy, thanks for sharing, I hope you have a wonderful weekend, big hugs...
ReplyDeleteCandy, this is AMAZING!!!
ReplyDeleteThere are so many awesome details. I LOVE the pipe cleaner characters. And that little bat...fabulous! Absolutely fabulous!
Hi its amazing how simple it can be to communicate with people and have them understand a vintage halloween airplane style topic, you made my day.
ReplyDeleteISO 2341 | DIN 1444
Magnificent Candy. You are always so imaginative and informative. Love your work. Jenny x
ReplyDeleteThis is freakin' amazing! Picking my jaw up off the floor. What a magical, whimsical, joyous celebration of Halloween. Love all the details...I've been down for the count with a nasty cold, but had to pop in and see what you are up to. So glad I did! xoxo
ReplyDeleteAbsolute genius, Candy! I know I'm late, but I'm so glad I didn't miss this... It's completely delightful, and I followed all the making-of photos with a daft grin of pleasure all over my face. Wonderful, inspirational creativity!!
ReplyDeleteHad a crazy work week on the back of the house move, so now looking forward to some catching up (crafting and sleeping) over the next few days.
Alison xx
This is just plum fabulous, Candy! So glad you have BlogLovin so I can catch it, even this late. The skulls/chains blowing in the wind are my favorite part but there are SO many cool details it was hard to even focus on that single one. Love it!
ReplyDelete