BE AFRAID! BE VERY AFRAID!
This week at Simon Says Stamp Monday Challenge the theme is "SPOOKY". As Halloween draws closer and closer, it's time to create some spooky fun!

Halloween always conjures up wonderful childhood memories of dressing up in costumes, going door to door, Trick or Treating as my Mom or Dad kept a close eye from the street. Then my brother and I would race home and dump heavy pillow sacks full of candy on the living room floor only to race out again and ring more doorbells. At the end of the evening, we would spread our candy all over the living room floor, separating it all into piles of like candies and rejoicing in our "haunting haul".
I also remember all of the wonderful decorations that used to adorn our windows; the orange and black cardboard witch heads, the long jointed skeletons, the cutesy yet supposed to be scarey scarecrows. I love those images much more than today's ghoulish and sometimes really disturbing decorations. Give me the good ol' days!
I LOVE vintage Halloween pieces and try to create at least one new one each year.
Since I now have grandchildren who love to Trick or Treat "Mimi and Papa's house", I wanted to create a frame to hold those treasured memories of each years' Halloween visit!
Using several Tim Holtz die cuts and stamps, I created this 5" x 7" wooden frame that I dearly love! It has so many classic Halloween images on it, that I remember as a kid. Plus my own "spin" on Tim's Picture Wheel die cut to create a funky umbrella that puts me in mind of "Beetlejuice".

I began by covering my wooden frame with Matte Multi Medium. Here, I am using it as a glue to add crumpled up white tissue paper and other pieces that I die cut out of Plain Grungeboard to add to the front of the frame.

Next I added "SPOOKY" from Tim Holtz' Word Play, the dangling spider from Candlelight Fright and the cat from Raven and Scaredy Cat all cut out of Plain Grungeboard. Then I heat set it.

The next step was to cover everything with a coat of White Gesso and heat set it.

Now the fun really begins as you being to add a real personality to the frame through color. Here, I have sprayed the frame with Sunset Orange Color Wash and Black Marble Dylusions Ink Spray.

I added black to the cat and dangling spider using a Pitch Paint Dabber. I then used some Gold Paint Dabber on my finger to add highlights to the crumpled tissue paper and around the edges of frame, spider and cat. I thought I would like "SPOOKY" predominantly in Gold with touches of black ...

but I later changed my mind and made it black and outlined it with Mercury Glass Stickles. Much better! Much more vintage looking!

Now to give my frame that real vintage feeling .. the addition of the retro witch's face on a rosette and headstone.
I began by doing the same thing to the headstone that I did to the wooden frame ~ first cover the Plain Grungeboard with Matte Multi Medium and then add the crumpled white tissue paper and the die cut bat. Heat set. Then paint over everything with a Pitch Paint Dabber and heat set. Next add gold to the bat and highlights over the crumpled tissue paper by lightly touching the areas with paint on your finger. Heat set.
To create the Rosette, distress a strip of manila cardstock with Ripe Persimmon Distress Ink. After die cutting it through the Vagabond, I like to add a long piece of clear scotch tape across the back of my Rosette to make sure it doesn't tear apart while I am folding the creases. Use Glossy Accents to hold the Rosette together. Let dry. Then add Platinum Stickles to the outside edge of the Rosette and let dry.
The Witch is stamped onto Specialty Stamping Paper using Jet Black Archival Ink. I colorized her face with a Detailer Water Brush and Peeled Paint Distress Ink. The hat is Ripe Persimmon. The eyes are Mowed Lawn. The cheeks and tongue are Tattered Rose. Heat set and then cut her out and use Glossy Accents to center her on the Rosette. Glue the headstone in place on the left side of the frame.

Create the large Tattered Banner by first distressing a strip of Manila Cardstock very lightly with Ripe Persimmon and then more with Vintage Photo and Black Soot Distress Inks. Die cut the strip, locate the center of it and stamp "Happy Halloween" using Jet Black Archival Ink. Fold under the two sides of the banner until you have a nice, dimensional curled banner. Add dots of Glossy Accents to hold the banner together but don't smash the dimension of the layers of curled paper. Glue in place.

Here is the frame (minus the Mercury Glass Stickles outlining "SPOOKY"....
(that was added on before the final pictures were taken.)
I love my new frame but I think I want to add something even more spooky that can be added or removed ... whatever my spooky mood is at the time.
Soooooo .... how about a spooky umbrella made from Tim Holtz' Picture Wheel die cut? Yes, that's right ... an umbrella made from the Picture Wheel!

It's fun and funky and easy to make! Here's how:
Step 1: Die cut two Picture Wheels from Manila Cardstock. Distress the top of one and the bottom of the other with Ripe Persimmon Distress Ink and a little Black Soot Distress Ink along the outside edges and the inside edges of each cutout square.
Step 2: Use Jet Black Archival ink and stamp the dangling spider from Mini Halloween 2 by lining up the spider with ever other picture square. Only ink the spider string up about half way so that it will die into the hole in the center of the wheel.

Step 3: Distress some clear vellum with something to yellow it a little bit. I used some Honey Stain spray but anything would work. Then using Jet Black Archival Ink (or black Stazon ink), stamp just the head of the skeleton and black cat from Mini Halloween 2. Heat set and cut into squares big enough to fit into the picture squares. Apply Glossy Accents on the underside of the wheel and alternate the pictures in the squares. Heat set.

Step 4: Die cut two strips of the Tapered Fringe out of black cardstock (as one strip may not be enough to complete go around the wheel. Be sure to cut the straight edge very close to the tapered edge so that the paper will easily curve when being added to the wheel. Add 1/8" Scor Tape around the outside edge of under the top Picture Wheel and add the fringe just to the edge.
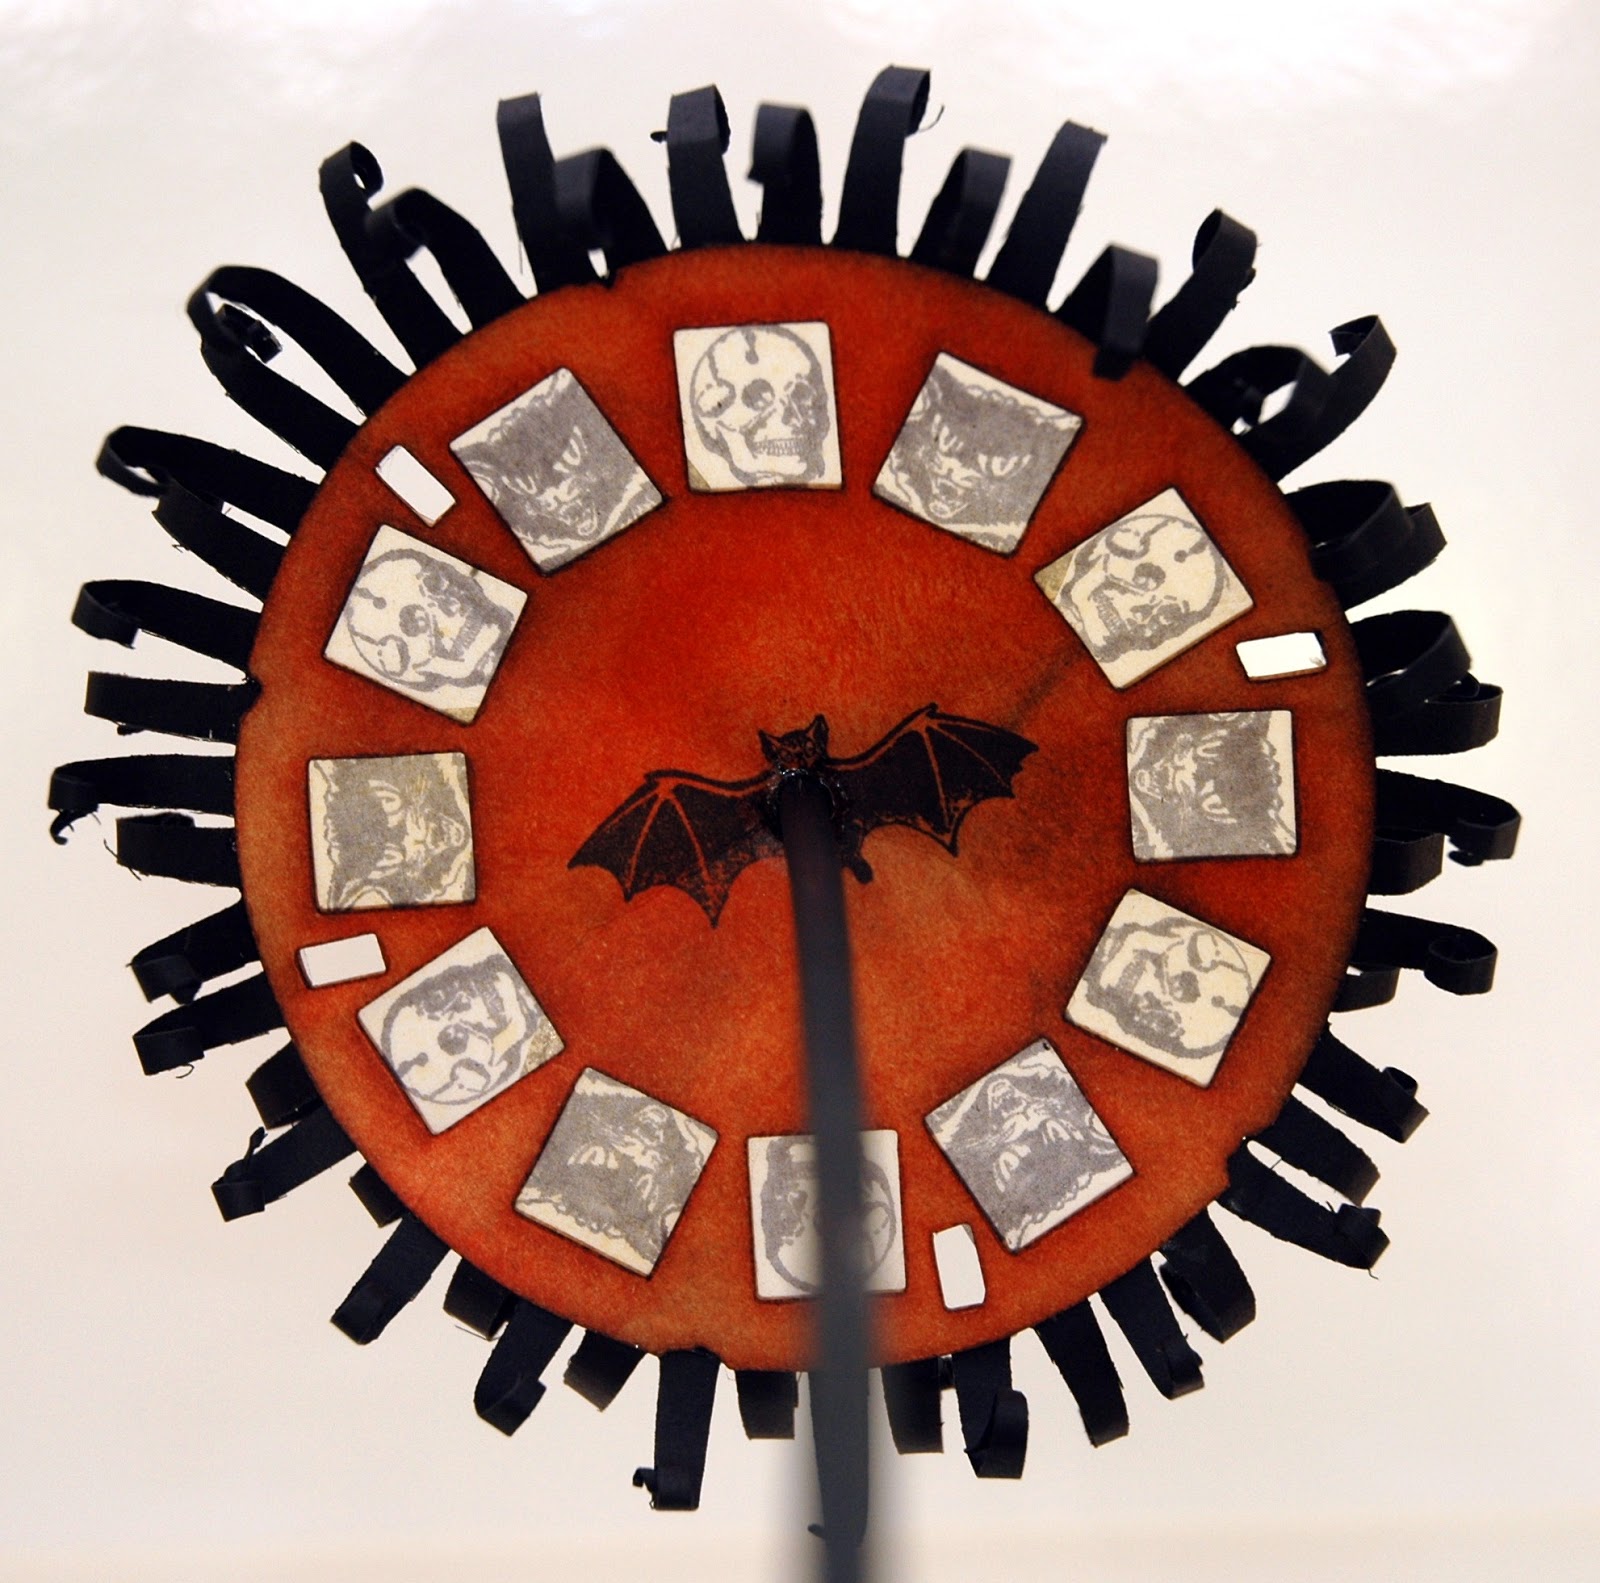
Step 5: Stamp the bat onto the center of the distressed orange picture wheel bottom using Jet Black Archival Ink. Then glue the bottom onto the top, lining up the squares and little rectangles. (Ignore the stick at this point).

Step 6: Fold the umbrella along the lines you've created with the dangling spider. There should be three folded lines across the entire umbrella. This will give more depth and dimension to the umbrella and it won't look so flat. Then use a Tonic Craft Tool or something that you can wrap the ends of the tapered fringe around and alternate curling one fringe up and the next one down. Do this all the way around the umbrella.

Step 7: Measure a black dowel rod (the diameter of the hole in the Picture Wheel) and paint it with a Pitch Paint Dabber. Heat set. You can either leave the point of the dowel rod exposed through the top of the umbrella or add a spooky little skeleton head like I've done on this one, if you can find the little heads. I got this one at a local craft store. Use Glossy Accents to glue around the hole and the dowel rod on the underside of the umbrella. Then repeat this on the top of the umbrella to hold the umbrella in place on the rod. You may also want to coat the point of the rod (if you are leaving it exposed) with Glossy Accents for a more whimsical look.

And finally...to attach little strips for the umbrella to slide into on the back of the frame: cut two small strips of Manila Cardstock and color them as best you can to match the frame or distress them with black and gold highlights. Hot glue them in place, leaving a little room for the dowel rod to be able to slide in and out of the paper holders.
Right now, this frame is home to a very cool vintage Halloween photo of Trick or Treaters from a long time ago. But very soon, I will have a photograph of my grandchildren as they come a knockin' at my door.
~ BOO! ~
Did I scare you? I hope not! But I do hope that this spooky vintage frame has inspired you to join the spooky challenge at Simon Says Stamp's Monday Challenge.
You could be the lucky winner of our random weekly drawing of a

$50.00 gift voucher to spend at Simon Says Stamp.
You could also receive special recognition in our

Designer Spotlight if your work is chosen to be one of the most inspirational for the week. This doesn't mean that it necessarily has to be a work of art, it just has to fit our theme and be chosen by our Design Team as something special for a number of reasons!
So, what are you waiting for? I hope you'll join us and share your spooky creations with all of us!
Here are all of the products available at Simon Says Stamp
that were used to create this Spooky Frame.
 |  |  |  |  |
 |  |  |  |  |
 |  |  |  |  |
 |  |  |  |  |
 |  |  |  |  |
 |  |  |  |  |
 |  |  |  |  |
 |
Hi Candy.....fabulous spooky frame and so well thought through. Your creativity and imagination knows no bounds. Thank you for sharing
ReplyDeleteAnnie x
Stunning project Candy!! Great photo, wonderful tutorial (as always), love the effect of the tissue paper, - just a gorgeous spooky make altogether!
ReplyDeleteWow, Candy! This is amazing! Love the frame and the spooky umbrella is brilliant! Love how it's build up! So very clever! Hugs, Sandra
ReplyDeleteAbsolutely brilliant Candy, I love both projects. The textured frame look amazing with the colours and images you have used - soooo spoooky - and the umbrella is spectacular - such a clever idea. Have a great week.
ReplyDeletehugs {brenda} x0x
awesome! love what you did with that view master :)
ReplyDeleteHi candy!!
ReplyDeleteI LOVE your make!! The layers, the colours...... The umbrella is genius!
Big hugs xx
Love this Candy!! The umbrella is so clever, what a great idea. Love all the different details, the texture of the frame, stickles outlining of the letters and everything else. The photo is so cute too!
ReplyDeleteYour project is out of the box. Love that umbrella, reminds me of Beetlejuice.
ReplyDeleteThank you so much for the inspiration, can't wait to make my own
frame.
Soooooo utterly brilliant, Candy!
ReplyDeleteThis project is so very enchanting and whimsycal and heavenly texture loaded.... I can't even describe all that I love and admire on it! Very, very inspirational and one of the best halloween projects I have ever seen!!!!
Big Boo....er...hug,
Claudia
I am so late...... your creation is fantastic, I just LOVE the umbrella you created, how clever are you? Love the twiddly bits and the photos are brilliant. The frame is just gorgeous, I love the 'spooky' word and the witch is just amazing - she has such a scary face. A really fabulous creation full of wonderful inspiration - thank you! Hugs, Anne x
ReplyDeleteLove this frame Candy how clever to use the Picture wheel to make the umbrella so cool . Thanks for the tutorial on how you put this all together you have so much imagination .
ReplyDeleteCool creation, Candy! I love the pic too! The view master is too cool!!
ReplyDelete*mwah*
Steph
Simon Says Stamp!
oh, I love this especially the umbrella, really cool!
ReplyDeleteSuch a unique project Candy! Love all the texture and shimmer! What a fantastic keepsake!
ReplyDeleteWhat an awesome frame! Candy. The colors and texture are just fantastic! Love how you made the fun umbrella. Thank you for the great inspiration! :)
ReplyDeleteLove your framed piece Candy, the umbrella s out if this world creative. This is my favourite piece of the frame. The picture is fabulous and framed beautifully . Love the texture and how you highlighted the texture too. Love the colours and stamping too. So creative. Tracy x
ReplyDeleteWhat a great frame. Love the texture! So many wonderful details and the color is perfect. Everything you do is so polished. Very inspiring!
ReplyDeleteSuperb Candy. Thank you so much for the step by step as it really helps to show your clever ideas in full. The umbrella topped off your frame perfectly. Jenny x
ReplyDeleteCAndy i'm in love with your umbrella/ picturewheel! FAntastic idea!!!!! Wonderful piece as always! BArbarayaya
ReplyDeleteOh, Candy, your spooky frame is fantastic!! Love what you did with the picture wheel, too, making that gorgeous and funky umbrella.
ReplyDeleteThis is brilliant, Candy! I love how you created that amazing umbrella! It's awesome! What a clever design. I think that this is one of my favorite projects ever. All of the little details are beautifully done. Very inspiring!
ReplyDeleteHoly amazing project, Batman! I was really wowed by this one and loved your write-up about Halloween growing up. Weren't pillow cases the best way to rake in all that "loot"? So many fun times! This piece is crammed with creativity, as always, but my favorite has got to be that fabulous whimsical umbrella! It was cool on its own, and then when I saw what you made it out of, I was doubly impressed! Incredible piece and I really loved everything about it.
ReplyDeleteDefinitely too spooky and cool for school!! What fabulous texture on the frame, and the little parasol is a stroke of genius! Love the photo and Halloween memories too... thank you for sharing (and impressed that you and your brother used to share the stuff out too!).
ReplyDeleteAlison x
The frame itself with the step outs was pehnomenal and then that brilliant umbrella!!!! what a spectacular idea and perfect... I was feeling a little beetlejuice with that umbrella!
ReplyDeleteI like everything about this frame, especially that very clever umbrella that you made using the picture wheel die. You are SO creative at repurposing dies. Blessings, my friend!
ReplyDelete