Happy Hump Day everyone!
It's been snowing and cold here. I am like a bear in the winter when it is this cold! I love to "hibernate" in my craft room and experiment with new ideas and also work with my first love ... vintage pieces.
Here I have just finished this large Ranger #10 Manila tag. I recently received my new Tim Holtz Hearts Stencil and wanted to play with it in a couple of ways: as a background and also use the largest of the hearts on the stencil to create some little "balloons". Would you like to know how I made this? Well, grab a cup of something hot, get all cozy and I'll share the step by step with you!
Here I have just finished this large Ranger #10 Manila tag. I recently received my new Tim Holtz Hearts Stencil and wanted to play with it in a couple of ways: as a background and also use the largest of the hearts on the stencil to create some little "balloons". Would you like to know how I made this? Well, grab a cup of something hot, get all cozy and I'll share the step by step with you!

I sort of call this my "I Love Ranger Tag" because pretty much everything on it is either Ranger and/or Tim Holtz products. I love Ranger products because they are so dependable and do what you expect them to do with little effort. And who doesn't love Tim Holtz products? If you are a fan of vintage, Tim's stamps,Ideaology, and die cuts are so fun and easy to work with ... and so interchangeable.
Supplies: For this project, you will need the following: Distress Inks - Barn Door (all of the red areas), Gathered Twigs (brown distressing), Broken China - (distress on the tag), Tattered Rose and Scattered Straw - (mixed for flesh tones on the girl and yellow hair), Antique Linen - (lace on the dress); Archival Ink - Jet Black; Distress Paints - Antique Linen (on the angel wings, doily and a little dry brushed over the water on the globe), Salty Ocean and Picket Fence - (water on the globe), Scattered Straw - (continents on the globe); Adirondak Gold Paint Dabber - Painted on the Mini Numerals and Vintage Lace; Perfect Pearls Mists - Sunflower Sparkle (wings), Forever Red - (heart balloons); #10 Manila Tag; Non Stick Craft Sheet; Craft Glue Stick; Glossy Accents; Matte Medium; White Gesso; Specialty Stamping Paper; 1/4" Scor Tape; Mercury Glass Stickles; Tim Holtz Stencils - Hearts; Ideaology - Mini Numerals, Word Band, Elements Tissue Tape, Winter Tinsel Twine, Terminology Tissue Wrap, Grungeboard; Sizzix Die Cuts - Tattered Wings, Vintage Globe, Tattered Banners; Tim Holtz Stamps - From The Heart, The Girls, Simple Sayings, Odds and Ends; Tim Holtz Detailer Water Brush; Tim Holtz Tonic - Paper Distresser, Craft Knife; Misc. Supplies - 4" paper doily, Pop Dots, Vintaj Wire, 1/8" Metallic Gold Ribbon, Hole Punch, Regular Small Paint Brush (for work on the globe)

1. Begin with distressing a #10 Manila tag with Broken China and Gathered Twigs. Use a Paper Distresser to roughed up the edges.


2. Lay the Heart Stencil directly over the #10 tag and using a Mini Ink Applicator or a make up sponge, apply Barn Door Distress Ink over the stencil and stencil the hearts onto the tag. Add a row of hearts at the top of the tag by offsetting the stencil and applying the ink.
3. Add Tissue Tape at the top and punch the hole in the tag.

4. Apply Matte Medium over the Grungeboard and add Terminology Tissue Wrap over it. Heat set. Die cut the Tattered Wings out of the Terminology Tissue Wrap and Grungeboard piece. Also die cut the Vintage Globe out of plain piece of Grungeboard.

Paint over the wings lightly with Antique Linen Distress Paint and heat set. Distress the edges with Gathered Twigs and lightly mist over the wings with Sunflower Sparkle Perfect Pearls Mist. Heat set. Add a thin line of Mercury Glass Stickles to the edge of the wings. When dry, glue the smaller wings on top of the larger ones. (You will not use the smallest set of wings on this tag).
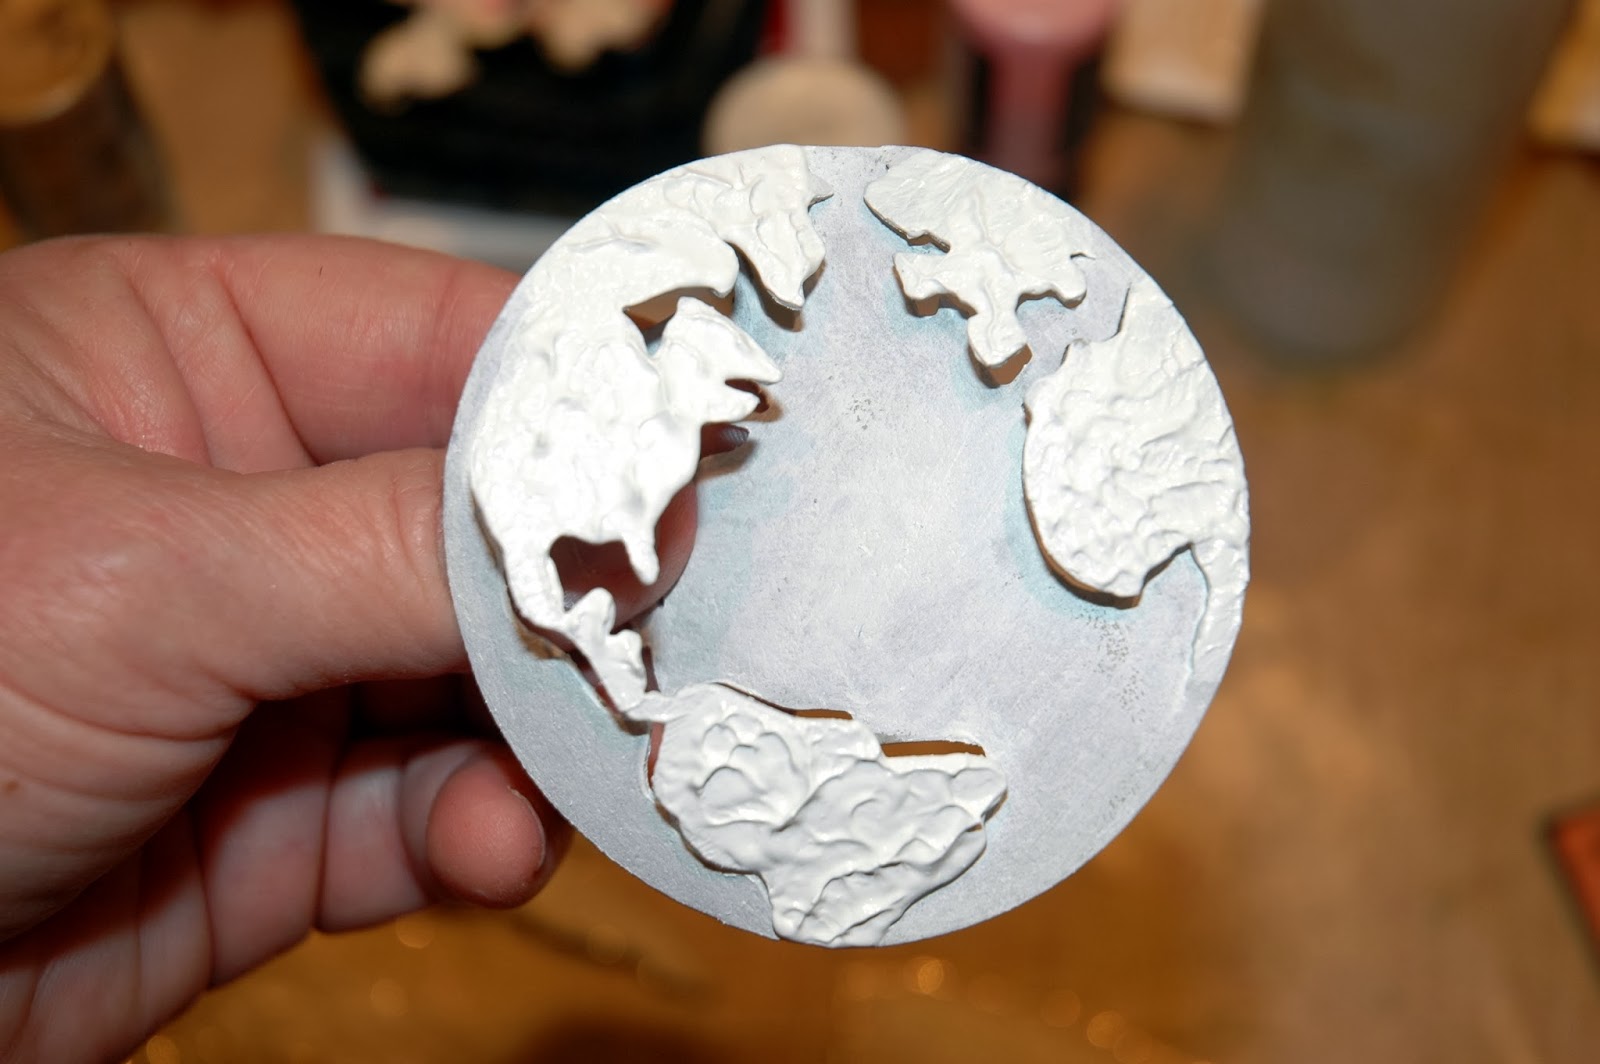
5. Paint over the globe with a coat of White Gesso. Add several layers of Gesso to the continents by stippling the brush and lifting, adding dimension with the Gesso. Let dry.

Paint over the water portion of the blobe with a mixture of Salty Ocean and Picket Fence Distress Paint.Paint over the continents with Scattered Straw using a small paint brush. Heat set. Dry brush Antique Linen over the water. Distress the globe with Gathered Twigs. Add tiny bits of Mercury Glass Stickles as accents to the continents and also lightly line the outside edge of the globe. Let dry.
6. Take a 4" in diameter doily and paint the exterior of it with Antique Linen Distress Paint. Heat set. Then lightly edge the doily with Mercury Glass Stickles. Let dry. When dry, glue the Vintage Globe onto the doily.

7. Stamp the little girl onto a piece of Specialty Stamping Paper using Jet Black Archival Ink. Heat set. Color the girl using Distress Inks and a Detailer Water Brush. Mix Tattered Rose and Scattered Straw for a flesh tone. Color the dress and bow with Barn Door. Color the lace trim with Antique Linen. Cut out the girl, leaving a tiny border all the way around.

Ink the very edge of the paper with a Black Soot Distress Marker. **It is very important not to leave white edges on your cut paper when doing vintage work. Always ink those white edges with black or brown to remove the stark white! Color in the small border around the girl with a Scattered Straw Distress Marker. Make a small slit on the top and below her hand on her lap using the Tonic Craft Knife.

8. Distress a small piece of white cardstock with Barn Door Distress Ink. Lightly mist over it with Forever Red Perfect Pearls Mist. Heat set. Lay the heat stencil on top of the cardstock and pencil around three of the largest hearts. Cut them out. Attach a long piece of wire to the backside of the hearts with a 1/4" piece of Scor Tape followed by a dab of Glossy Accents to hold in place. Let dry and then go around the outside edges of the hearts with Mercury Glass Stickles. Let dry. When dry, add a small metallic gold bow to each of the hearts using Glossy Accents.

9. Feed the wire through the little girl's hand and apply pop dots to her back. Attach the little girls to her wings.
10. Distress a piece of white cardstock that was distress with Barn Door and Gathered Twigs. Stamp the Love Bank Note and also the Happy Valentines ticket using Jet Black Arcihval Ink. Heat set and cut out. Lightly apply Mercury Glass Stickles around the outside edge of the bank note and on the inner rectangle of the ticket. Let dry.

11. Take the remaining piece of white cardstock that was distressed with Barn Door and Gathered Twigs and die cut the next to smallest Tattered Banner. Line the edge of the banner with a Black Soot Distress Marker. Stamp "I LOVE YOU" in the center of the banner. Heat set. Work the banner to curve and fit your globe. Then apply a small amount of Mercury Glass Stickles to the banner and also a line around the edges of the banner. Let dry.
12. Die cut Vintage Lace onto a piece of white cardstock. Paint the cardstock with a Gold Paint Dabber. Heat set. Cut to fit the top and bottom of the middle portion of the banner. Lightly cover the lace with Mercury Glass Stickles. Let dry. When dry, add 1/4" Scor Tape to the underside of the banner and attach the Vintage Lace. Add Pop Dots to the underside of the banner. Place the banner on the globe. (see photo above for the finished banner)
13. Paint the silver Mini Numerals "14" with a Gold Paint Dabber. Heat set. Then cover with a thin coat of Mercury Glass Stickles. Let dry. Then add Pop Dots to the back of the numerals.

14. Add the Word Band at the top of the tag using 1/4" Scor Tape under the band. First, tie the Winter Red Tinsel Twine onto one side of the band then stick the band in place and bring the Tinsel Twine around to the other side of the tag. Tie the Tinsel Twine to the other side of the band and cut off the excess twine.

15. Glue the Bank Note in place. Then glue the Vintage Globe in place.

16. Pop Dot the winged girl and stick her in place, sitting on top of the globe. Arrange her heart balloons.
17. Pop Dot the Valentines ticket and put it in place on the lower right corner of the tag.
18. Pop Dot "14" in place above the little girl's head.

All done and ready to enjoy!
I hope this tutorial has given you some good ideas for creating your own Valentine tags or cards. Or maybe it's just answered a question for you about distressing or a "how to" you were curious about.
I'm also linking this Valentine tag up to Simon Says Stamp's LOVE NOTES Challenge this week. Check it out! Also...huge congratulations to BarbaraYaYa for being named as the newest Design Team Member to Simon Says Stamp Monday Challenge. Her work is awesome!
I'm also linking this Valentine tag up to Simon Says Stamp's LOVE NOTES Challenge this week. Check it out! Also...huge congratulations to BarbaraYaYa for being named as the newest Design Team Member to Simon Says Stamp Monday Challenge. Her work is awesome!
Thanks so much for stopping by my blog and sharing a bit of your day with me.
Happy Valentine's Day to you and yours!
Soooo fabulous Candy! Tour de force of crafting with excellent tutorial. Especially LOVE the little girl with her adorable heart balloons perched so wonderfully! Her flesh colour is perfect as is your cutting. The globe too is superb. Love that mercury stickles thing you have goin' on! STUNNING work! Thanks so much for sharing and educating.
ReplyDeleteWrap up warm and stay snuggled! Awful weather here too with unprecedented rain and sea flooding. Nicola xx
This is beautiful! I love the touches of gold. So pretty!
ReplyDeleteAbsolutely stunning Candy, I absolutely love your vintage tag. The backdrop with the heart stencil is gorgeous and I love how the little girl is holding the heart balloons. The globe is a fantastic touch as are the tattered wings. Wonderful details and beautifully embellished, so good to see you joining in the Simon Says Stamp Monday Challenge my friend, an honour to have you playing along. Tracy x x
ReplyDeleteYour posts are always so inspirational and full of wonderful tips Candy and this one is no exception! That little girl is one of my favourite Tim stamps and I love how you cut her out and added those wonderful heart balloons and the fabulous die cut wings. The heart stencil makes the most wonderful background too. A truly wonderful tag. Anne xx
ReplyDeletewow your Valentine's tag is drop dead gorgeous Candy, wonderful layering and a great tutorial.
ReplyDeleteAnnette x
http://nettysartadventures.blogspot.co.uk/
Wow! What a fantastic valentine and your attention to detail just blows me away!
ReplyDeleteThis is stunning! I love every detail. It's just perfection on a tag!
ReplyDeleteOut of this world!!! Candy, you have really rocked this tag in so many gorgeous ways! I love that background, the world is incredible and the wings. Well I just adore every detail! Stay warm! I am going to Portland, OR over the weekend and it will be cold, wet and snowy!
ReplyDeleteCandy, your tag is beautiful! I love the sweet image and all the shimmery gold detail! Those wings are the perfect fit for her! So happy you joined along with the Simon Says Stamp Monday Challenge! Always a treat to see your artwork!
ReplyDeleteCAndy this work is totally amazing as always! I like especially your touch of gold !!!!! Thanks for your kind words!!!! BArbarayaya
ReplyDeleteAbsolutely love it, Candy. Great mix of imagery & products to add depth & mystery.xx
ReplyDeleteStunning. I just adore everything about this Candy, thanks so much for sharing the steps you took to create it. Must go back and look at it again to take more if it in xx
ReplyDeleteAnother fabulous project Candy. Love the floating hearts and the way you've altered the globe (must try that). Hope your heating is working well and you have plenty of warm layers on :) Jenny x
ReplyDeleteNow that is an amazing amount of detail .... and the end result is gorgeous.
ReplyDeleteOh my Candy this is stunning! I only wish I had this new stencil. I'm still waiting for it to make its way North of the border. I just love how you layer. I'm a huge Barbara fan and I'm so excited SSS has snapped her up.
ReplyDeleteJeepers, Candy! What a wealth of detail, technique, skill and love has gone into this! I love the mountainous texture you've given to the land masses on the globe, and the brilliant tinting of the little girl image, and how adorable that she's actually holding onto those little heart balloons... an absolutely amazing piece of work - and all on one tag!! Fantastic!
ReplyDeleteAlison xx
What an amazing piece! I love all the perfect details on this, I must say the wings are my favorite part, well that and the background and the hearts and I can just go on and on and on! lol Perfectly delightful piece and I too love Rangers products. ~Diane
ReplyDeleteI'm loving this whole tag, Candy... the earth's texture, the sweet girl perched on it and all the embellishments (especially for her - the wings, balloons, etc. - amazing!) Looks like you had a lot of fun making this one!
ReplyDeleteThis is an exquisite piece, Candy! I've been wanting to purchase the TH globe, and you may have just convinced me that I really need it through your creative use of it - LOL! Have a blessed week.
ReplyDeleteCandy! AWESOME!!! SO fun to have you linking up with us :) Ashli
ReplyDeleteThis tag is phenomenal! I never cease to be amazed by both your range of techniques and your attention to detail. I love how you used the hearts in for the background and as the balloons. As always, your tutorials and pictures make me think, "Hey! I can do that!" so thanks for making such extraordinary art pieces seem within reach. I really like how you combined such different elements, which gave it a cool vintage eclectic vibe. You are truly an original and this is one of my faves....even though I think I say that every time!
ReplyDeleteHello Miss Candy, WOWZER, out of this world is right,, I'm just gobsmacked, I looooove watching you create your magic, how you created all that on a tag is flipping brilliant, those balloon hearts are so creative and the little girl holding them, fantastic, that world is fan-tas-tic... Tim's products are the best and you have shown them to the mountain top :O), Thanks for sharing, your process, techniques, tips, brilliant post, ((( BIG HUGS))) Have a wonderful week..
ReplyDeleteOh, Candy.....what can I say? This incredible tag has an almost ethereal quality to it. Love just pours out of it! I love every little detail...the doily behind that beautifully painted globe...the sweet little girl sitting on top of the world...those fabulous heart balloons (I love your imagination!) and the wings! Oh....the wings! What a work of art. Someday, when the Smithsonian does a display of the paper crafting movement in the US, your work will be displayed as a prime example of the imagination, whimsy and artistry that made this industry take flight. I can't think of enough wonderful things to say.
ReplyDeleteOh Candy, I have not been round here for far too long!! Both this and your previous Valentine's project are unbelievable, so totally full of gorgeous, nostalgic vintage goodness!! And you always write such amazing tutorials!!! Thank you for such great inspiration!!
ReplyDeleteYou did your magic again, Candy!
ReplyDeleteLOVE your Valentine's tag and especially the balloons of course! Gorgeous!
Hugs,
Claudia x
Wow, what an absolutely gorgeous tag!! All of the layers and details are spectacular!! This is stunning!! I love, love it!! And awesome tutorial, too!! Thank you so much for stopping by my blog!!
ReplyDeleteLisa
A Mermaid's Crafts
Wow Candy this is marvellous! So many beautiful details, vintage feeling and colours...I totally Love it! I really appreciate that you share step by step photos with us and thank you very much for being happy with me for Blogworthy link...I still can’t believe!
ReplyDeleteI missed this one...sorry! What a super super gorgeous tag! So much to see and love! Love how you colored the girl and the globe is wonderful!
ReplyDelete