Hello everyone! Welcome to the weekend!
It's time for our 13th challenge over at Studio L3's
Are YOU being curious? In my first Compendium of Curiosities book, Tim Holtz autographed it by saying "Be Curious!" That always stuck with me. I have always been curious about how different mediums work with each other and how to construct different things. Being curious leads to creativity and as my blog is titled, "Creativity Is Contagious!"
And since these challenges are for those of us who love Tim's techniques, his products and his ability to inspire all of us .... have you seen this beautifully done video of Tim sharing his creative journey and what inspires him? If not, you really need to check it out! THIS is the essence of Tim and it will make you fall in love with him all over again! It's a very candid interview where Tim allows people into his personal space to gain a better understanding and I think more appreciation for who he is and what motivates him. I loved it!
And since these challenges are for those of us who love Tim's techniques, his products and his ability to inspire all of us .... have you seen this beautifully done video of Tim sharing his creative journey and what inspires him? If not, you really need to check it out! THIS is the essence of Tim and it will make you fall in love with him all over again! It's a very candid interview where Tim allows people into his personal space to gain a better understanding and I think more appreciation for who he is and what motivates him. I loved it!
Okay...back to the current challenge! This challenge is not a technique challenge although I'm sure there will be lots of techniques used in putting your project together. Turn to page 35 in your Compendium of Curiosities III book and check out "Worn Covers".
I love these guys! There are several different styles ranging from The Journaler (even comes with a special Christmas Wishes cover) , The Diary, The Chronicle and the one I chose to use for my project, The Composition.
It is a 5" x 7" cover. There are also inexpensive pocket inserts that you can purchase to hold tags, photographs, memorabilia; all sorts of things. Or, you can make your own interior pages and attach them with Tim's Ring Binders. That is what I plan to do with my little book...add some of my own art journaling pages with my own sketches and experimentation with water color.

This is my completed Composition Worn Cover book. Each little book is like a blank canvas. They are way cool without doing anything to the covers. But, when you add your own personality to the cover, you really can create some great art. I think when you add all sorts of stuff to them, they are just begging to be picked up, opened and enjoyed.
I began with just the basic Composition Worn Cover. I put together a collage of "stuff" from several of Tim's products: Found Relatives, a #8 manila tag, pieces of ephemera from Tim's Thrift Shop and Expedition Ephemera Packages, some Filmstrip Ribbon, a File Tab, "TOGETHER" from Tim's Framed Alpha Parts, an arrow Index Label, a Journal Ticket, a Mini Paper Clip, and a pretty die cut butterfly that I cannibalized from anther art project. It has a small Tim Light Bulb on it.

I started with the #8 Manila Tag that I had torn away the outside edge and distressed it using Gathered Twigs Distress Ink. To that, I added another piece of manila cardstock that was torn on all edges, and colored using Wild Honey and Gathered Twigs Distress Inks. I also did Tim's Spritz and Flick method on them and added Black Soot to the edges of everything. To add more interest, I stenciled Tim's Latticework design using my Broken China Distress Marker attached to Tim's Spritzer. Then I added a Chevron strip using Black Soot Distress Ink. I glued the distressed design on top of the tag and added a layer of lace and trim from Tim's Naturals Trimming Set. For a little more interest, I added a Journal Ticket to hang over the edge of the Worn Cover. I used the "1" from Tim's Rubons and put it on the back side of the ticket. Then I added some black machine stitching all around the edges. I would add a few more embellishments later on, after I started laying out the cover and see where this design wanted to go.
I love Tim's Ephemera Packs. I used some pieces out of Thrift Shop and also Expedition on this cover. I added some Peacock Distress Ink and a light spritz of Mint Perfect Pearls Mist to the map. I added some Treasure Gold Silver Guilding Wax to the outside edge of the clock face (because most of my metal elements are silver). Then I began to lay everything out.

I glued my distressed map piece in place in the upper left side of the cover. I would build the rest of the collage from this point.

Across the top of
my Worn Cover, I added a piece of Tim's Industrious Border Stickers.
They are adhesive on the back but I also added a 1/8" strip of Scor Tape
just to give it a double stick. Then I laid down my clock face and the Filmstrip Ribbon. The piece of Filmstrip Ribbon is glued in place using Glossy Accents. It dries clear and is perfect for adding clear elements like the Filmstrip Ribbon.

I began adding Ideaology elements to my collaged tag. I cut out the sweet little brother and sister from Tim's Found Relatives and went around all of the cut edges with a Black Soot Distress Marker (to hide the white paper edges). I added some Antique Linen over them to really give them a rich, antiqued appearance. Then I secured some twine around the bottom of the tag and glued my brother and sister in place. I added the "memoirs" File Tab at the top of the collaged tag, adding a piece of tied twine before I stuck it in place. The "TOGETHER" Alpha Parts piece was glued onto a piece of cardstock that had been sprayed with Dylusions Calypso Teal Spray. On top of the black Alpha Parts, I added touches of Gold Paint Dabber. Then I glued all of that on top of a piece of tattered vintage lace and glued it in place on my collaged tag. Another little accent that I added at this time was the Mini Paperclip on the upper left of the collaged tag. Funny how just little things like that add so much interest!

Then I added the collaged tag to the Worn Cover front, using 1/4" Scor Tape. Once my cover was in place, I decided to add the dimensional butterfly. She adds that extra touch of femininity that I wanted to bring to this cover. I also popped the arrow Index Label with a partial sentiment from Tim's Simple Sayings stamp set on it. The original sentiment says "Enjoy the journey". I didn't have enough room for all of it, but I liked "the journey".

In the upper
right corner of the Worn Cover, I added one of Tim's Faucet Knobs and dangled an "INSPIRE" Philosophy Tag from it using a Jump Ring. Now, this tag was originally an antique gold. But I wanted it a dirty silver. So, I simply painted over the finish with a Silver Paint Dabber and heat set it. Then I used the Pitch Black Paint Dabber to rub over the face of the tag. Before it dried, I wiped away almost all of the black paint but leaving it in the engraved "INSPIRE 3197". The other small amount of black paint that I left on the face gave it a wonderful distressed look. Love it! I added the Faucet Knob with Glossy Accents. I always love projects that have moving,
interactive pieces on them.

(This photograph is shot on the interior side of the Worn Cover book. This shows the Ring Binder being held in place on the spine with Tim's Naturals ribbon.)
Now it was time to add the Large Ring Binder to the interior. The Ring Binders come with brads and if you want to just pop them in place, you can do that and you're done. But, I wanted to create something a little more fun. So, I used some of Tim's beautiful Naturals Trimmings ribbon to add my Ring Binder.

I simply started on the outside of the Worn Covers spine and pulled my ribbon through the bottom hole, including the bottom hole of the Ring Binder. Then I pulled the ribbon up through the Ring Binder and pulled the ribbon through the holes at the top of the binder and the spine. Once the ribbon was back on the outside of the spine, I simply tied it into a decorative knot, added another piece of the same ribbon and a piece of a different ribbon and tied knots. You could stop here but why do that? Time to add more "stuff" and make the book even more interesting!!

I used a small Swivel Clasp as the base for my dangling charms. It was connected within the knots and then I simply added the charms to the chain on the Swivel Clasp using small Jump Rings. I used two Baubles at the top, then a silver Locket Key, a silver Buckle and a silver Word Stick at the bottom.
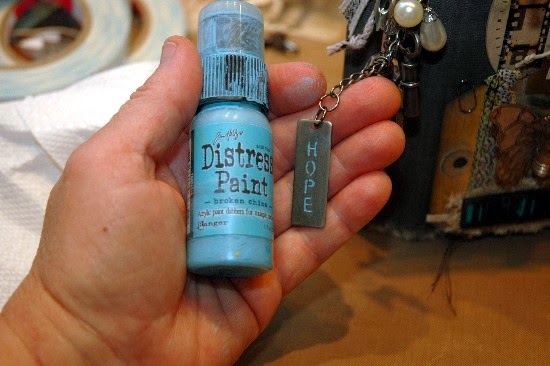
I added some Broken China Distress Paint to the stick to emphasize the word that is engraved into it. I wiped away the excess paint, leaving it only on the embedded "HOPE". I decided to add one more metal piece at the very top of the dangling charms. I used a Pen Nib but it didn't have a hole to make it a charm. NO PROBLEM!

I simply used my Tim Holtz Punch to "drill" a small hole and then I could easily add it to the knots with a small Jump Ring.

It filled up that little bare spot perfectly! Love it!

For now, I am going to leave my interior of the book exactly how it comes. It's already got that distressed look and once I start adding my art journal pages, I don't want them to compete with the insides of the book.
I did this book in no time and you can, too! Then enter our challenge over at Compendium of Curiosities III. Be sure to follow the few simple rules when writing your blog post and you'll be on your way to maybe being one of our TWO lucky winners!
This challenge is being sponsored by the very generous folks at ...

Can you believe it? A $50.00 gift certificate could be yours if you are chosen the winner of this challenge by the Curiosity Crew. But that's not all ...
Tim and Mario, those gracious guys of gratitude and all things good, have also donated really REALLY REALLY nice prizes to be given at each challenge. So, you have TWO chances to win!
Be sure to check out all of the amazing projects created just to inspire you by the Curiosity Crew! And THANK YOU for all of your continued support and wonderfully uplifting comments. They mean the world to me!
Be sure to check out all of the amazing projects created just to inspire you by the Curiosity Crew! And THANK YOU for all of your continued support and wonderfully uplifting comments. They mean the world to me!
GOOD LUCK! I can't wait to see all of the beautiful Worn Covers that will be displayed over at Compendium of Curiosities III for everyone to enjoy!
How clever of you to move the knob to the top of the cover! The photo of your brother and sister is just too adorable. The butterfly with her glow worm body and wire feelers is another stroke of genius! I too have one of those hole punches, it is one of the most useful tools in my kit! I use it for many things! Thanks for great inspiration.
ReplyDeleteFantastic journal cover. All the details are wonderful.
ReplyDeleteWhat a lovely worn cover Candy! So much detail. Very vintage very beautiful. Love all the trinkets on the side too. Karen.x
ReplyDeleteThis is so cool, Candy! Don't you love having Tim's Punch to be able to put a hole where there isn't one?!
ReplyDeleteHello Miss Candy WOW another SPECTACULAR creation, love the map, the tag is flipping gorgeousssss, and those dangly bits fantastic, you are just so darn creative, thanks for sharing hope you have a wonderful weekend ((( BIG HUGS )))...
ReplyDeleteWhat an awesome journal cover! I wish this would have been first then I might have been tempted to create a page instead of a tag for the rest of the challenges. Or I could go back and do it anyway. Thank you for some super collage inspiration!
ReplyDeleteCandy ... amazing project. Love your layers ... as usual. And those charms on the spine -- perfect. REally adore all the elements that you used on it. Fantastic make -- Mary Elizabeth
ReplyDeleteCandy, you are the Queen of embellishments! I love the way you put the knob at the top of the worn cover! There are so many delightful details that it is fun to see where they all are! The butterfly is perfect too - adds a bit of innocence to the composition which goes so well with the children! Love it!
ReplyDeleteCandy, this piece is awesome! You are definitely the Queen of embellishments! I love every little detail - they are so much fun to look for! The butterfly is the perfect addition - it adds such a touch of innocence to go with the children!
ReplyDeleteAnother fabulous project! I love that stunning tag. So many fun layers! Fabulous idea to use the Naturals ribbon to add the Book Binding and then dangle all the fab pieces from it. I love to do that. I think I must go find my Worn Covers in my Tim stash & try one. I am in love with yours!
ReplyDeleteGirly...I LOVE your worn cover! I spied a butterfly too! You know what that does..makes me giddy! hehehe. Your embellishments are perfect...a vintage masterpiece! I love these Saturday mornings...your cover is making me want to get creative! LOVE LOVE LOVE!
ReplyDeleteSo much to see and love Candy! I adore the tag with the kiddos! Just marvelous and eclectic!
ReplyDeleteOh Candy I LOVE your composition worn cover... the collage cluster with the found siblings just so awesome... and ALL the Idealogy goodness dangling from the spin ... OMG! The butterfly is fabulous... just so many wonderful details! Great inspiration for using my Tim stash !
ReplyDeleteCandy, very nice covers. I love your techniques
ReplyDeleteBeautiful Candy, from the wonderful collage, to the fabulous trinkets hanging at the side (now I know what I can use my drill punch for!) to the gorgeous little people.... and then the fabulous butterfly. There is so much to look at and enjoy - the faucet is such fun too. I am really looking forward to having a go at this challenge. Thanks so much for the wonderful inspiration. Anne x
ReplyDeleteCandy, I love something that you said--Add your own personality! I love that! That's a great quote :) And not only do you have a GREAT personality showing through your altered worn cover, it's chock full of talent and fun! Such a great CC3 #13 inspiration piece :) XOXO-Shari T.
ReplyDeleteLove your beautiful project. Thanks for sharing.
ReplyDeleteLove all the stuff you added to your art journaling book. The composition is pleasing and so artsy. The details like the light bulb and the charms are the perfect finishing touches.
ReplyDeleteI love all the embellishments and the way you've distressed and altered with paint. Such a lovely project.
ReplyDeleteCandy I love all the little inviting embellishmenst and details to your cover. Love the little guy and gal! You always make such sweet pieces of art....
ReplyDeleteStunning as usual. I love walking through your projects as they are always amazing!
ReplyDeleteCandy, can you just make two of every project you do so I can have one? Seriously. This is awesome. I love it so very much.
ReplyDeleteJess
Awesome, awesome AWESOME Worn Cover, Candy. I love every bit of Idea-ology and grunginess you added, and all the tips for the types of adhesives you used. Very helpful! Would love to see all the lovely pages you put inside.
ReplyDeleteGlossy accents to adhere the film strip, awesome idea .. now mine will stay on projects. Thanks for that tip. Your cover is awesome .. i love the use of all the ephemera !!
ReplyDeleteAnother wonderful project Candy. Love all the detail.
ReplyDeleteWow, Candy! You are one busy lady! Your work is always so unique and beautiful!
ReplyDeleteAmazing as always. Your detail is fantastic and your step by steps are incredible. I'm always so inspired after visiting your blog!
ReplyDeleteHugs,
Linda
Holy Moley! This is fabulous, Candy. I've just been poring over it checking out all the details. Love the way you've built up your cover... the butterfly body is killer and OMG on the idea to use the punch to drill the pen nib. Off to pin!
ReplyDeleteOnce again I am over here drooling up a storm! Love all the layers you have on your worn cover and I now have to get a punch!!! That butterfly is gorgeous and the added body light, so Candy! Love every detail! Now to put my thinking cap on!
ReplyDeleteCandy, you always do such beautiful work; never fail to impress! So many wonderful details that all work so well together. Nice job!
ReplyDeleteI don't recall if I left you a comment. Soooo... WOW! Coming here is such a treat :)
ReplyDeleteI love all the depth and textures! And thanks for the tip on the drill being able to punch through the nibs! I don't think I would have tried that...
ReplyDeleteWow this is truly amazing so many layers so much detail - brilliant work Candy
ReplyDeleteI love collage and Candy, you are one of the best collage artists I've ever seen. I ALWAYS learn something from reading your blog. Your worn cover is fabulous, of course. SO cool!!
ReplyDeleteI wish I had your talent at combining embellishments! This will be a very cool art journal!
ReplyDeleteCandy, your worn cover is AMAZING!!! I love all your layers and grungy goodness!!! You are so incredibly talented! ;)
ReplyDeleteSo much to see with all the different embellishments and your overall effect is fantastic! Love your cover :-)
ReplyDeleteAwesome Candy!!!! Love all the different embellishments, colors and the background!!!
ReplyDeleteHugs,
Ellen
beautiful work Candy - that set of embellishments is lovely - I love the tag also - brilliant. Hugs rachel x
ReplyDeleteLove all the fun trinkets, it makes your book so interesting to look at.
ReplyDeleteWow Candy! I don't know how you do it! What a beautiful book with such a vintage look with so much to look at and you said you completed it in no time! I love it! Thanks for showing us how!
ReplyDeleteLove the vintage, old feel of history to yours. I love your idea of keeping your art journal ideas in it.
ReplyDeleteSo much detail, I could look for hours, I love this.
ReplyDeleteFabulous. Candy! Really love the way you have used layer upon layer, you have created so much interest. Each time I look I find something else ! X
ReplyDeleteCandy
ReplyDeleteI am always curious to see what you create and as always, I love it. Your tutorials are so well explained and the projects are fabulous.
As always, I was amazed! Your work is truly wonderful in every little detail! I love the colors, the photo that you used and I love the spine of the album with all the little pendants! You know you're one of my muses! BArbarayaya
ReplyDeleteI'm always curious about what you're up to creatively as well Candy. Your style of crafting is why I'm in this adventure...it's about memories, cherishing people, places and times. I gained so much inspiration from this project and post. Thanks!
ReplyDeleteBTW I have to have that cool tool (drill) and I know my hubby won't mind me getting it lol. Too bad if he does. ;)
Great job! So many interesting trinkets and embellishments Candy!
ReplyDeleteAmazing work Candy! Love how you pulled all this "stuff" together!
ReplyDeleteThis is really neat!! I especially like the butterfly with the lightbulb.
ReplyDeleteCandy, this is exquisite! I love all those wonderfully distressed layers. YUM! The "found relatives" you selected are so YOU....innocent, sweet and friendly. I love how feminine this is, yet gloriously grungy at the same time. The butterfly with the light bulb body is gorgeous..and the perfect feminine touch. I love the way you secured the ring binder on this...soooooo beautiful, and all those lovely baubles...divine. A real work of art....and it will contain even more works of art...like a mini art museum. I love it!
ReplyDeleteI adore the way you've layered up the ephemera for this and of course your trimmings and trinkets are always the business. Jenny x
ReplyDelete