This week at Simon Says Stamp and Show, we're busting our buttons for this challenge. If you are like I am, I love buttons! I have tons of them from ones I've saved over the years to those gorgeous glass ones when I am lucky enough to find them at flea markets. I also love the "vintage" style buttons from Tim Holtz' Accoutrements and I often use them in my vintage pieces.
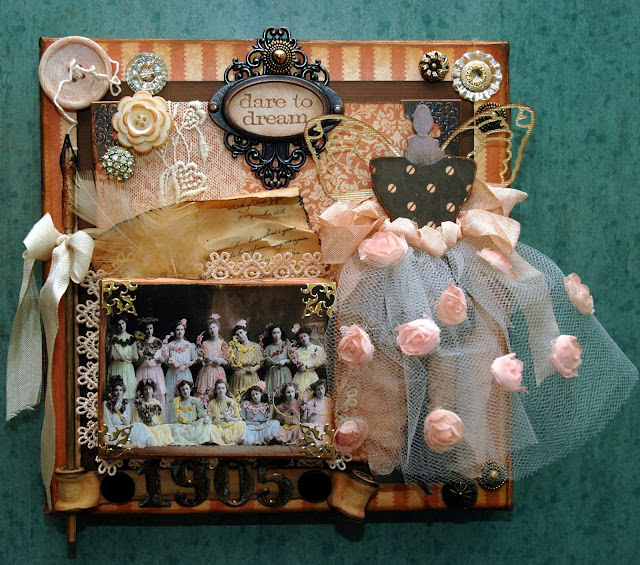
I created this vintage and very feminine 8x8 canvas using those gorgeous papers from Graphic 45's A Ladies Diary 12x12 papers. A few weeks ago, I created a masculine 8x8 canvas using Tim Holtz' French Industrial paper pad. I plan to hang this canvas next to that one because I think they will compliment each other so well.
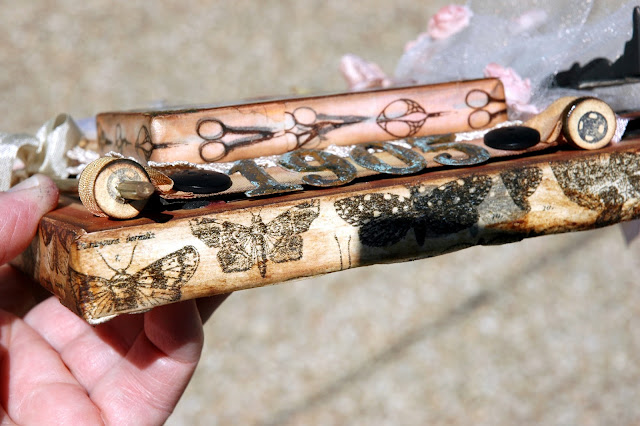
This canvas began the same way as the mens' canvas, by wrapping the edges with Tim Holtz' Tissue Tape. This time, I used the Sketchbook butterflies around the edge. I used a different tissue tape that I had on the smaller canvas. I loved the scissors on it and I thought it went well with the dressform, tiny spools and buttons. I then distressed the tissue tapes using Gathered Twigs Distress Ink. Next I brushed Matte Multi Medium over the top of the canvas and added the striped paper. I sanded all of the edges and inked them with Gathered Twigs.
To create a nice contrast between the two pink-ish Graphic 45 papers that I used,
I added a piece of 6 1/"2 x 6 1/2" dark brown Bazzill cardstock as a mat around the raised 6x6 center damask pinkish paper that I used as a background. That paper was glued onto a 6x6 piece of chipboard, edges sanded and distressed with the Gathered Twigs Distress Ink as well. I added the antiqued copper Metal Corners to the 6x6 area. I also added one of my flea market treasures, a strip of vintage lace, vertically to the left side of the 6x6 square.
The smaller canvas that sits atop the lower left corner of the 6x6 raised area is approximately a 2 1/2 x 3 1/2 canvas. I found the vintage photograph online and sized it to fit my canvas top. I colorized all of the ladies using watercolor pencils. Aren't they fun? I love the way they turned out. I added some lace behind the canvas almost like a little antique frame. I added a stamped letter from B-Line Designs that was made to look like very old paper and using Vintage Photo and Black Soot Distress Inks to age the paper. Then I scrunched up the paper, partially smoothed it back out and positioned it behind the canvas. In between the letter and the canvas, I added a couple of cream colored feathers to sort of tie in with the writing pen I created to the left. I popped the little vintage canvas assemblage into place using 1/4" Scor Tape.
Speaking of the writing pen, here it is. This was created by coloring a wooden skewer with an Espresso Paint Dabber. The pen nib was originally silver. But, since I prefer gold, I used a Gold Paint Dabber to alter the color. Then I added a bit of Chestnut Roan Ink on top of the gold and it turned into a nice antiqued goldish brass color. I then wiped just a touch of Pitch Black Paint Dabber to the point of the pen nib, as if old dried ink from many written letters remained on the tip of the pen. I added a little cream ribbon around the wooden part of the pen and glued it in place; with the base of the pen running through the small hole in the wooden spool at the bottom.
Let's follow that pen down through the spool. The area under the collage was a lot of fun to create. "1905" was also originally silver but I altered it to a patina goldish brassy appearance by using the Gold Paint Dabber, a touch of Chestnut Roan Ink and some Juniper Paint Dabber lightly added with my finger. I glued a piece of thin chipboard underneath the distressed ribbon and then glued the numbers on top of the chipboard for stability. On either side of the numbers, I rolled a little of the ribbon onto miniature wooden spools that were colored using Chestnut Roan Ink. I punched 1/2" circles out of manila cardstock and stamped the snap from Darkroom Door's Dressmaker stamp set in the center. I was trying to recreate a little label for the spool ends. I glued those into place and the tucked the ribbon on either side for more detail. Finally, I added the dark brown buttons on either side of 1905. Then I pop dotted that assemblage in place.
The dress form was so much fun to make. Ii is from Tim Holtz' Sewing Room die cut. I absolutely LOVE the full tulle skirt and the feminine quality it really gives to this canvas. I gathered the tulle using a needle and thread and sewed it into place after I had covered the dress form. The dress form was cut out of chipboard and colored using the Espresso Paint Dabber. I covered the body of the dress form with a scrap of paper that I had leftover from Graphic 45's Romantique collection. I love the deep brown and the pinkish polka dots next to the A Ladies Diary papers. G45 papers seem like they can always coordinate with other G45 collections. I dyed some of Tim Holtz' white Trimmings Organza Ribbon Roses and some white ribbon with Vintage Pink and Vanilla Breeze Glimmer Mist. I then cut the roses apart and hot glued them into place on the tulle skirt. I fashioned a sash and a double bow that I glued in place on the dress form.
Behind the dress form are very delicate butterfly wings from Memory Box. I love these and they are the perfect size for Tim's dress form. I assembled all of the dress form together and hot glued it into place.
Across the top of the 6x6 raised piece, I have added an antique copper Ornate Plate with "date to dream" from Tim Holtz' Simple Sayings stamp set.
I have scattered buttons from Tim Holtz' Accoutrement as well as little metal buttons and glass buttons that I have collected over the years. Some of Tim's buttons were altered using Picket Fence Distress Stain and a Gold Paint Dabber.
I hope that this little vintage canvas has inspired you to go through your sewing drawers or your stash of treasures and dig out some buttons. Then create something wonderful and join our button challenge at Simon Says Stamp and Show. You could be the winner of our very generous sponsor's
$50.00 credit voucher. And...you might be selected as one of the TOP THREE artists for the week! So, what are you waiting for? I can't wait to see what you come up with!
Here is the list of products available at Simon Says Stamp used in creating this piece:

Let's follow that pen down through the spool. The area under the collage was a lot of fun to create. "1905" was also originally silver but I altered it to a patina goldish brassy appearance by using the Gold Paint Dabber, a touch of Chestnut Roan Ink and some Juniper Paint Dabber lightly added with my finger. I glued a piece of thin chipboard underneath the distressed ribbon and then glued the numbers on top of the chipboard for stability. On either side of the numbers, I rolled a little of the ribbon onto miniature wooden spools that were colored using Chestnut Roan Ink. I punched 1/2" circles out of manila cardstock and stamped the snap from Darkroom Door's Dressmaker stamp set in the center. I was trying to recreate a little label for the spool ends. I glued those into place and the tucked the ribbon on either side for more detail. Finally, I added the dark brown buttons on either side of 1905. Then I pop dotted that assemblage in place.
I hope that this little vintage canvas has inspired you to go through your sewing drawers or your stash of treasures and dig out some buttons. Then create something wonderful and join our button challenge at Simon Says Stamp and Show. You could be the winner of our very generous sponsor's
$50.00 credit voucher. And...you might be selected as one of the TOP THREE artists for the week! So, what are you waiting for? I can't wait to see what you come up with!
Here is the list of products available at Simon Says Stamp used in creating this piece:


