Simon Says "Show Tickets!" Hmm...what to do?? With the holidays fast approaching, I wanted to make something Christmas-y. But TICKETS ... CHRISTMAS .... how can those two go together? I'll show you my creation in a minute. But first ...
I hope you'll take the time to stop by SIMON SAYS STAMP AND SHOW'S BLOG to see what wonderful creations my Design Team buddies have conjured up for you this week! It's all about "TICKETS" and their ideas are AMAZING!
Then, create your own vintage or Tim Holtz-ish style design using tickets and enter them in our challenge! You could be the lucky winner of our sponsor's most generous gift of a .....

... AND if your entry is chosen as one of the TOP THREE, you will receive special recognition for this honor with a TOP THREE BLINKIE you can post on your blog.
Here is my "TICKET" design. This big ticket could easily be used as a package decoration or as an ornament on a Christmas tree.
I hope you'll take the time to stop by SIMON SAYS STAMP AND SHOW'S BLOG to see what wonderful creations my Design Team buddies have conjured up for you this week! It's all about "TICKETS" and their ideas are AMAZING!
Then, create your own vintage or Tim Holtz-ish style design using tickets and enter them in our challenge! You could be the lucky winner of our sponsor's most generous gift of a .....
... AND if your entry is chosen as one of the TOP THREE, you will receive special recognition for this honor with a TOP THREE BLINKIE you can post on your blog.
Here is my "TICKET" design. This big ticket could easily be used as a package decoration or as an ornament on a Christmas tree.

This started out as a plain extra large manila tag (8 1/2" x 4"). I used my Martha Stewart Score Board (I LOVE THAT THING!) and scored 1/4" inside the tag on all sides. Then used a 1" round punch to clip off the edges...making my extra large tag look like a ticket.
I used a combination of Gathered Twigs, Stormy Sky, Black Soot, and Tumbled Glass Distress Inks to colorize and distress my big ticket's background. I then used a combination of the larger and smaller snowflake stamps from Tim Holtz' Mini Holidays 2 and Winterwonder Stamp Sets. I heat embossed the snowflakes using a mixture of Rangers' Queens Gold and Copper Embossing Powders.
Finally, I stamped a Ranger Distress Embossing Ink Pad over the entire ticket and covered it with Clear UTEE. Then, I melted the powdered UTEE; sealing my ticket and leaving a lightly pitted enamel effect. In the picture below, you can see some of the scoring, the embossed snowflakes and the pitted enamel background.
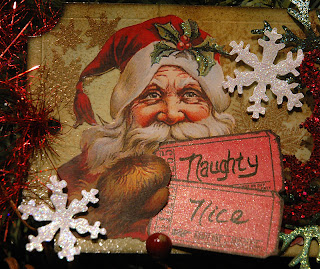

I found a wonderful vintage Santa image, sized it to fit my ticket and cut it out. I used my Tonic Craft Knife Tool to slice the edge of Santa's glove so that I could add more tickets underneath. Then I glued the Santa in place, leaving under his glove unglued.

I have been anxious to try some of my new Tim Holtz' Christmas die cuts! I chose to use the Tattered Pine Cone and the Vintage Noel die cuts. I cut the pine cones out of cream cardstock that I had distressed with Gathered Twig and Walnut Stain Distress Inks. I cut the pine needles out of a dark green cardstock. I glued the pine needles in place and then stickled them with three different greens: Firefly, Eucalyptus and Patina. I followed the instructions included with the die cut to make the pine cones and set them to the side. I also added some Eucalyptus and Patina Stickles to the holly leaves on Santa's hat.

I used a red cardstock as the base for the NOEL die cut. Then I brushed over the letters with Matte Multi Medium and sprinkled NOEL with Siren Art Glitter Dazzlers. It is like a chunky vintage glitter. I love the look I achieved with it.

I then added some festive narrow gold ribbon and the Tattered Pine Cones. Hmmm...it still needed a little something to "lighten" things up a bit. So, I decided to add some Mini Snowflakes cut from Plain Grungeboard and painted with a Snow Cap Paint Dabber. When that dried, I covered the snowflakes with Star Dust Stickles to give them that glisten of freshly fallen snow and glued them in place.

Finally, I added the tickets that Santa is holding in his hand. They were fashioned out of manila tag board that was colored with Fired Brick, Picket Fence and Barn Door Distress Stains. Then I lightly spritzed over it with Biscotti Perfect Pearls Mist for that subtle shimmer. Using Tim Holtz' Odds and Ends stamp set, I stamped two plain tickets onto the vintage red background and wrote "NAUGHTY" on one and "NICE" on the other. Then I glued them underneath Santa's glove.
So, there's my "ticket" for this week's challenge ... an extra large ticket with Santa holding tickets! If Santa asked you to choose a ticket to describe how you'd been this year...which one would you choose..."NAUGHTY" or "NICE"?
Have a great week and take time to PLAY!!!

