Showing posts with label Wanderlust 2016 Prompt Art Journal Page. Show all posts

Monday, June 6, 2016

WANDERLUST 2016 WORD PROMPT PAGE ~ WHAT I AM MOST GRATEFUL FOR

It's the start of a new week and I wanted to share some art journal pages I recently finished.

I am loving my Wanderlust 2016 year long art journal.  We are given prompts approximately every other week.  They are thought provoking and sometimes a real challenge to put my feelings down on paper in art form.  But I love doing it!  For me, it's a very introspective and creative process.

"What I am most grateful for ..."  Just think about that for a few minutes.  SO MANY things come to mind ... what I am I THE MOST grateful for?  

It took a while for me to really consider ALL of my blessings and I came upon the one thing that I think is at the root of all other things that make me grateful.


~ UNCONDITIONAL LOVE ~

I created this simple tree of life covered in hearts.  Life and love are so intertwined.  I cannot separate the two.

At the center of my tree is a cross with a heart in the center representing my faith in God and my belief that from Him, all things are created, given and blessed.

1 Corinthians 13: 4-7 is a beautiful scripture often referred so as "The Love Chapter" in the Bible.  I thought these words were so appropriate for these pages.  They truly express what unconditional love is all about.

It begins with my Heavenly Father: the creator of life and was then passed onto me through my loving parents.  What a gift!

I pray that I have been able to share this type of love with my family and friends.  

So what I am MOST grateful for is the unconditional love that is at the foundation of everything:  happiness, harmony, understanding, joy, compassion and so forth.


I began these pages by covering my art journal pages with some different Tim Holtz' Tissue Wrap papers.  I glued them in place using DecoArt's Media Matte Medium.  Then I brushed over the pages to seal them.


Next I added some torn cardstock, book text, portions of a doily and some corrugated paper to the pages.  I glued them in place using DecoArt Media Matte Medium and then brushed over them to seal them.


Once dry, I began adding DecoArt Media White Gesso on top of the pages in random strokes ... not covering up all of the colors, pattern and textures of the papers below.  Let dry or gently heat set.


I added more texture to the pages by using some DecoArt Media Modeling Paste through Tim Holtz' Bricked and Bubble Stencils.  I randomly added the bubbles towards the top of the pages and the bricks across the bottom to create a wall effect on either side of the pages.  Let dry and immediately clean your stencils.


When the Modeling Paste was dry, I began to add color to my pages.  I started with the corrugated paper that was going to represent the Earth and grass and the brick walls.  I experimented with a combination of DecoArt's Media Fluid Acrylics and Dr. Ph Martin's Concentrated Water Colors.  After I had colored my bricks, I added depth to the mortar with a Stabilo black pencil and a Detailer Water Brush.


Now ti was time to add some color to the sky.  I experimented with DecoArt Media Fluid Acrylics Titanium White and Dr. Ph Martin's Turquoise Blue to create a wispy blue sky.  I did not want to cover up the musical notes and other images below so the water color was a wonderful semi transparent blue.  I dabbed some solid Titanium White to add a cloudlike texture along with the stenciled bubbles.  I loved the varying hues of the blue sky!


Then I sketched my Tree of Life onto the pages.  I off set the tree to the left of center so that I could add my scripture to the right of the tree.


The tree began to take shape as I used DecoArt Media Fluid Acrylics to paint it.  These colors are more opaque and really made the tree stand out against the wispy sky.


The tree was painted using DecoArt Media Fluid Acrylics: Burnt Umber for the tree bark, Pyrolle Red for the hearts, Hansa Yellow Medium for the cross, a combination of Blue Green  Light and Yellow Green Light for the leaves.  I then added a black line around the tree and the hearts.  


A little trick ... I sized the scripture to fit in my space on the right side of my page.  I then attached a piece of plain tissue paper to a piece of copy paper by taping it around all of the edges using 1/4" Scor Tape.  Then I ran the tissue paper taped to my copy paper through my printer and it worked perfectly!


I then tore the tissue paper around the edges of the scripture because the edges of torn tissue paper melts better into the background than does cut paper edges.  I brushed DecoArt Media Matte Medium over the area where I would be laying down my tissue paper.  Then I laid the tissue paper in place, made sure there were no wrinkles over the letters and then brushed over the top of the tissue paper with Matte Medium to seal it in place.


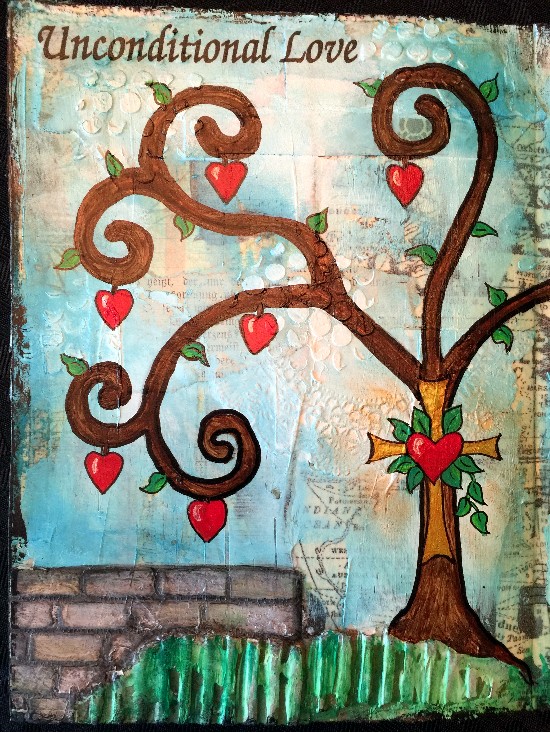
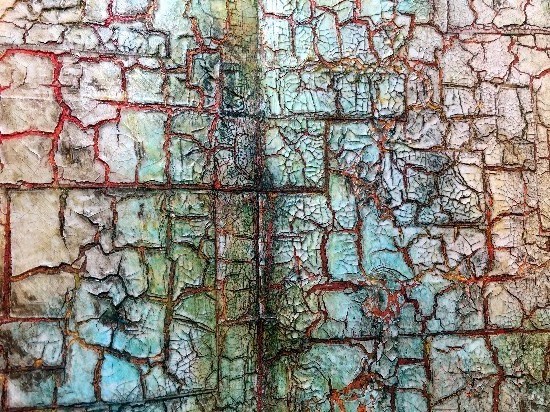
Here is a closeup of the left side of the pages.  You can see alot more detail in the background in this picture and also the depth that the corrugated paper and stabilo pencil shading add.  I also added a dry brush effect of DecoArt Gold Metallic paint around the cross.

I hope that you are having a lovely day and you are finding some time to create!


Wednesday, May 25, 2016

WANDERLUST 2016 WORD PROMPT JOURNAL ~ THINGS I NEED TO LET GO OF

Happy Wednesday!  
I hope you're having a good week.  It's rainy here in Missouri and the extended forecast is for more of the same.  

So this is a perfect time to steal away to my studio and play!

We were recently given a new word prompt for our year long art journal through Wanderlust 2016.  This time the theme was "Things I need to let go of."  

I typically like more positive, happy pages but this theme had more of a dark connotation for me because things you need to let go of are typically things that are not good for you.


So ... after much soul searching, then many layers of background to try to convey more of a broken, chaotic, disjointed feeling; this is the art journal spread I ended with.


I began by just gluing and sealing bits of random cardstock and book text onto my art journal pages.  I used Golden Soft Gloss Gel to do this.  After it was dry ...


I painted a coat of Diarylide Yellow followed by a light coat of Pyrrole Red DecoArt Media Fluid Acrylics to the surface and let it dry.

Next I decided to use Andy Skinner's Mega Crackle technique.  You can see a video of that HERE.  Basically after the paint on the background surface was dry, I painted a medium coat of Paper Artsy's Crackle Medium over the entire surface of the background and let it air dry thoroughly.  You could also use DecoArt's Weathered Wood for this step. 


Next I painted a medium coat of DecoArt's Media Crackle Paint over the Crackle Medium.  Work fairly quickly and do not continue to brush back over your surface.  Almost immediately the Crackle Medium will activate and large cracks will appear.  Let air dry thoroughly.


To create even MORE crackles or a "Mega Crackle" effect, paint a medium layer of DecoArt Media Crackle Glaze over the surface and let air dry thoroughly.


To age and better define all of this crackling going on, paint a light coat of DecoArt Media Antiquing Cream over the surface of the crackled background.  In this case, I chose Raw Umber.  Once dry, use a baby wipe or damp cloth to remove the excess Antiquing Cream.


After wiping away the excess Antiquing Cream, here is what the Mega Crackle technique looks like so far.  Perfect for my background that I am attempting to look chaotic, discombobulated to fit the theme of these pages.


To add more color to the background, I dry brushed first DecoArt Media Fluid Acrylics Cobalt Teal Hue followed by Transparent Yellow Iron Oxide to add sepia tones and the "age" factor and finally a little bit of Carbon Black around the edges and randomly on the pages.


With dry brush colors randomly added, here is a sample of what the background now looks like.


I love Dina Wakley's silhouette stamps and one in particular was perfect for my pages.  Except....the stamp size was too small.  So, I scanned the image and increased her size to 6 1/2" on my computer.  Then I printed her out on heavy cardstock, cut her out and later glued her the left side of my art journal spread.  I added the sketched lines after she had dried.  I glued her in place using Golden Soft Gloss Gel as a glue and then a sealer.


I added a brick effect to the perimeter of my journal pages using Tim Holtz' Bricked stencil and Archival Ink.  


Here are the art journal pages before I glued on the silhouette and finished them out.  Before I glued that in place though, I wanted to lighten the left side a bit where the silhouette would be to create a better contrast.


So using my finger, I first lightly added DecoArt's Media Fluid Acrylics Titanium White around the general area where the silhouette would be.  Then I added some Yellow Iron Oxide to soften the vivid white just a bit.  When I was happy with that area, I glued the silhouette in place and added my sketch lines around here with a permanent black pen.


Next I added the words "Let Go Of" using some old rub on letters I've had forever.  I just love them!


To start filling in the background, I added some random stamping using one of Dina Wakley's Script Stamps and Black Archival Ink.


I used a white Posca Pen to do a little doodling on the rub on letters to help them stand out.  Here is what this portion of the art journal spread looks like at this point.


I used Tim Holtz' Rays Stencil and DecoArt's Dazzling Metallics Peacock Pearl color to create rays emerging from my silhouette.  I extended the rays even further onto the journal page with the paint and a small brush.


On my computer, I created the things that I need to let go of.  I sized them to fit on my rays but I did not want the white paper to cover the rays.  So, I experimented with a piece of plain tissue paper taped onto a piece of plain paper using Scor Tape around all four edges to secure the tissue paper in place when the paper ran through my printer.  IT WORKED!!!  So then all I needed to do was tear around each thing I need to let go of.


If your tear instead of cut the edges, they will meld better into your background.  I first brushed a layer of Golden Soft Gloss Gel on the surface of each ray, laid my tissue paper piece in place and then brushed over the tissue paper with more of the gel.  Here is how it turned out.  I love it!


For the finishing touches, I added a few circles stamped from paint lids dipped into paint and some dots stamped randomly onto the page using Tim Holtz' dot stamp.

I hope that you're having a wonderful week and will find some time for yourself to just let yourself go and play with your art.  These pages were very catharsis for me by helping me realize things that could be holding me back from being my best self. 


Wednesday, April 13, 2016

WHAT HAPPENED TODAY WANDERLUST WORD PROMPT PAGES

It's hump day and I'm playing "catch up" on some projects.

Our latest Wanderlust 2016 Word Prompt Pages had the theme "What happened today..."
I took that quite literally to mean what I actually had been doing the day I started my pages. 


I had started Spring cleaning my entire house and that became my inspiration for my art journal pages.  


I began pulling some tissue papers and napkins with various colors and images to use in my background.  I had absolutely no idea where the pages were going but it's always fun to get a background going.


Here is the beginning of the background; tissue papers and 2 ply napkins (with the excess backing papers removed) torn and laid randomly in place.  They are glued and sealed using DecoArt Media Matte Medium. 


I kept adding layers of napkins and Matte Medium.


Once I had all of the papers in place and they were dry, I started wiping some DecoArt Fluid Acrylics Titan Buff over the surface using a baby wipe to soften the colors and meld everything together a little better.


Then I followed that up with some starker DecoArt Media Fluid Acrylics Titanium White to give more contrast.  Finally, I added some DecoArt Media Fluid Acrylics Transparent Yellow Iron Oxide.  I am in LOVE with this stuff!  It adds such a richness, warmth and aged feeling to the pages with just a few swipes of a baby wipe.  I love how the little bird in the nest is peeking out of the right side and soon I would come to love it even more as I began working with my focal point ...


While my background was drying, I decided to start working on my focal point.  The first thing I thought of was Dina Wakley's Scribbly Birds stamps.  I think they are so cute and I wanted to use one for my pages.  The stamp was a bit too small so I scanned it and enlarged it to fit on my page.  Then I added a head kerchief and broom to fit my "Spring Cleaning" theme on a separate bird.


I traced it onto a piece of heavy cardstock and brushed over it with DecoArt Media Matte Medium to seal it.  Then I could add paints, watercolor crayons, colored pencils; whatever I wanted to use.


I decided to use a combination of Neocolor II Watercolor Crayons and a Detailer Waterbrush, Prima Colored Pencils and a Black Permanent Micro Ink Pen to outline.  I also added polka dots to the kerchief using a stylus and DecoArt Media Fluid Acrylics Titan Buff paint.


I cut out the housecleaning little bird and glued her in place on my art journal page.  Then I penciled in the nest underneath her, the tree branches and the leaves.


Here are the pages before I painted in the details of the branches and leaves.


The first things I painted were the brown things: the nest, the branches.  These were done with DecoArt Media Fluid Acrylics Raw Umber, Titan Buff and Burnt Sienna.  The leaves were basically painted in with the colors in the photo above.  I combined all of the green DecoArt Media Fluid Acrylics to colorize the leaves.


I added highlights on the leaves with the combination of the DecoArt paints shown in the photograph above.  Here you can see the progress of the art journal pages.


Next I penciled in "Spring Cleaning" and colored it in using a Permanent Black Micron Pen.


To add a light black mist to my pages, I used Tim Holtz' tool and a Black Soot Distress Marker.


Next I randomly added a crackle effect from Andy Skinner's faux crackle paint stamp from his Steampunk stamp set.  I love this stamp!!!  It's perfect for backgrounds!  


Then I added Seth Apter's text stamp from his ConText stamp set to add a little more interest to the background. Perfect for filling in the empty spaces without cluttering the pages too much.


I finally added a few musical notes that I drew in using a Black Permanent Micron Marker and it's all finished!

Thanks for stopping by today!  I hope you'll make some time to play and let your creativity take over!