This is an exciting week at Simon Says Stamp and Show! Our fabulous sponsor, Simon Says Stamp is celebrating ...

... and we are helping kick off STAMPtember ™ festivities with a
Design Team Blog Hop!
You have a chance along the way to win a $25 gift certificate for hopping onto my blog, leaving a comment and entering our challenge. Winners will be announced at
8AM September 12.
Please hop to my teammates' blogs as well. Each of them has a special handmade work of art to share with you and also MORE PRIZES along the way! Enter the "Read All About It!" Challenge. Be sure to put a STAMP on it and you could be the lucky winner of our
GRAND PRIZE $100 Simon Shopping Spree!
SIMON SAYS STAMP was founded in 2002 with an interest in exclusively selling rubber
stamps. It didn’t take long until we realized we couldn’t stop there. Over the
past 10 years we celebrate rubber stamping in its full glory by giving access
to people around the world to a one stop shop. Rubber stamps still remain the
heart of our business and we are celebrating by hosting a “STAMPtember” ™ event
intended to inspire, educate, and celebrate the greatness of rubber stamping.
Part of the enticement of rubber stamping is that stamps can be used in
creating or complementing ANYTHING! From stamping dates on bank documents and
postage parcels in the early 18th century, rubber stamping has dramatically
expanded to include card making, scrapbooking, mixed media and many forms of
altering and expressing art.
Whether you're a regular or a first time visitor, WELCOME TO MY BLOG! If you came here from the lovely and talented Ashli Oliver's blog, then you're on the right track for SIMON SAYS STAMP AND SHOW'S STAMPTEMBER BLOG HOP!
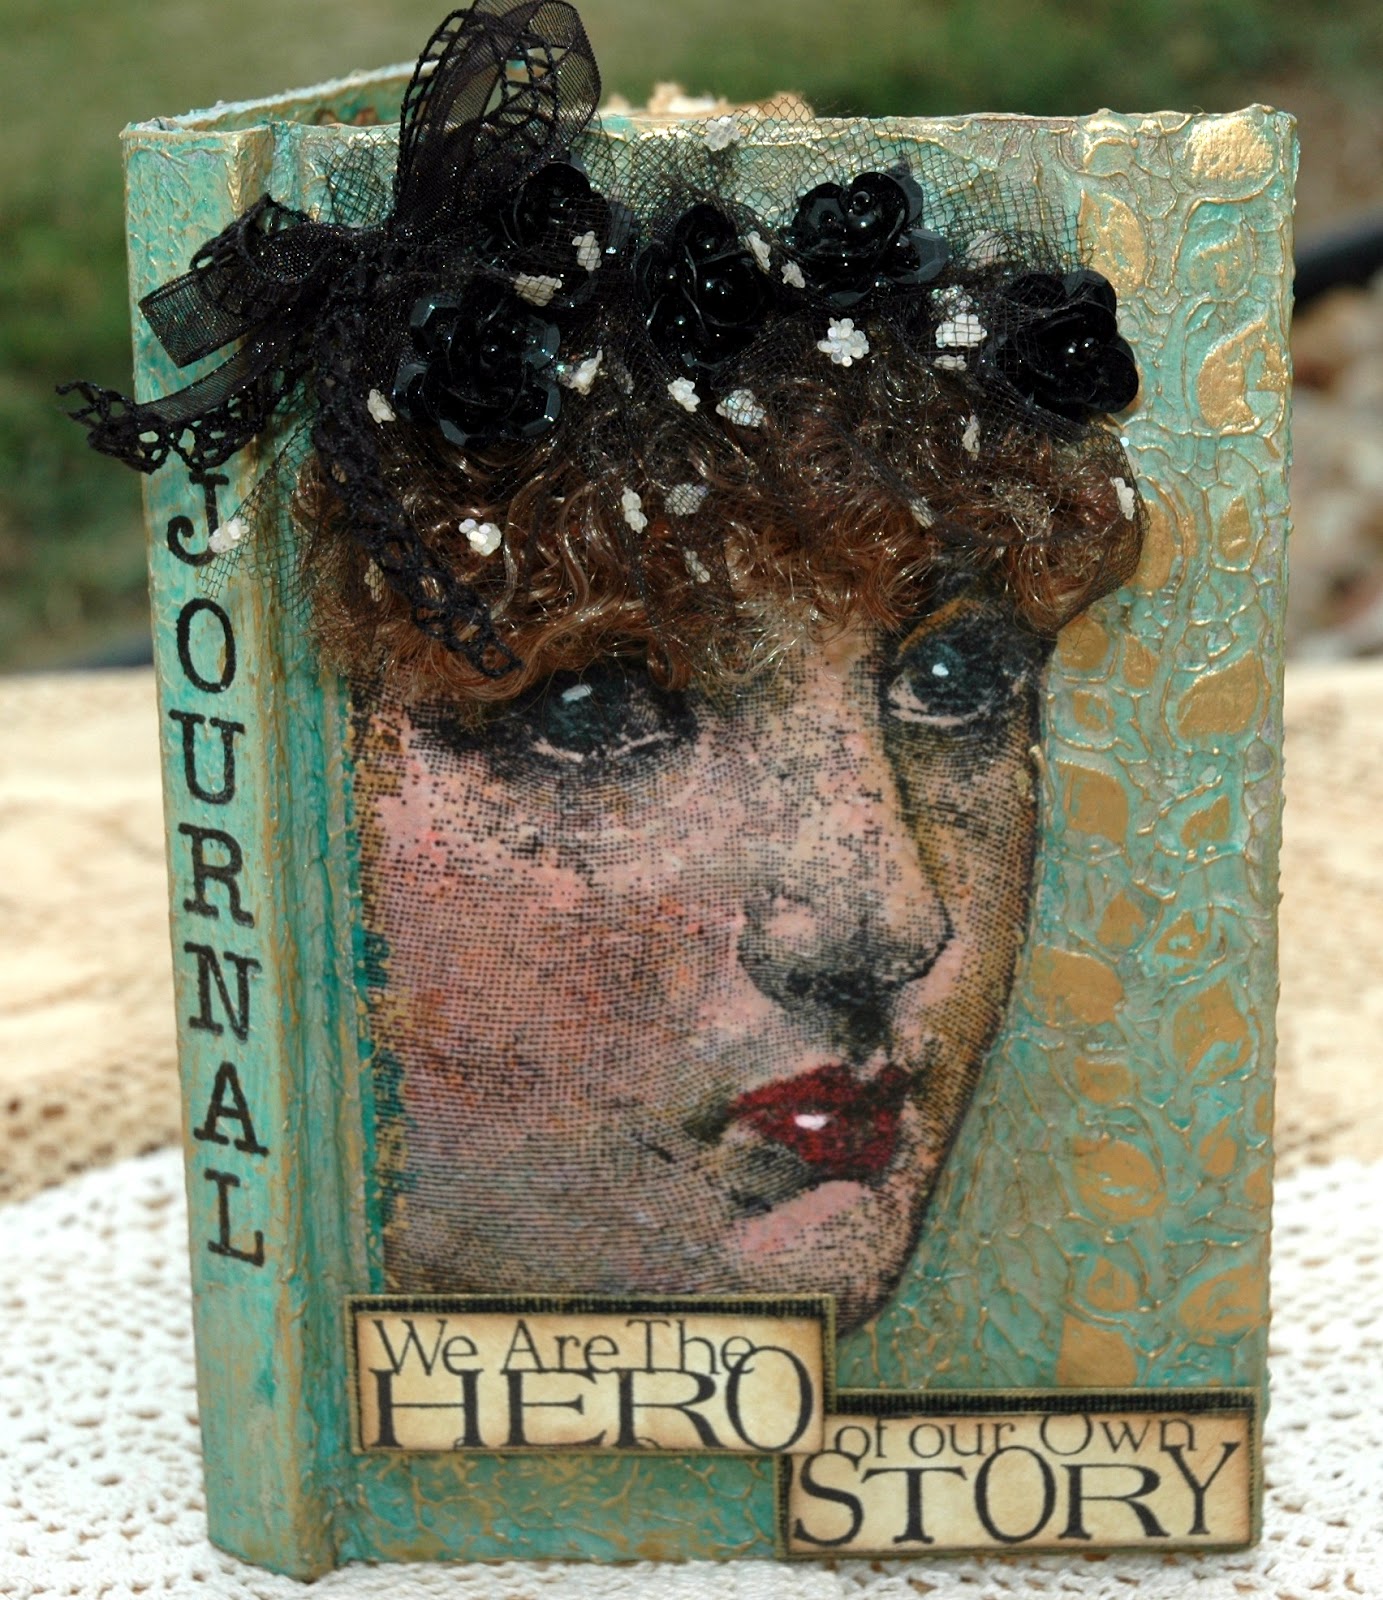
This week's challenge theme is titled "READ ALL ABOUT IT". Do you love stamping text or using actual text in your pieces? Well, then this week's challenge should be fun for you! Whether you make a book, alter a book, stamp script or use pages from a book or a newspaper; incorporate something about text and stamping into your challenge piece.
Here is my finished "Read All About It" piece.
Whether you're a regular or a first time visitor, WELCOME TO MY BLOG! If you came here from the lovely and talented Ashli Oliver's blog, then you're on the right track for SIMON SAYS STAMP AND SHOW'S STAMPTEMBER BLOG HOP!
This week's challenge theme is titled "READ ALL ABOUT IT". Do you love stamping text or using actual text in your pieces? Well, then this week's challenge should be fun for you! Whether you make a book, alter a book, stamp script or use pages from a book or a newspaper; incorporate something about text and stamping into your challenge piece.
Here is my finished "Read All About It" piece.

I have completely altered a 4x6 blank book and turned it into a journal.

This is what the book looked like before I started. My daughter had gone to furniture store closing and bought all that they had, fourteen in all, for $.50 a piece! The best part...she gave them all to me!
They are beautifully bound little books with quality linen-ish textured blank pages inside; as you will see in future pictures. When I saw this week's challenge theme, I knew that I wanted to transform this little guy into a beautiful journal.

And...when I saw Tim Holtz' new release of the Classics #5 Stamp Set, I knew that beautiful lady would grace the cover of my new journal! She is so fabulous. In fact, that entire stamp set is just amazing!
If you've got a few minutes, grab a cuppa and I will share with you the step by step in creating this little altered journal. I hope you enjoy it....

I started off by covering the front, spine, edges and just a bit of the inside edges of the front cover with molding paste (a product similar to Gesso). I used a palette knife to smear a light coating of molding paste and then I tapped it with my finger in a random fashion to create more texture. Next I laid Dyan Reaveley's Luscious Leaves Stencil down on the right side edge of the cover. I used a palette knife and scraped more molding paste over the stencil to add the leaves along the edge. Then I gently lifted the stencil and allowed the cover to dry. When the front was dry, I repeated the process (minus the leaves) on the back cover
and let it dry.
Next, I cut out a pattern around the size of the face stencil that I would use on the cover. I laid it on the cover and lightly penciled around it, so I could see the placement of the face.
and let it dry.
Next, I cut out a pattern around the size of the face stencil that I would use on the cover. I laid it on the cover and lightly penciled around it, so I could see the placement of the face.

Since molding paste dries in a semi transparent state, I needed to create an opaque surface. So, I painted the entire cover with a base coat of an off white acrylic paint. I painted the area of the face with a skin tone acrylic paint and let it dry.

Next, I added color to my cover by using Peacock Feathers Distress Ink Refill and a touch of water. I brushed the ink (plus a little water added) onto my cover, working it into all of the high and low areas. Then I dabbed a paper towel over the cover to remove excess ink and add a variation of color. Then I heat set the color.
Because the cover had texture, I knew that I could not stamp directly onto the surface of the journal and get a clear image; especially when working with a stamp with so much detail. So I stamped that beautiful face from Tim's new Classic #5 Stamp Set onto a piece of white tissue paper, using Jet Black Archival Ink. Then I heat set it. I painted Matte Multi Medium on the flesh area of the journal cover and laid the tissue paper stamp directly over the flesh area. Then I painted a layer of Matte Multi Medium over the entire front cover, sealing the tissue paper and also the color of the journal cover. (When dry, I painted the Matte Multi Medium over the spine and back cover to seal the color as well. You need to work quickly when sealing with Multi Medium over the Distress Ink Refill because until sealed, the ink is still water reactive and you will lose a little bit of the color if you keep rubbing over the same place.)

Next, I used my ink applicator and Gathered Twig Distress Ink and distressed the entire cover of the journal. Then I heat set it.
I wanted to add more color to the face. There was already a base of a flesh tone color underneath the tissue paper stamped image but she needed more detail. The additional color was all done with Distress Markers and a water brush (to dilute the color if needed). Antique Linen and Tea Dye provided deeper skin tones. Spun Sugar gave that blush to her cheeks. Worn Lipstick followed by Barn Door provided the color on her lips. Broken China was added on top of the black in her eyes. And a touch of a Sakura White Opaque Pen added that glint in her eyes and shine to her lips.
I wanted to add more color to the face. There was already a base of a flesh tone color underneath the tissue paper stamped image but she needed more detail. The additional color was all done with Distress Markers and a water brush (to dilute the color if needed). Antique Linen and Tea Dye provided deeper skin tones. Spun Sugar gave that blush to her cheeks. Worn Lipstick followed by Barn Door provided the color on her lips. Broken China was added on top of the black in her eyes. And a touch of a Sakura White Opaque Pen added that glint in her eyes and shine to her lips.

Next I introduced some metallic gold from a Gold Paint Dabber by gently rubbing the paint over the high points with my index finger. I did this to the entire cover; working very carefully to add a lot of gold over the leaves; giving them that embossed look.

Here is a picture of the covers after adding the gold highlights. I added a slight wash around the face area using Sable Brown Studio Paint and water. I loved my lady on the cover but I did not like how stark the top of her head looked against the background color. So, I decided to soften that look and add more dimension to the cover by adding hair. But, how would I do THAT?

Then I remembered some curly doll hair that I had bought ages ago. I added 1/8" Scor-Tape double sided tape above her face and began adding the hair. I added two rows of it. Now she had hair but it still looked weird to just have the hair coming out of nowhere. So, I decided to add some vintage black milliner's netting, a few black sequin flowers and a little black ribbon. All of those items were attached with Glossy Accents.

That was just the touch it needed to give her that finished look. (The ribbon was still not added in at this point...it came later).

Now the cover was coming along but it still needed something at the bottom. I loved the sentiments on the Classics #5 Stamp Set and I used both of them in this journal. I think the one I chose for the cover is perfect for a journal..."We are the HERO of our Own STORY."

The sentiment, the way it was on the stamp, would not fit properly on my journal cover, so I decided to cut it in half and separate it. I stamped the image onto cardstock, cut it out, distressed it with Gathered Twig and then edged the cardstock with a black cats eye ink pad. Then I took a piece of Bazzill black cardstock and (using my index finger) rubbed gold paint lightly over the surface to show the raised area on the paper. I pop dotted the sentiment on top of the black cardstock, cut the black cardstock to leave just a matted edge and ran the Gold Paint Dabber over the edges of the black cardstock. I overlapped the sentiment and glued them into place using 1/4" Scor-Tape.

I had some perfect sized letters to stamp "JOURNAL" on the spine of the book using Jet Black Archival Ink. Then I heat set them before moving into the interior of the journal.
Since this challenge was titled "READ ALL ABOUT IT", I wanted to further tie this journal into that theme. So, I created the interior covers by stamping some script text.

To create the interior covers, I started with two 4x6 pieces of cream cardstock. I rubbed Evergreen Bough and Iced Spruce Distress Inks onto a Non Stick Craft Sheet. I then intermittently added a little Picket Fence Distress Stain and spritzed just a bit of water over all of it. Then I dragged the two pieces of cardstock through the inks and heat set them. I tore around the edges of the cardstock. I did this for two reasons. I needed to make them smaller to fit inside the covers and I also wanted those torn, uneven edges to distress and create that old, worn look.
**When you are tearing paper, always tear towards you if you want the pulpy side of the paper to face you. The ink will grab onto the pulpy paper and give you that really worn look. I also like to ink the edges in brown and then lightly touch the edges with a black cats eye ink pad to create a really old, worn ... almost a burned edges effect.)

I did this same edge technique on the sentiment. I stamped it onto manila cardstock and then distressed it with Gathered Twig Distress Ink. I tore the edges, added more Gathered Twig and then a touch of the black cats eye ink pad. I did the same black Bazzill background on this sentiment as I did on the one I did on the cover; only I could leave more of the black highlighted in gold showing on this inside cover. Don't you love that sentiment?

Here you can get a better look at those lovely pages inside of this book. Aren't they awesome? I stamped this decorative image using Jet Black Archival Ink and then I randomly added little dots of Patina Stickles to add a touch of blue green sparkles and to pull the teal from the interior pages. Let the Stickles dry before closing the book cover!
Here is the cover again.

And here is what you will see when you open the cover.
Have you finished that cuppa yet...or possibly had to get a refill before finishing these instructions? (smile)
This was a fun and relatively easy project to do. You just have to be patient and wait for the drying times involved.
Now it's YOUR turn to create something wonderful using our theme.
Be sure to include some stamping! Then enter our challenge!
Grand Prize Drawing of a $100 Shopping Spree at
Simon Says Stamp!
And don't forget the chance to win a $25 gift certificate to Simon Says Stamp and Show on my blog (and all of the Design Team Member's blogs) just by leaving a comment and using at least one stamped image when entering our challenge.
Who wouldn't like THAT? And...if you are chosen as one of the TOP THREE entries, you will receive special recognition on our blog. So, have fun with this one! I can't wait to see YOUR creation!
From here....hop on over to our Design Team Leader, May Flaum's blog for more inspiration. If you need to start at the very beginning...click on Anna-Karin Evaldsson's blog and you you'll be on the right path to get your STAMPTEMBER inspirational journey started!
Here are all of the participating Simon Says Stamp and Show Design Team in their correct blog hopping order:
GOOD LUCK!
Here are Simon Says Stamp products used in this piece:
 |  |  |  |
 |  |  |  |
 |  |  | |
 |  |  |  |
 |  |
I love your book! So elegant! Than to see the layers of texture you put in makes me love it more. I love the texture on her hair a perfect detail!
ReplyDeleteoh my goodness, this is simply amazing! I'm in awe....
ReplyDeletewhat a beautiful project - love the texture on the cover and your hair -thanks for sharing
ReplyDeleteBarb Housner
Love your altered book! Really would like to try that myself one day.
ReplyDeleteWow, It's beautiful. I read through this twice...really inspiring.
ReplyDeleteLook at all the details. Gorgeous.
ReplyDeleteWow Candy, this project is so pretty and I loved seeing the process of how you made it. Gorgeous altering. The covers are just wonderful. Love the lady and that you added hair. Great colours. And the insides are wonderful too. Such a great find to get all those books!
ReplyDeleteI'm always attracted to altered books but have only made one. Your great description of your process encourages me to try some more. I especially love the hair and ribbon treatment you gave your lady on the front. I'm so glad you shared this project.
ReplyDeleteWhat an awesome piece of Art! LOVE it! TFS
ReplyDeleteBeautiful is the only word that I can think of at the moment and even that doesn't do it justice!
ReplyDeleteAnother fabu.ous transformation from plain to WOW. I love texture and it's in abundance on this piece, looks so tactile I love it. Love your attention to detail on the face image and she is coloured so beautifully . Her hair is a wonderful touch and adds so much interest and character to her. Love the background colour and again fantastic details on the inside too. Besutiful Candy. Tracy x
ReplyDeleteI love the addition of the curly hair! Great job on the altered book!
ReplyDeleteGORGEOUS! Love it!
ReplyDeleteI love your book it is really beautiful. Adding the hair and netting was such a great idea.
ReplyDeleteLove your journal! You put alot of work in to it! Great inspiration!!
ReplyDeleteLoved the altered book, one of m favorite things to do. Earlier in my crafting adventure learned bookbinding so often make my own books.
ReplyDeleteThat lady looks so innocent :) Fun project.
ReplyDeleteAbsolutely beautiful, Candy!! Love all that texture - gorgeous!
ReplyDeleteWow, your altered book is truly an amazing piece of artwork, love the transformation with the different design elements!!
ReplyDeleteI would have to be locked in a closet for atleast a decade to create this! how wonderful & I too felt great joy over your daughter's furniture store "find"! LUCKY!
ReplyDeleteGreat project! Love the texture!
ReplyDeleteStunning...what a creative project and beautiful result!
ReplyDeleteWow!!! How fabulous is this creation. It's a work of Art and love. Absolutely beautiful.
ReplyDeleteHugs
Suzi x
SCORE Candy!! journals for only 50 cents!!! Love how you added the texture with the modeling paste. then using the tissue brilliant! Awesome journal!!
ReplyDeletehugs Lynn
Wow!!!! I read (and soaked in) every single word on how you made this beautiful journal! I had to crack up about the doll hair. I have an obscene stash of craft supplies and KNOW at some point they will come in handy!
ReplyDeleteI am afraid to ask, how long did the entire project take???
Really nice project!!
ReplyDeleteThere's no way anyone would recognize the original journal in your finished project! What a wonderful creation! Thanks for sharing!
ReplyDeleteYour book is soo amazing!
ReplyDeletewow I love the textures on your book cover. Well done!
ReplyDeletegrace
The most exciting part of this hop was...to see what you've created, because you're always surprising with stunning ideas. I love your transformed book cover also as the inside. It will be a pleasure to write in it.
ReplyDeleteFabulous book! Thanks for the detailed tutorial. It was fun to see how you created this masterpiece!
ReplyDeleteOMG ,incredible project, texture, colors, i love everythings
ReplyDeleteWOW! I am in love with your altered book. It's fabulous!
ReplyDeleteThat's a beautiful cover you've made for your journal. I love how you gave her hair!
ReplyDeleteWow! Love this journal cover! Thank You for the detailed instructions. I have been eyeballing that stamp set, now I want it even more!
ReplyDeleteOk...I went out of order because I wanted to save you for last!!! I am SO NOT disappointed! You had me hanging on your every word. I love texture paste...fabulous use here! I kept wondering how you did the face...tissue paper...really?!?! Genius! Love her hair and the millinery netting another genius! The inside is fabulous too...love the ripped and distressed pages! What a great daughter to give you such a wonderful prize!!!
ReplyDeletePS...some of the wording can't be read on the black background.
Oh my goodness Candy, I don't know what I can say that will truly express my feelings for your spectacular book. I absolutely love it, you are an artiste extraordinaire! I'm hankering after that stamp set as well LOL, may have to have it :D. Hugs, Chris
ReplyDeleteJust gorgeous!!
ReplyDeleteGorgeous. What a fabulous eye for detail you have. Amazing creation.
ReplyDeleteJust when I think you cannot better yourself Candy, you go and do it! I am drooling over this totally amazing book, I love the face but the hair just finishes her beautifully and love what you have done with the pages. Fabulous tutorial too. Brilliant! Anne x
ReplyDeleteAn amazing altered book the front cover with the leaves are cool I like the lady and how you finished her off
ReplyDeleteBeautiful journal!!
ReplyDeleteWhat a lovely journal. Thanks for such a detailed tutorial.
ReplyDeleteWhat a great job in this journal!!!!!!
ReplyDeleteLots of great texture on the front of your journal and I like how you finished off the inside covers.
ReplyDeleteabsolutely stunning altered media...!!!
ReplyDeleteWhat a beautiful project. I really like seeing altered journals but I've yet to try one myself. Thank you for sharing your process.
ReplyDeleteExcellent journal. Great hop.
ReplyDeleteOh my word this is amazing, the hair is just so fabulous. How did you think of that!! You're so clever.
ReplyDeleteAnnette
xx
What a fabulous book! You are very talented. Hugs, Robin
ReplyDeleteCandy this is absolutely stunning! Love the texture. Such a beautiful journal. Thanks for sharing.
ReplyDeleteWOW!!! This is AMAZING!!!! Thanks for sharing
ReplyDeleteWow! This is really a piece of art! Love it!
ReplyDeleteI love it! TFS the step-by-step instructions.
ReplyDeleteFabulous altered book, Candy! I love all the details!
ReplyDeleteWOW! That is a beautiful book! I've never done any altering to create journals, but am inspired to after seeing yours!
ReplyDeleteAmazing journal. Thanks for showing how you created it.
ReplyDeleteWhat a fabulous project. Just love it. Thanks for sharing!
ReplyDeleteI love your book! It's so beautiful! :-) xx
ReplyDeleteYes, I do love that sentiment! What an incredible piece of art you have created! Beautiful!
ReplyDeleteHiya my sweet friend, I love your piece of ART, your book looks absolutely stunning and the layers you have placed in it, fabulous.....LOVE IT..another stunning piece of ART sweetie, hugs terry xxxx
ReplyDeleteSweet Daughter!!! Super find!! I love the idea of altering the blank book. I was looking for some books to alter at a used book sale, but just could not bring my self to trash the books. But a blank book!! Now, that is more like it!! Love it!!
ReplyDeleteAbsolutely delightful! Amazing cover and love those stamped pages.
ReplyDeleteYour altered book makes a lovely journal! Thanks for the tips!
ReplyDeleteGorgeous work!!! Love it!
ReplyDelete~Linda
wow! that's all i can say! WOW!
ReplyDeleteI've never altered a book, but your has inspired me to give it a go. It is sooooo cool.
ReplyDeleteI love the girl's bangs. You gave the cover such texture and life. Love it!
ReplyDeletewhat a beautiful book. You've done a wonderful job. TFS
ReplyDeleteCandy once more you did really stunning creation...I love texture and her hair...just amazing!!
ReplyDeleteHugs from Slovenia
WOW!! Your book is beautiful!!! Thank you for the tutorial!
ReplyDeleteJust amazing! I love how you tranformed the book and all the great techniques you used!
ReplyDeleteI guessed this was yours from the collage pic on the SSSS page... wow, girl, she is stunning! The texture is amazing and the hair is OVER THE TOP cool!
ReplyDeleteStunning! And what a find on those books! My hat's off to you!
ReplyDeleteGlorious, Candy, and thank you so much for the step-by-step insight into your creative process. (I've just been using exactly this stamp in a journalling page - not had a chance to post it yet - and I agree she's completely gorgeous.) I love the patina you've created on the covers - amazing!
ReplyDeleteAlison x
So many wonderful techniques to see here. Love this journal book. Michelle x
ReplyDeletelovely altered book. Yup she is a fantastic image. Have a great day
ReplyDeleteWhat a beautiful altered book, and to think it all started with 50cents!
ReplyDeleteoh my goodness...your altered book is outstanding...i'm off to the store to buy some modeling paste...what a great idea...thank you for sharing!
ReplyDeleteThis is fantastic, your abilities are amazing! You're so talented. I love those sentiments too, so inspiring.
ReplyDeleteTanya xx
Stunning project!
ReplyDeleteWonderful, inspiring piece of art.
ReplyDeleteWow! Fantastic book cover.
ReplyDeleteWhat a fabulous job! So unique and fun and the sentiment is so perfect!
ReplyDeleteincredible!!! i loved it!!!
ReplyDeleteI love altering books for journals. Your project turned out amamzing.
ReplyDeleteAmazing project!! Love all the texture you did on the cover. Thanks for sharing.
ReplyDeleteWOW!!! Beautiful!!!
ReplyDeleteWhat a beautiful project and I love the thought about playing and living. How true!
ReplyDeleteMaria V.
The texture added by the paste is completely worth the extra waiting time. I admire the clear commitment to the effect you were going for -- no shortcuts!
ReplyDeleteAbsolutely beautiful x
ReplyDeleteFabulous as always candy! I love her hair! What a punch that packs.
ReplyDeleteYour creativity is amazing. Thank you for sharing so much detail about your incredible project.
ReplyDeleteOnce again I am in awe of your stunning project! This journal is fabulous. That lady on the cover is gorgeous, and the texture ... AMAZING! Love, love, love this!
ReplyDeleteYour finished journal is at least 200% nicer than the before picture! :P Gorgeous altered art.
ReplyDeleteWhow love your book, the cover is fantastic.
ReplyDeleteChristina P.
this is soooo beautiful xxx the texture is great xxx
ReplyDeleteAmazing project! Wow! TFS
ReplyDeleteThank you once again for the beautiful instructions! You have inspired me to make my art journal and to get the face stamp and the Dyan R stencil with the leaves. I have been seeing the face stamp in many places and I love what you did with it!!
ReplyDeleteWow! What a stunning journal! Love your tutorial! Thanks for sharing your talents with us!
ReplyDeleteA very nice journal - you really made it beautiful.
ReplyDeleteYou have created a masterpiece! Love the hair, especially!
ReplyDeleteThis is amazing! I am in awe and at a loss for words at how stunning your book is! Thanks for sharing!
ReplyDeleteWhat a fabulous book and I love the dimension given with the hair. It's perfect!
ReplyDeleteWow! What an inspiration you are. Your book is beautiful
ReplyDeleteAnita J.
What a fantastic book! LOVE it!
ReplyDeletegorgeous. I too love the new Tim Holtz stamps.You have done a wonderful job. thanks for sharing
ReplyDeleteLove the dimension and texture.
ReplyDeleteStunning! Love the touches of gold!
ReplyDeleteDeanne :)
Oh my! That is sooo beautiful! I don't know that my handwriting would be good enough to be enter into that journal!
ReplyDeleteLovely journal!
ReplyDeleteDeniseB
Your altered journal is a work of art. The lady is so pretty.Thanks for sharing your wonderful talents with us.
ReplyDeleteWow - can't wait to try that myself!
ReplyDeleteWow, I love every detail of your journal. From colors to crinkled pages, just fabulous. Thank you!
ReplyDeleteSo different and so many mediums! Love the colors, too.
ReplyDeleteWow! Gorgeous journal! Lots of careful attention to details and it shows in the results of a stunning creation! Thanks for the step by step tutorial! I'm going to try this with products I have on hand.
ReplyDeleteI love all the color, texture and dimension you created on your journal!
ReplyDeleteI would love to win this!! I am sooo in love with everything that has been showcased!
ReplyDeletePatricia
the PaperTemptress
Your altered journal is fantastic!! I love the colors and all the textures you created! simply awesome! thnx for sharing!!
ReplyDeleteHi Candy,
ReplyDeleteI was so surprised to stop by your blog and see you are from Springfield, MO. I live in Clver, which is not to far from Springfield. Your work is amazing!! This book is spectacular.
Have a Blessed evening ~~ dawn
Amazing transformation. Great score with the books.
ReplyDeletenice journal cover
ReplyDeleteJust beautiful!
ReplyDeleteGod bless!
This is one amazing book I love it I have to make one of these soon :)
ReplyDeleteI love how you layered everything on this book. It came out so awesome! And the pages inside are so cool!
ReplyDeleteAMAZING project! Beyond gorgeous!
ReplyDeleteWow just beautiful!!!! I love it.
ReplyDeleteWOW; this is gorgeous. You put a lot of work into it and it shows. What a great treasure!
ReplyDeleteThis book is fabulous and so is that lady! Gorgeous texture and colors. I would be proud to journal in such a book.
ReplyDeleteThis is incredible!!!WOZERS Candy!!!
ReplyDeleteBee-Uuuu-teeee-ful!!! That's off the hook! Thanks for sharing!
ReplyDeleteOoooh I am sooo going to make one of these! Your altered journal book is absolutely stunning! Thanks for the inspiration!
ReplyDeleteSo creative, so wonderful. Thanks so much for walking us through how you did this. And how lucky are you to have such a wonderful daughter get you these books!
ReplyDeleteWhat a charming project! The coloring for the face is wonderful!
ReplyDeleteAll I can say is, "Wow!" What a masterpiece!
ReplyDeleteWOW and AMAZING--truly a work of art. Thanks so much for the play-by-play. Many of the technique ideas can be used in so many other things.
ReplyDeleteOh Candy, your journal is amazing. The woman is stunning. She looks like a beautiful woman who might be a loved one from the past and maybe we could read her journal.
ReplyDeleteOHHHH, how to save this page??? I want to do that! I have a journal just waiting for my time :0
DeleteOh my goodness!!! You are a creative genius! Love the modeling paste process, the stamping on tissue paper, and the dolls hair and other trimmings. Just brilliant!!
ReplyDeleteLove the altered journal! I learnt so much! Thanks for sharing!
ReplyDeleteWhat a neat project! So many textures and techniques, thanks for the detailed tutorial!
ReplyDeletewonderful project love all the textures and techniques
ReplyDeletewow that is a very impressive journal...thanks for the step by step pictures.
ReplyDeleteVery creative--I like the texture and the doll hair on the cover.
ReplyDeleteslrdowney at hotmail dot com
wow! super creative! the texture looks amazing!
ReplyDeleteWow, I have never sean anything like this! Amazing!!
ReplyDeleteSo stunning! Great instructions :-) Thanks so much for sharing your awesome creativity!
ReplyDeleteThis is soo cool!! Great project, and great sharing of techniques! What an amazing find by your daughter!
ReplyDeleteMy mind is racing, and fingers twitching....must go play!!
Thank you
Fab altered book, love all the texture!
ReplyDeleteYour journal is stunningly beautiful! Wow. Wow. Wow.
ReplyDeleteFantastic alteration of an old book for a new use
ReplyDeleteYour book is amazing! I too love great finds and altering them. I'm so glad you were given a stash of these books to wow us with in the future. Thanks for a chance to win also - love SSS.
ReplyDeleteHi Candy,
ReplyDeleteLady I was floored at the site of your fabulous journals. The female image is absolutely gorgeous! You are such an awesome artist.
Tons of Hugs, Dangina
I love how you really finished off the book by doing the inside cover as well as the pages. It really looks great. Thanks for sharing.
ReplyDeleteAbsolutely stunning! I appreciate reading all the details so much particular to get my questions answered after the first glimpse...how did she paint the lips and oh the eyes...and how about the hair done....OH thank you so much for sharing!! You should be so very excited about the entire piece!
ReplyDeleteOMG you completely blew me away! Seriously. I am leaving for work now, but when I come home tonight, I am going through your site like a mad woman!
ReplyDeleteWhat a great journal.. I love that saying on the inside cover.
ReplyDeleteLOVE your book, those torn edges is something I have to remember- Going to use that in future, that's for sure!
ReplyDeleteAs always, i love your designs, its out there… its totally unique… it simply stunning… great work of art
ReplyDeleteeveryone needs a journal, this is great
ReplyDeleteupnurse at aol dot com
This is a really gorgeous project. I love it and i would like to have a similar diary
ReplyDeleteAmazing creation! Thanks for the detailed step-by-step instructions.
ReplyDeleteGreat work. So much effort. Thanks.
ReplyDeleteWhat a wonderful project! I, too, keep a journal but not nearly as magnificent as this one! What a huge treat to get those old journals and be able to alter them! I was fascinated by all the steps - and enjoyed my coffee too! Thanks so much for sharing this beautiful project!
ReplyDeleteYour altered book is just beautiful, I loved the way that you used that stamp of the lady's face, and the hair and trim on top just finishes it off perfectly.
ReplyDeleteWOW Candy, this is a realy special project, I love the texture in the face and how you made her come out of the book with all the hair!! What an fantastic idea!!
ReplyDeleteLove from The Netherlands,
Leintje*
Wow, what a lot of wonderful and different skills you used while transforming this book. I'm impressed!
ReplyDeleteI love your book. It looks like you had a lot of fun making it. I love getting my hands dirty too, playing with lots of products. Thank you for the inspiration. It's a lovely project. Take care. :)
ReplyDeleteWOW, what a lovely lady!Amazing results. Thanks for the step x step, I really enjoyed seeing your process
ReplyDeleteSuch a beautiful journal and your instructions are wonderful! So detailed I want to begin today. Thanks so much for a great way to begin my day with 2 (HA) cups of coffee. Mary Werner
ReplyDeleteYou are an artist! Great work
ReplyDeleteAn amazing project!
ReplyDeleteThis is so beautiful! What a fantastic piece of art! You are very talented. I would love too be able to create this. Thank you for sharing.
ReplyDeleteFabulous!!! Love this one.
ReplyDeleteCandy, this an other beautiful project of yours! I love your tutorials! This one is no difference! Amazing how you added the texture and love that you gave her some hair! Stunning piece! Hugs, Sandra
ReplyDeletewhat a great journal!!!
ReplyDeletestamping sue
http://stampingsueinconnecticut.blogspot.com/
Candy,
ReplyDeleteAwesome altered book, great artwork. Thanks for sharing details.
Take care,
Lizzette
Simply stunning! I love all the texture. Can't wait to see what you do with the rest of the books!
ReplyDeleteYour book is absolutely AMAZING!!! Thanks so much for the step by step tutorial!
ReplyDeleteO-M-GEEE! How Exquisite! Fabulous! Smooches...
ReplyDeleteWow this is so gorgeous! What a lovely project with so many loving details. Inspiration at every turn!
ReplyDeleteThe cover of this journal is really fabulous. The stamp you used is just perfect. Just an awesome altered book.
ReplyDeletefabulous journal makeover...i love your creativity with this book...happy journaling...
ReplyDeleteWhat a super looking journal. Great colors, great design, great idea!
ReplyDeleteOMG your Journal is just amazing... I an Awwww stuck
ReplyDeleteOMG this is realey GEORGEOUS!!!!!
ReplyDeleteLove it how you bild it up!
Thanks for sharing!
Kind regrads Patricia
love your project and what a fun tutorial
ReplyDeletemarie-anne
sorry i ma so late , this is a stunning make as usual, love the textures and colours you have used!fab trace x
ReplyDeleteYour journal is beautiful. Iris
ReplyDeleteAwesome job on the face coloring - WOW!!
ReplyDeleteSuch a beautiful book! :)
ReplyDeleteAbsolutely LOVE altered "anything"!! This is fantastic, what great inspiration! TFS!
ReplyDeletelove the texture of your book!
ReplyDeleteAn amazing journal! So creative!!!!
ReplyDeleteAn amazing journal!!! So creative!!!!
ReplyDeleteHi Candy....................this is fabulous. Another very inspiring piece. I just love it and the colours are so beautiful.
ReplyDeleteI am quite enjoying the painting and stamping combo.
Just back from hols so hope to get back crafting soon.
TFS
Hugs Annie x
Love your altered journal, so unique.
ReplyDeleteI love your idea with the hair
wow! that is so creative! i would love to write in a journal like that!!
ReplyDeleteWow! Just WOW! ;-)
ReplyDeleteSuch a great project. I loved how you explained the steps and techniques. A stamp and a blank canvas to start turned into a beautiful piece of art. Thank you!!
ReplyDelete