Happy Monday and welcome to my blog! I hope y'all had a good weekend.
Our theme at Simon Says Stamp and Show this week is all about backgrounds ... creating them with a stamp ... or stamps, I suppose.
I had so much fun designing and creating this vintage photo album using several of my favorite new Tim Holtz products; the Picture Wheel die cut, the Torn Notebook/Cahier On The Edge die cut, Tim Holtz' new Elements Tissue Tape and his new Ideaology Cabinet Cards. I actually designed and put together this little album in the better part of a morning. So, it's not difficult to make and I think you'll get lots of ooohs and aaahs with this one! It would make a great gift; very personal, easy and inexpensive to make. And so much fun!
I created three different backgrounds using various stamps on this album. The front and back cover are multiple stamping from one striped stamp, creating my own striped background with the red I wanted to use. The flourish is another background behind the Picture Wheel and on the flip side of the flourish is random stamping done with an alphabet stamp to create yet another background.
I love this technique! How many times have you not been able to find just the right piece of cardstock for a project? Not problem...with some cardstock, stamps and ink colors, you can literally create your own unique backgrounds!


this very unique cover ... lots of fun details before you ever get to the photographs!
Here are the steps in creating this sturdy little vintage photo album.
Step 1:
Cut 2 - 5"x7" chipboard pieces. These will be your covers for your album
Cut 2 - 1"x7" chipboard pieces. These will be the side "spines" for your album.
Cut 2 - 1"x7" pieces of Tyvek to use as a stabilizer in between the chipboard spine and album cover
Cut 2 - 7 3/4" x 8 1/2" pieces of cream cardstock.
Cut 5 - 6 1/4" x 3" pieces of Black Bazzill cardstock and score all at 1 1/2" lengthwise.


Step 2: Put 1/4" Scor Tape down one lengthwise edge of the 5x7 chipboard and the 1" chipboard. Place the 5x7 and the 1" chipboard pieces 3/4" apart and attach the Tyvek, leaving the 3/4" gap. This gap will allow your album cover to freely open and close. *NOTE - be sure to determine a front and back cover before putting the Tyvek in place. You will want the seam showing the Tyvek to be on the interior of your album covers.
Step 3: Stamp Wendy Vecchi's stripe from her new Busy Making Art stamp set onto the cream cardstock using Vermillion Archival Ink. This is a little bit tricky as cardstock measures 7 3/4x8 1/2. The stamp is about a 4 7/8" square. So, I had to be careful to match up my image as best as I could with a ruler acting as my guide. I stamped the stripe starting at the bottom right corner of the cardstock. Then I reinked the stamp and lined it up with the ruler and also hoping that the stripes would match as I stamped the next set of stripes at the remaining top of the cardstock. Then I moved to the lower left side and repeated the process until all of the cardstock (for the front and back covers) was covered. (My camera messed up the finished picture of the stamped cardstock, so I have no picture to show you of this step...sorry!)


Step 4: Lay the cardstock, stamped side down and apply glue all over the chipboard. Be sure that the Tyvek gap is facing up and you can see it. Now center the chipboard onto the cardstock and press in place. I used a brayer to be sure the paper was flat and well adhered. Next, fold the cardstock up on all sides, making it easier to adhere the cardstock onto the exposed chipboard. First, lift up the corners of the cardstock and glue them, pointing the point of the cardstock towards the opposite corner. Use a bone folder to make nice crisp creases in the folded cardstock. Do this for all corners on both covers. Next apply 1/4" Scor Tape at the outside edge and the inside next to the fold on all of the cardstock flaps that will be folded over the chipboard. Then, one side at a time, remove the Scor Tape backing and fold the cardstock flaps in place. Use a bone folder to make crisp edges.
Step 5: Distress the exterior and interior edges of the covers first with Vintage Photo then Gathered Twigs followed by a touch of Black Soot at the edges of the covers. Then set the covers to the side as you create your album front cover.


Camera issue again...I didn't get a picture of the large Fabulous Flourish stamped onto this side.
But, you can see it in the final pictures.
Step 6: Using a piece of heavier cream cardstock or tagboard, cut a piece 5 7/8x 7. Line up Tim Holtz' Distress Doily in the center of the cardstock and die cut the doily on the lengthwise edge. On the remaining cardstock sides next to the doily, use Martha Stewart's Arch Lattice Edge Punch and finish those edges. Score at 7/8 lengthwide on the opposite side from where you did the die cut edge. Distress both sides of the cardstock first with Vintage Photo then Gathered Twigs and a touch of Black Soot at the edges. Do Tim Holtz' Spritz and Flick method to further mottle the cardstock. Turn under the 7/8" strip as that will later be used to adhere this cardstock flap to the cover of the album. Create another background by using Tim Holtz' larger flourish stamp from his Fabulous Flourishes stamp set using Jet Black Archival Ink. Then take a piece of Tim Holtz' new black Elements Tissue Tape and run it lengthwise along the folded edge of the cardstock.


Step 7: Create a Picture Wheel...actually create TWO Picture Wheels. Die cut Picture Wheels from cream cardstock. Distress them using the same Distress Inks in the same sequence as you have done on the cover and the cardstock flap. Using the Vintage Photo Distress Marker's brush end, color all of the interior windows and outside edge of the Photo Wheels. Use Tim's Spritz and Flick method to further mottle the Picture Wheels. Complete the one for the outside cover first....
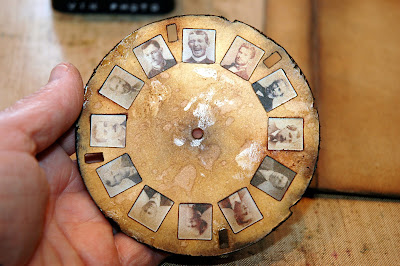

I even smeared a bit of glue and heat set it onto this Picture Wheel. Then I added more ink over the top of the glue, to give it an even more worn look. Obviously this picture was taken before I added the
compass stamp to the center.
Size miniature vintage photographs to fit in a 1/2 x 5/8 rectangle. Cut them out and glue them to the backside of the Picture Wheel. Use the compass from Tim Holtz' Air Travel Stamp set and center it on the center of the Picture Wheel. Using Jet Black Archival Ink, stamp the compass onto the center of the Picture Wheel. Use a Tonic Paper Distresser and rough up the edges of the Picture Wheel. Edge the Picture Wheel with a Black Cats Eye Ink Pad. Lay the Picture Wheel on top of the Distress Doily and puncture a hole in the cardstock flap where you will place the wheel. Place a large metal brad through the center of the Picture Wheel and leave a little space between the fastener and the Picture Wheel when bending out the brad prongs. This way, the Picture Wheel can spin on the front cover. (I would advise removing the Picture Wheel from the front of the flap while you stamp and finish the back side of the flap).


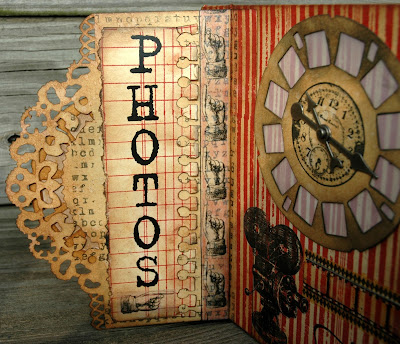
Step 8: Randomly stamp small alphabet letters on the back side of the flap using Jet Black Archival Ink. Run a piece of Tim Holtz' Tissue Tape with the pointing hand up the inside of the flap, along the folded edge. Using Tim's Detailer Water Brush, color the tape around the hand with Fired Brick Distress Ink. Cut a piece of cream cardstock 6 1/2" x 3". Die cut one lengthwise end of the cardstock using Tim Holtz' new Notebook/Cahier On The Edge die cut. Distress the cardstock as you did the flap. Using the same technique for stamping the Vermillion stripes on the covers of the album, stamp the ledger lines from Wendy Vecchi's Fun with Art stamp set onto the entire piece of cardstock. Tear off the other edge of the cardstock, leaving approximately a 2" strip. I used some old Making Memories Rub On Letters to spell "PHOTOS" running down the flap. Then at the bottom, I attached one more tissue tape hand. Distress the torn edges of the strip with a Black Cats Eye ink pad and use a Vintage Photo Distress Marker to color all of the edges of the Cahier side of the strip. Put the Picture Wheel from the front cover back in place. Apply two long strips of 1/4" Scor Tape to the backside of the "PHOTOS" cardstock strip and press it in place, hiding the prongs of the brad underneath. Stamp the same red stripes as on the cover onto the strip of cardstock that you have folded. Distress it to match the cover. Apply 1/4" Scor Tape underneath the folded edge and then press the cardstock "tab" in place on top of the cover to create the Picture Wheel flap on the cover.


This one, I chose not to distress as much as the first one.
Step 9: The second Picture Wheel and the outside cover underneath the flap. Cut a piece of vellum just smaller than the Picture Wheel. Using a Black Soot Distress Marker, color all of the interior lines of the cut out rectangles and the outside edge of the Picture Wheel. Apply glue to the underside of the Picture Wheel and attach the vellum in place. Next, using Jet Black Archival Ink, center and stamp the clock from Tim Holtz' Elements of Tim stamp set onto the center of the Picture Wheel. To get a perfect centering of the clock, ink up the stamp and then place it stamp side up on a table. Center the hole for the clock with the hole of the Picture Wheel and lay the Picture Wheel on top of the stamp. Be sure not to move the cardstock to smear the stamp. Just lightly press down on the Picture Wheel and then lift up. Your clock will be perfectly centered! Then attach a large and medium silver Game Spinners with a Long Fastener through the hole and bend the prongs back. Use a few pieces of 1/4" Scor Tape and place the Picture Wheel in the upper right side of the cover so that it peeks out from under the Distressed Doily flap when it is closed. Then I added an old movie projector image from Kaisercraft's Timeless/Theater Rub Ons. I stamped "FAMILY" in the lower right corner and it fits perfecty when the Distress Doily flap is closed. I also added a piece of Tim Holtz' Filmstrip Ribbon with Glossy Accents and ran the harlequin Tissue Tape from Tim Holtz' Elements Tissue Tape collection on either side of the Filmstrip Ribbon. (*Be sure to use enough of the Filmstrip Ribbon on the backside of the cover to catch underneath the paper that will be added shortly.)
Step 10: Cut two pieces of patterned cardstock 6 1/2x5 3/4 to use to cover the inside of your album covers. Apply glue to the backside of the paper, center it on the chipboard cover (covering the Tyvek joint) and glue in place. Now measure in 1 1/2" from the ends of chipboard side spine of the front cover. Mark that spot with a pencil, being sure to center it on the spine. Using the larger hole punch of a CropADile, punch a hole at both ends. (This will be where you thread the ribbon that holds the album together. Put the front spine on top of the back spine and mark the holes. Punch out with a hole punch.

Step 11: Age the five cabinet cards that come in the package. I simply sprayed mine first with a Honey Stain Spray and then followed up with a Glossy Wood Tone Stain Spray to darken and also leave the "age spots" that you see on the cabinet cards. (Pictures slide in and out from the top of the cards). Spray both sides. I love these!! The fronts have various shapes for photographs and the backsides already have those wonderful vintage images of photography studios. Very cool!


Step 12: Edge the five black Bazzill card inserts with a Gold Paint Dabber around the front and sides, not on the folded edge. The place a piece of 1/4" Scor Tape on either long edge of the paper and one strip of tape in the center, next to the fold. Lay the front side of a cabinet card edge half way or about 1/8" on the tape. Then simply fold the paper in half so that it sticks to itself at the fold line and also catches the backside of the cabinet card with about 1/8" of the black paper covering the back edge of the cabinet card. Repeat this for all five cards.
Step 13: Take the first black card insert and center it (outside edge to outside edge) with the top spine of the album. Mark the holes and punch them. Do this for all five card inserts, measuring them from the album front-to be sure that all of the holes are being marked from that pattern.
Step 14: Cut a piece of black ribbon about 3/4 of a yard long. Thread one end of the album together, starting at the back and working to the front. Now repeat for the other side of the album. Tie a double knot in the ribbon centered on the front of the spine of the cover. Then tie a bow and leave some tails or ribbon. On this album, I actually tied a second bow over the first bow with another piece of black ribbon and left tails from it as well.

Closeup of of the Picture Wheel attached to the Distress Doily flap on the cover of the album.

Closeup of the interior of the Distressed Doily Flap.

Closeup of the cover of the album, hidden behind the Distress Doily flap.

Inside cabinet cards, attached with the black Bazzill card inserts.
I actually made my album in the better part of a morning. These would make neat little gifts for people! The cabinet cards aren't that expensive and they are so darn cute! I love their vintage images on the back sides. And, as you can see, the rest of the items I used to create this little album, you could do from scraps you have laying around.
Stop by Simon Says Stamp and Show's blog to see the beautiful backgrounds that my Design Teammates have waiting for you. Then create your own background using a stamp or stamps and submit your piece to our challenge.
You could be the lucky random winner of our generous sponsor's
You could be the lucky random winner of our generous sponsor's
$50.00 weekly prize drawing. And, if your project is voted one of the TOP THREE, you will receive special recognition of that! So, what are you waiting for? Let those creative juices start flowing and let's see what cha got!
Here are the products available at Simon Says Stamp used
in creating this vintage album:

in creating this vintage album:
 |  |  |  |  |
 |  |  |  |  |
 |  |  |  |  |
 |  |  |  |  |
 |  |  |  |  |
wow I love the vintage feel, this is a wonderful make, just full of vintage yumminess! love it hugs trace x
ReplyDeletethanks for your lovely comments..x
Another beauty!
ReplyDeleteWhat an amazing project, Candy! You are so clever!
ReplyDeleteLucy x
loving your album Candy, so many great things to look at. Have a great week, hugs Annette x
ReplyDeleteCAndy! I'm here!!!!!This is truly a piece of art! It is fantastic, I love all the details, the wheel picture is one of my favorite dies! You are amazing! BArbarayaya
ReplyDeleteSooooo BRILLIANT, Candy!
ReplyDeleteI adore your selfmade backgrounds!!! Love your choice of colours and textures and all the awesome layering and distressing!!!!
Whoever gets this is in for a treat!!! WOW!!!
Hugs,
Claudia x
The front of this album is so awesome and then you open it up and see the beautiful pages inside. Wow! Beautiful inside and out!
ReplyDeleteLove ,love this Candy and yes it would make a beautiful gift .Thanks for sharing and I'm going to add it to my fav. things to make list LOL
ReplyDeleteWhat a great idea to use the cabinet cards to make an album. Love this Candy! Gorgeous picture wheels and love how you paired them with the doily on the edge die. Great colours too!
ReplyDeleteWow, this album looks great.
ReplyDeleteI love the vintage style and this picture wheel die stands on top of my wish list.I like the way you used it here.
Have a nice and sunny week.
Spring finally has found its way to northern Germany and we made a change from winter coat to t-shirt in just three days. ;-)
Hope the sunny weather will stay for a while.
Anke x
Hi Candy, you have inspired me to pull out my picture wheel die and start using it. Your picture wheel looks fabulous, I love the vintage feel and those fabulous photographs set behind. Those red stripes really do add a pop of colour too and are a wonderful backdrop for your vintage pieces. Love how you stamped a clock in the middle of the picture wheel too before adding the game spinners. The distressed doily flap looks fabulous and really adds to the vintage feel of this piece. The vintage camera is the perfect stamped image to this creation too. Enjoy your week my friend. Tracy x x
ReplyDeleteThis is such a wonderful creative project! I love it!!!
ReplyDeletePerfect! I love it!!!!!
ReplyDeleteI am in awe! If you created this album in the better part of ONE morning...I'm doing something wrong! I love it!
ReplyDeleteOh, Candy, it's fabulous! Thanks for the tute. Love how the compass fits so perfectly on the picture wheel!
ReplyDeleteAnother stunner Candy! Just love the creativity in this! Fabulouso!
ReplyDeleteThis is beyond fabulous Candy! Wow! Love the wonderful details and thank you for sharing the "how to"! I just purchased the picture wheel too!
ReplyDeleteWishes
Debbie
This is fabulous Candy...your projects are so darn cool, and your explanations seem like anyone can do them. Great job!! Thanks.
ReplyDeleteWow o wow! Candy, this is really amazing! Love your album so much! That picture wheel is so stunning with the little pictures in it, and love the flourish background stamp! Fabulous! Hugs, Sandra
ReplyDeleteWhat a cool retro & artsy album! I love the way you compiled this!! Fabulous!
ReplyDelete*mwah*
Steph
Simon Says Stamp!
Love, love, love this piece....One of the best I have seen. Thank you for sharing...
ReplyDeleteSo perfect! Live your vintage photo album and the use of Tim's new stuff. Love your work and interpretation.
ReplyDeleteCandy, This is fantastic. I love all of the details you put into this ... the tiny alphabet letters, the finish on the cabinet cards, the lattice punch finishing out the "on the edge" doily die cut. Just an amazingly creative project. Love it!! -- Mary Elizabeth
ReplyDeleteCandy, This is fantastic. I love all of the details you put into this ... the tiny alphabet letters, the finish on the cabinet cards, the lattice punch finishing out the "on the edge" doily die cut. Just an amazingly creative project. Love it!! -- Mary Elizabeth
ReplyDeleteCandy, this is fantastic. I love all of the details you put into this album ... the tiny alphabet stamps, the lattice punch that finished out the "on the edge" doily die cut, the finish on the cabinet inserts ... and I could go on and on. Such an amazingly creative project. Love it!! -- Mary Elizabeth
ReplyDeleteIt's beautiful
ReplyDeleteTotally Fabuliys Candy. Love the way you have pieced this all together and the backgrounds are wonderful.
ReplyDeleteBrilliant project
Crafty hugs
Annie x
This is amazing!!! Oh and I have both dies...now I am inspired to pull them out! Hope you have a happy week!
ReplyDeleteOnce more one of your wonderful projects! I love the on the edges dies, too - they are so versatile! Also the new picture wheel die is so cool! Thanks a lot for your detailed tutorial,
ReplyDeletebest wishes, serafeena
Fantastic album Candy ! Love how you've used the doily die and the step by step instructions are amazing ! Sue C x
ReplyDeletereally cool project!!! love all the dimension!
ReplyDeleteCandy - This is so great!! Thanks for sharing it with us. Love your work.
ReplyDeleteCandy - This is so great!! Thanks for sharing it with us. Love your work.
ReplyDeleteWow, Candy - the vintage look on this is beyond wonderful... such fabulous layers built up through the pages with the doily, and the picture wheel - it's just brilliant! With the candy stripe paper and the picture wheel, it reminds me of some Victorian What the Butler Saw peepshow machine at an amusement arcade on a run down pier at some beach resort... it's so full of atmosphere. Are you getting that I love it?!
ReplyDeleteAlison xx
Your vintage album is simply fabulous, Candy, and your distressing is outstanding. The way you mounted the cabinet frames was brilliant too. By the way, I'm glad I took your advice regarding the purchase of the picture wheel die cut. The possibilities to use it are truly endless. Blessings!
ReplyDeleteLoved his work, I love the things of Tim, but your combination, color and stamps, is fabulous.
ReplyDelete(Amei seu trabalho, adoro as coisas do Tim, mas a sua combinação, cor e carimbos, está fabulosa.)
love the detail
ReplyDeleteOh my goodness, this is gorgeous. My favourite part is the stamping of that Tim Holtz Flourish ont he cover - it looks so OLD and elegant. The photo wheel is such a great idea for the cover too. My goodness, do you know I am old enough to remember cine film?? That projector stamp just reminded me lol! Hope you are well. So sorry to hear all the sad news coming out of the US this past week and I pray you are all safe and well. Maddy x
ReplyDeleteHello,
ReplyDeleteIt is such an amazing project-and one of the reasons why I decided to buy the Tim Holtz distressed Doly Die. Now I am so disappointed. I tried so many different cards and papers and not one material was cut properly by the die. I tried baking parchment between die and card/paper. It helped a bit - but no way I could say, it was properly cut.
Do you have anysuggestions?
Thanks for your help,
Nessie
Hi Nessie. I am shocked that you are having trouble with the Distressed Doily die cut. This truly is the first I've heard of this. I have cut everything from cardstock to a very thin still cheesecloth type of fabric and it's always worked fine. If you bought it a local store, I would suggest taking it back to them and having them try cutting something with it. Maybe you have a defective die cut. Sizzix is a wonderful company and, although I am not affiliated with Sizzix, I can't imagine that they would not replace it if it's defective. Sorry that you've had trouble with yours. It really is a very cool die cut. Keep me posted... <3 Candy
DeleteLiebe Candy,
ReplyDeleteich bin ganz überwältigt von der Schönheit dieses gestalteten Albums. Sie bringen so viele wunderbare Ideen ein, auch die Tags sind wunderschön. Ein ganz großes Kompliment!
Liebe Grüße,
Bärbel
Candy, I have been looking around for a project to make for my family & friends Christmas In July party I have every year...(us crafy folks get together & I teach them to make something they can give as a gift)...I found it the minute that I saw your item on Pintrest!!! Bonus-I have all but 2 items so I can make something really similar. One item I didn't have was that aaaaawesome projector...and buying rub on's is out of the question...so I did a search and was able to find a stamp just like that...for anyone who wants one, there are 3 more sets left...if you sign up for her free VIP list you get a code for 20% off...cost me $6 shipped...
ReplyDeletehttp://www.etsy.com/transaction/129253215?utm_source=transaction&utm_medium=trans_email&utm_campaign=purchase_buyer
Hope this helps another "wanna craft like you follower".
Freda
WOW!!! What a lovely album. So glad I found your blog. Thanks for sharing. Karen.x
ReplyDelete