Hello everyone and welcome to my blog!
I was so excited to recently be invited as a guest designer for
Steampunk is such a fun genre and their blog is a wonderful creative outlet for those of us who love Steampunk!
I was asked to create something for this challenge using matchboxes. Here is what I came up with ...
This dresser consists of 8 small matchboxes with Tim Holtz Ring Fasteners used as drawers pulls. Want to know how I made this?
Well ... grab a cuppa and I'll share how I did it.

1. Begin with however many matchboxes you want to use. I this case, I used 8.

2. Tape or glue the matchboxes directly on top of each other. If gluing, you might want to put a rubber band around them to secure them until the glue dries. I also created a center piece measuring 2" x 2 1/8" out of chipboard (to go between the matchbox drawers) and covered in the front with a piece of embossed metal foil sheet that has an antiqued finish. (Your chipboard piece may measure slightly differently, so be sure to measure you stacked matchboxes before cutting this center piece. When ready, glue or tape the stacked matchboxes to the center piece.

3. Measure the outside dimensions of the stacked matchboxes. In this case, the outside pieces measured 2" x 2 1/8". Cut 4 chipboard panels: one for either side, the bottom and the top. (The back piece will be different).

4. Brush Matte Multi Medium onto each piece of chipboard (outsides only) and cover with white tissue paper, purposely making texture out of bunching up parts of the tissue on the chipboard. Brush Matte Multi Medium over the tissue paper to seal it as well.

5. Arrange your embellishments on top of the chipboard and glue in place using Matte Multi Medium. Brush over the pieces with the multi medium as well. Heat set or air dry.

6. On my piece, I painted over all of the sides with white Gesso first and then with Black Acrylic Paint. I really think that just painting with the Black Acrylic paint would have been sufficient.

7. To create the back piece, I cut a piece of chipboard taller than the top of the dresser would be because I wanted to add a "backsplash" onto it. At the top, I used Tim Holtz' Ornate On The Edge die cut to create a decorative top. I used the remaining piece from this die cut on the bottom of the front of the dresser. I added some Melissa Frances Pearls to it to look like "rivets". (Check it out on the picture of the finished dresser.) Then I brushed Matte Multi Medium onto the top of the back and added small metal gears.

This is the outside of the back of the dresser. Brush with Matte Multi Medium and then place pieces onto the back. Brush over them with the Multi Medium again. Heat set or air dry.

8. Paint over the surface with Gesso and/or Black Acrylic Paint. Again, I painted it with Gesso first, let it dry and then covered it with the black paint. But, I think just painting the black paint would have been sufficient since I was going with a black base of color on this dresser. Light bulb just went off! You could use Claudine Hellmuth's Black Gesso on this, too! That would work in place of the white gesso and then the black paint! Just thought of that! ... Duh!

9. The top of the dresser ... I simply added some Tim Holtz Ball Chain to the edges using Matte Multi Medium as the glue and then brushed over the chain again to seal it.

Here is the same dresser top after all of the layers of paint have been added. What a difference! See what texture you get from the tissue paper? And the added ball chain doesn't even look like a ball chain anymore. Very cool! .... Back to the "how to".

Here are all of the side pieces painted with the Black Acrylic Paint.

10. Dry brush whatever color of metallic paint you like over the black acrylic paint. In this case, I used silver paint as my first coat and LIGHTLY dry brushed over everything. This takes a little time to do but the results are well worth it! Once dry, I used my finger and added little swipes of gold paint to add even more of a metallic feeling.

11. You could stop with step 10. But, I like to add subtle hints of "patina". So, in this case, I very lightly used my finger and some paint from a Juniper Paint Dabber and lightly brushed over high areas of some of the objects embedded on the chipboard.
~ Making the Drawers ~

12. LIGHTLY paint or stain or ink the interior walls and the exterior of all of the drawers with whatever color fits your project. (If you gunk up the exteriors of your drawers with too much paint, they will be too thick to close, so VERY LIGHTLY add your exterior color of paint or stain or ink). I used black. Measure the interior of the drawers and line them with paper. Before gluing the paper in place, you might want to add stamped images and distress the paper and edges. All of these are stamped in Jet Black Archival Ink and are from Tim Holtz' Tiny Things stamp set. They are the perfect size for these drawers.

13. I added Tim Holtz' Ring Fasteners as drawer pulls. They are like a brad in that they have two prongs that are on the backside of the fastener. I simply made a hole in the center of each drawer with a Tonic Craft Pick and slipped the prongs through the hole and opened them up on the inside of the drawer to hold them in place.
And here are pictures of the finished piece ... After gluing everything together, I added some Gold Paint Dabber (using my finger) around any edge that might show the chipboard or just to finish off any edges nicer.

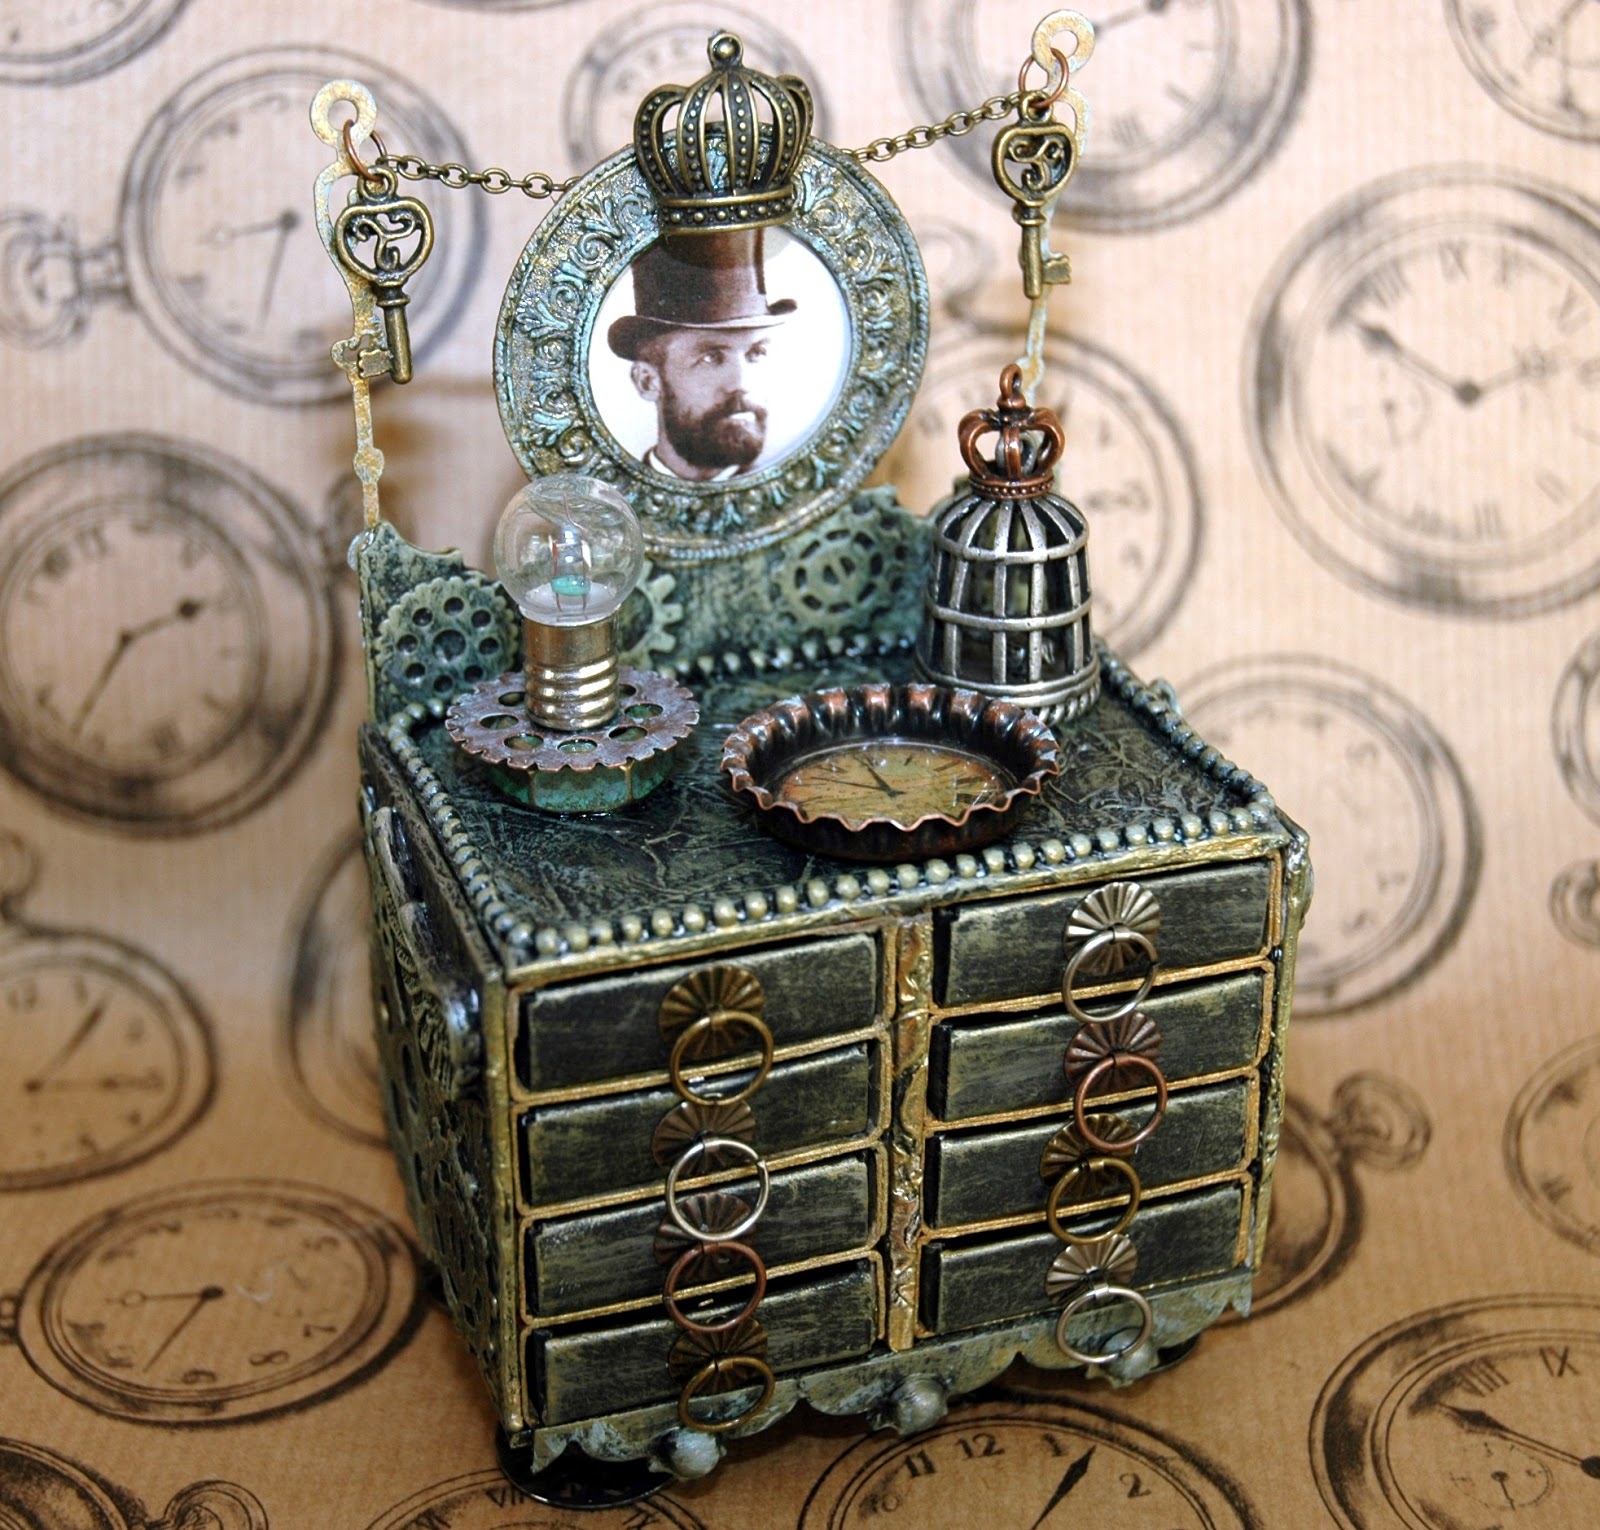
The finished piece.

The Steampunk Dresser back. I used sewing machine bobbins for the feet of the dresser. They were finished the same way as the dresser.

The dresser top closeup. I made a "mirror" out of little metal frame that was bright silver. I finished it in the same way as the dresser. I added the vintage photo of the gentleman in the top hat, added chipboard back covered in book text and the copper metal piece over it. (see the photo above). I then glued the mirror to the backsplash using hot glue. I glued a small metallic crown to the center of the mirror. I used two clock hands on either side of the dresser and strung some chain across the dresser for more decoration. Using two small jump rings, I added a key to each side. All of these things that needed to be glued into place was done with hot glue.

On the dresser top you will find a small bird cage with a small crown glued on top, a "lantern" made from a small nut, a gear placed on top of it and a small lightbulb stacked on top of it. In the front is a copper bottle cap with a clock face image in the center covered by a cabochon that is glued in place and magnifying the clockface image.

The left side of the Steampunk Dresser.

The right side of the Steampunk Dresser.

The drawers actually work. They are the last thing to be added to the dresser when it is finished. They might be a tight fit; depending on how much color you added to their exteriors and how tight you glued together your dresser body. So, be aware of that when you are constructing your dresser.
So there you have it ... my matchbox challenge guest designer piece for
Thank you ladies for asking me to be a guest designer for you!
and ... thank YOU for stopping by my blog!
I hope that you like my little Steampunk style matchbox dresser and this tutorial has been an inspiration to you.
and ... thank YOU for stopping by my blog!
I hope that you like my little Steampunk style matchbox dresser and this tutorial has been an inspiration to you.
Join in on the fun at the Steampunk Challenge and share your steampunk style!
Here are all of the items that I used in creating this piece that are available at
Simon Says Stamp:


What a cool thing to make out of match boxes! Beautiful work, Candy.
ReplyDeleteWay, Way, Way, WAY, COOL!
ReplyDelete~Linda
I LOVE your dresser, Candy!
ReplyDeleteIt is such a brilliant and adorable piece of altered art! Thank you for the wonderful Stepxstep too - I really enjoyed reading it and seeing this project come to life.
Thank you so much once again for being our fabulous guest designer for this month's matchbox challenge!!!
Big hug,
Claudia x
Fabulous piece! Your step by step is great. I so love your work.
ReplyDeleteOMG, Candy I am speechless!!! This piece is unbelievable, you are amazing!!! So often when I visit your blog I think, oh wow, this is my favourite piece, and then the next time I think it again.... Well this is definitely one of these occasions again, my mouth hangs on the floor, - and to think it all started just with some matchboxes....
ReplyDeleteWOW, WOW and WOW! Gorgeous! My mouth just hit the floor and now I have a rug burn!
ReplyDeleteI don't do steampunk but this is so cool! Love all the detailed instructions...helps inspire me to follow them but using different colors to suit whatever project I might be making.
ReplyDeleteReally!?!?!?! This piece is insanely gorgeous and creative ... honestly unbelievable! Love how you put the matchboxes together to make this dresser. And all those incredibly intricate details ... from inside the drawers to the spool "legs". The tissue paper texture is inspired. Genius!! The "guilding" on the front with the embossed foil really sets off the drawers. Not enough words in my vocabulary to tell you how amazing this piece is. Definitely inspired. I must try steampunk soon!! Thanks for sharing this with us Candy!!! -- Mary Elizabeth
ReplyDeleteYeah! This is SO cool, and so cool that you are the guest designer for Sandee and die amelie! LOVE the details on this, awesome!
ReplyDeleteThis is so PERFECT...stunning alteration with amazing details..
ReplyDeleteOne of the best alterations I've ever seen so far Candy.
Big compliments for this masterpiece and thanks for sharing with us!
Wowww....I'm so impressed!
kind regards, Alie :-)
Stunning! i've only one word: stunning! This project is fantastic, this tuorial is fantastic! Candy you're really an artist! Hugs BArbarayaya
ReplyDeleteThanks so much for the tutorial and all the step out photos.
ReplyDeleteI absolutely, positively love, Love, LOVE your matchbox dresser! Wonderful construction, great details -- just wonderful!
Fantastic!
ReplyDeleteOMG!!! Such a candy eye!! The back,the front,the cap, the little drawers ,along with the handle! Magnifico, Candy!
ReplyDeleteWell I think you know by now that I think your work is fantastic, innovative and just downright clever but I think even you have gone to another level with this masterpiece Candy! It is superb, your finishing is wonderful and I just love all the elements on the top of the dresser - fabulous creation! Hugs, Anne x
ReplyDeleteYou never fail to surprise us! You are such a great inspiration. Love your altered victorian, steampunk matchbox dresser. Creations like this really make my day. You are my artistic marvel (:o)
ReplyDeleteOfcourse you would come up with something beyond fabulous! Congratulations on being Guest designer! There is so much attention to detail here, everything works together so phenomenally brilliant! I bet it took you ages! Loved every bit of it!
ReplyDeleteOh my giddy aunt! This is so creative and imaginative and detailed....I'm just blown away. I love the finish you created. When I first saw it I thought it was metal. And you even lined the drawers!!!! Genius.
ReplyDeletecandy you have done it again! This is amazing!! Amazing! Your eye for design and the detail on this absolutely yummy make , wow LOVE IT !! hugs trace x
ReplyDeleteOh, good grief, Candy! Be still my beating heart... this is beyond brilliant. Every single detail is a sheer delight, from the stamp-lined drawers, to the metallic finishes, the bottle-cap clock, the tiny birdcage. I agree with Anne, this is on another plane of creativity. Utterly fabulous!
ReplyDeleteAlison x
Hi from St. Louis... I love your work of art. The details are just beautiful!!! Thanks for sharing how you created it.
ReplyDeleteThis is really incredible, Candy! I'm at a loss for words. Very, very cool!
ReplyDeletetotally amazing work!
ReplyDeleteWhat an incredibly inventive design Candy, such an original and unique work of art that is full of inspiration. I love it.
ReplyDeleteHugs Brenda xox
Oh my god ... what a precious dresser! Can't get tired of looking at this delightful work! You turn the most simple things into artwork ... bottlecaps and matchboxes ... and those most lovely ring fasteners! I didn't know this stuff at all. Absolutely gorgeous - as always :)
ReplyDeletebest wishes, serafeena
Most amazing design ever!!! I am so pinning!
ReplyDeleteI was making a dresser (inspired by TalkingHorsesArts.blogspot.com (during a craft night 2 months ago)) then I saw yours!! Hope you don't mind I'm going to scraplift ... guess it's alteredlift :) the edging .. instead of ballchain, using flat back pearls ... such a gorgeous idea :) thank you!!
ReplyDeleteLisa
PutTheGlueDown.blogspot.com
mooi hoor ziet er goed uit
ReplyDeletegroetjes rien van martha :)
lol
zier er goed uit :) groetjes Rien van Martha lol
ReplyDeleteThis drawer is absolutely fantastic. I am amazed at all its elements. A work of art. Got to pin this one!
ReplyDeleteI've just stumbled across this and I am stunned! It's just incredible and I absolutely love it. :)
ReplyDeleteSkvělé! ...
ReplyDelete