Showing posts with label Dylusions Sprays. Show all posts

Sunday, June 30, 2013

ANYTHING GOES ~ DIMENSIONAL NOSTALGIC PAPER MACHE BOOK

Happy Monday everybody!  

This week at Simon Says Stamp and Show it's "Anything Goes".  So, join us by creating anything your heart desires and post it to our blog challenge.  You could be the lucky winner of our random $50.00 credit voucher!  And ... you and your unique work of art could be featured in our new feature at Simon Says Stamp and Show.... "Simon's Spotlight!"

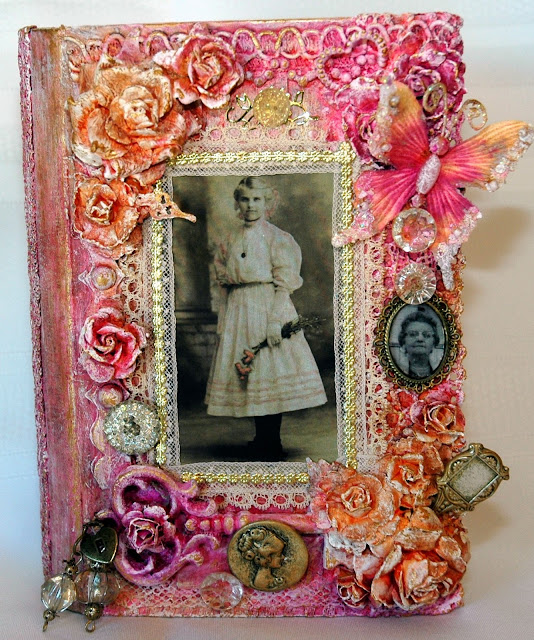
I was digging through some family photos the other day and came across a lovely portrait of my paternal grandmother when she was a young girl.  (The smaller picture in the metal frame is also of my grandmother in her later years).  Her name was Maeme, pronounced "Mame-E".  Her parents immigrated to the United States from Sweden in the late 1800s.  Unfortunately she passed when I was only about 5 years old but I do remember several things about this dear lady.  When I saw her portrait, I was inspired to create something with a vintage feminine quality to showcase what a lovely girl she was.


I transformed a plain paper mache book into this nostalgic and feminine piece that will sit atop a lovely antique dresser. 


I first scanned and printed out the portait onto some semi-gloss photo paper.  I then added the bits of pink to give the photo that old colorized effect.  To do this, I swiped some Tattered Rose Distress Ink onto my Non Stick Craft Sheet, picked up a bit of the color on my Inkssentials Craft Nibs and then added the pink to the rose buds, the bow in her hair, and the detailed folds in the skirt of her dress.  Then I lightly tapped all over the portrait with Antique Linen Distress Ink and an ink applicator.  That not only set the color but gave it an even more vintage appearance.  

Next I prepared the book by completely covering the book with a coat of Claudine Hellmuth's White Gesso because I wanted to seal the somewhat porous finish of the paper mache and also to create a white base coat to apply my colors onto.

When dry, I began layering all of my different textures from vintage laces that I had but being very careful to leave a space for my portrait.  I added a strip Tim Holtz' Brackets On The Edge die cut that I cut from Plain Grungeboard and stacked to the left side of where my portrait would go, some Melissa Frances Pearls that I glued on top of the Brackets Die cut, a large metal key underneath the portrait, a white Mariposa Prima Butterfly and different sizes of Prima Roses in various places.


(Note:  The colors of the flowers, laces, butterflies, etc. makes absolutely no difference because you are going to cover everything with White Gesso.  So, it is more important to be more concerned with the TEXTURE of an item rather than the color.) Then I needed to let that dry.  Next, I brushed over all of the elements with the White Gesso and let that dry; both by air and also my Heat It Craft Tool.  The key is that you need to be sure that everything is completely dry before going to the next step.  

When I was happy with all of my texture and the design of my cover, I randomly sprayed the book (inside and out) with Bubblegum Pink and Squeezed Orange Dylusions Ink Sprays. Again, I had to let them completely dry.  Then I went back and dry brushed the White Gesso over all of the laces, flowers, edges of the die cut, any place that I wanted to highlight and bring out the texture.  


Then, to add even more interest, I used some paint from a Gold Paint Dabber and gently swiped it (with my middle finger) over the high areas of the roses, some of the lace areas and some of the edges of the book.  


I then added the lace frame to my photograph using 1/4" Scor Tape and then placed the photograph in the center of the book. I added the delicate gold dresden trim to really bring out the gold highlights of the gold paint.  Finally, I hot glued some glass buttons and other little metal objects onto the cover after I was finished adding all of the spray color and White Gesso dry brushed high lights.


Here is a picture of a simple piece of lace that I added to the binding of the book.  It's amazing how much just one piece of very textured lace can add!


A book needs pages!  So, I created these old and tattered looking pages using Wendy Vecchi's White Embossing Paste.  I heavily added the paste using a brush and also a palette knife.  Once it was dry, I painted the pages with an off white acrylic paint.  When that was dry, I added a wash of brown using Adirondak Espresso Paint mixed with water.  I also lightly washed the binding, back and interior of the book.  


Finally, I added an interior cover from some left over Glitz pages that I had to finish off the book.  I added some little gold Dresden like corners and a lacy flower at the center top of the page to dress it up just a bit.

So, that is my "Anything Goes" home decor piece.  Stop by the challenge blog to see all of the wonderful creations that the Design Team has for you.  Then enter our challenge.  


Not only do we have the $50.00 credit voucher give away,  but YOU and your creation could be featured in our brand new feature ...

 
Simon's Spotlight!  Now THAT is exciting!

Here are all of the products available at Simon Says Stamp that were used in creating this vintage book:


Sunday, February 10, 2013

LET'S GET MESSY!!!

It's Monday and time for a new Simon Says Stamp and Show Challenge.   
This week the theme is"Let's get messy"!

As I've shared with you before, this is so far out of my realm of a comfort zone, it's not even funny.  I don't know what it is; perhaps the fear of the unknown or the fear of feeling stupid when an art piece isn't working out like I want it to.  Do you experience that?  Doesn't that sometimes frustrate you?  I mean, you see other people making beautiful art that you really want to try but SOMETHING is holding you back.

Well, this year, I've vowed to face that fear head on.  What's the worst thing that can happen?  You absolutely hate it, start over and no on is the wiser.  Hmm...not such a bad thing, right?  

I jumped into the Dylusions Ink Spray waters head first with this piece.  I didn't hate it, I didn't start over.  I just kept spraying, stamping, stenciling and before I knew it, I had a pretty self expressive piece of art journaling on an 8x8 canvas.


For a first attempt at something like this, I must admit I am satisfied.  My friend, Ellen Vargo does amazing art journals.  While at CHA, she shared a couple of them with me and Ellen, I have to give a shout out to YOU because you are the inspiration behind this piece.

This canvas is all about layers: Dylusions Ink Sprays, Perfect Pearls Mists, Stamps, Archival Ink, Paint, Embossing Paste, and paper.  And it definitely qualities as a "messy" project.  But it is also SO MUCH FUN TO DO! I can't tell you the fun I had experimenting and just free flow letting it all hang out.

  
I began with an 8x8 canvas.  I used Wendy Vecchi's Studio 490 Embossing Paste to create the textured edge and top from Dylusions' Chequered Dots stencil.  First I did it in white, but later I redid it in Black Embossing Paste.  You could actually skip the step in the white but I honestly didn't know where this piece was going when I started it.  And, the extra layer of white embossing paste gives more depth to the chequered dots. (Be sure to immediately wash your stencil after using paint or embossing paste with it!)


Next I lightly spritzed the canvas with water and then randomly sprayed Vibrant Turquoise, Lemon Zest and Bubblegum Pink Dylusions Sprays.  I heat set and repeat the spraying until I achieved the brightness I wanted.  Here you can see how the textured shows but it is much more interesting and provides great contrast when I covered it again in the black embossing paste.


Here are the chequered dots in the black.  I also scraped some embossing paste along some of the edges of the canvas.  The stylish lady was from a magazine.  I loved her black and white outfit.  It is perfect with my textured edge. I knew that I wanted her to be in this corner of the canvas but that is all I knew at this point.


Next layer is some "ghosting" techniques that Dyan Reaveley teaches. I simply laid her Letter Jumble Stencili down on the canvas and lightly sprayed a portion of the stencil with Sunflower Sparkle Perfect Pearls Mist.  Then I lifted the stencil, turned it over and pressed it a couple of times onto the canvas, leaving those blotchy areas of gold spray.  You can either air dry or heat set the Perfect Pearls spray.  I heat set it and here is the result.  Love it!


I used Jet Black Archival Ink to do some random stamping of the squiggles from Dyan Reaveley's Background Love stamp set.  Aren't they fun?  


Next, I added some polka dots from Dyan Reaveley's Basic Backgrounds stamp.  These were done with Picket Fence Paint Dabber.  I also dipped the edge of the clear plastic cap of a Dylusion Spray bottle into the paint and formed the circles on the canvas. (Immediately wash your stamp after stamping with paint so that it doesn't dry on your stamp!)

Keeping in mind how I was going to situate my lady, I added this border from Dyan's Around The Edge stamp set.  I added the white dashes for more contrast.  Right now, it sort of looks like it's floating but when I put the lady in place, it all makes sense. Then I lightly sprayed Workable Fixative to seal the canvas before adding the lady with the Matte Multi Medium.  (Since most of the products I used on this canvas are water based, I needed to seal them to prevent any blurring or diluting of the colors before adding the multi medium.)


Here again is the finished canvas.  See what I mean about the stamped border in the center of the canvas?  Her foot rests on the line and it blends right into the canvas.  The words are my own and I generated them on my computer, cut them out and edged them with a permanent black Sharpie marker.


Here you get a closer view of the layers on this canvas: the embossing paste, the ink sprays, the ghosted perfect pearls mist, the archival ink stamping, the paint stamping and the lady and sentiment; which of course, are paper.


New from Tim Holtz this season are more Blue Print Stamps. This wheel comes from his Mini Blueprints 4 set.  I love it!   I stamped the wheel onto Ranger's Specialty Stamping Paper with Jet Black Archival Ink and heat set it.  Then I colored it in using Broken China, Worn Lipstick, Scattered Straw and Black Soot Distress Markers.  I cut it out, mounted it onto a piece of chipboard and inked the edges in black.  In the center, I added a Game Spinner with a Long Fastener and the spinner will spin.  I mounted it (and the lady) in place using Matte Multi Medium.

If you're overwhelmed at the thought of making a mess like this on a canvas, start small; an ATC card or a #8 manila tag.  Just play and create backgrounds first.  Then the rest will follow.  Have fun with this!  It really is so much fun to just MAKE A MESS!

Then enter your piece in our weekly challenge at Simon Says Stamp and Show.  You could be our lucky random winner of a ...


$50.00 credit voucher.  You could also be named as one of the TOP THREE works of art for the week.  That is quite a nice honor as well.

Have fun and good luck! I can't wait to see your creations!

Here are the products available at Simon Says Stamp that were used in this canvas: