Hello again and welcome back to my blog! This week, Simon Says Stamp and Show's challenge is especially for girls! But hey guys, you can enter the challenge, too! Just get in touch with your feminine side and create something girly!
I had an unfinished four drawer wooden chest that measures 11" tall x 7 1/4" wide x 5 1/2" deep that I loved but didn't know what to do with it...until I saw Pink Paislee's London Market Collection! As soon as I saw them, I knew that the Pink Paislee's London Market papers, Collage Sheets and Ephemera pack were destined to create the shabby chic look on my poor little plain wooden chest.

So, I removed the cheapy little black metal handles, sanded down all of the box and gave it a base coat of Vintage Lace Paper Artsy Fresco Paint. When dry, I added some Gathered Twig Distress Ink to distress the edges and the little wooden knobs that would later become "feet" for my chest.

Next was the task of choosing between all of the beautiful designs and images of those gorgeous papers to cover my chest. Here is the chest front with the four drawers and one of the sides with the papers glued in place and distressed around the edged using the Gathered Twig. I also added some Spun Sugar, Tattered Rose and Vintage Photo Distress Inks to the papers to further distress and pull the colors from the papers.

Here is the back of the chest, covered in the Fresco Paint and London Market paper.

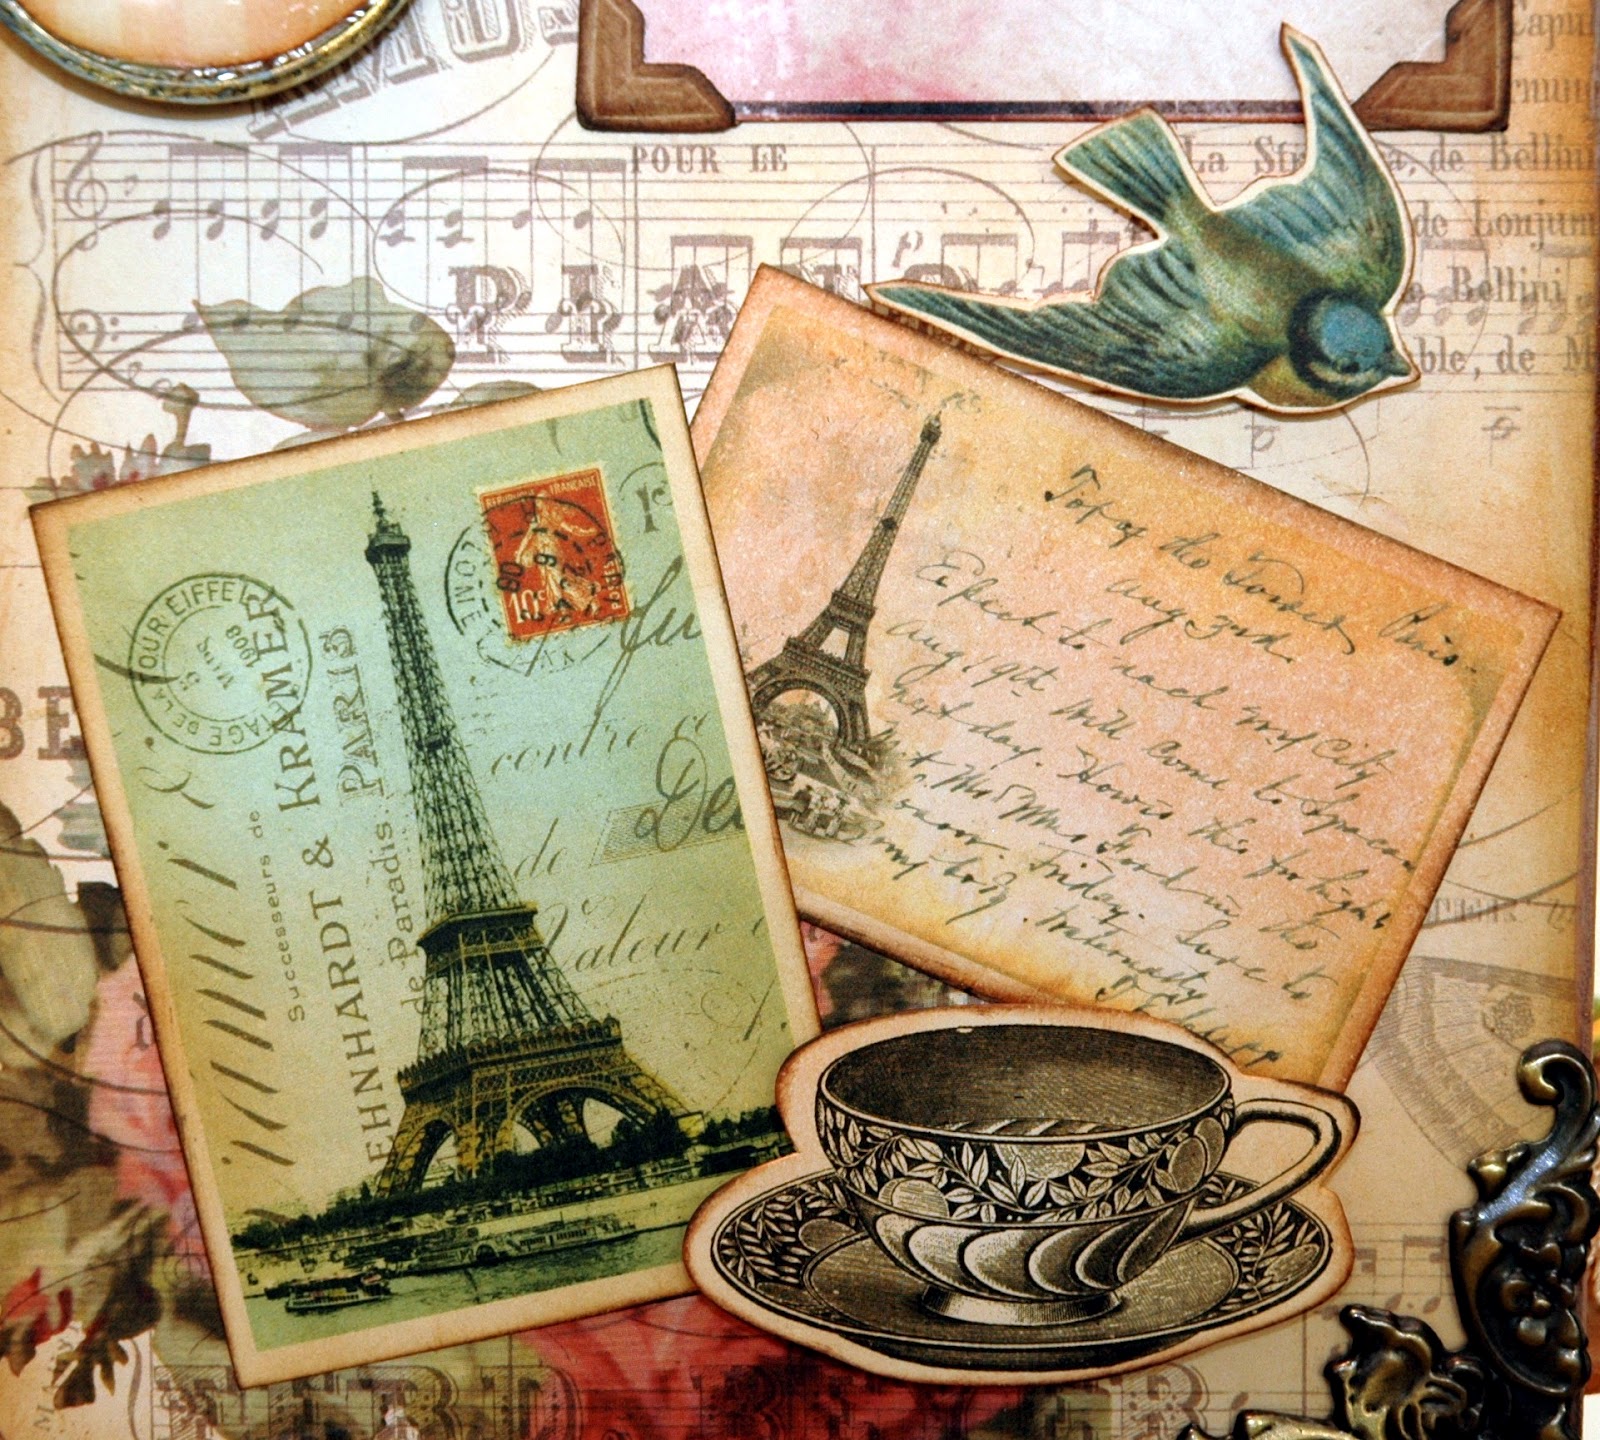
Aging paper is fun! This is a comparison of one of the wonderful collage sheets that come in the London Market Collage Sheet package. The sheet on the left is the sheet after I aged it through the use of Vintage Photo, Gathered Twig, Spun Sugar, Tattered Rose and Black Soot Distress Inks. I inked the paper to add color and depth using Tim Holtz' "walk on" method of adding the ink. Then I used his "spritz and flick" technique from his Compendium of Curiosities~Volume II. This added the random spots on the paper. I also tore and bent up some of the edges and applied the Black Soot Distress Ink to those edges. I then lightly added a little Heirloom Gold Perfect Pearls Powder to give a subtle sparkle to the collage sheet. Then I added another stamped bird cage image to this paper courtesy of the wonder Kaisercraft Bird Cage stamp. Do you not LOVE that stamp?! This piece of paper was now ready to add to the side of my chest.

Here is a closeup of the collage sheet on the side of my chest. I also added a London Market Button with a little flower glued on to it, a little metal bird cage hanging from a metal crown hot glued on to an Shabby Accoutrement Button. The butterfly is one of the butterflies in the Ephemera pack. I distressed it with the above mentioned distress ink colors and added the Heirloom Gold Perfect Pearls. The butterfly's body is a Pen Nib that has been colored using a Gold Paint Dabber to alter the silver metal and a Juniper Paint Dabber to patina the finish. I added a little wire for the antenna and glued it into place using Glossy Accents.

Below the collage sheet, I stamped this sentiment and birds onto another of the pieces from the Ephemera pack. I colored the birds using Tumbled Glass and Spun Sugar Distress Inks swiped onto a craft sheet. I picked up the color with a Small Sakura Water Brush and colored in the birds.

I also added another Ephemera butterfly with a Word Key as a body and two 7 Gypsies Antique Brass Corners to two opposite corners on this side.

Here is a picture of the entire side of the chest.

The opposite side of the chest features a 7 Gypsies Optical Lens Charm that has a Tim Holtz crown from his Mini Ornates stamp set. The charm is dangling from a 7 Gypsies Antique Brass Hook that is covered with a shabby bow (white seam tape colored with Tattered Rose and Spun Sugar Distress Ink & lightly spritzed with Perfect Pearls Sunflower Sparkle Mist). The Ferris Wheel Post Card is from Glitz Afternoon Muse Epmehera Pack. I distressed and added the photo corners to this and some other ephemera on the chest.
More beautiful ephemera is found at the bottom of this side...distressed with Vintage Photo, Spun Sugar and edged with Gathered Twig.

Here is a picture of the right side of the chest.
The back of the chest is probably my favorite! I love all of the detail!

"Fairy Whispers" is from a paper layers pack I had left over from Glitz Afternoon Muse. I think it is so precious. I have added a Tim Holtz crown from Regal Adornments that has been altered with a Gold Paint Dabber. I have also added more colored seam tape and little flowers; some sprayed with Vanilla Breeze and Vintage Pink Glimmer Mist Sprays. Holding the ribbon and tulle on the right is a Tim Holtz bird from his Adornments Ideaology. It, too, has been altered with Gold and Juniper Paint Dabbers. The other side of the ribbon is being held with two buttons; one from Shabby Accoutrements, the other from Fanciful Buttons and an attached Tim Holtz Bauble.

The bottom detail includes some London Market Buttons, Tim Holtz Vials filled with "fairy dust" also know as glitter (smile), more little flowers and some antique laces. In the corners of "Fairy Whispers" are some smaller 7 Gypsies Antique Brass Corners.

Here is the finished view of the back.

The top of the chest features more ephemera, a stamped bird colored in Distress Inks and a water brush: Tumbled Glass and Scattered Straw. The Time Piece sits atop an Ornate Plate and another metal embellishment; all altered with a Gold and Juniper Paint Dabber.

The front of the chest is embellished with more ephemera and buttons from the London Market collection. The drawer pulls are crystal knobs from Tim Holtz' Curio Knobs. "LOVE" and "DREAM" are from Tim Holtz' Stuff To Say stamp set.

Here is a closeup of two of the drawers.

The drawers are also lined with London Market paper and they are deep enough to store laces, trinkets, etc.

I even found some little metal tins at a local craft store that fit perfectly inside a drawer. I plan on putting little charms in them.
So...there is my girly, shabby chic piece and I love it! Think PINK and let's see what you can come up with for this challenge...something for the girls! Then post your project to our blog at Simon Says Stamp and Show. While you're there...check out all of the ideas our very talented Design Team has waiting for you!
You could be the lucky winner of our sponsor's $50.00 credit voucher!

You could also receive special recognition for being one of our TOP THREE entries for the week!
Good luck and I can't wait to see what you create!