Happy New Year Everybody!
Let me take this opportunity to thank everyone who has followed my blog and also my contributions to Simon Says Stamp and Show. I really appreciate all of your support and wonderful comments that you leave. They inspire me and encourage me. My wish for you is that your life will be so richly blessed in 2012.
And now...for the first challenge of 2012...
Simon Says Show "Something Old ... Something New..."
Simon Says Show "Something Old ... Something New..."
When I saw that, the first thing I thought of was a wedding. You know...Something old, Something new, Something borrowed, Something blue. One of my passions is taking something brand new and making it look really old. So, my challenge piece this week mimics one of those ornate pages from an old photo album and I made a vintage frame out of it.
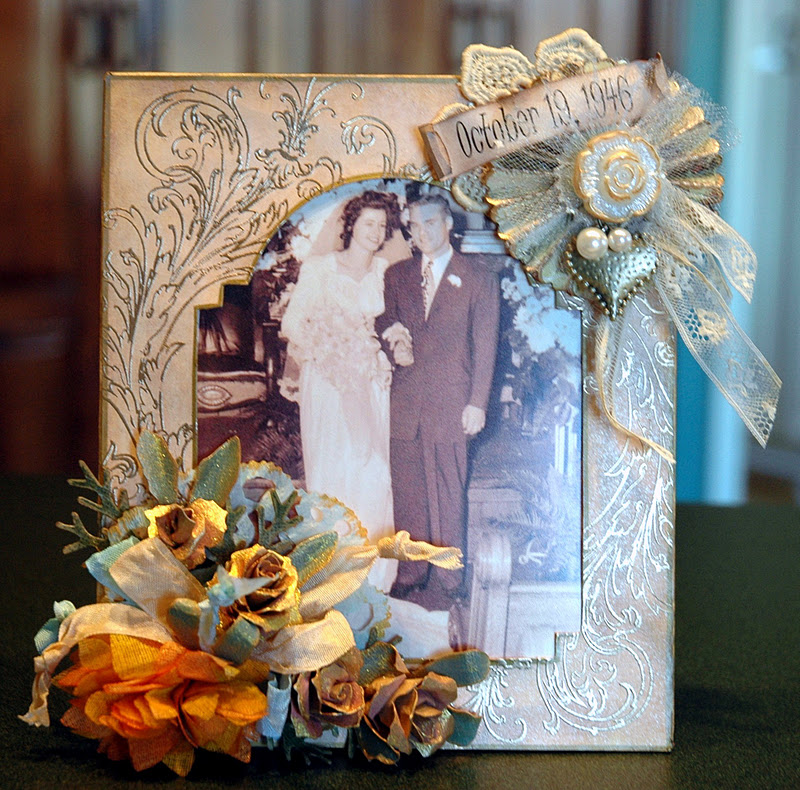
I started with a piece of Ranger's Manila Cardstock and cut it into a 6" x 7" piece. In the center of that, I die cut Tim Holtz' Vintage Cabinet Card (to create my opening). I then cut a back for my frame out of chipboard and another piece of Manila Cardstock 7" x 8".

I cut the manila cardstock an inch larger so that I could cover the chipboard and leave a 1/2" border all the way around. That would allow me to make nice covered edges and miter the corners.

I cut the manila cardstock an inch larger so that I could cover the chipboard and leave a 1/2" border all the way around. That would allow me to make nice covered edges and miter the corners.


Next I distressed the Manila Cardstock with a mixture of Brushed Corduroy, Wild Honey and Picket Fence Distress Stains. Then I lightly distressed the edges with Brushed Corduroy Distress Ink. When the was dry, I lightly misted the front and back of the frame with Pearl Perfect Pearls Mist. I love the sheen that the pearl mist gives. It's subtle but really amazing! Next I used a Gold Metallic Pen and edged the Vintage Cabinet Card cut out and the outside edge of the picture frame. Finally, to add the intricate design work to the frame, I used the larger flourish from Tim Holtz' Fabulous Flourishes stamp set and Ranger's Queen's Gold Embossing Powder.

Before I began embellishing the picture frame, I needed to add a backing. The perfect solution for this is Tim Holtz' Small Easel Die Cut. I cut it out of chipboard and colorized it using Brushed Corduroy Distress Stain. Then I hot glued it onto the back of my frame.
I attached the frame front to the back using 1/2" Wonder Tape on the sides and the bottom. I left the top open so I could slide pictures in and out of the frame.

Let the embelllishing begin!! I began by cutting three vintage pink Tattered Pine Cones from Tim Holtz' Kraft Core Nostalgic Paper Stack. Instead of pine cones, I made little sweetheart roses. I also cut greenery from the Tattered Pine Cone die cut. I also used the mum looking flower from Tim Holtz' Tattered Flowers die cut. I used two different greens from the Nostalgic Paper Stack on the greenery.

Behind the roses is something blue. This is made from Tim Holtz' Distressed Doily On The Edge die cut. I cut the doily out of white crepe paper that I then sprayed with my own concoction of Tumbled Glass Distress Ink Refill, Biscotti Perfect Pearls and Water in a Mini Mister. I used that color combination on the doily and also on the "vintage" ribbon you see mixed in with the roses.
I also cut a mum Tattered Flower out of white crinoline and sprayed three layers with my concoction of Dried Marigold Reinker, Sunflower Sparkle Perfect Pearls and water. I also tipped the distressed doily with that orange-ish color and accented some of the greenery by dragging them through the color spray. The other three layers of the mum are sprayed with my concoction of Mustard Seed Reinker, Sunflower Sparkle Perfect Pearls and water. I alternated the layers of color on the mum and distressed some of the edges with Brushed Corduroy Distress Ink. I smushed the mum up and glued it on to the lower left corner of the frame. Then I added the blue "vintage ribbon" and also a ribbon sprayed with Sunflower Sparkle Perfect Pearls Mist. I created a double bow and stuck them in place above the mum and among the sweetheart roses. I also sprayed the roses with a touch of the Dried Marigold color spray to highlight their delicate edges. Then I glued all of the roses in place.

I added an old piece of lace in the upper right hand corner with a Rosette partially resting on top of it. I highlighted the edges of the Rosette by heat embossing them with Queen's Gold Embossing Powder. Layered on top of the Rosette is a gathered piece of blue tulle. On top of the tulle is an adornment made out of a Tim Holtz' Accoutrements Fanciful Button (highlighted by a Gold Paint Dabber), Tim Holtz' Baubles and Tim Holtz' Heart Charm from his Adornments Ideaology. The heart is distressed with a Gold Paint Dabber. All of those elements are put together with Tim Holtz' Jump Rings. I added a little more vintage lace, reminiscent of a bridal bouquet and a date of October 19, 1946 on a little banner at the top.
OH...and that beautiful bride and groom that is in the center of my frame...that is my parents on their wedding day.
Now it is YOUR turn to create "Something Old...Something New". Stop by Simon Says Stamp and Show to see all of the absolutely beautiful ideas my Design Team buddies have created for you this week. Then enter your piece in our weekly challenge. If you are the lucky winner of our random drawing, you will be awarded a fabulous

If your work is voted as one of the top three, you will receive that special recognition on our blog and you will also receive a TOP THREE BLINKIE to proudly display on your blog.
Here's to a creative 2012!!! I can't wait to see your entries!!
Just too spectacular for words! As soon as I saw the theme I immediately thought weddings as well. Now I wonder what I'll do??????? Best put my thinking cap on.
ReplyDeleteGorgeous frame. Love the flourish! You made this entire project look beautifully vintage.
ReplyDeleteOh what a gorgeous piece of art just beautiful . So much detail had to go back several times to take it all in
ReplyDeleteHappy New Year .
Marilyn
What a beautiful way to display such a precious photograph. I love how you have used the vintage cabinet card die as the central shape it works fabulously. Love the touch of subtle sparkle too and the flowers are stunning as is the rosette with the touches of gold and I love the subtle touch of blue too. A wonderful keepsake. Happy New Year. Tracy x
ReplyDeleteCandy, this is gorgeous!!! The colors are wonderful, the flourish stamped on the frame is perfect, the group of flowers is fabulous and the rosette, etc at the top right is awesome!!!!
ReplyDeleteAnd I forgot to say what a nice picture of your parents!!!! And looks perfect in the frame!!!!
ReplyDeleteJust Stunning!! What a beatiful way to hold the memory............ perfect xx
ReplyDeleteHey there Candy thank you for sharing your special project with the wonderfull picture of your loved ones....I really love the embossed swirlies on the frame and the flowers are absolutely georgous. Thank you for the tutorial I have to remember that how to make the fabby and beautifull flowers. The rosetta is georgous....with the little gold touch on it.....wow....a very special project and that you just have to give a really special place, I know it has a special place in your heart. A really beautifull memory to keep. Huge Hugs Terry xxxx
ReplyDeleteP.s. thank you so much sweetie for your loving comment on my blog. I really appreciate it a lot. xxxxx
You exceptionally creative, I love what you've done. Is the photo your parents? You are too young for it to be you.
ReplyDeleteWowza! I've been trying to get back over here since I spied a glimpse of this on Monday @ SSSS. Your project is so wonderful, especially how it is honoring your own parents. All your flowers have blown me away on this one, Candy!
ReplyDeleteWow what a touching and gorgeous creation, Candy! I love this fab photo of your parents...this will make a great memento and I love the flowers you used to frame it :)
ReplyDelete*mwah*
Steph
Simon Says Stamp!
This is just gorgeous! OMG! You really did an awesome job on this!
ReplyDelete