Hello again my blogging friends!
Do you ever go shopping and see something that really sparks your imagination? That happened to me recently when I was at a big craft store. I saw an adorable little children's book with all sorts of cuts and shapes and windows. That totally fascinated me and immediately my creative juices started flowing as to what that little book COULD be....with a little help from some of my wonderful DecoArt products.
So, I bought it (actually SEVERAL of them .... for A DOLLAR each (regular price for them), brought them home and went to work!
Sorry for the length of this blog post but there is A LOT of information to cover ... so grab a cuppa something and sit a spell. I'd love to share some inspiration with you. Thanks for spending a part of your day with me!
Here is a picture of the original book and then the beginnings of my version of the altered children's book. There is a detailed pictorial tutorial of how I transformed the book from its original to here book on DecoArt's Mixed Media Blog. Notice the "CHIPPED PAINT EFFECT" on the front of the book?
Here is another picture of just the altered book, also showing the back of the book. This "chipped paint" effect is an Andy Skinner technique. I am totally amazed at how Andy can manipulate acrylic paint and other mediums to create the illusions of all sorts of weathered, vintage, chipped surfaces. I call him "The Master of Manipulation" and I mean that in the most complimentary way possible! If you click on the DecoArt Mixed Media Blog link above, you will be taken to my tutorial and see how to create this effect.
Since this was originally a children's book, I was inspired to leave it a book about children ... vintage children. So after finding all sorts of adorable photographs of vintage children in my files and files of images, I narrowed them down to the few that you will see within the pages of my magical little castle book below.
We will turn the pages together and discover the magic of manipulation with DecoArt paints and products, a little imagination, lots of rub ons, stamps, laces, little metal embellishments, butterflies and little positive and powerful encouragements throughout. I hope you will enjoy this little book as much as I loved creating it.
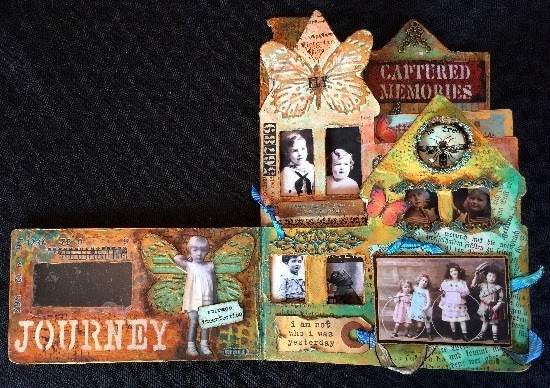
Here is my finished altered children's book. Notice all of the little children peeking through the windows purposely cut out of the original book? I LOVE all of the color, the various shapes, the textures and the smile that comes each time I hold this book. I can almost hear the children's laughter and feel that innocence again that was "childhood".
On the front cover of the book, I have added a Tim Holtz Alpha Parts "REMEMBER". I love these little black plastic dimensional wonders! They can really make a statement. Here, I combined DecoArt Metallic Gold and Silver Media Acrylic paint and using my finger, I kept tapping and rubbing the surface of "REMEMBER" until I got the weathered look I was going for. When that was dry, I added touches (with my finger) of DecoArt Blue Green Light and Titan Buff Media Acrylic paints to simulate a patina look.
I have to warn you now, I am somewhat of a "finger painter" when I work on mixed media projects. So I will often use my fingers instead of a brush when there is not a lot of detail work involved. I'm not sure if that is because I just love getting my hands painty of if it's because I get a better feeling for the piece through actually touching it with my hands as much as possible, instead of relying on a brush. Actually, I think it's a combination of both! (smile)
Let's move on to the inside pages of the book ...
I love all that is going on here.
To begin ...
I painted a couple of strips of white heavyweight cardstock with DecoArt's Media Crackle Paint and let it dry. Once dry, I painted over the crackle finish with DecoArt's Cobalt Teal Hue and Vermillion Media Acrylic paint. These colors are a beautiful vivid color! But since this is a vintage book, I wanted to tone down the color just a bit. So ...
I brushed over the surface with "the magic potion" DecoArt's Quinacridone Gold Media Acrylic paint. I cannot tell you how much I LOVE THIS STUFF! Everytime I use it, it's like heaven's gate opening up and a choir of angels singing. I seriously think I may have an addiction going here! (smile)
Notice how the crackle really pops with the addition of the Quinacridone Gold? And the way the Quinacridone Gold mutes the vivid teal and gives it more of a warm, greenish-brown cast is just magic. And the "feel" of the product on the paper....just amazing!
I used these strips of paper to die cut and emboss Tim Holtz' butterfly wings from Butterfly Duo set. You will see one of the wings used below.
In the tutorial on DecoArt's Mixed Media blog, you will know that I originally covered the surface with patterned cardstock. Over that, I added a light was of Quinacridone Gold and water mix. I stenciled "JOURNEY" using Andy Skinner's Industrial Elements stencil with DecoArt's Titan Buff Media Acrylic paint.
On either side, I added random images from Andy Skinner's Shedded Stencil using first first with DecoArt's Burnt Umber and then Blue Green Light Media Acrylic paints. (Be sure you immediately wash your stencils after using paint to get them clean.)
Next I added gold highlights to the raised areas of the butterfly wings and around the window opening and randomly around the edges of the page for a more dramatic effect.
I glued the vintage image of the sweet little girl onto the butterfly wings and glued her in place on the page.
Next I added a piece from a Mica Sheet over the window opening and glued it in place using Glossy Accents because it dries clear.
I used remnants of the teal crackled paper I used to create the butterfly wings to create little encouragement signs that would be displayed throughout the book. This sweet little butterfly girl is holding on of Tim Holtz' favorite expressions "embrace imperfection". I glued it in place using Glossy Accents.
Finally I used random pieces of remnant rub ons from Tim Holtz to fill in little areas that might need something.
Moving on to the next page ... notice that the children on all of the pages are positioned so that when the book is closed, they are peering through the window openings.
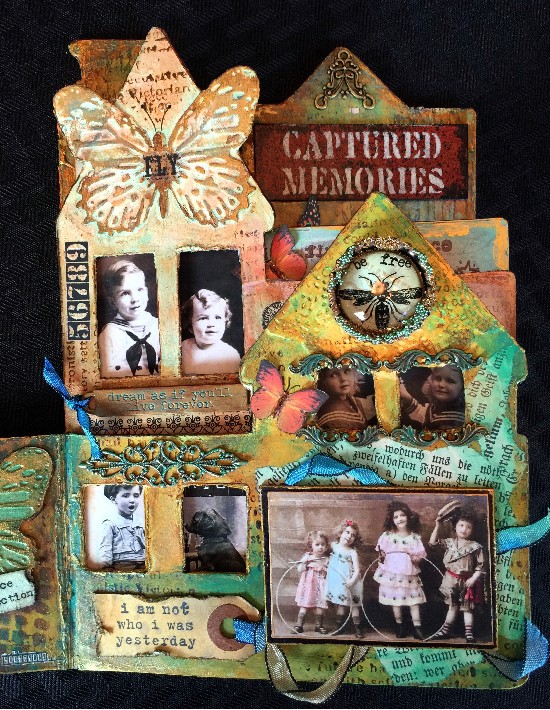
I began the final steps on this page by adding book text from a German book I bought at a flea market while visiting Rothenburg last summer. This was added using DecoArt Matte Medium first to glue the text on and then brushed over it to seal it. Using a baby wipe, I lightly added some DecoArt Blue Green Light Media Acrylic paint to the page and heat set it. I added the little metallic embellishments that had also been given a touch of the Blue Green Light acrylic paint for a patina look.
I added gold highlights using my finger and DecoArt's Media Metallic Gold acrylic paint to the edges of the vintage photograph and the black chipboard piece that I mounted under the photograph, around the window openings and randomly around the perimeter of the page.
I glued the little metal embellishments in place using Matte Medium brushed onto the surface of the book and then over the metal pieces to seal them in place. Let dry or gently heat set to dry.
I positioned the vintage photograph so that the little girls would be peeking out of the window when the book was completely closed. Before I glued them in place, I added the tag with a Unity Stamp sentiment from their Empowered Words set. I glued it in place and glued the colorful ribbon flowing from the tag behind where my vintage photograph would be placed. Then I glued the photograph in place. The chipboard mounting gave the photograph a bit more dimension.
In the roof top section at the top of this page, I had added a portion of a Tim Holtz embossed doily and it along with the page had been colored with various colors of DecoArt Acrylic Media paint. (see DecoArt's Mixed Media blog) I used one of Tim's bee images from his Remnant Rub Ons sets and added the words "be free" from more of Tim's Remnant Rub ons. After gluing a cabachon in place over the top of the bee (using Glossy Accents), I let it dry. When dry, I added the vintage German glass glitter and teal micro beads with Glossy Accents. When dry, I glued the bottle cap in place using Glossy Accents.
Little butterflies are seen throughout the book. Then are images I had on my computer, sized to fit various locations in the book or to be used as wings behind some of my sweet little children images. I glued them in place using Glossy Accents on just the body portion (so that the wings could be lifted and given more dimension). I added a little Glossy Accents to the tops of the body and later penned in antenna using a black permanent pen.
Turning the page we see the next spread ...
Again, you can read about all of the background tutorial work on DecoArt's Mixed Media Blog.
After I had done all of the background work, I added various rub ons from Tim Holtz as well as others that I had in my stash. When was happy with my background, I brushed over all of it with a light coat of DecoArt's Ultra Matte Varnish. This provides a beautiful transparent seal and the feel of the page is a professional finish.
Here is a closer picture of this page with the sweet little butterfly baby and the encouraging sentiment. These butterfly wings are more of Tim's Butterfly Duo. I painted in the indented areas of the embossed wings with DecoArt's Blue Green Light and then washed the crackled wings with a Burnt Umber wash.
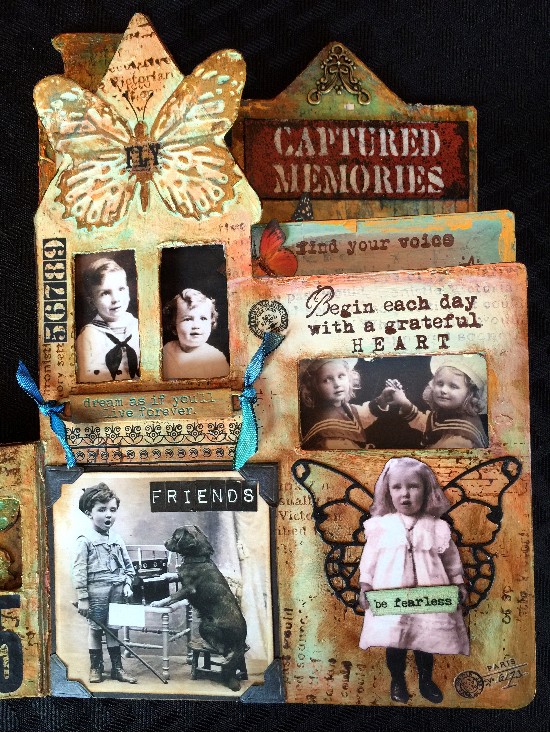
This next page only has two images of children blued onto it but it looks like four because of the children peeking through the windows! Again, I added more rub ons to the page, stamped a Unity Stamp sentiment. "FRIENDS" are some of Tim Holtz' Label Letters. I love the vintage feeling they add to the photograph of the boy and his dog. That photograph is mounted on black cardstock and black photo corners were added. The sweet little girl is holding a "be fearless" sentiment; more of Tim's Remnant Rubons. The lacy wings are a Memory Box die cut out of black cardstock. The embossed butterfly at the top is one of Tim's Butterfly Duo that was added to this page at the very beginning of the transformation using heavy white cardstock and Matte Medium to glue it in place and seal it. It is colorized with the background colors of washed DecoArt Titan Buff Media Acrylic paint, antiqued with DecoArt Burnt Umber and Metallic Gold Media Acrylic paint around the cut openings and edges of the page and the embossed butterfly. I also added some Renaissance Guilding Wax to the raised areas of the butterfly and finally a "FLY" Remnant Rubon to the center of the body. Finally I added a Tim Holtz Word Band underneath the double window. I added colorful ribbons to either side.

The Word Bands are an antique silver color. I wanted to alter that to an antique bronze-ish color. So I simply mixed DecoArt's Media Burnt Umber and Metallic Gold Acrylic paint to create a nice antique bronze color. I used my finger to add the paint to the band and heat set it. I kept working the paint onto the band until I achieved the look I was going for. Then I wiped DecoArt's Blue Green Light Media Acrylic paint over the entire surface of the band and wiped away everything but the paint that had seeped into the letters. You can see the result in the photograph above ... the word band with the letters subtly highlighted in color.
Turning to the next page spread ...
On these two interior pages, I mixed some DecoArt Titan Buff and Cobalt Teal Hue Media Acrylic paints and using a baby wipe, I randomly swiped the color on the pages. Then I added DecoArt Metallic Gold to the cut openings and the edges of the pages using my finger as my paint brush.
I used a beautiful vintage stencil that I have and patted a paint mix of DecoArt Titan Buff and Cobalt Teal Hue. (Clean your stencil after using paint on it). Then I heat set the pattern. You can also see the wonderful added detail that Andy Skinner's peeling paint background stamp adds to this page. I added the vintage laces by first brushing DecoArt's Matte Medium in the areas of the page where I would be adding the laces, laying the laces in place and then dabbing the brush over the top of the laces to seal them and also to remove any clumps of the clear drying Matte Medium.

Here is a closer look at page 4. I love the butterfly children with their colorful wings and encouraging sentiment. The red hearts on their chests are cut out of red cardstock, glued in place using Glossy Accents and then Glossy Accents added over the top of the red hearts for more dimension and a bit of a gloss finish. The little clock in the clock tower was created by painting a circle with DecoArt Titan Buff Media Acrylic paint, heat setting it, then added a Tim Holtz Remnant Rub clock face over it. Finally I added some little metallic clock hands and a half pearl over the center of them using Glossy Accents.

More rub ons were added to the background of this page along with more vintage lace. Just two couple of children were glued onto this page. The set of children at the bottom right are actually on the page behind but are visible through a cut opening. Again, little butterflies were added to the page by gluing them at the body and allowing the wings to be folded up for more dimension. The sentiments stamped in Black Archival Ink are from The Unity Stamp set "Empowered Words". Again, as on all of the interior pages, I used my finger and some DecoArt Metallic Gold Media Acrylic paint to highlight the cut out areas and along the edges of the pages.
Turning the final page ...
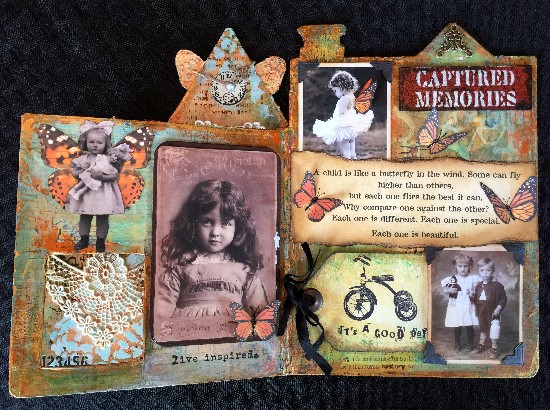
we see the layout of yet more sweet little vintage children. On the left, you see the vintage lace from the previous page peeking through the cut out doorway.
The sweet little butterfly child above the opening was glued in place using DecoArt Matte Medium. Isn't she precious holding her little doll? And I adore the vintage cabinet card image on the right. I actually mounted that image on top of a piece of chipboard that is painted with DecoArt Burnt Umber paint and the corners rounded with a CropADile. This mounting gave her just that little touch of dimension that added so much. I also added a few more little monarchs to this page spread because I love them so much!

Before I show you a close up picture of the back cover, I wanted to show this background to you. I love it! This is layers and layers of different "stuff". First was Tim Holtz' Melange Tissue Wrap Paper then a light coat of DecoArt White Gesso. On top of that I added a wash of DecoArt Yellow Ochre Media Acrylic paint and water and heat set it dry. Then I created a wash of Quinacridone Gold and water and added another layer of wash to the page. I heat set that dry. To get the "ghostly" images of letters, I used Andy Skinner's Alphabet Spaghetti stencil on the upper portion of the page and used Gathered Twigs Distress Ink over it. I LOVE LOVE the colors here!
And here is a closer look at the finished page. You can see the stenciled area above. fashioned a pocket out of the vintage photograph of the brother and sister on the bottom right. More detail about the pocket in a second ...
I glued the sweet vintage photograph of the little ballerina to the top left of the page after adding black photo corners to give her more of a vintage feeling. I folded some little monarch wings in half and using Glossy Accents, I added them to her back.
The "a child is like a butterfly ... " sentiment was computer generated. I tore and distressed the edges of the paper with Gathered Twigs and Black Soot Distress Inks and glued it in place on the page. I glued the little monarchs as I had done on previous pages, leaving their wings free to lift. I added Glossy Accents to the bodies to give them dimension and penned the antennas with a permanent black ink pen.
I brushed DecoArt Matte Medium to the rook peak, place the metal embellishment in place and then carefully brushed over the metal piece with the Matte Medium to seal it in place.
Finally, I added the "CAPTURED MEMORIES" plaque to the upper right of the page so that it is visible when the book is closed. To create the plaque, I simply painted a piece of DecoArt White Gesso'd chipboard with DecoArt Quinacridone Gold Media Acrylic paint and heat set it dry. Then I lightlyl spritzed the chipboard with DecoArt Carbon Black Media Mister and distressed the edges with DecoArt Carbon Black Media Acrylic paint (using my finger). Once that was heat set dry, I stenciled the letters in place using DecoArt Titan Buff Media Acrylic paint. I then glued it in place using Glossy Accents.

The pocket photo was created by adding photo corners and 1/8" Scor Tape (double sided tape) on the back top, bottom and exterior side of the photograph. Then I created the little tag using manila cardstock and lightly sponging it with DecoArt Blue Green Light Media Acrylic paint onto the outsides of the tag. I distressed the edges with DecoArt Burnt Umber Media Acrylic paint. After stamping the Unity tricycle and sentiment, I added a large vintage grommet and some black ribbon. The tag slides in place behind the photograph.
From this ...
and this ...
To this ...
SO much fun to experiment and play with so many techniques, products, images and elements. I hope that you enjoyed this little journey though my altered book and that maybe somehow it inspired you to not be afraid to try new things and allow your imagination to be free enough to explore the possibilities of what something "COULD" be.