Happy Monday everybody!
This week's challenge theme at Simon Says Stamp and Show is "into the woods". Rather than creating a tag using Tim's Woodgrain Texture Fade or something so obvious...I decided to re-create a functional wooden piece for my craft room. Here it is ...

This week's challenge theme at Simon Says Stamp and Show is "into the woods". Rather than creating a tag using Tim's Woodgrain Texture Fade or something so obvious...I decided to re-create a functional wooden piece for my craft room. Here it is ...

Now here is the back story on this wooden piece and how it went from boring to WOW thanks to Tim Holtz products!
I recently found on a craft organizer at a local store that was on clearance (don't you LOVE finding a bargain?) Anyway, it is THE PERFECT PIECE that I had been wanting for a long time to cover with my favorite French Industrial Paper Stash papers. I have LOVED that paper since I saw it at CHA in January. The thing that I love about this paper pad is that it contains so many different sizes of the same images. From 12x12 to 6x6 to 2 inch squares and all the way down to 1 inch strips, this paper pad has the most gorgeous images...including awesome vintage looking pillow ticking stripes for backgrounds.
I recently found on a craft organizer at a local store that was on clearance (don't you LOVE finding a bargain?) Anyway, it is THE PERFECT PIECE that I had been wanting for a long time to cover with my favorite French Industrial Paper Stash papers. I have LOVED that paper since I saw it at CHA in January. The thing that I love about this paper pad is that it contains so many different sizes of the same images. From 12x12 to 6x6 to 2 inch squares and all the way down to 1 inch strips, this paper pad has the most gorgeous images...including awesome vintage looking pillow ticking stripes for backgrounds.
Originally this wooden organizer was an all white wood piece, almost like a press board. Very bland but very functional and, as I said, at a great price! The transformation begins....
 The back was colorized by using Tim's Detailer Water Brush and various Distress Inks.

I sprayed the interior of the organizer with some spray stain that I have called "Glossy Wood Tone". It was great for covering the white areas that I really did not want to cover with paper. Then I swiped an Espresso Paint Dabber over the top edges of the wood compartments to give them a deeper wood tone quality. Next I set about covering all of the exterior and the interior of the drawer with several of those luscious, gorgeous vintage papers. On some areas, I used regular glue to adhere the paper. In other places, I used some 1/4" Scor Tape. Once covered, I sanded all of the edges with a sanding block and then inked all of the edges with Gathered Twigs and a touch of Black Soot. That really gives a nice aged look to the edges and corners of paper.

Here is the back of the box. Since it was larger than 12x12, I collaged the back with bits from several papers.

Here is the inside of the drawer. I covered it with a beautiful vintage map from the French Industrial Paper Stash. I inked all of the edges before gluing them into the drawer.

The bottom of the organizer was still white. So, I swiped an Espresso Paint Dabber back and forth across the bottom of the box, covering the white but intentionally streaking the paint. When dry, I added a touch of Wild Honey Distress Ink and then a few more streaks of the Espresso Paint Dabber. I think it looks sort of like a wood grain. Finally, I sprayed the bottom with a spray stain that I have called "honey" and that sealed the bottom and gave it a nice slick finish.
I could honestly have stopped there because the images on the papers are so wonderful that they need no further embellishing. But, since I love metal pieces so much, I decided I just HAD to add some assembled Ideaology and other metal pieces.
I started with the Ornate Plate in the center of the front panel. It is the antiqued copper one. I simply added "MY STUFF" stamped in the center of it and glued it into place using Glossy Accents.

Next I added the four Bottle Caps to the front band. I measured and marked where all of the caps would be located. Then I draped a small chain between all of the marks and stuck it in place using a small piece of 1/4" Scor Tape. Next I assembled the Bottle Caps with 1" circles from the Paris Passport Set and then added the 1" Cabachons on top. I glued them all in place using 3D Crystal Lacquer by Sakura Hobby Craft. Those Cabachons are awesome because they magnify the image, really making it pop. Once dry (only takes about 20 minutes), I pop dotted the Bottle Caps in place over the Scor Tape and chain. I love how the Bottle Caps look ~ giving dimension and a pop of color to that center panel.

Next I added the Hardware Findings straps to the sides and front panel of the organizer. They were cut from plain Grungeboard. I wanted to give them an aged and pitted metal look so I inked them with a Distress Embossing Ink pad and then covered them first with Antiquities Rust Embossing Paste and heat set it. Then I reinked the strap and sprinkled a little Verdigris Embossing Powder over the strap and heat set it. I then added a bit more of the Rust and heat set it. This gave a really nice gritty feel and the pitted look I was going for. A touch of Chestnut Roan ink followed by edges of Black Soot and the transformation was complete! I then added the Long Fasteners to make it look like the hardware was actually nailed into the wood. I set those in place using 1/4" Scor tape and also a bead of Glossy Accents on the back.

To finish off the top rim of wood on the organizer, I added some little 7 Gypsies Antique Brass Dome Studs. I removed the adhesive pad from the bottom of the studs and just added a dot of Glossy Accents and pressed them into place. I like the little bit of detail they give to the wood.
 Left Side
 Right Side
I chose to leave the two sides of the organizer fairly plain, in case I would decide to butt something up next to them....and as I said earlier, the vintage images on these papers are so wonderful that they need little to no embellishing. But, I did decide to add a larger wing from the Regal Adornments Ideaology set and some Sprocket Gears and Mini Gears on each upper section of the organizer. I antiqued the wings with a Gold Paint Dabber followed by a touch of Juniper Paint Dabber to create a patina look. Then I hooked three gears together using Jump Rings and gluing them in place with Glossy Accents. Just a little accent...but that's all the sides needed.

I LOVE of the three Parisian men on the left front of my box. I loved it so much that I continued that image on the front panel and over the drawer front. I really love how it turned out. The drawer is there, but it does not take away from the image. I didn't want to do anything to take away from that image, so I focused on adding embellishments to the right side of my evolving craft organizer.

I began with the assembled keyholes and hanging keys. These Ideaology pieces were originally all silver. I glued all of the pieces together first using Glossy Accents and let that completely dry. To get the Clock Key through the keyhole, I unscrewed the screw from the back then slipped the Clock Key through the keyhole and then screwed the screw back in place. That was done before I glued all of the pieces together. This assemblage consists of the more oval Ornate Plate as the base. Then I added a silver oval key hole from the Keyholes Ideaology set. It fits almost perfectly over the oval opening of the Ornate Plate. Then I added the Long Fasteners so that it would look like the piece was nailed into place. Next, I totally altered the appearance of the silver metal pieces by layering a dabbed on Gold Paint Dabber followed by touches of Juniper Paint Dabber, a touch of Black Soot Distress ink and then a touch of Chestnut Roan ink. Then I kept layering a combination of those paints and inks, adding texture and also color until I was happy with the look. I added a piece of junk chain through the holes in the Clock Key and added two small keys from the Locket Keys Ideaology set to the ends of the chain with small Jump Rings. Those can freely move...which is something I love...when things can move or hang without restriction on pieces.

Next I created the winged clock face assemblage for the lower right side of the front. This time I altered the pieces with the same paints and inks that I used on the keyhole assemblage. The wings are the smaller ones from Regal Adornments set. The were made to look like antique gold and then given a slight patina look. The Clock Face is one of the medium sized ones that already had a gold-ish finish. I only added a bit of juniper paint to give it a patina finish. The heart on the top of the Clock Face is from the Adornments Ideaology set and was altered from silver to a antiqued gold finish with a touch of patina. Then I glued the four pieces together using Glossy Accents and let it dry. When dry, I glued it to the front of the organizer using Glossy Accents.

I then added the "EMBRACE IMPERFECTION" Word Band the top of the right side of the organizer. It too was silver so I altered it by swiping it first with an Espresso Paint Dabber to make the engraved letters more visible and then I wiped the brown paint off of the face of the band. Then I lightly dabbed the Gold Paint Dabber over the band to antique it to gold. I added a couple of Long Fasteners and pop dotted it into place.
The left side of the front needed a little metal to balance the right side. So, without distracting from the gorgeous vintage image of the three men, I stamped the small of the two flourishes from Tim Holtz' Fabulous Flourishes stamp set down the left side of the front using Jet Black Archival Ink. I wanted to create a bit of a contrast on the background so that the Collage Key that I was going to place there would show more.

The Collage Key is silver. Again, I altered it to appear antique gold. I added the vintage image to the interior and the cabachon to cover it (all included in the set with the Collage Keys). I looped a large Jump Ring around a Hitch Fastener. That would be what my Collage Key would hang from. I also added a Fleur De Lis (made to look antique gold and patina) from the Adornments Ideaology set to the Jump Ring around the Hitch Fastener. I glued (using Glossy Accents in two or three little spots) a piece of torn Mica onto the left side of the front. I think it also added some neat texture and interest underneath the Collage Key yet did not distract from my vintage image. I glued a little lacy piece of filagree that I had over the mica and then glued the Hitch Fastener onto the filagree piece with Glossy Accents. Then I left it alone to let it dry. Perfect! The Collage Key dangles from the Hitch Fastener...LOVE it!

On the lower left corner, which is part of the drawer, I simply added a fancy metallic flourish corner that I had. It was already antique gold so I just added touches of Juniper paint. I added a little silver metallic rose that I had. I altered it to look antique gold with a touch of patina. I glued both of those into place using Glossy Accents.
"CREATIVITY" on the front of the drawer, is taken from Tim Holtz' Words For Thought stamp set and stamped in Jet Black Archival Ink. The label holder it sits in was part of the original organizer. I altered it from silver to appear antique gold. I also slipped another piece of mica into that label holder.
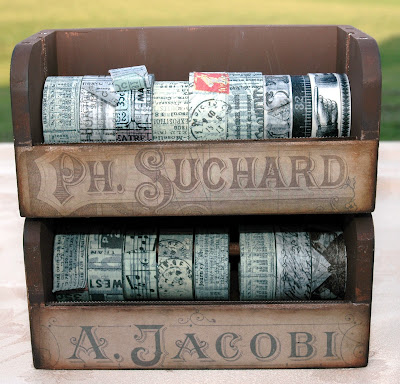

So that is it....my new and I think MUCH improved Tim Holtz style craft organizer. I love it! So much so that I also added two Tissue Tape holders to my growing set. These were also just the solid white press board that I covered with yet more papers from that fabulous French Industrial paper pad.
 Here is my organizer set so far. The big clothespin is also painted in Espresso Paint and then covered with scraps from French Industrial Paper Stash. I will put the giant clothespin up on the ends and clip a photograph or something into the spring end.
You could easily do something like this to your boring craft organizers and boxes. Give them a new look!
Stop by the challenge at Simon Says Stamp and Show and check out what my Design Teammates have waiting for you...wonderful creations! Whatever "into the woods" creation you come up with, share it with us at Simon Says Stamp and Show! You could be the winner of our most generous sponsor's weekly drawing of a

$50.00 credit voucher! You could also be recognized as one of the TOP THREE artists for the week. That is quite an honor as we have such WONDERFUL entries every week. So good luck. I can't wait to see your creations!
Here is a list of all of the products available at Simon Says Stamp that were used in creating my new craft organizations pieces:


Here is the back of the box. Since it was larger than 12x12, I collaged the back with bits from several papers.

Here is the inside of the drawer. I covered it with a beautiful vintage map from the French Industrial Paper Stash. I inked all of the edges before gluing them into the drawer.

The bottom of the organizer was still white. So, I swiped an Espresso Paint Dabber back and forth across the bottom of the box, covering the white but intentionally streaking the paint. When dry, I added a touch of Wild Honey Distress Ink and then a few more streaks of the Espresso Paint Dabber. I think it looks sort of like a wood grain. Finally, I sprayed the bottom with a spray stain that I have called "honey" and that sealed the bottom and gave it a nice slick finish.
I could honestly have stopped there because the images on the papers are so wonderful that they need no further embellishing. But, since I love metal pieces so much, I decided I just HAD to add some assembled Ideaology and other metal pieces.
I started with the Ornate Plate in the center of the front panel. It is the antiqued copper one. I simply added "MY STUFF" stamped in the center of it and glued it into place using Glossy Accents.

Next I added the four Bottle Caps to the front band. I measured and marked where all of the caps would be located. Then I draped a small chain between all of the marks and stuck it in place using a small piece of 1/4" Scor Tape. Next I assembled the Bottle Caps with 1" circles from the Paris Passport Set and then added the 1" Cabachons on top. I glued them all in place using 3D Crystal Lacquer by Sakura Hobby Craft. Those Cabachons are awesome because they magnify the image, really making it pop. Once dry (only takes about 20 minutes), I pop dotted the Bottle Caps in place over the Scor Tape and chain. I love how the Bottle Caps look ~ giving dimension and a pop of color to that center panel.

Next I added the Hardware Findings straps to the sides and front panel of the organizer. They were cut from plain Grungeboard. I wanted to give them an aged and pitted metal look so I inked them with a Distress Embossing Ink pad and then covered them first with Antiquities Rust Embossing Paste and heat set it. Then I reinked the strap and sprinkled a little Verdigris Embossing Powder over the strap and heat set it. I then added a bit more of the Rust and heat set it. This gave a really nice gritty feel and the pitted look I was going for. A touch of Chestnut Roan ink followed by edges of Black Soot and the transformation was complete! I then added the Long Fasteners to make it look like the hardware was actually nailed into the wood. I set those in place using 1/4" Scor tape and also a bead of Glossy Accents on the back.

To finish off the top rim of wood on the organizer, I added some little 7 Gypsies Antique Brass Dome Studs. I removed the adhesive pad from the bottom of the studs and just added a dot of Glossy Accents and pressed them into place. I like the little bit of detail they give to the wood.


I chose to leave the two sides of the organizer fairly plain, in case I would decide to butt something up next to them....and as I said earlier, the vintage images on these papers are so wonderful that they need little to no embellishing. But, I did decide to add a larger wing from the Regal Adornments Ideaology set and some Sprocket Gears and Mini Gears on each upper section of the organizer. I antiqued the wings with a Gold Paint Dabber followed by a touch of Juniper Paint Dabber to create a patina look. Then I hooked three gears together using Jump Rings and gluing them in place with Glossy Accents. Just a little accent...but that's all the sides needed.

I LOVE of the three Parisian men on the left front of my box. I loved it so much that I continued that image on the front panel and over the drawer front. I really love how it turned out. The drawer is there, but it does not take away from the image. I didn't want to do anything to take away from that image, so I focused on adding embellishments to the right side of my evolving craft organizer.

I began with the assembled keyholes and hanging keys. These Ideaology pieces were originally all silver. I glued all of the pieces together first using Glossy Accents and let that completely dry. To get the Clock Key through the keyhole, I unscrewed the screw from the back then slipped the Clock Key through the keyhole and then screwed the screw back in place. That was done before I glued all of the pieces together. This assemblage consists of the more oval Ornate Plate as the base. Then I added a silver oval key hole from the Keyholes Ideaology set. It fits almost perfectly over the oval opening of the Ornate Plate. Then I added the Long Fasteners so that it would look like the piece was nailed into place. Next, I totally altered the appearance of the silver metal pieces by layering a dabbed on Gold Paint Dabber followed by touches of Juniper Paint Dabber, a touch of Black Soot Distress ink and then a touch of Chestnut Roan ink. Then I kept layering a combination of those paints and inks, adding texture and also color until I was happy with the look. I added a piece of junk chain through the holes in the Clock Key and added two small keys from the Locket Keys Ideaology set to the ends of the chain with small Jump Rings. Those can freely move...which is something I love...when things can move or hang without restriction on pieces.

Next I created the winged clock face assemblage for the lower right side of the front. This time I altered the pieces with the same paints and inks that I used on the keyhole assemblage. The wings are the smaller ones from Regal Adornments set. The were made to look like antique gold and then given a slight patina look. The Clock Face is one of the medium sized ones that already had a gold-ish finish. I only added a bit of juniper paint to give it a patina finish. The heart on the top of the Clock Face is from the Adornments Ideaology set and was altered from silver to a antiqued gold finish with a touch of patina. Then I glued the four pieces together using Glossy Accents and let it dry. When dry, I glued it to the front of the organizer using Glossy Accents.

I then added the "EMBRACE IMPERFECTION" Word Band the top of the right side of the organizer. It too was silver so I altered it by swiping it first with an Espresso Paint Dabber to make the engraved letters more visible and then I wiped the brown paint off of the face of the band. Then I lightly dabbed the Gold Paint Dabber over the band to antique it to gold. I added a couple of Long Fasteners and pop dotted it into place.
The left side of the front needed a little metal to balance the right side. So, without distracting from the gorgeous vintage image of the three men, I stamped the small of the two flourishes from Tim Holtz' Fabulous Flourishes stamp set down the left side of the front using Jet Black Archival Ink. I wanted to create a bit of a contrast on the background so that the Collage Key that I was going to place there would show more.


On the lower left corner, which is part of the drawer, I simply added a fancy metallic flourish corner that I had. It was already antique gold so I just added touches of Juniper paint. I added a little silver metallic rose that I had. I altered it to look antique gold with a touch of patina. I glued both of those into place using Glossy Accents.
"CREATIVITY" on the front of the drawer, is taken from Tim Holtz' Words For Thought stamp set and stamped in Jet Black Archival Ink. The label holder it sits in was part of the original organizer. I altered it from silver to appear antique gold. I also slipped another piece of mica into that label holder.


So that is it....my new and I think MUCH improved Tim Holtz style craft organizer. I love it! So much so that I also added two Tissue Tape holders to my growing set. These were also just the solid white press board that I covered with yet more papers from that fabulous French Industrial paper pad.

You could easily do something like this to your boring craft organizers and boxes. Give them a new look!
Stop by the challenge at Simon Says Stamp and Show and check out what my Design Teammates have waiting for you...wonderful creations! Whatever "into the woods" creation you come up with, share it with us at Simon Says Stamp and Show! You could be the winner of our most generous sponsor's weekly drawing of a
$50.00 credit voucher! You could also be recognized as one of the TOP THREE artists for the week. That is quite an honor as we have such WONDERFUL entries every week. So good luck. I can't wait to see your creations!
Here is a list of all of the products available at Simon Says Stamp that were used in creating my new craft organizations pieces:
 |  |  |  |  |
 |  |  |  |  |
 |  |  |  |  |
 |  |  |  | |
 |  | |||
 |  |  |  |  |
 |  |  |  |