Greetings everyone! Can you believe this will be the last Simon Says Stamp and Show challenge for April? Time sure flies, doesn't it?
Today's challenge is themed "Passport To Fun". This is a really broad theme in that it can be anything just as long as it has to do with some sort of travel. Maybe a layout page of a recent trip? A post card from far off lands that inspired you to create. Maybe a travel journal you want to create for a friend who is taking a trip. Be sure to stop by the blog and visit all of the wonderful examples of passport fun that my design teammates have waiting for you!

I decided to transform a plain manila folder into this fun and easy to construct Passport Pocket Folder.
It just takes one inexpensive manila folder to create the base of this fun little album. After that, you can decorate it as far as your imagination will take you! I'll show you pictures of my pocket folder and then share with you how to make one of your own! Trust me...you will LOVE making one of these! So fun, so simple and the possibilities are endless!
 The basic folding of the manila folder to form the pockets and pages.
 The folder as the papers are being applied.
 All of the papers are now in place - interior.
 The papers in place - exterior.
 If you choose to do some machine stitching, you will want to do that BEFORE you put the folder together. Here, you can see the interior of the folder (pockets folded down).
 Here you see the exterior of the folder. The pockets are visible here but will be folded back up inside of the folder.
 Here is the pocket folder ready to be glued together.
And now for some of the embellishments on the cover...
 I LOVE THESE PICTURE WHEELS!
This is the first step in their transformation from plain manila tag board...first step London Night Fresco Finish basecoat. Air or heat dry.
 Second step...add a thin layer of Fresco Finish Crackle Glaze. Air or heat dry.
 Third step...a top coat of Snowflake Fresco Finish. It starts crackling before I can even finish the top coat! Amazing stuff and QUICK!
 Distress the picture wheels with Vintage Photo, Gathered Twigs and Black Soot Distress inks. Then swipe Caramel alcohol ink to a piece of vellum.
 Glue (on the backside of the picture wheel-careful not to get glue into the cut out areas) the colored vellum to the backside of the picture wheel and cut it out. Attach the other side of the picture wheel, matching up all of the cuts. Repeat this process for the second picture wheel. Wha-lah! Instantly aged picture wheels that take all of about 15 minutes to make!
 I LOVE TIM'S NEW STAMP SETS!
Here I have stamped these gorgeous images onto LaBlanche's Stamping Paper with Espresso Adirondak ink and heat dried it. Then have colorized the stacked suitcases and this sweet little man with Tim's detailer water brush and various Distress Ink colors. You can get a great flesh tone if you mix Scattered Straw and Tattered Rose together with the water brush.
 You will want to put some sort of "binding" over the exterior fold of the center of your folder. Here, I have chosen to use a piece of Sticky Back Canvas, measuring 1 1/2" wide. I had added a piece of Tim's new Tissue Tape and colorized the hands using his Detailer Water Brush and various Distress Inks. Tuck the extra tape underneath the canvas, add a piece of Scor Tape over the edges where the Tissue Tape is and place the tape over the fold on the exterior.
 I also added two strips of plain cardstock to the edges of the folder before I stitched it. Here you see the canvas binding. It's a little tricky to stretch it, center it and get it in place. But once you do, it's really worth the vintage look it gives!
Here are the pictures of my completed Passport Pocket Folder.
 The front and back covers.
 Front cover with the brown tie not pulled through the two spaces in the picture wheel to tie it all together.
 The back of the pocket folder. The little "passport" actually opens and has pages inside.
 When you open the folder, this is the first thing you see...the pockets and a tag in each one.
 Flip the center page and you will see these next two pocket pages with tags in each one. You don't have to put tags in these pockets. They could store a lot of things. But since I love tags, that is what I chose to put in them to show you!
 Here is a closeup of one of the pockets and a very simple way of embellishing it. Just Tissue Tape at the top, then Tim's Filmstrip ribbon with little vintage photos in each frame, then a stamped train at the bottom.
 And....here are my four tags. Each with very different techniques and images.
 My queen Elizabeth tag. This began with Weathered Wood Distress Paint. Then it was embossed with Tim's Book Covers Texture Fade. The middle sized oval from his new Sized Ovals die is perfect for the center of the book cover. Then I gently heat embossed Queens Gold (appropriately enough) Embossing Powder over the raised areas of the embossing.
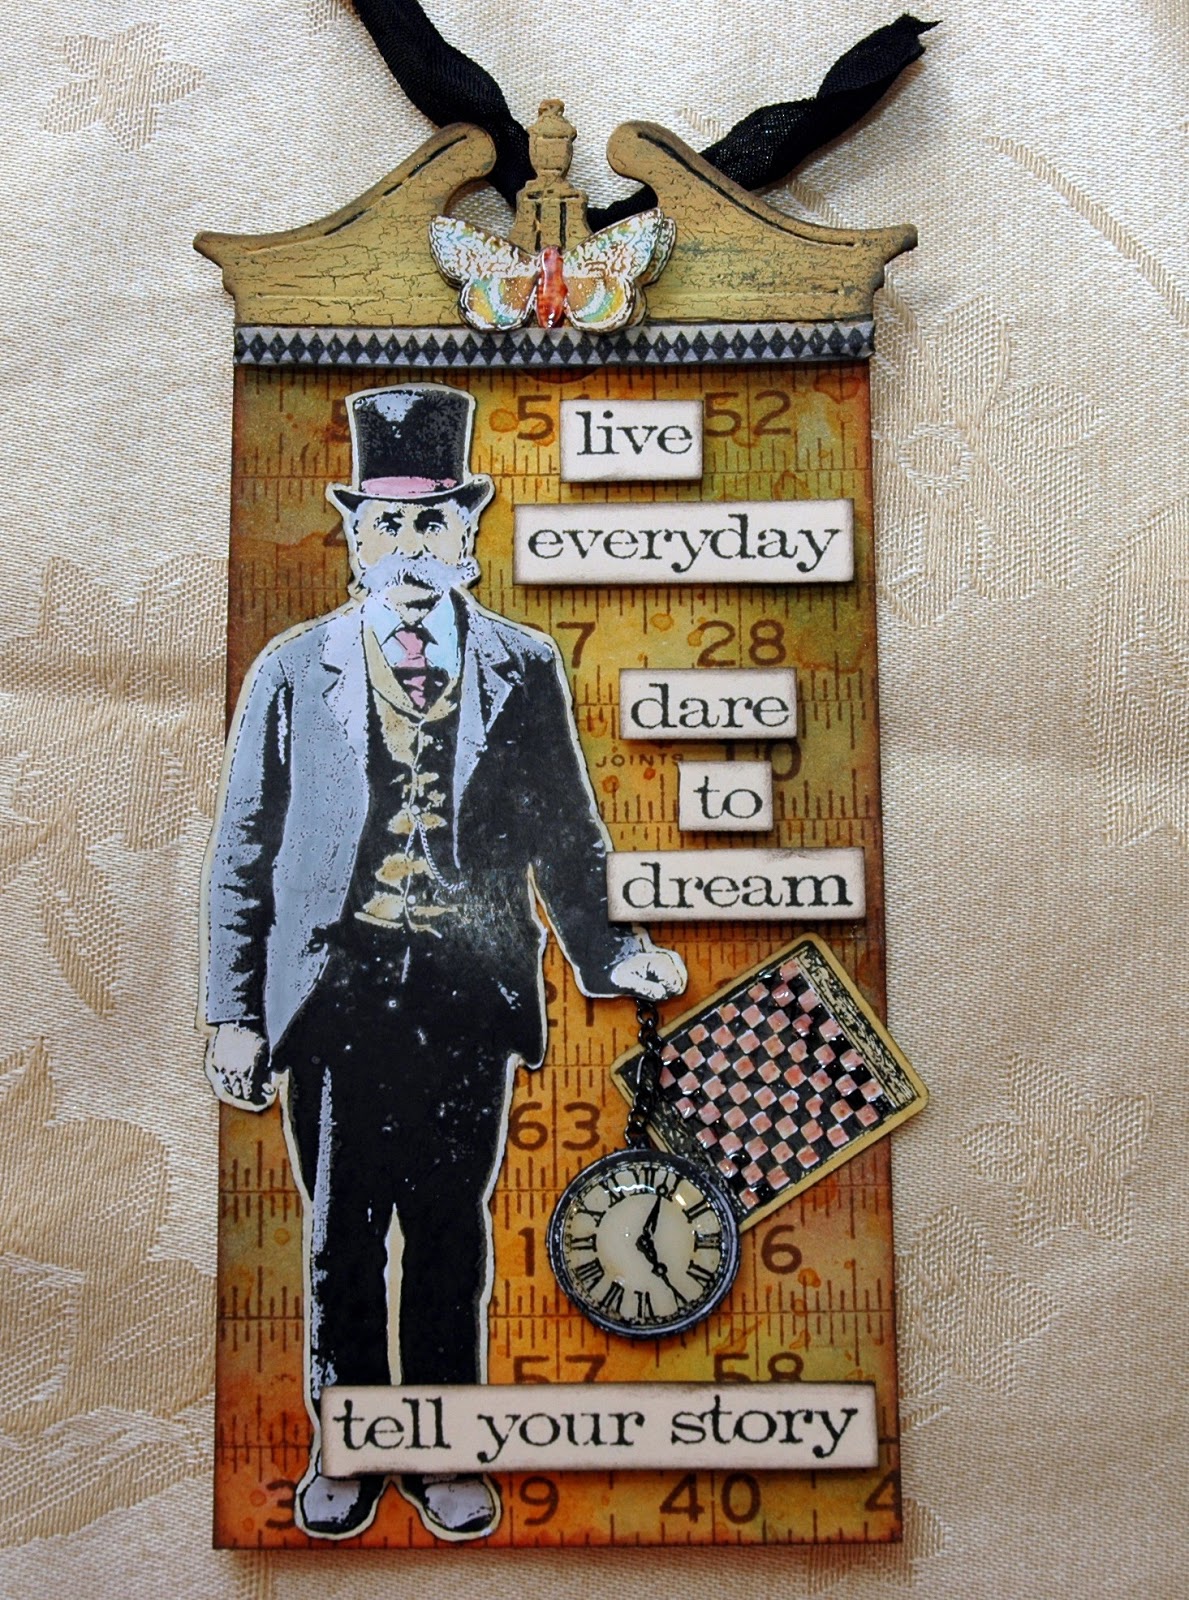
 I love this gentleman! I also love Tim's new Pediments die cut. I cut the top out of Grungeboard and cracked it in the same manner at the Picture Wheels. This time I used burnt umber as the base and then Haystack Fresco Finish paint at the top coat. I distressed with Gathered Twigs and Black Soot. The delicate butterfly is from Tim Holtz' new Tiny Things stamp set and I used Distress Markers directly onto the stamp and then stamped the image onto Specialty Stamping Paper. I stamped it twice, so the butterfly is stacked one on top of the other and glued with Glossy Accents at the body so that the wings are dimensional. The little clock and checkboard are also from Tiny Things. The sentiments are all from Simple Sayings and are popped onto the tag. The man is holding the clock with a piece of Tim Holtz' Lace Chain.
 The Blueprint Globe was stamped onto the manila tag and then masked by stamping another globe and laying it on top of the first one. I then distressed the tag with Bundled Sage and Pumice. I colored the globe with various Distress Inks and a water brush and then covered the continents with Crackle Accents for extra dimension.
 Mmm...Wild Honey, Rusty Hinge and Mustard Seed created this background that was then spritzed and flicked with water. A little Gathered Twigs for distressing the edges and Tim's gorgeous sentiment stamp from his Way With Words stamp set was stamped using Jet Black Archival Ink.
I hope you like my Passport Pocket Folder and I have inspired you to create one for yourself. Whatever you create...join us at Simon Says Stamp and Show's challenge. You could be the lucky winner of our sponsor's

$50.00 credit voucher. You might also be recognized as one of our TOP THREE entries for the week. But, you can't win if you don't enter! Good luck and I can't wait to see what inspires your "Passport To Fun" piece!
Here are all of the supplies available at Simon Says Stamp and Show used in creating this Passport Pocket Folder:

And now ... as promised, here are the instructions:


And now for some of the embellishments on the cover...

This is the first step in their transformation from plain manila tag board...first step London Night Fresco Finish basecoat. Air or heat dry.


Here I have stamped these gorgeous images onto LaBlanche's Stamping Paper with Espresso Adirondak ink and heat dried it. Then have colorized the stacked suitcases and this sweet little man with Tim's detailer water brush and various Distress Ink colors. You can get a great flesh tone if you mix Scattered Straw and Tattered Rose together with the water brush.


Here are the pictures of my completed Passport Pocket Folder.


I hope you like my Passport Pocket Folder and I have inspired you to create one for yourself. Whatever you create...join us at Simon Says Stamp and Show's challenge. You could be the lucky winner of our sponsor's
$50.00 credit voucher. You might also be recognized as one of our TOP THREE entries for the week. But, you can't win if you don't enter! Good luck and I can't wait to see what inspires your "Passport To Fun" piece!
Here are all of the supplies available at Simon Says Stamp and Show used in creating this Passport Pocket Folder:
 |  |  |  |  |
 | ||||
 |  |  |  |  |
 | ||||
 |  | |||
 |  |  |  |  |
 |  |  |  |  |
 |  |  | ||
 |  |  | ||
 |  | |||
 |  | |||
 |  |  |  |
And now ... as promised, here are the instructions:
The basic supplies you will need for this project include one standard size manila folder, a ruler, a Martha Stewart Score Pad, some paper to cover the separate pages you will create, 1/4" and 1/2" Scor Tape and you're set!
Begin by finding the center of the manila folder. DO NOT CUT OFF THE TABS THAT WILL STICK OUT ON OPPOSITE SIDES OF THE FOLDER AND DO NOT INCLUDE THEM IN YOUR MEASUREMENTS. The center of my manila folder was approximately 8 5/8". It typically is NOT where the manila folder normally folds...so be aware of that! Score your center line and fold it or mark it to be sure that you don't mistake your center line. From there, find the center of each side of the folder. Mine measured 4 1/4" on each side. I scored that center line on each side with my Martha Stewart Score Pad and folded them to create four equal portions. You fold them in a mountain/valley style.
Next, you will create the pocket portion of your folder. To do this, lay your manila folder out flat again. Measure up 3" from the BOTTOM of your folder and score all the way across the folder. Then fold this UP. Use a bone folder across the bottom fold to help the pockets lay a little flatter. Then refold the body of your manila folder into the mountain/valley shape. This is your basic pocket folder! See, how easy was that??
Next you will cover your pocket folder with papers (plain or patterned), measuring each section separately to be sure that when you cut your paper, it will fit properly. For this pocket folder, I primarily used the 6x6 squares from Tim Holtz Lost and Found Paper Stash papers. Here are your measurements that typically are correct:
- 2 pieces of patterned cardstock for the outside covers - 8 3/4" x 5" (most of your cover will measure 4 1/2" but if you are covering the tab as well, you will need 5"). If you want to leave your tabs uncovered, then your measurement will be 8 3/4" x 4 1/4" to 4 1/2".
- 4 pieces of patterned cardstock for the interior pages - 4 1/4" x 6" (you will not need to cover the entire length of the interior pages because the bottom 3" will be covered with the pocket.
- 4 pieces of cardstock for the pockets - 4 1/4" x 3".
Covering the Pocket Folder
For ALL papers, INK THE EDGES prior to gluing them in place. I also like to ink all of the exterior edges of the folder and the fold lines prior to adding my papers.
As you are covering the plain manila folder with paper, you will notice that it gets heavier and much more substantial. But that is what I love about it! No one would know it's just a plain little manila folder!
- Plan which papers you want to go where on your folder. It doesn't matter if you cover the outside or the inside first. I typically start with the outside covers. Lay what will be the finished side of your cover directly over the portion of the paper you want to use and trace around it with a pencil. Cut it out, use Scor Tape (or glue if you perfer) and glue your paper in place. Trim off any excess paper and do the other side in the same manner.
- Cover what will be the four interior panels of your pocket folder by measuring the blank manila folder and cut your papers out. Use Scor Tape or glue and stick each panel in place. Check by folding each section as you work to be sure that you are not hindering the folder to fold properly as you are adding the papers.
- Cover what will be the fronts of your pockets. To do this, BE SURE THAT SECTION OF THE FOLDER THAT WILL BE THE POCKETS UP - OTHERWISE YOU WILL BE COVERING THE INSIDE OF THE POCKETS!! If you want to add tissue tape to the tops of your pockets, do that now.
Putting the Pocket Folder Together
- If you want to machine stitch your pocket folder, now would be the time to do that. It is not necessary to do this. It is purely for embellishment purposes. YOU ARE NOT STITCHING THE POCKETS TO THE FOLDER! YOU ARE STITCHING AROUND ALL OF THE AREAS OF THE FOLDER BEFORE YOU EVER PUT IT ALL TOGETHER. Use a fairly broad stitch and you will have to "help" the needle get through all the layers of paper from time to time. But, as you can see from my folder, it is very do-able. Vary your stitches...straight stitch some areas, zig zag other areas, etc. Remember that the part of the folder that is facing you when you are stitching will be the prettiest. So when working on your covers, decide if you want the pretty side of the stitching on the outside or the inside.
- Once you have machine stitched, you are ready to actually put the folder together. Pull the pocket back up in their proper position. Use a bone folder across the bottom again. Fold the pocket in its accordion shape again and run a bone folder over all of the folds.
- Now unfold the folder and place 1/8" pieces of Scor Tape (you can use 1/4" strips as well-if you don't have 1/8" Scor Tape) right along the fold lines that will be UNDERNEATH the pockets. You should have Scor Tape at both outside edges and also along the two fold lines on the interior of the folder. Take off the backing of the tape and pull the pockets up and into place. Fold the folder again to "work" the pockets into their glued position.
- Lay the folder back out again and turn it over so that the two outside covers and the two interior blank panels are laying face up. Place 1/2" Scor Tape along all four sides of one of the blank interior panels. Remove the tape backing and fold the two blank sections of the folder together, back to back. Refold all of the pocket folder again and run a bone folder over the folds. Your pocket folder is now ready to be embellished and enjoyed!