Tuesday, December 19, 2017

VINTAGE CHRISTMAS FRAME AND BOOK

Merry Christmas Everyone!

I'm pleased to announce that I have created a lovely vintage Christmas home decor piece that is being featured on DecoArt's Media Blog right now!


This Christmas piece is created from a plain paper mache book that is turned into a glitzy, shimmering vintage book/picture frame combination.  Using DecoArt's many wonderful Media Line products makes crafting to easy and the results are always guaranteed to be show stoppers! 

On the left of my book is a lovely vintage Santa combined with wonderful laser cut pieces from Southern Trading Company. On the right is a Shiny Brite picture frame that can flip out for easy picture replacements.  There is also a neat little hidden compartment behind the picture frame to store older photographs or other little momentos.

To see the complete pictorial tutorial, click HERE to be transported to DecoArt's Media Blog!

Here's wishing you and yours the most wonderful and blessed family Christmas ever!

Merry Christmas to all!!

Wednesday, December 13, 2017

HO HO HO ... SANTA IS ALMOST HERE!

Are you ready for Christmas?  Trees decorated and ready to wrap your gifts?

Well then this pictorial tutorial is for YOU over on Andy Skinner's blog!  

It is a pictorial tutorial on creating your own vintage style Santa Christmas tree ornaments or special gift tags for those important presents!


Here is a sneak peek at what you will find on Andy's Blog!  Click HERE to be taken to his blog and check it out!  Thanks so much for stopping by and ...

MERRY CHRISTMAS EVERYONE!  

As Tiny Tim would say, "God bless us, everyone."

Tuesday, December 5, 2017

SANTA CLAUS IS COMING TO TOWN!

Hello everyone! Welcome back!

It's the most wonderful time of the year!  Especially for creating wonderful vintage style pieces that remind us of our childhood Christmases.

I was in a flea market/gift shop the other day and ran across this darling little wooden chair.  It's about 20" tall. It was only $5 and I could not resist it.  It was screaming "take me home and make me a little Christmas chair!"


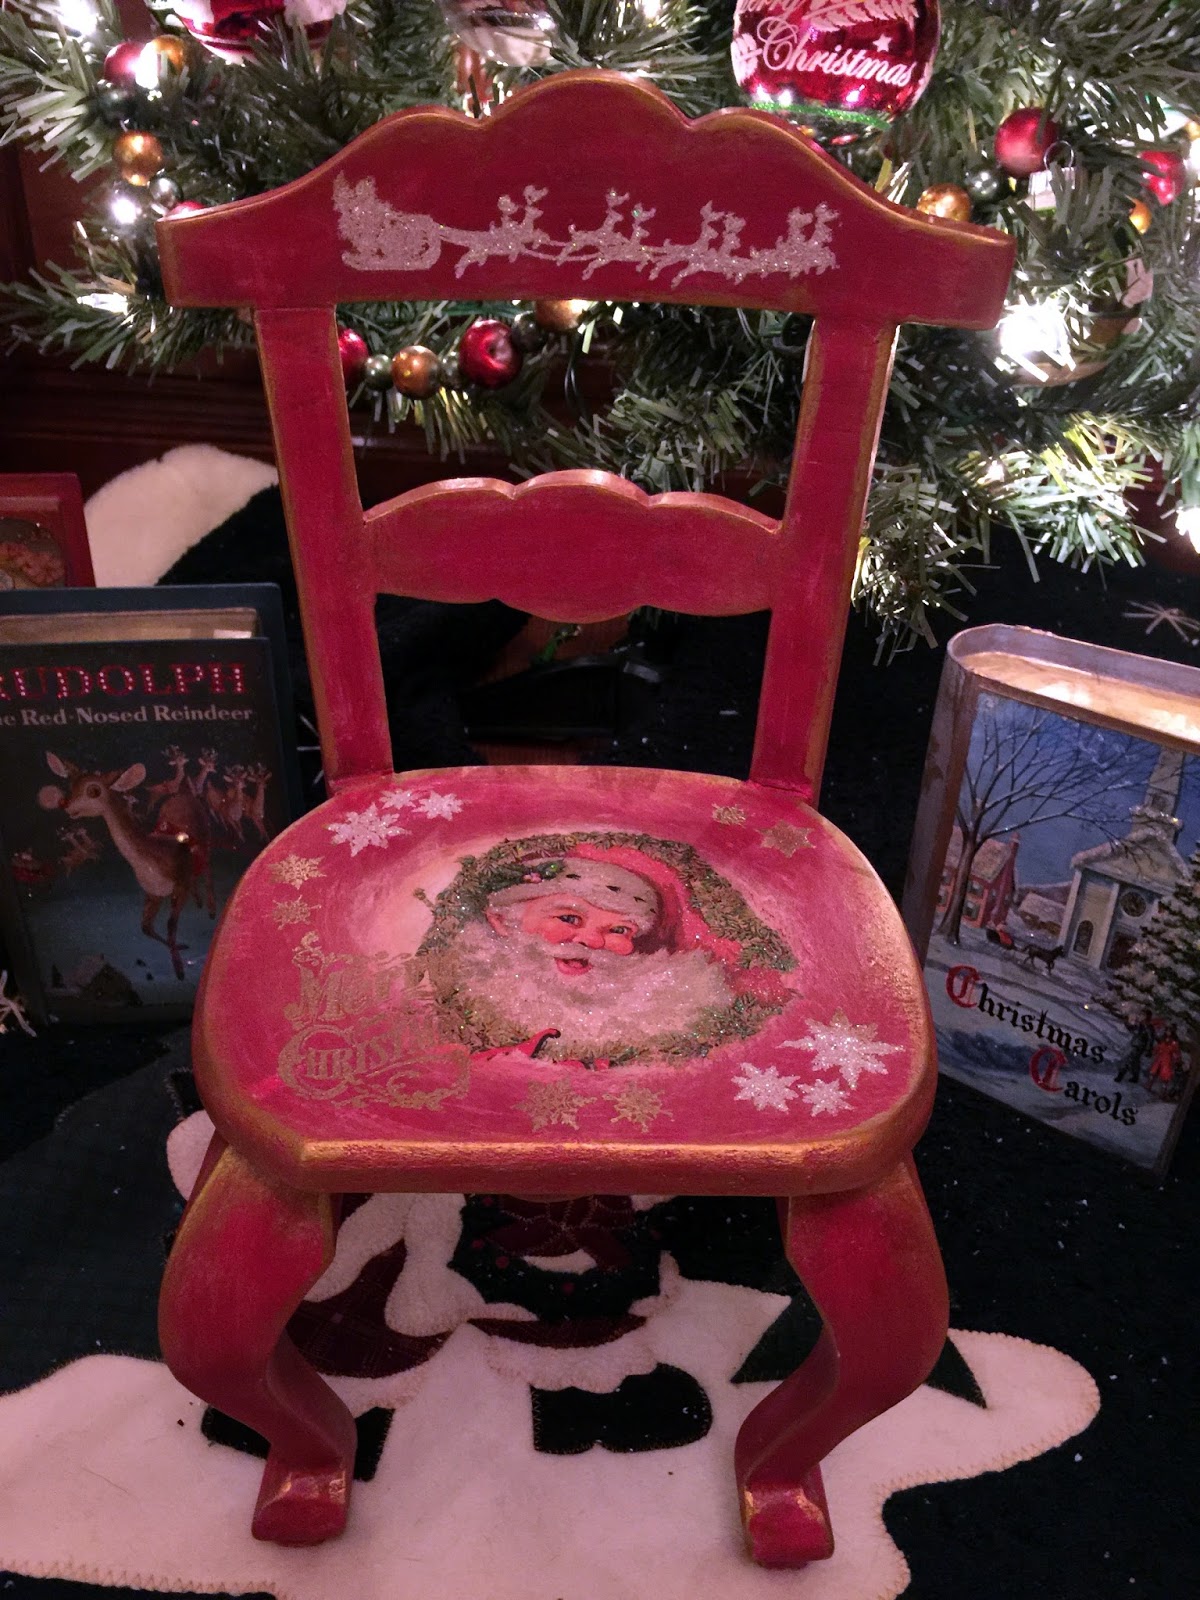
So, I brought it home and went to work.  With a little imagination and some wonderful DecoArt products as well as a few other goodies, that little chair went from drab brown to this ...


Let me show you how I did it ...


I absolutely LOVE DecoArt's Chalky Finish paints because they require no prep work before applying them to most surfaces. I brushed on a coat Romance Chalky Finish...a beautiful vintage Christmas Red color and let it dry.  When dry, I lightly sanded parts of the chair and applied another light coat of the paint and let it dry. 


Next I randomly added some of DecoArt's Crackle Medium around the edges of the chair and in areas that I wanted to give a very aged or crackled effect to.  I let that air dry...although it was not completely dry when I went on to the next step.


I added a vintage wash to the chair using DecoArt's Vintage Effect Wash in white.  After that, I lightly brushed over the chair in random areas with the Romance Chalky  Finish red paint again.


Now to really give it that aged look and to also sort of seal the chair, I brushed on a light coat of Americana Medium Creme Wax and wiped off the excess.  Where I had added the crackle finish, the wax stuck because the crackle medium was still a bit tacky and I loved the effect when I wiped it off.


My little brown chair was being transformed into a darling little antique style Christmas chair!  


I also ran across the cutest vintage Santa image on a package of paper napkins...so I bought them.  he's PERFECT for my chair!  I added an area of white to the seat of the chair so that when I applied Santa to the chair, he would really stand out.  The white paint is DecoArt's Everlasting Chalky Finish paint.  

The Santa image is torn out of the napkin because torn edges tend to disappear into the background better than cut edges.  I also removed all of the underlying plys of the paper napkin; leaving only the printed piece.


Next, using a light amount of paint from DecoArt's Media line; Transparent Yellow Iron Oxide, I "aged" around the edges of the white circle to better blend with the Santa napkin image. 


To apply the Santa to the seat, I brushed a generous amount of DecoArt's Matte Medium to the chair, laid my Santa in place, removed all of the bubbles and wrinkles and then brushed over him with another coat of the Matte Medium.  This works as a glue and then a sealer to project him from wear and also from the products I would shortly be adding to him.  I gently heat set the Matte Medium.


Here is Santa at this point.


Across the top of the chair, I embossed Santa and his reindeer using a white embossing powder.  


I have always loved images of Santa and his reindeer and this one was perfect for the little chair!


Now it was time to finish off the chair around Santa.  I added some gold and white embossed snowflakes.  I also added a gold embossed "Merry Christmas" in a vintage type.


Next, to add some "glitz", I added some crystal sparkles to Santa's image using DecoArts's Twinkle Writer.  I shook the bottler really well and then added the sparkles here and there.  It came out of the bottle pretty fast, so there was no need to squeeze it.  While the sparkles were still wet, I sprinkled in some clear and shiny mini glitter to really give things that festive sparkle!


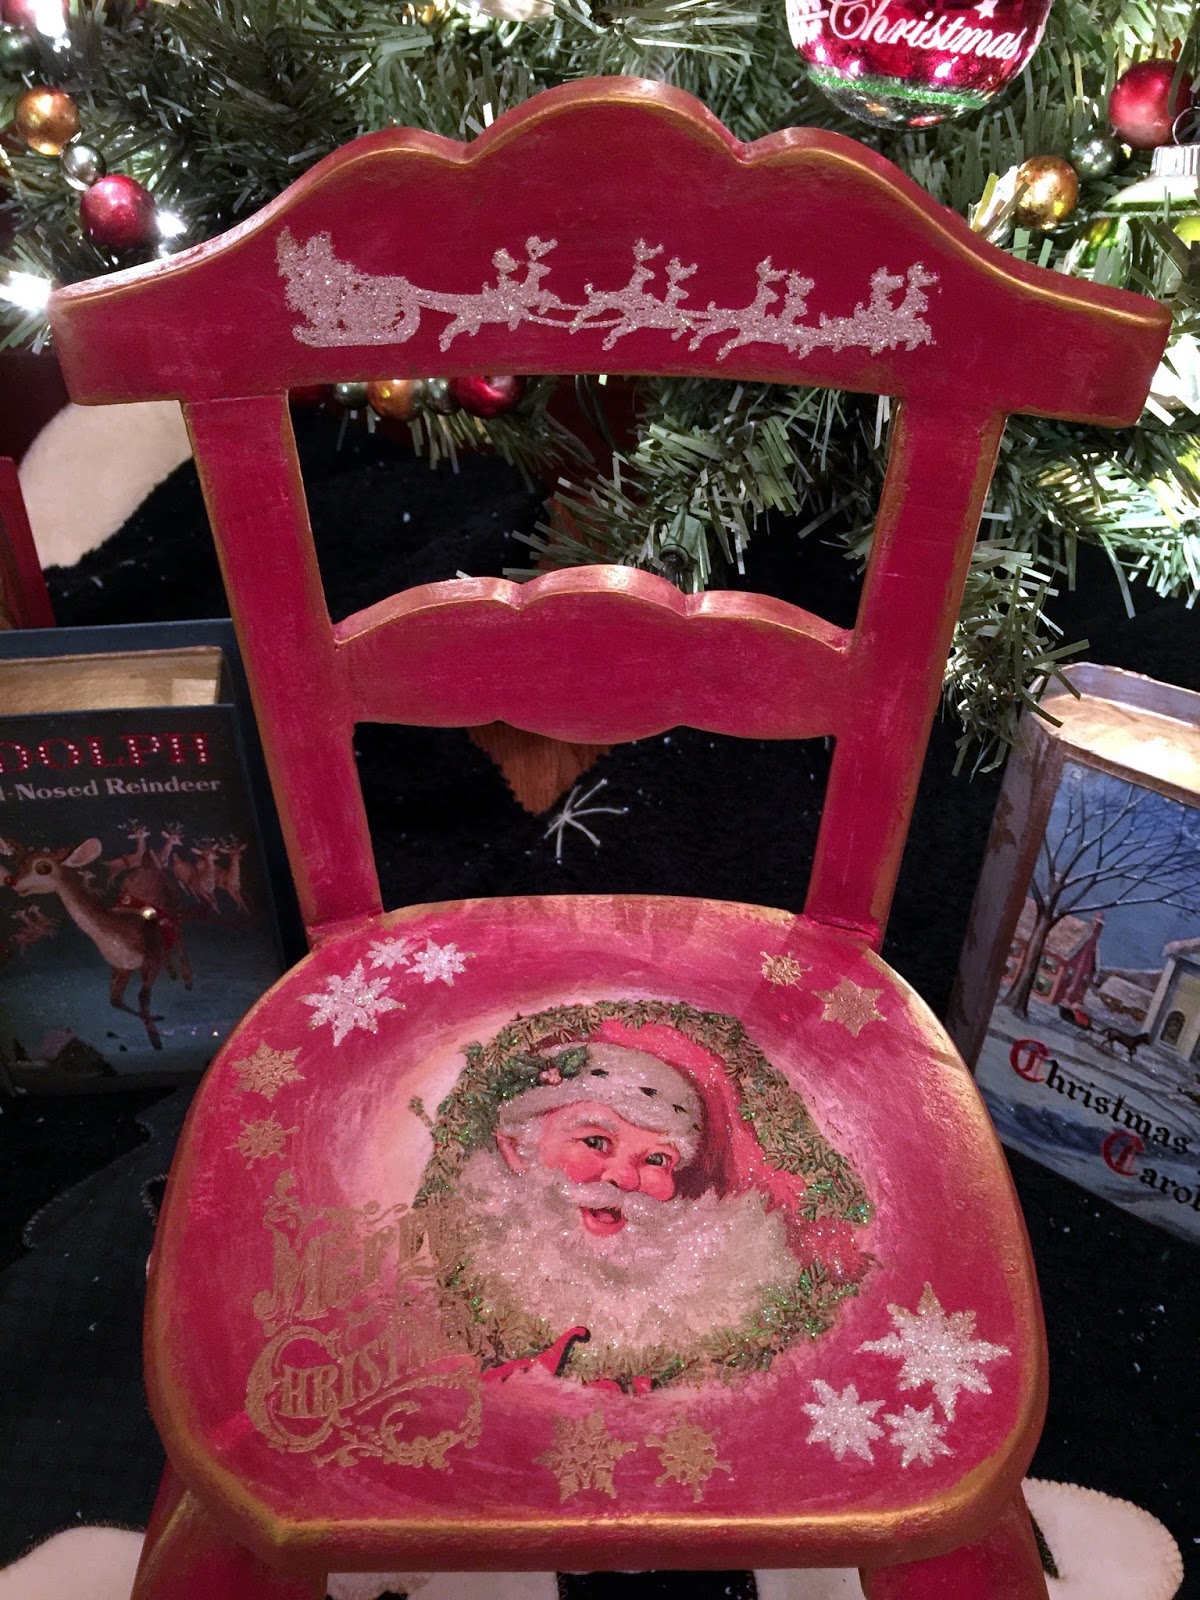
Here is the seat of the little chair.  I love the way it turned out!


I also added the Twinkle Writer to Santa and his reindeer followed by sprinkling glitter on them.  In person, they are so sweet and the Christmas tree lights really catch the sparkles of the glitter.


Finally, I completed the look of the chair by adding DecoArt Media Metallic Gold paint along the edges of the chair.  I simply used my finger to swipe the paint all around the edges. It really finishes out the chair so perfectly.


From a plain little drag wooden chair, to this darling vintage style Christmas chair ... I wouldn't take anything for it and I know it would cost a WHOLE LOT MORE than $5.00 now!


Here is a closer look at the detail in this little chair.  So fun to bring back to life!


What a difference the gold edging makes!  It frames everything and just seems to say "Merry Christmas!"

Here's wishing you and yours a blessed Holiday Season!

Thanks for stopping by!

Wednesday, November 15, 2017

WHAT THE AUTUMN LEAVES CAN TEACH US

Happy Fall Y'all!

I am so proud to be featured on ANDY SKINNER'S BLOG again this month.  This time with an autumnal art journal page spread using a really fun almost watercolor effect with DecoArt's amazing Media Fluid Acrylics paints.  


Are you not a gifted sketch artist but you'd really LOVE to incorporate beautiful images in your art journal pages?  Well then, bring out your scissors and start looking through magazines, calendars, old cards, wrapping papers, napkins; anything that has wonderful images! Clip those images, store them and you'll have them for virtually anything that pops into your head.

I recently was inspired by a "Country" magazine that was just FULL of beautiful autumnal farm and countryside photographs.  Watching the colorful leaves falling like snowflakes to the ground outside my windows also gave me pause to consider how much we are like those lovely leaves.  These things were the inspiration behind my art journal spread.

I even took a crack at writing my thoughts and used them on my pages.  

So, hop on over to ANDY'S BLOG and check out the complete pictorial tutorial!

Happy Thanksgiving and a very blessed upcoming holiday season to all!

Tuesday, October 24, 2017

BEWARE! THE DOOMSDAY CLOCK IS TICKING...FOR YOU!

Welcome to my lair!  
Bwaaaahhhh!

Do you hear the clock ticking?  What clock you ask?  The Doomsday Clock!
I have created this spooky vintage Halloween home decor piece for Andy Skinner's Creative Design Team. Lots of fun without a lot of time invested!

Head over to ANDY SKINNER'S BLOG to see the complete pictorial tutorial!  


Halloween is fast approaching!  Are you READY?!?!

Bwaaahhhh! 

Thursday, October 5, 2017

VISIT THE PUPPET MASTER AT DECOART

Hello everyone!  It's almost the weekend!  Halloween is coming and it's a GREAT time to do some holiday crafting!


Hop on over to Decoart's Mixed Media Blog and check out my 5 x 7 canvas titled
"THE PUPPET MASTER".  Created using the fabulous DecoArt Media products and Andy Skinner's new Birds and Bones Stamp set, this canvas will be part of my Halloween decor this season.

There is a complete pictorial tutorial over there so hurry up and check it out!

Thursday, September 14, 2017

THE BIRD BRAIN HALLOWEEN DOOR HANGER

 BOO!

HALLOWEEN IS COMING!

How about a fun tutorial using Andy Skinner's wonderful Skuldoggery and Birds and Bones stamp sets?

Barney "the Bird Brain" is waiting for you over on Andy's Blog!


Who is Barney "the Bird Brain"?  Well, here's a hint ... he's just hanging on a door!

Here is a sneak peek at this fun and easy project.  Head on over to Andy Skinner's Blog for a complete pictorial tutorial.   

Thursday, September 7, 2017

THE UNICORN PAPERS ART JOURNAL

Greetings art fans! 
I've been having so much fun with a new project and I wanted to share it with you.

Recently I got together with a couple of my art buddies and we decided to play with our "take" on creating Shannon Green's Unicorn Papers and Journal.  Never heard of it? Me either! You can see her YouTube video HERE and HERE to see how she constructed the basic pages. Layers and layers of paint, pattern and FUN!


This is the cover of my little journal. I LOVE IT!  More about how I constructed it at the end of this post. 

Remember a couple of weeks ago when I shared with you how to coffee stain your own book pages? Click HERE to refresh your memory on that. That was my first step in working on my own Unicorn Papers Journal. This is not a mandatory step but I really love how my pages turned out with this as the base. The pages actually feel more like material rather than paper after you complete the layers.


This journal started out as a 42 page (back and front) paperback devotional. But you could use anything. I coffee stained my book pages because I love the feel of them and the aged look before I even began working with them.


Here is what things looked like in the beginning. I decided on the colors I wanted to use to create my "rainbow" of color. Let me say that DecoArt's NEW PREMIUM ACRYLIC PAINT TUBES are PHENOMENAL and definitely live up to all the hype they've received! 

The colors are rich and creamy and work to perfection. I also used some of DecoArt's bottled acrylic paints. They are wonderful as well ... but OH! Those new Premium Tube Paints! They are thicker and for this project, I liked them the best.

Anyway, you start with a variety of acrylic paint colors arranged to your liking.  Have a hotel key or straight edge and a plastic palette ready to go.  AND...UNDERNEATH, don't forget to have a piece of scrap paper not only to protect your work surface but to get all sorts of yummy, wonderful abstract colors as you're working.  SAVE THOSE SCRAP PAPERS!!!


Next, squeeze out big dobs of paint at the top of your plastic paint palette. They should be touching but not overlapping. Then using your hotel key, lightly scrap the paint downward to the opposite side of the palette. Let the paint flow down from the hotel key leaving a trail of color.


Once you have done that,use the edge of the hotel key to pick up some rainbows of paint and then start randomly swiping it across your coffee stained pages.  You will get all sorts of randomness. This is just the first layer so don't be so concerned with covering every inch of the pages with paint. The pages in this picture are only the first layer of paint.


Next, take a piece of wax paper a little larger than your book pages. Squeeze some DecoArt Titanium White Acrylic Paint or Gesso onto the wax paper and spread it out with the hotel key. Next turn the wax paper, paint side down on top of each of your painted book pages. Press the white paint into the book pages. You get a wonderful random white layer on your painted layer. Reload the wax paper with white paint and repeat the process until you are happy with all of your painted book pages.


Here is what your pages will look like at this point. Onto the next layer ...


NOW the REAL FUN begins! Adding another layer of pattern and more color! Choose anything you like to create texture. Anything from stencils, stamps, bottle lids, bubble wrap, sponges, rubber drawer liners; you name it.  Dip those pieces into your rainbow of paint on your palette and start pressing them randomly onto your painted book pages.


Here are your pages at this point!  Aren't they wonderful? So much color and FUN going on here!

Now it's time to embellish the pages in whatever manner you choose. I started out with a magazine girl for my first finished page. I will take you through the steps I did on a few of my beginning pages as I am working through my art journal to help you along your journey.


I chose a magazine girl and cut her to fit my page. Then I started tracing around the stamped flowers with a Fudeball Permanent Black Ink Pen. After that, I used a very small brush and painted DecoArt Titanium White Acrylic Paint around my flowers and dotted in the centers for more interest. 


Next I used an exacto knife on a pad to cut around some of the flowers so that my girl could slip underneath them and I wouldn't lose that detail when I glued her onto the page.


Contining to add more layers and detail; I added various Washi Tapes from Jane Davenport and some other random ones. I added more black pen markings as well.


I added a sentiment from a magazine and inked around it to finish off the page. I also used my finger with some DecoArt Media Fluid Acrylics Carbon Black paint on it to finish off all of the edges of the page.  I will do that on every page as I love how it frames everything.

Some pages can be really detailed while others can be simple.

An example of a simple page ...


I began with this page with all of the basic layers on it. The black stamps are Seth Apter's from his Ink Spots and Pathways stamp sets. Aren't they cool? I just love this background! Again, the black paint around the edges of the page.


Here is the finished page.  I simply glued my magazine girl in place and added a magazine sentiment which I framed with a black permanent ink pen. Simple ... but the background makes this page!

No magazine people on a page?  Okay. Here's an example ...


I added some DecoArt Media White Gesso to this page in the center. You'll see why in a second.


I stamped this lovely butterfly onto the center of the page using Permanent Black Ink. I also stamped a sentiment underneath. I started filling in the butterfly using another fun medium, Dr. Martin's Radiant Concentrated Water Color and a fine brush. 


Just look how the white gesso allowed the butterfly to POP against an otherwise very colorful background. I edged the page with black paint and added some random stamping of Andy Skinner's very versatile peeled paint stamp from his Industrial stamp set. LOVE THIS STAMP! A few black paint bottle lid circles and it's finished. Simple yet very powerful. 


One more page example and then I'll show you the construction of the outside cover.


This page features a stamp from Dina Wakley's Silhouetted Women stamp set.  It was stamped with Permanent Black Ink.  Now what to do?


I added another magazine girl to this page and also did a little heat embossing. Using Seth Apter's circle stamp from Pathways, I first stamped in black and then in Saffron Permanent Ink.  Immediately I added some Clear Embossing Powder over the ink, removed the excess powder and heat set it. I repeated this three more times randomly on the page.


And here is the finished page; framed in black paint.  The sentiments are from Dina Wakley's Face In The Crowd stamp set and are stamped with Permanent Black Ink.  I also cut around the stamped image and slipped the girl into the page. I like how those figured intersect.

And now for the cover ...


Remember when I told you to SAVE THOSE SCRAP PAPERS? Here's why!!!
Just look at all of the color, pattern and possibilities here.


I chose this small piece of randomness for my journal cover. To the left you see the paperback devotional journal all double taped and ready to receive it's cover. I cut the paper a bit larger than the journal so I would have "wiggle room" when covering the journal. Then I cut off the excess paper.  Finished, this will be an 8 1/4" x 5 1/2" journal.


Here is the journal cover in place; along with the black paint edges.


I glued my little unicorn girl in place a little below the center of the cover. Once dry, I added black pen work around the little girl and added some glitter glue to her because she's a "magical unicorn".  The shimmer of the glitter glue really plays off of the brilliant colors on the cover and the black edging really pops everything.


  Finally, I computer generated the letters for the cover, cut them out and glued them in place. I did some black pen work around every other letter to complete the look.


Once all of my pages are finished, I will glue them into the book.  If I have trouble with the staples in the center of the book coming apart, I will do some sort of stitching in the center to hold everything together.  This is such a fun project!  I hope you'll give it a try.

And don't forget to pull out those DecoArt Premium Acrylic Tube Paints and bottle paints!  You will LOVE your results!