I know it's not even Summer yet and I'm already thinking about Halloween!
I guess since I'm already seeing all of the big box craft stores putting out FALL things already, I think I better get with it!
I bet Christmas items will start appearing in the stores next week! It's ridiculous! But THAT is another blog post subject! (smile)
Anyway.... I wanted to share with you a Halloween frame I just completed. Here it is ...
A few months back, I got together with some of my friends and we experimented with some different techniques in creating the background for the frame. I didn't take pictures of this process so I can't share the step by step with you. But, I basically I created a lot of texture with old pieces of netting, my fingers and a palette knife and a little Crackle Paste particularly around the edges of the frame. Then I covered the background; working in small sections with modeling paste and stamped into it using various Halloween themed rubber stamps.
After all of that dried, I added my DecoArt Media Fluid Acrylic colors, sticking with the traditional black and orange. The center piece of the frame was done with a little Crackle Paint followed by shades of black and grey. The bolts were all done by using one of several rust techniques and DecoArt Media Fluid Acrylics. I have to admit when the frame was finished, I was less than enamored with it. So, I put it down and figured I'd come back to it sometime and try to rescue it. That day came this week! And now I LOVE the end results!
I rubbed some DecoArt Copper Kettle Metallic Lustre in strategic locations all over the frame and WHAT A DIFFERENCE IT MADE!! It gave "life" to a rather dull background and really popped the stamped images.
So now I can pick up on the step by step as I finished out the frame...
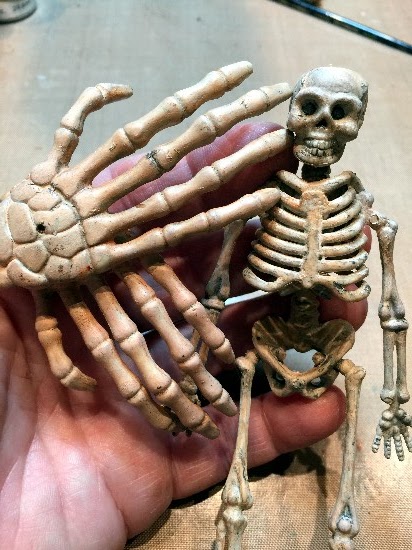
I began by taking some Halloween pieces purchased from a box store: a small plastic-ish skeleton, some little skulls and some creepy hands. I gave them a basecoat of DecoArt Media Fluid Acrylics Titan Buff (a great soft beige color).
Next I made a "dirty wash" of Quinacridone Gold and Paynes Grey mixed with water-about equal parts of each of the paints and more water. I painted that all over the pieces and wiped away the excess. Repeat this step until you have achieved the appearance of a natural bone color.
Here is the end result. LOVE IT!
Next I created an eye socket using Paper Clay that would fit into the center section of my frame. That has to dry thoroughly; like overnight.
Next I chained up my skeleton with some old chain I had in my craft room and some jump rings.
I began working on the interior recessed portion of the frame. The sides were covered in DecoArt Media White Gesso using my finger. I love using my fingers much more than a palette knife because you can really get a "feel" for the project.
After that was finished, I scraped DecoArt Media Crackle Paste through a stencil made to look like bricks. Let it dry thoroughly. You do not heat set any of DecoArt's Crackle products. Let them crackle naturally with a normal drying time.
Next I painted over the gesso with Titan Buff then Yellow Oxide followed by Transparent Yellow Iron Oxide and finally a bit of Quinacridone Gold to give a bit more of a rich "brickish" appearance.
To weather the bricks and give them a lot of contrast, I added a layer of DecoArt Media Antiquing Cream in Raw Umber. Simply brush it on and let it dry. Then using a damp cloth, wipe away all of the cream you want to remove. You can also brush on the antiquing cream and immediately wipe away the excess; giving a lighter antiqued look.
Next, using my finger, I added some depth to the brick interior of the frame. I added a little DecoArt Media Fluid Acrylics Burnt Umber primarily around the outside edges of the center; feathering it in toward the center.
I temporarily assembled the frame to placement of my eye socket.
Then I painted the socket using various colors of DecoArt Media Fluid Acrylics to give it a more natural look. I found an eyeball on the internet, sized it to fit my eye socket, printed it, cut it out and mounted it on a piece of chipboard. I brushed over the eyeball with DecoArt Media Gloss Varnish.
I took an old craft brush and sprayed the bristles with DecoArt Media Black Shimmering Spray. After it dried, I cut bristles out of the brush and stuck them in place using a 1/8" piece of double sided adhesive tape that was added to the eye socket. After that dried, I painted over the tape to blend the eyelashes into the eye socket.
Then I simply assembled the center section of the frame in place using double sided adhesive tape and hot glued the hands, skulls and skeleton in place. I also added a bit more chain running across the frame; from the boney hands to the chained skeleton. I love dangling chains and things that move freely on a piece.
I hope you are all taking some time out to play and experiment with your artsy adventures! It's so fun and freeing.