Sunday, June 10, 2012

ANYTHING GOES WITH THE OLD CURIOSITY SHOPPE

Hello friends! It's another glorious Monday and time for another Simon Says Stamp and Show Challenge.  This week....Anything Goes!


I had so much FUN with this one! I took an unfinished wooden box, turned it upside down, added Tim Holtz' amazing Pulley Wheels, covered it in Graphic 45's fabulous The Old Curiosity Shoppe Papers and filled it with all sorts of "curiosities". 


Here is a picture of the completed cabinet with the embossed glass door closed.


Here is a picture of the original wooden box, before I did anything to it, including turning it upside down and having to also turn the handles upside down.

I sanded the box and then washed it in a mixture of Raw Sienna Acrylic paint and water.  Then I began covering the box in those amazing Graphic 45 The Old Curiosity Shoppe papers plus one very cool lady from Graphic 45's Steampunk Debutante 12 x 12 paper.  I used both 12x12 and 8x8 papers on this box.


The right side of the box features the lady from Steampunk Debutante.  I created a pocket in the lower portion to hold yet more "curiosities".  This is how I did that....


I scanned the globe portion of the lady on my computer so that I would have an exact copy of the image.  I printed it onto white cardstock.   Then I cut it out and cut out another shape of the globe out of Kraft Paper (to later use as a backing for my pocket.)  I also left a tab of kraft paper on the bottom of the globe that I could use to attach the bottom of the globe to the lady already glued on to the side of the box.  This would create the bottom of my pocket.  I took a piece of black milliner's netting from an old hat and covered the globe with it. It almost matched the cross hatch pattern in the paper perfectly. I attached the netting to the back side of the globe using 1/4" Wonder Tape.  Then I placed the kraft paper backing over the loose netting ends.  That gave the inside of my pocket a nice, finished look.


Next I made little bows out of black organza ribbon to glue onto the globe.  I also made two little accordion sides for my pocket out of kraft paper.  I inked just the edges using a Black Cats Eye Ink Pad.  Next I used the Wonder Tape to secure the bottom tab to the cabinet.  Then I secured the sides of the pockets to both the globe pocket and to the side of my cabinet. I hot glued the little bows in place on the globe.


Here is a view of the finished pocket before I added ephemera.


This side also features an embellishment that I learned to make in Tim Holtz last summer.  It is made from a Copper 1x3 Memory Frame, an Ideaology Corner, the bird and heart from Tim's Ideaology Adornments, Sketchbook Tissue Tape as the interior of the frame, an Ideaology Time Piece, two Game Spinners and a Jump Ring.  I have given them a patina look by using a Juniper Paint Dabber.


The left side of the box features a victorian lady from The Old Curiosity Shoppe papers.  I love dimension and pieces that are free to move.  So, I added a patina key to her back and a metal butterfly hanging from a chain.  It is able to swing freely.  There is also a larger patina butterfly hot glued onto the upper left corner of this side. I had a little metal crown charm that I thought my proper lady should be wearing.  I added a piece of vintage lace and three little roses to the side. The lady is holding a small mirror charm in her hand.  I found the OLD MAID playing cards online.  So, I sized them to fit my cabinet and added them for fun.


In both of the side pictures, you can also see embossing on the glass doors.  I found out the hard way that when you're embossing on glass, be careful not to let the glass get too hot or it can crack.  If you look closely, you can see the crack on this door.  I added a little Glossy Accents along the wooden frame edge to hold the glass in place and prevent it from slipping.  It dries clear and worked perfectly! I actually like the crack ~ a happy accident!  The steampunk man's image on this glass is from Tim Holtz' Pen and Pencil stamp set.  It is heat embossed using Black Embossing Powder.  The flourish used on both windows is a smaller version from Tim's Artiful Artifacts stamp set.  It is embossed using Queens Gold Embossing Powder.  


The back of the box is quite intricate as well.  I scanned the skate, and popped it on top of the original skate after adding some feathers for more dimension.


Here is a view of the back of the box with all of the "curiosities" on top.


Here is a closeup view of the left side of the back of the cabinet exterior.  I gave a patina look to Tim Holtz' Faucet Knob and an Ornate Plate that serve as a hanger for a little butterfly girl inside of an optical lens.  Tim Holtz' Vials came in handy.  One sits in the corner, holding more feathers while another smaller one holds a tiny lightbulb and is sprouting a "flower" made from a Memo Pin, Foliage and Glossy Accents.  A little Bottle Cap rests on the bottom lip of the cabinet along with a Pen Nib.  I used Butterscotch and Stream Alcohol Inks to create the background on the domino and stamped a sentiment on it.  I also added a little crown from Tim Holtz' Adornments.


As I stated earlier, I pop dotted the skate on top of the original skate on the paper.  I filled it with feathers and used Graphic 45's Brad Metal Staples for the wheels.  All of the bottle images on the bookshelf are filled in with Glossy Accents to give them a bit more dimension.


The interior of the box was so much fun to put together.  It's filled with stuff I've collected or some stuff I altered especially for this box. 


Here is a better look at the upper shelf.


Here is a closeup of the lower shelf.


I think the top of the cabinet is my favorite.  Remember...this was actually the bottom of the wooden box and I turned it upside down to add the wheels.  But..it also created the perfect top shelf to add more "stuff".


My favorite is "Petunia", inspired by the "When Pigs Fly" paper in the Old Curiosity Shoppe pad.  I bought this pig at a craft store and "gussied" her all up with butterfly wings left over from Pink Paislee's Butterfly Garden collection.  I added the pink tutu and ribbon sash.  I added the little crown on her head, the magic wand in her hoof and the rose she's grasping in her teeth.  She is hysterical when you see her in person.


She is perched on a little stand made out of unfinished wood pieces (two sized of tires and a little post with a small wooden disk at the top).  I painted these wooden pieces with Paper Artsy's Haystack Fresco Paint.  I then crackled the pieces using Paper Artsy's Crackle Glaze.  It's AWESOME stuff...crackles within minutes!  I then antiqued it further with Gathered Twig.


And here is Petunia's "little one" sitting high atop his high chair...spouting his baby wings.


Here is a closeup of the left side of the top of the box.


And here is the right side of the top.  As you can see, it's quite a conglomeration of "stuff".


I found these labels on the internet, sized them to fit the bottles and then distressed them and glued them in place.  I rubbed Rock Candy Stickles on the labels for more interest.  I also added more feathers to the one bottle and made a little dangling charm out Swarovski crystals.


I purchased the mannequin at a craft store and sprayed it with a honey colored stain.  The wings are stamped and then colorized with Tim Holtz' Distress Markers.  I added a little time piece and hanging key to his front and gave them a patina look.


You can see more detail from the back of the top of the box.


The ABC book is from a collage sheet I purchased at Alpha Stamps.  I sized it to the size I wanted and made a little book out of it, using chipboard, masking tape stained with Fired Brick Distress Stain and the book cover that I distressed with Gathered Twig and Black Soot Distress Inks.


Sorry for the extra long blog today.  There is just so much of this piece that I wanted to share with you.  It's such fun and it makes me smile just to look at it.


So...ANYTHING GOES!!!  Join the fun at Simon Says Stamp and Show and enter our challenge. You could be chosen as the lucky winner of our weekly prize of 


Your art could also be chosen as one of our TOP THREE for the week.  We have such gifted artists who follow and enter our challenges.  So..this is quite an honor! 


Have fun with your ANYTHING GOES! I can't wait to see your creations!


Wednesday, June 6, 2012

Hey Friends!  I hope you're all having a wonderfully creative week so far!  


I'm excited about the Ranger blog this month!  They always have wonderful projects and greats tips for using their products.  One of my creations is being featured right now!  Click HERE to be magically transported to Ranger's blog and all of the details on how to make this really fun 6x6 wall hanging.  This piece is heavily inspired by Tim Holtz and Wendy Vecchi.  I love their products.  They are so versatile and fun!  I also LOVE Ranger products because they are so user friendly and you always get great results! 

Remember to get INKY and take time to PLAY!!  It's SOUL FOOD!

Sunday, June 3, 2012

SHOW SOME TEXTURE

Hello everybody! Welcome to another week of Simon Says Stamp and Show's Challenge.  This week...Simon Says Show Some Texture!  Check out the wonderful creations that my Design Teammies have made for you by clicking the link above.  They are so talented and work hard every week to bring original ideas to you.

Texture can come from anywhere....netting, combs, the edges of plastic cards, stencils...anywhere.  So, when you are creating with texture, think outside of the box!


I have created a texture rich trinket box.  I started out with just a simple little unfinished wooden box.  I first covered the top of the box with Claudine Hellmuth's White Gesso as my base.  When dry, I began to build two or three layers using the Gesso and Dyan Reaveley's wonderful 5x8 stencils:  Luscious Leaves, Letter Jumble, Dotted Flowers and Diamond Of A Border.  I also used a little piece of Punchinella for the honey comb effect in the center.  Finally, what looks like loose netting is actually little pieces of plastic garden weed netting that I stuck into the Gesso.


Here is my box before I embellished the top.


These leaves are from Dyan Reaveley's Luscious Leaves Stencil with Gesso scraped over the top of it.  After the Gesso dried, I painted the entire box with a light pink acrylic paint then washed it (antiqued it) with Raw Sienna Acrylic paint and water.  Then, using a small paint brush, I painted in the leaves using Italian Sage Acrylic Paint followed by some Juniper Paint Dabber.  Your can see the really defined honeycomb pattern achieved by scraping Gesso over a piece of Punchinella.


The garden netting added some neat texture as did Dyan's Diamond Of A Border and Letter Jumble Stencils.  The small polka dots at the bottom are from Dyan's Dotted Flowers Stencil.  I then lightly wiped a bit of Italian Sage Acrylic Paint over some of the raised areas using my finger followed by a touch of Juniper Paint Dabber.


Here is the top of the finished box before I added any embellishments.  You can see the sides of the box that are also textured using Metal Foil Sheets that are dry embossed.  I measured the length and width of the side of the unfinished wooden box and cut strips of metal foil.  Then I embossed them using my Vagabond and embossing folders.  I used a couple of Cuddlebug folders and the Tim Holtz Postcard Texture Fade for the front.  The sheet metal is adhesive on the back, so once I cut the strips to fit the box, it was easy to adhere them into place.


Here is the postcard front.  It is silver sheet metal that was washed with Raw Sienna Acrylic Paint and then given the patina look using the Juniper Paint Dabber.  The metal hardware was originally a shiny gold finish.  It was also given a patina finish courtesy of the Juniper Paint Dabber.


Both of the sides are embossed buttons embossed from a Cuddlebug embossing border and then antiqued in the same method at the front.


Here is the back.  The metal and the metal findings were also finished in the same way as the front and sides of the box.


The top of the box was then embellished with some metal buttons and some delicate little flowers that I dipped into melted Clear UTEE and made to look like porcelain flowers.  I added a little Hug Snug "distressed" seam tape for ribbon and some little green wire curls for added texture and interest.


Open the box to reveal four small compartments...perfect size for ATCs to be stored.  I just finished off the interior using a sheet of Pink Paislee's Butterfly Garden paper that I had left over.  I popped some of the embellishments with pop dots or by using Glossy Accents.


Here is a closer look at the top portion of the box.


Here is the bottom portion of the box.  The bird's nest is heat embossed with Rust Antiquities and a touch of Copper Embossing Powder.  The eggs are colored with a Pool Paint Dabber and then coated with Glossy Accents to make them appear more dimensional.

Working with texture...love it!  Now it's YOUR turn to create something with texture and post it to Simon Says Stamp and Show. You could be our lucky randomly chosen winner of a very generous ...


... and you could also be chosen as one of our TOP THREE entries of the week!  Considering the amazing talent that part of our weekly challenges, that is quite a feat!  Good luck and thanks for stopping by my blog! Have a great week and take time to PLAY!


THE ARTISTIC STAMPER QUEEN'S JUBILEE GIVEAWAY

I hope everyone is enjoying a fab weekend.  I worked in the yard all day yesterday, weeding beds around the house and helping the hubby and a friend clean out our garages. My sore muscles are screaming this morning, reminding me that they are there and that I should use them more often! (smile) Hopefully I can work the soreness and stiffness out of them this morning as I do more outside work.

Even though I am not British, I have met some AMAZING and TALENTED artists through this incredible art journey.  They are celebrating their Queen's Jubilee this weekend. I have been watching the coverage on television.  I am so proud for them!  Seeing their country all come together in such exciting and patriotic gatherings is wonderful!  The Union Jack is proudly flying everywhere.  People are celebrating everywhere from elaborately planned events to neighborhood parties.  I love it!

Over at THE ARTISTIC STAMPER, Jennie Boxall has a wonderful giveaway to coincide with the Queen's Jubilee.  Check out these goodies.


These would definitely be fun to win! I've already got my name in the drawing...if you decide to add yours, just click on her blog and leave a comment.  Good luck!

Sunday, May 27, 2012

THIS ONE'S FOR THE GUYS ...

I hope everyone in the US is enjoying a safe and happy Memorial Day holiday weekend.

Simon Says Stamp and Show is asking all of us to create something for the guys this week.  Check out the blog to see the wonderful masculine pieces my fabulous Design Team buddies have posted this week.  As always, they are amazing!

I got my grunge on and used almost all Tim Holtz products to create this 6x6 board.


This piece really has an emphasis on Tim's wonderful and often misunderstood Distress Embossing Powders.  They are not meant to be metallic or shiny when they are heated.  They are meant to be grainy and rough with a sand paper-ish type texture.

First I glued a piece of paper from Tim's Crowded Attic Paper Stash to a 6x6 chipboard square.  I distressed the background using Bundled Sage, Pumice Stone, Weathered Wood, Crushed Olive then Black Soot Distress Inks.  Next I embossed the 6x6 board using Tim's Postal Texture Fade.  I lightly tapped the Distress Embossing Ink to just hit all of the high areas of the embossed design and cover them with clear ink.  Then I sprinkled first Walnut Stain and then Vintage Photo Distress Embossing Powders randomly over the entire embossed image; mixing the two colors.  I removed the excess powder and heat set it into the raised image.  I rubbed off the excess powder and release crystals leaving a beautiful, rough image.


Next I randomly stamped parts of the harlequin design from Dyan Reaveley's Basic Backgrounds stamp set using the Distress Embossing Ink.  Using the same technique that I did with the postal cancellation image, I randomly sprinkled Weathered Wood and Vintage Photo Distress Powders over the ink and heat set it.  Then I distressed the board again with a little more Vintage Photo Distress Ink.


I die cut the Old Jalopy out of Grungeboard.  Then I rubbed the surface of the jalopy with the Distress Embossing Ink pad and sprinkled Black Soot Distress Embossing Powder all over it.  I heat set and removed the excess powder.  The little die cut details in the car are heat embossed with Vintage Photo Distress Embossing Powders and glued into place using Glossy Accents.  The "windows" in the jalopy are made from Mica that is glued to the backside of the jalopy die cut. I added the Plaquette across the car door.  The "smoke" coming out of the back end of the jalopy is made using a Mini Flourish die cut out of Grungeboard and painted with a Cloudy Blue Paint Dabber.  When it was dry, I smeared Waterfall Stickles over the surface and distressed the edges with Black Soot Distress Ink.  Then I glued it to the back end of the car, as if it were smoke coming out of a tailpipe.


I distressed Tim's Journaling Ticket with Vintage Photo and Crushed Olive Distress Inks with just a touch of Black Soot around the edges.  I stamped 'Enjoy The Journey" from Tim's Just Thoughts stamp set, using Jet Black Archival Ink.  I used Tim's Ruler to punch three holes equidistant on the top and bottom of the ticket.  Then I added a Long Fastener to each and pounded them with Tim's Texture Hammer to distress the heads.  The ticket is mounted on a piece from a Metal Foil Sheet that was embossed with Tim's Damask Texture Fade.  It was then rubbed with a Pitch Black Paint Dabber and I wiped away some of the paint with a paper towel, leaving a really cool antiqued look to the metal.  I then cut the edges of the metal sheet to mimic the edges of the ticket.

Finally, I added a piece of Tim's Filmstrip Ribbon to the right side of the board, using Tim's Tiny Attacher.  I pop dotted the Journal Ticket in place and then hot glued the Old Jalopy in Place.  With all of the Distress Embossing Powders, this not only has the look but the feel of a masculine project.

Now it's YOUR turn to create something for the guys and post it to our blog.  If you are chosen as the lucky random winner for the week, you will receive a ....

      
And...you could be chosen as one of our TOP THREE artists for the week!!  So...get your thinking caps on and think about all of those wonderful guys in our lives!  I can't wait to see what you create!
  

Monday, May 21, 2012

TIM HOLTZ MAY TAG ... OR IN MY CASE ... AN ATC

I love Tim Holtz' TWELVE TAGS of 2012!  If you're not participating, I encourage you to do so!  Not only are the tags really pretty and fun to do, but the techniques are way cool, too.  Click HERE to see Tim's May tag.


Here is my version of Tim's tag.  Instead of making a tag...I made an ATC.  I used Tim's miniature dress form, needle book, spool label, ruler and pattern image from his Attic Treasures stamp set.  They are the perfect size for ATCs!  

The background was done with Tim's new Spring Distress Ink colors; Peacock Feathers and Squeezed Lemonade.  I also did the spritz and flick technique to add some interest to the background.  Stamping is all done with Jet Black Archival Ink, except for the pattern image.  That was stamped with Peacock Feathers Distress Ink.

  
The dress form was stamped directly on to the background.  I stamped another dress form and cut out the bodice.  I added the skirt made from Tim's Tissue Tape.  I added some Orange Peel to the skirt and drew a line at the bottom of the skirt to give it some definition.

The wings are stamped using Tim's Distress Markers directly onto the stamp and then stamping them on Ranger's Specialty Stamping Paper.  There is a bit of a glare in the photo but they really blended nicely.  I added the smaller flower from Tim's Ideaology Foliage.  I colored it using Vintaj Patina in the green tones.  
Finally, I hot glued a little Ideaology Hanger underneath the Foliage flower to hold it in place. I also added an Ideaology Type Charm with the letter "T" to dangle from the hanger. 


The needle book and spool label are also stamped onto Specialty Stamp paper and then colorized using Tim's Distress Markers.  The little butterfly and the larger wings used on the dress form are from Tim's Papillion and the Attic Treasures Stamp sets.


The faux porcelain flowers were originally little white flowers.  I sprayed them with a mixture of Spiced Marmalade Ink Refiller, Bronze Perfect Pearls Powder and water in a Mini Mister.  Then I dipped the flowers in hot UTEE (see Tim's tutorial for the May tag) and then glued them in place on my little ATC.  They are so easy to make but really look like little porcelain flowers.

I hope you're enjoying this beautiful Spring weather and you're taking time out of your busy schedules to stop and smell the roses.  Enjoy your day and take time to play!


Sunday, May 20, 2012

THE LAZY HAZY DAYS OF SUMMER....

Hello everyone!  Happy Monday!!  

Memorial Day is fast approaching.  That means summer  vacations will soon begin!  Simon Says Stamp and Show's challenge this week is all about Summer Holidays.  The Design Team has posted some really wonderful works of art for your viewing pleasure.  Check them out over at Simon Says Stamp and Show.

 
I have created a journal using that wonderful  
Graphic 45 On The Boardwalk paper. 

I started off with a plain 9 3/4 x 7 1/2" composition notebook.  I covered both the inside and outside covers of the notebook with great background papers.  Then I finished off the insides of the covers first; followed by the back and then finally the front.


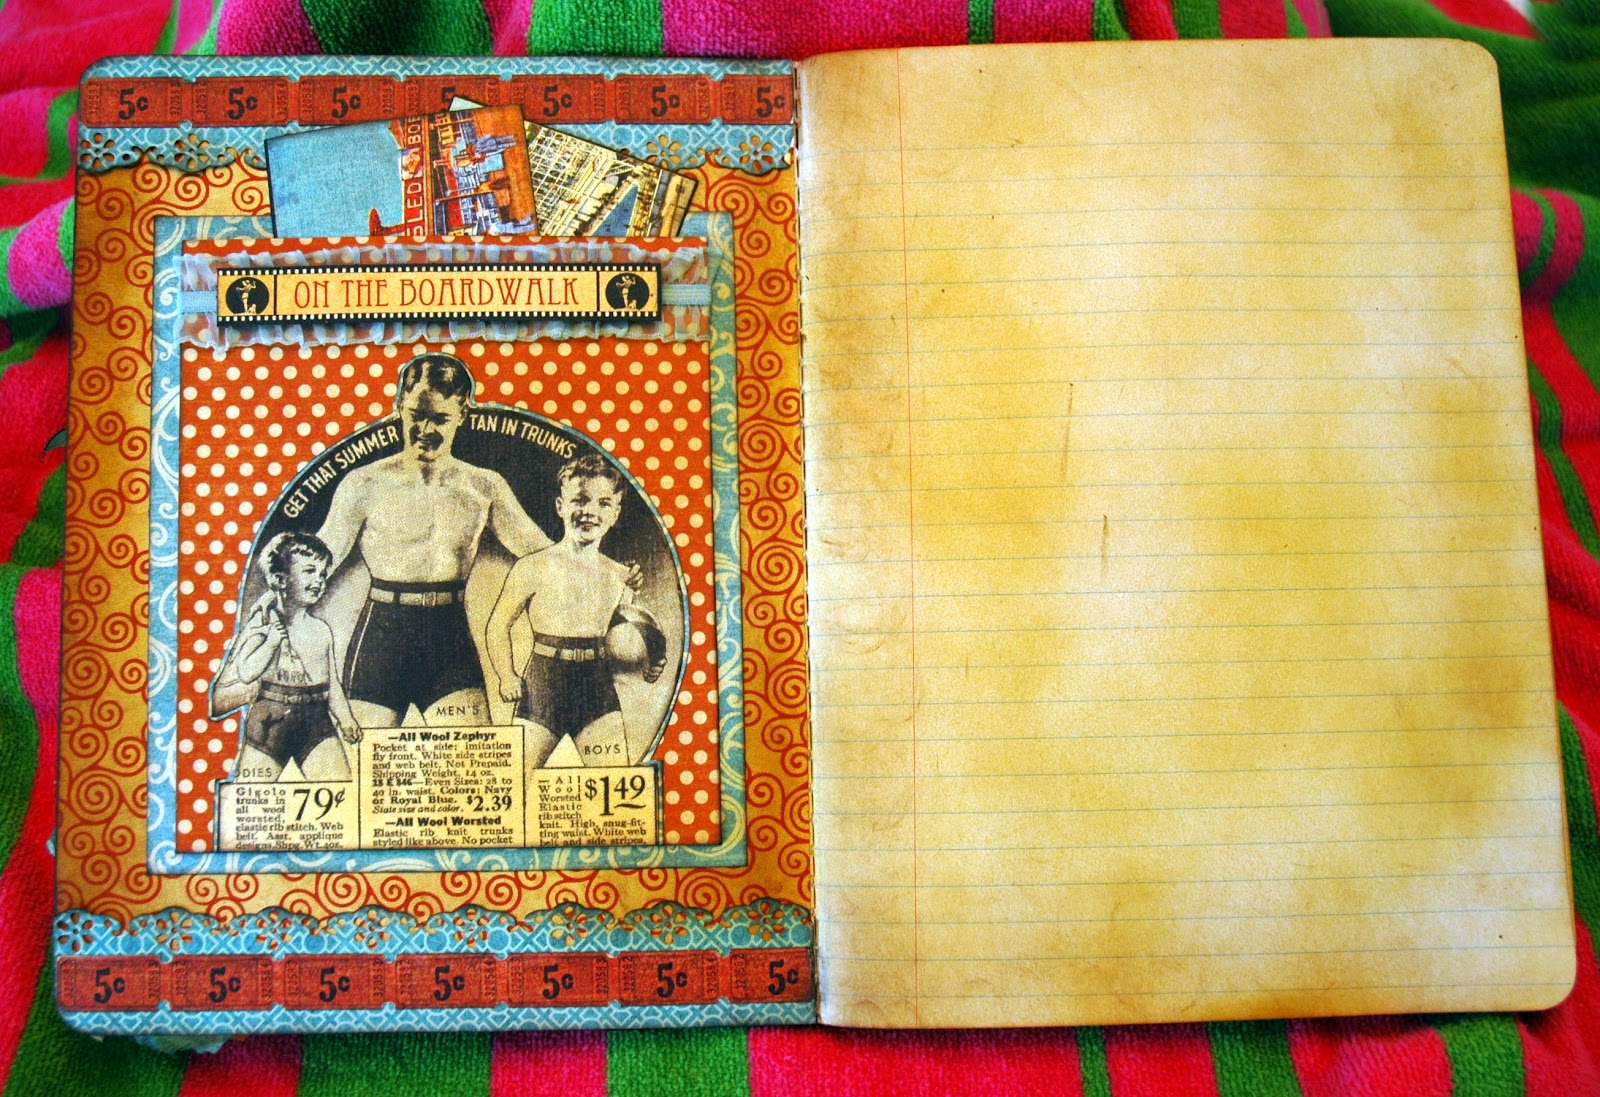
The inside of the front cover features a really cute vintage advertisement mounted onto a pocket.  


Tim Holtz' Trimmings gathered elastic ribbon was sprayed with my own concoction of Broken China Reinker, Kiwi Perfect Pearls and water in a Mini Mister.  It was then taped across the front of the pocket using 1/8" Wonder Tape.  I added extra ribbon onto both sides so that I could tuck it under the folded edge of the pocket before gluing the pocket in place using 1/4" Wonder Tape.  Then I just taped the "On The Boardwalk" piece on top.


I sprayed a Honey Stain from Design Masters on several of the first and last pages of the journal, to give it even more of a vintage feeling.


The embellishment running across the top and bottom of the inside cover was created using a Martha Stewart Floral Lace Edge Puncher.  I distressed the edges and put them in place using Wonder Tape.  Next, I added the little tickets, also using Wonder Tape.  All of the images I've used to embellish this journal are included in this wonderful 12 x 12 paper pack!!


In the pocket, I've stuck a couple of vintage postcards I created from still more of the images included in this paper pack.


The back interior cover features a long pocket on the side so you can slip notes, pictures or other memories in it.  The postcards laying on the left side of the book can easily be tucked into the pocket on the right.  All of the vintage photos and post card images were taken from the paper pack.  I have distressed the edges of all of the photos and other cut pieces with a Chestnut Roan and Black Cats Eye ink pads.


The back cover again features more of those wonderful vintages images from the On The Boardwalk collection.  I added some ribbon trim under the accent stripe that looks like bottle caps on the left side.  


I also smashed a couple of bottle caps and added them to coordinate with the bottle cap images on the accent stripe.


The front cover is my favorite.  It features a beautiful "bathing beauty" with a small group of lovely ladies.  Paper Artsy's Hot Picks 1201 stamp set provides the wonderful vintage anchor at the top and the lovely seashell at the bottom.  

The anchor was stamped using Coffee Archival Ink.  I punched a hole in the top and ran a hemp type cording through it and down the anchor; following the cording on the stamped image.  I then continued the hemp cording down the side of the cover to add interest and dimension.  I popped the anchor in place using small pop dots.   These cute little tags are part of the paper pack.  I added them to the hemp twine and tied them with ribbon. 


At the bottom of the twine, I added an airy Tattered Floral was made from Tim Holtz' Terminology Tissue Wrap.  The flowers have been colorized first with Picket Fence Distress Stain followed by Broken China, Spiced Marmalade, Mustard Seed and Wild Honey Distress Stains.  Another smashed bottle cap was added for the center.


The seashell was colored right onto the stamp using Tim Holtz' Distress Marker Colors: Tea Dye, Spiced Marmalade, Vintage Photo, Barn Door and Dried Marigold.  I stamped the shell on Ranger's Specialty Stamping Paper.  After I dried it, I added some Tumbled Glass and Broken China highlights to the shell using Tim Holtz' Detailer Brush.  I popped the shell in place using small pop dots.  I couldn't get a good picture of the shell...but the Distress Markers really did a nice job of blending and shading the shell colors.

Now, I'm set to journal about my summer holiday and beyond!  Time to start planning YOUR summer Holiday!  Post your creation to our blog and you could be the winner of our generous sponsor's weekly prize of a .... 


You could also be selected as one of the TOP THREE entries for the week.  That is quite a compliment, judging from the amazing entries we have each week!  So, enter today for your chance to win!!!  I can't wait to see your creations!