Hello friends and welcome to my blog! This week's Simon Says Stamp and Show Challenge was a bit of a challenge for me!
The theme is "What I'm known for ... ". You would think that might be easy but when you really stop to think about it, it's kind of tough to define yourself. I would like to think that, at least in the art community, I'm known as someone who tries to be different all the time; not defining myself by one particular style. I love all things vintage. I love Tim Holtz' style. I love dimensional pieces and I love lots of detail. So, I guess that defines me better than anything. But, as I said, I also try to create things that are different and share not only what I did but how I did it with you. That is why, when I came up with my piece for this week, I even surprised myself. I attempted an easel card with a drawer! My first EVER!

I am not a card maker. I think I have made one or two cards my entire life. I love cards and I have seen some of THE MOST beautiful cards I've ever seen made by people posting to the challenges at Simon Says Stamp and Show. But, for some reason, I think I'm intimated by cards! (smile)
Anyway, in the interest of staying true to being different, doing vintage, having dimension and lots of detail, I decided to be totally different and create this easel card with a drawer!
I was inspired by one of our challenge posts a few weeks ago....Shea Marshall's entry that was a easel card with a drawer. Check out her blog and there is a video link to show you the basic construction of this easel card with a drawer.
See, you guys inspire ME as much as I hope that I inspire YOU!

I began with papers from Pink Paislee's beautiful London Market 12"x12" paper pad.
1. Begin with a 6x6 square out of solid cardstock (I used the dark brown patterned paper) for the basic drawer.
2. Score it at 1" on each side, using the Martha Stewart Score Board. Then cut along one of the score lines on each side (to tuck that tab inside when creating the corners for the drawer).
3. Use 1/4" Scor Tape or glue to glue the corner tabs to the inside of the drawer.
4. Using patterned paper, cut eight strips measuring 3/4" x 4". Then cut two pieces 4"x4". These pieces are used to decorate the outside and inside of the drawer. Ink all of the edges of all of the cut paper with Gathered Twigs Distress Ink. Decorate the outside of the drawer now.
5. Cut a handle measuring 1/2"x4" out of plain cardstock. Score each end at 1/2". (I also lightly swiped the brown cardstock with a Gold Paint Dabber for a metallic look.)
6. Punch a hole in either end of the handle.
7. Measure in 1/2" from either end of the drawer front and punch a small hold.
8. Line up the hole on the drawer front with the hole in the handle and put in place using a brad.
9. Now decorate the interior of the drawer with the remaining cut patterned paper.
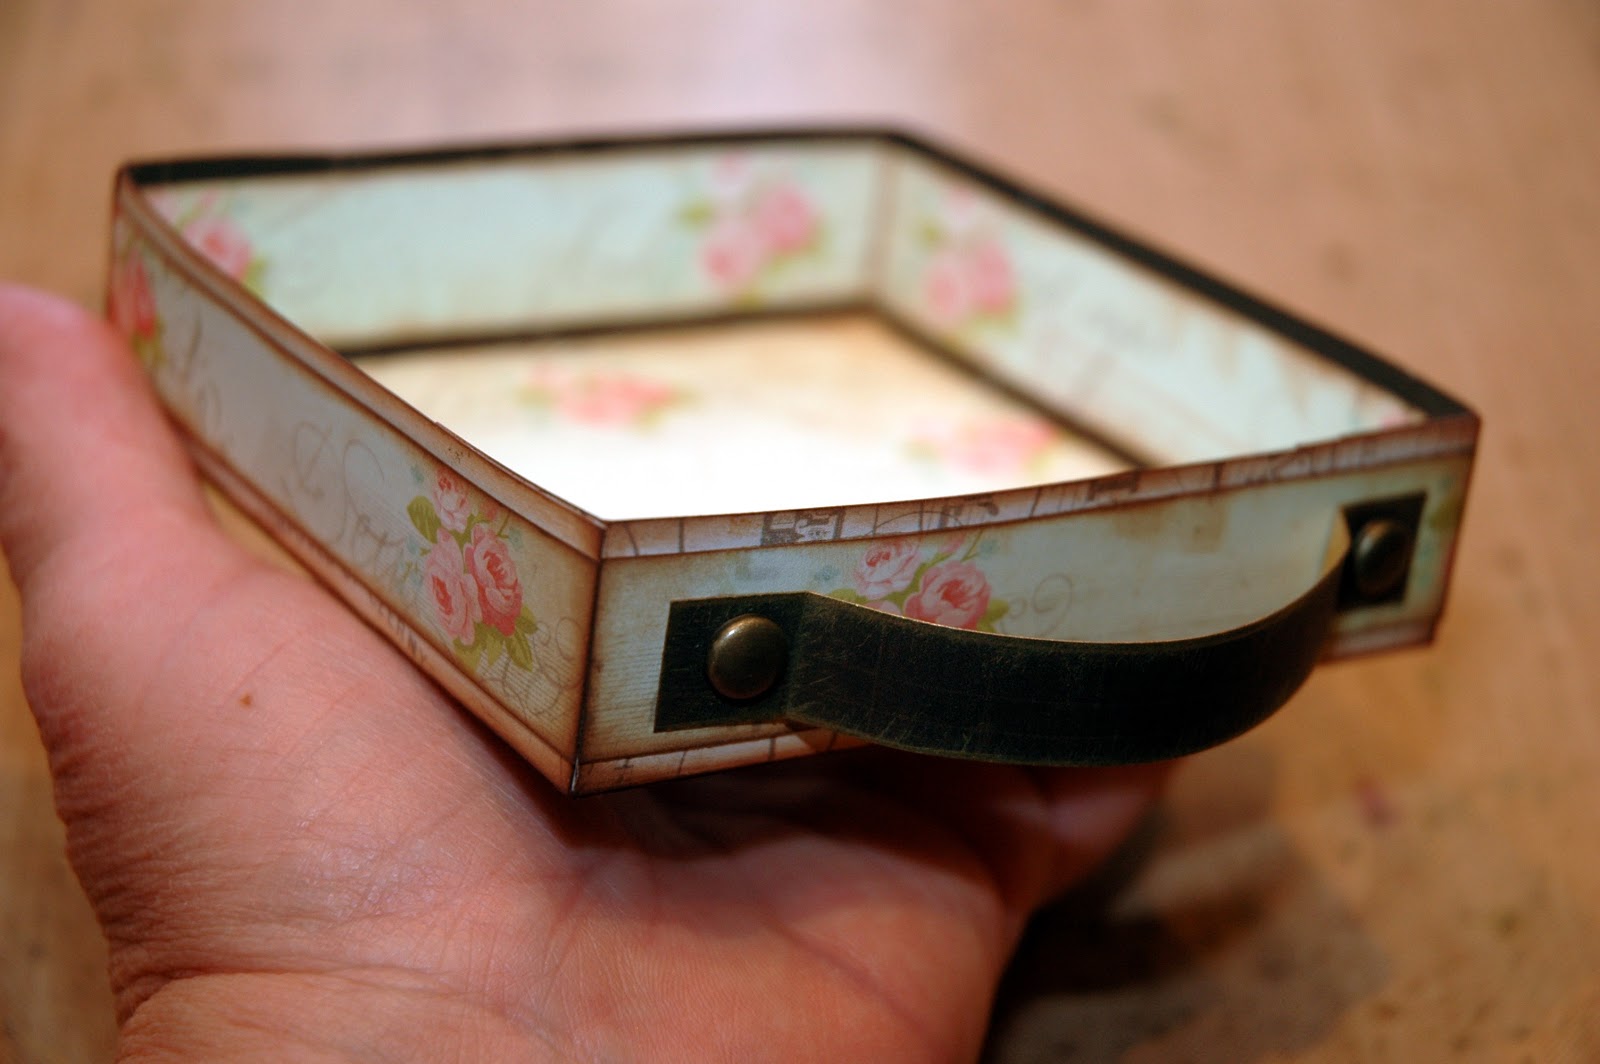
Here is the finished drawer....

The cardstock used to decorate the drawer not only is pretty but it adds strength to the drawer.

Next you are going to create the band that the drawer will slide into. This will also be the base for the easel card.
1. Cut a piece of solid cardstock 4 1/8" x 11". Score the band at 1 1/8", 5 1/4", 6 3/8" and 10 1/2".
2. Cut two pieces of patterned papers 4 1/8" x 4 1/8". These will go on the two outer sides of the band. Be sure to ink all of the edges with Gathered Twigs. I also stamped "DREAM" and the butterflies on either side of the side panels. DREAM is from Tim Holtz' Stuff to Say Stamp set and the top butterfly in the row of four butterflies from Attic Treasures. I used Coffee Archival Ink.
3. Decorate each panel of the band.
4. Glue or Scor Tape the band together. The drawer will slide into the band.

This is the finished base and drawer assembly.

Now you will create the easel portion of the card.
1. Cut a piece of 4 1/8" x 8 1/4" out of plain cardstock. Score this piece at 4 1/8" and 6 1/4". The 4 1/8" square will glue to the top of the drawer. The other end will create the easel.
2. Cut a piece of patterned paper 4 1/8" x 4 1/8". Glue this square to the inside of the top flap that was created from the scoring.
3. Cut pieces of patterned paper to decorate the easel portion of the card, both back and front sides.

Now your easel card should look like this ...
Then embellish your card and it is finished!

I began my embellishing by die cutting these pieces from the dark brown patterned paper that I used to create my basic card. I swiped the pieces with both Gold and Juniper Paint Dabbers to create a shabby metallic appearance. These die cuts are Spellbinders Fleur De Lis Accents. I added some bling to the flourish corners.
I also embellished the medallion pieces...one with a sentiment from Tim Holtz and the other with a metal gold frame and a metal butterfly than has been touched with the Juniper Paint Dabber.

Here is the medallion on the top of the card, popped over a partial distressed doily and a paper strip from the London Market papers. Next to the medallion is another butterfly. It is from Tim Holtz' Mini Blueprints 2 stamp set. It is stamped on an almost kraft cardstock and colorized with a Detailer Water Brush and Tattered Rose and Bundled Sage Distress Inks. I hot glued a little dimensional copper crown with bling at the top. The butterfly flutters among a Tattered Rose colored ribbon and trailing Prima Avon Roses.

Here is my easel card top.

My cardstock medallion on the bottom of the card is backed with Melissa Frances' cream tulle ribbon. I love all of her stuff...so vintage and shabby!

Here is the bottom of my easel card....flourish bling in the corner, beautiful sentiment medallion, little copper butterly popped on the upper corner and the Avon Roses trailing onto the bottom of the card.

Really fun vintage style project! Fill the drawer will little candies, a gift card; whatever your heart desires...that will fit in the drawer! (smile)
Now it's YOUR turn to create something that defines YOU and enter it to our challenge. You could be the lucky winner of Simon Says Stamp's

$50.00 credit voucher! A very nice prize! And...you could be named as one of the TOP THREE PICKS for this week's challenge. Good luck! I can't wait to see what you're known for!
Here are the products available at Simon Says Stamp that were used on this project:


Oh, Candy, this is simply LUSH!!!
ReplyDelete~Linda
ADORABLE ARTFUL PIECE!
ReplyDeleteCandy this has your hallmark attention to detail and fab vintage spin to things! I am not a card maker either find them hard..Hubbie says I lose my mojo...I love the detail you put into your beautiful creations! hugs trace x
ReplyDelete( hard challenge!)
Hi Candy..........this is so beautiful. I absolutely adore it. X it's amazing that you don't make many cards, yet create such inspiring pieces. You are so creative and supportive of your followers too, which is why I love to visit your blog.
ReplyDeleteAnnie x
Candy this is an utterly beautiful candy confection. Totally love your creation and thank-you for all the step-by-step. Nicola x
ReplyDeleteAbsolutely fricking stunning Candy x
ReplyDeleteYeah, I think this piece define you, it's 3d, rich in detail, and you always share with us the process, and it's a think that I love most :-)!
ReplyDeleteI am so glad that other people snoop around other blogs and share what they find. Love the easel card. And the tutorial. thanks as always for sharing.
ReplyDeleteTotally wonderful Candy eye-candy! Your card is gorgeous and a real vintage beauty on the inside and out. The adornments are amazing and your whole piece is bursting with creative flair. Fabulous! X Sarah.
ReplyDeleteCandy, this is AMAZING!!!
ReplyDeleteCandy, I couldn't believe my eyes when I popped over and saw you had created a card today!!! Way to go!! You should do more of these you know, it's absolutely bloomin' fabulous. LOVE all those vintage details, especially that tuille backing for the sentiment, the gold dabbed diecuts, the patterned papers you used to decorate the drawers, and all those gorgeous flowers. I made a blank easel card with four little drawers from brown cardstock and it's been sitting on my desk for three months now while I've been trying to decide how to decorate it. Thanks for the inspiration. Maddy x
ReplyDeleteThis is just beautiful. I love the little drawer too. Beautiful papers as well.
ReplyDeleteI ADORE your easel drawer, Candy! And I think that the way it has turned out is exactly 'What you are known for...' - beautiful pieces of art! I love your choice of papers and embellishments and your attention to detail is always amazing! I'm still a beginner when it comes to vintage and all things Tim Holtz, but love to visit and see your latest creations as they always impress! Thanks for sharing, Lisa x
ReplyDeleteMeine Güte!
ReplyDeleteMir fehlen die Worte...
Wie wunder-wunderschön ist das denn?!
Ein richtiges Prachtexemplar. Traumhaft schöne Kreation.
Herzlichst Sophie
There is no way I can look at this and ever imagine you rarely make cards, WE WANT MORE, pretty please. Love this dimensional card Candy, the draw itself is a work of art and the vintage paper is so striking. I love the flowers and that butterfly with the sweet little crown; it's touches like these that I really love. The lace at the bottom of the easel is the perfect stopper. A wonderful card Candy, something you really should do more of. Enjoy your week my friend. Tracy x x
ReplyDeleteAside from your crafting genius, I think you are known for your sweetness! And this little vintage box is just about as sweet as you can get. I love the pretty paper and the doily and the tulle - totally yummy, absolutely delish - defines you perfectly!
ReplyDeleteHugs,
Linda
Ooooooooh.... that is RICH! Love the drawer, the dimension, and all of your amazing details. I was thinking Candy is Complex but I'll go with Details, too!!!
ReplyDeleteThis is sooo amazing, Candy! I immediately fell in love with that gorgeous creation of yours. And when I saw the picture showing your hand holding it, I was amazed how rich in detail something so small can be made! Stunning!
ReplyDeleteHugs,
Claudia xx
Hi Candy, you are certainly the Queen of Detail! You may not make many cards but when you do - wowzers..... The step by step is the BEST I have seen for a drawer easel card, so good I am off to make one now. I just love the gorgeous papers, the embellishments, especially the bling crown on the butterfly and the Melissa Frances' tulle ribbon, small things but they really make your card a stunningly beautiful creation. You are also a very kind and generous lady.... Hugs, Anne x
ReplyDeleteGorgeousness!
ReplyDeleteOh - my - word! You just can't control yourself, can you? This is just splendid beyond words! If I touch you will some of this creativity rub off on me?
ReplyDeleteyou're always trying something new - love that! This piece is so lovely, and I'm glad you've shared lots of detail on the how-to so we can really appreciate all that went into it. AMAZING! I always think of lots of details and flowers and very classic vintage/shabby kind of soft look with your projects, and here you've really created something that both screams "a candy project!" and is inventive as well - which is totally you!
ReplyDeleteCandy this is just stunning!! Love all the detail, the differnt elements.........just FABULOUS!!!
ReplyDeletekaz x
WOW, I truly love this! It is amazing!!!
ReplyDeleteSo lovely and vintage! I love the roses and butterfly! And that drawer is awesome. I am with you on the cards. I still think they are intimidating but less so than before. It helps me to think of it as an odd shapped tag instead of a card. Happy Monday!
ReplyDeleteKate
Realy a wonderful decorated masterpiece!
ReplyDeleteThis is gorgeous, Candy! All the details & dimension are definitely you. Love this!
ReplyDeleteDear Candy, your creation is FABULOUS in every way. The creativity of design and the stunning papers are superb. Congratulations on your wonderful artwork.
ReplyDeleteWhat a beauty!! Lovely project, I don´t know you but I think this is SO YOU!(based on your blog projects). Well I will give it a shot..
ReplyDeleteLove from The Netherlands,
Leintje*
Your choice of dimension is so perfect as you make some amazing constructions. Your drawer easel card is totally beautiful and most definitely you. xx
ReplyDeleteThis is seriously cool! Amazing detail as always!!!
ReplyDeleteHi Candy,
ReplyDeleteI like how you challenged yourself a bit out of your comfort zone into the land of shabby chic! And you're right--it turned out fantastic! I love the distressed doily and touches of tulle.
*mwah*
Steph
Simon Says Stamp!
Since I first visited your blog I like Mondays because every Monday brings one of your beautiful creations. ;-)
ReplyDeleteI love this vintage card with all the little details and the drawer.Looking at it I get a feeling of spring while the snow is piling up outside.
Have a nice week
Anke x
Yip this is soooooo you Candy ... dimension, eye for detail and lots of vintage goodness, another stunning project. hope you have recovered from CHA:) x
ReplyDeleteFantastic, Beautiful and Elegant! So wonderful! Love the easel with the matchbox drawer! Fabulous!
ReplyDeleteThis is beautiful! Thank you so much for a wonderful tutorial I shall have to have a go making one of these, definately your style and really lovely.
ReplyDeleteThis is beautiful, thank you so much for a terific tutorial, I shall have to try and make one! Fabulous piece of work.
ReplyDeleteYOu are definitely a detail person...the best! This is exceptional! I love the drawer and the easel card...fabulous design! Your mind is a mecca of goodness! I am thrilled to be working with you!!!!
ReplyDeleteWOW! This is absolutely stunning, the draw is fabby thanks for sharing how you made it and your attention to detail is amazing, the butterfly in the frame is absolutely gorgeous
ReplyDeleteLindsay xx
wow, this is just awesome, really love it
ReplyDeleteI just love all your projects, and you're right, they all are full with details! That's definitely you! This one is no exception! This easel card is amazing! You rocked it! Hugs, Sandra
ReplyDeleteCandy, I followed the link from Simon Says Stamp to see if there were details about the card. Thank you for your generous step-by-step instructions!
ReplyDeleteWas für ein atemberaubend schönes Projekt, Candy, es ist unbeschreiblich, mir fehlen die Worte angesichts von so viel Schönheit. Bitte springen Sie über Ihren Schatten und zeigen Sie mehr in dieser Richtung.
ReplyDeleteVielen Dank für die Anleitung.
Liebe Grüße und eine lange Umarmung, Bärbel
Completely delicious card, Candy - the structure is amazing (thank you for your step-by-step - a model of clarity and detail as always) - and as someone who also struggles mightily with cards, can I just say you have totally triumphed with this one?! No fear you'll ever be pigeon-holed - you can turn your hand to anything, it seems to me...
ReplyDeleteAlison x
Holy crap, wow, so totally you so much detail and thought to the overall look, beautiful as always. mark
ReplyDeleteCAndy thanks for your comment on my blog!I was really surprised and happy and really compliments for your work, I love them all! I love this style!
ReplyDeleteCandy, I think you defined yourself perfectly. I feel the same way. it really just depends on the mood I'm in. That being said your art is ALWAYS FABULOUS!!!!
ReplyDeleteIts all in the details girly!
hugs Lynn
Hey there Candy, what aa amazing creation you made, I am stunned, all the little detaills and the colors are just fabulous wowwzerss another AMAZING creation from your hands, Fabulous sweetness Huge Hugs Terry xxxx
ReplyDeleteThat was a wonderful tutorial, you have this amazing knack for talking to an audience, without them actually being present with you… thank you… as for the easel card… What can i say… i don't want to say that you just beat the last one, for that would mean that the last one is not so great (which, it was)… so i'm simply gonna put in many words as possible…;-) this one is…. amazing, great, wowza, omg, fantastic...what else…
ReplyDeleteI can't thank you enough for your instructions. I'm not detail oriented and also try to make things harder than they are (go figure). But your instructions are perfect and when that drawer went in perfectly! Ah-h. All credit to you. Thank you.
ReplyDeleteThis is just gorgeous! So much fabulous detail. Thank you for the step by step i would love to try this idea. X
ReplyDeleteThis is magnificent Candy. Love not just your construction techniques but also your beautiful embellishment. Hugs, Jenny x
ReplyDeleteSimply amazing, you are truly talented and creative. Thank you for sharing how its done, will definately try my hand at this card and try to do it some justice to yours.
ReplyDeleteSo gorgeous!!! I saw it over on SSS and I had to come over to see more deets. So awesome :)
ReplyDeleteWhat a stunning piece! I totally adore every detail of it! For someone who is not a card maker, this is amazing all round! Very creative and will make a fantastic gift to someone! Thanks for the link to the tut too!
ReplyDeleteWow!!! Your 3-dimensional pieces never cease to amaze me. The textures, colors, and prints in your detailing truly make it seem like something from another place and time. By the way, I truly respect you as an artist, so your kind words on my latest blog post meant a lot to me. Blessings!
ReplyDeleteThe question was even hard to answer for me. All i can say about you is, you make the most beautiful and detailed art i've ever seen. There is so much heartblood in your crafting and every visit on your blog is never waisting time. Well and your comments on other blogs are always very lovely, because you really look with the right art - eye. I've never met you in person but i really care about you!! (:o)
ReplyDeletexoxo
Wow, that's a breathtaking piece of art.
ReplyDeleteHey Candy! Thanks so much for taking the time to stop by and let me know about SSS - you're a sweetheart!
ReplyDeleteAlison xx