What inspires you to create something magic? Is it a new product? Is is a famous quote? Perhaps it is something you saw or did on a family vacation. Whatever inspires you, that is what we want to see this week at Simon Says Stamp and Show.
I was inspired by several things to create my easel calendar featuring those gorgeous Graphic 45 papers from the 8x8 Place In Time paper pad. Because they are already in a calendar form, they are absolutely perfect for creating a calendar.
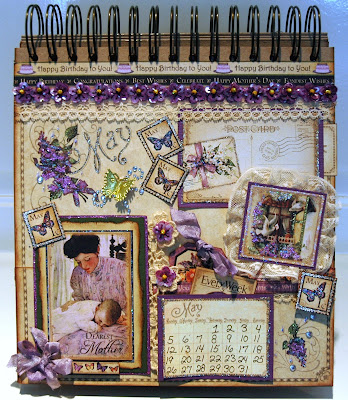 Here is, appropriately enough, the month of May page.

My other inspiration for this piece is one of my dear friends and crafting buddies, Jeanne, who actually came up with the chipboard easel design for the calendar. Easels are not a new concept, but she tailored an easel to fit the 8x8 paper pad. I love the functionality of this and how pretty it looks sitting on a desk, shelf or table. Very vintage victorian!
I will show you the photographs of my work and then I will give you the supplies needed and the steps to create your own easel calendar! Oh...one more thing!!!
Don't worry about doing all of this work for a calendar that you will only be able to use one year! Graphic 45 was so smart!! They provide a page in the paper pad that has blank calendars on it. Just print this page out several times and cut out the calendars for each month. Then, when you are attaching the calendar to your page, use a REMOVEABLE tape strip behind the calendar. That way, all you have to do is remove that calender and replace it with a new one for the next year after that month is finished! You can enjoy your beautiful easel calendar for years to come!
 Here is a basic calendar page.
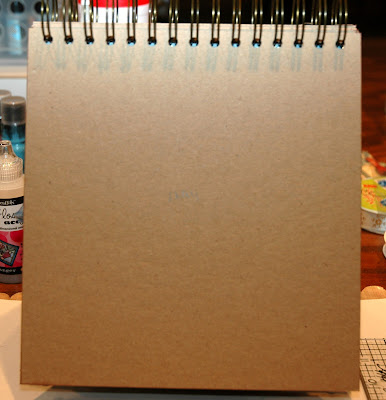
 Here is what the easel calendar looks like during the construction.


Be sure to stop by the Simon Says Stamp and Show blog to see all of the gorgeous inspiration from our Design Team this week! Then join us and enter your inspirational piece to our challenge. You could be the winner of our most generous sponsors'

$50.00 credit voucher to spend in their store! That is inspiration enough to enter! But your creation might also receive our TOP THREE recognition...which is quite a nice honor, considering all of the AMAZING work we see each week! So...come join us! I'd love to see your work!
And now ... on with the tutorial!


Here are a couple of pictures of the outside covers of the calendar, attached with magnetic strips for better reinforcement and ease of opening and closing.

Here is a picture of the May embellishment page. Every month's page is similar to this layout; with long word strips that I used across the top of every page, a post card, postage stamps, tags, more word strips and cute little images.

Every month also has a page like this. I chose to cut my pages apart 3" from the bottom so that I could create a pocket on each page.

By putting 1/4" Scor Tape on the bottom and two sides only, you can easily create a pocket on each month's page before adding all of the other embellishments.

Underneath the word strips on my May page, I added a piece of vintage lace and dimensional strip of sequin flowers that I had. They were clear. I first brushed them with Tim Holtz' Picked Raspberry Distress Paints and then spritzed them with Dyan Reaveley's Crushed Grapes Dylusions Ink Spray. That gave me the perfect shade of purple that i was looking for on this page. Next I painted the pearl centers of the flowers with Tim Holtz' Mustard Seed Distress Paint and then stickled over it with Yellow Stickles for that extra little touch of sparkle.

Here is another picture of the May page in process. You can clearly see the pocket which all of my calendar pages have. On this one, I added a piece of vintage lace, then another of the words strips. Don't worry, I will cover up the other side of the pocket with one of the gorgeous images from the embellishments page.

And here it is...the beautiful portrait of a mother and her child. I matted it a couple of times on different cardstocks, added a touch of vintage lace, a couple more of the flowers I had left from the top piece, and the calendar next to it. I also made a pocket out of the cardstock matting behind the calendar. Remember...the calendar itself is removeable, but the cardstock matting is an excellent little pocket!

Above the pocket and the calendar are the postcard with yet another pocket made from the matting. Stuck in this pocket is a little piece that you can write birthdays and special events on for each month. Below that is a beautiful little image of doves outside of a victorian window. I have matted the image and added a vintage lace ruffle around it. The I popped it onto the page. You can also see the sweet little postage stamps that I have added Stardust and Platinum stickles.
Want to see my other calendar pages that I have completed so far?

January

February

The "Be Mine" tag on this pocket also folds out to create a dimensional honeycomb heart thanks to Tim Holtz' Mini Hearts die cut. Simply cut out the honeycomb heart out of Inky Antics' Red Honeycomb paper. Then cut the heart in half. Glue half of it onto a base...in this case the postcard that is underneath it. Then glue the other half of the heart onto another base. In this case, the "Be Mine" tag. Then to keep it open, I have a mini paper clip stuck onto the postcard that will hold the heart open with the calendar month is turned to February.

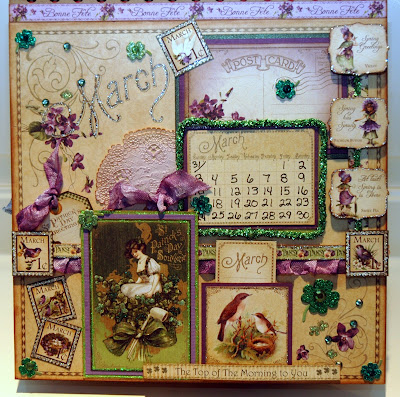
March

And my birthday month...April. I really loved adding the little dimensional roses and pearl and Dresden butterflies on this page.

Here is a closer picture of the pocket on this page.

And here is the calendar...again, remember, the calendar itself is removable! Just be sure when you're embellishing around the calendar, you remember that fact! Here, I have added some coordinated matting behind the calendar, some vintage lace behind that and the dimensional flowers on either side.

Once again...the finished May page.
Be sure to stop by the Simon Says Stamp and Show blog to see all of the gorgeous inspiration from our Design Team this week! Then join us and enter your inspirational piece to our challenge. You could be the winner of our most generous sponsors'
$50.00 credit voucher to spend in their store! That is inspiration enough to enter! But your creation might also receive our TOP THREE recognition...which is quite a nice honor, considering all of the AMAZING work we see each week! So...come join us! I'd love to see your work!
And now ... on with the tutorial!
Here is a supply list you will need to do this project:
- 7 pieces of 8 1/2" x 8" pieces of chipboard
- 2 pieces of kraft paper cut into 2" x 8" strips and scored down the center at 1"
- 2 pieces of Tyvek 1" x 7 7/8" (this is optional but adds extra strength to the hinge)
- 1 piece of 4" x 8" chipboard
- 1 piece of 1 1/8" x 8" chipboard
- 1/4" and/or 1/2" Scor Tape
- 8" x 8" Place In Time paper pad
- 2" zutter coil (I used antique brass ~ a bit smaller coil would also work)
- 4 8" strips of magnetic strip
- 1 piece of 8" x 8" paper to cover what will be a cover of your calendar.
- 1 piece of 8 1/2" x 8" coordinating paper that will be a cover of your calendar.
- 2 coordinating pieces of 4" x 8" paper to cover what will be the bottom of the calendar.
- 1 coordinating piece of 1 1/8" x 8" to to cover the back of the magnetic piece holding the easel together.
Assembling the Easel Calendar
1. Punch holes at the tops of the 8 1/2 x 8 chipboard pieces with a Cinch Book Binding Tool. Be sure that the chipboard is laying so that the 8 1/2" sides of the chipboard are VERTICAL when getting ready to Cinch the tops. Use 15 holes and center them at the top of the chipboard and make your holes with the Cinch.
2. If you choose to do so, ink, paint or color all of your edges and at least the top 1/2" inch of each of your chipboard pages.
3. Thread a piece of 2" coil wire onto the Cinched chipboard pieces and bind them with the Cinch. Then flip over the first chipboard page so that it is becomes the last page of what will be your easel calender. (That will hide the area where you coil wire came together inside of your calender).
4. Begin with the page you flipped over to hide where you Cinched the coil wire. This sill end up being "December" on one side and the back cover on the other side. Apply two pieces of magnetic strip across the very bottom of the INSIDE page (or the side of the chipboard that is resting against the other pieces of chipboard). Then cover the rest of the chipboard page with a piece of paper to cover the calendar. I used Scor Tape to adhere my paper to the chipboard.
5. Flip that page back over on top of the other unfinished chipboard pages. The unfinished side will become your page for "December". Lay the chipboard page out flat by itself on the table. The page you just covered with a coordinating paper should be laying face up to the left of your unfinished chipboard page and stacked on top of the rest of your bound chipboard pages.
6. Make "hinges" out of the two kraft paper strips. Apply the Tyvek strip down the center of the kraft strips by applying Scor Tape to the long sides of the Tyvek then centering the Tyvek on the kraft strip. Next, apply two pieces of 1/4" Scor Tape on either of the long sides of the kraft strip and then two more 1/4" pices of Scor Tape on either side of the scored line down the center. Peel off the backing.
7. Attach the long side of the hinge to the UNDERSIDE of the bottom of the chipboard page you have laying flat on the table. Try to line up the hinge so that the score line is running along the edge of the chipboard bottom. Next, take one of the pieces of 4" x 8" chipboard and place one long end of it at a 90 degree angle right up against the bottom edge of the chipboard page. Lightly take your finger and press the center of the remaining Scor Taped kraft hinge from the underside of the chipboard piece in place. Then lay the 4" x 8" chipboard piece onto the table and let the Scor Tape adhere itself to that piece of chipboard. Then turn the chipboard over and burnish the hinge in place.
8. Lay the calender back down on the table as you originally had it. Take the other hinge and remove the paper backing of the Scor Tape. Attach one side of the hinge to the UNDERSIDE of the 4" x 8" chipboard piece. Then take the 1 1/8" x 8" chipboard strip and lay it against the bottom of the chipboard at a 90 degree angle. Take your finger and gently press the tape underneath the chipboard strip into place in the center. Then lay the 1 1/8" x 8" strip of chipboard down and let the Scor Tape bond to the back side of the chipboard. Then burnish the hinge in place.
9. On the BACKSIDE of the 1 1/8" 7 8" strip, add two more pieces of magnetic strip. Cover the chipboard page with an 8" x 8" piece of coordinating cardstock. Cover both sides of the 4" x 8" chipboard with coordinating cardstock. Then cover the remaining chipboard hinged piece with coordinating cardstock. Work the 1 1/8" x 8" strip so that it will bend and catch the magnetic strips you placed on the other chipboard page. You have created the easel portion of your calendar!
TIPS FOR MARKING AND COVERING YOUR CHIPBOARD CALENDAR PAGES
1. Beginning with the BACKSIDE of the covered and hinged chipboard page, pencil in on that uncovered chipboard page the month of "January". Then turn the calendar around and mark the next page as "February" and so on until you have marked all of the months. This will keep you from getting confused as you begin covering each page of your calendar.
2. Begin covering each page with the corresponding month's paper and embellishments from the 8" x 8" paper pad. You will notice that each embellishment page has a long strip or two strips of words. These are located about 3/4 of the way down on each embellishment page. You can either cut these apart or use them together to create a band at the top of each calendar page.
3. To create a pocket for each calendar page, cut the bare month page apart 3" from the bottom of the paper. Then apply 1/4" Scor Tape at both sides and the bottom of the 3" piece of paper. DO NOT SCOR TAPE THE TOP OF THE STRIP! This will create your pocket when you put it in place. If you add a ribbon border to the top of that pocket, you might want to attach it first BEFORE you add the Scor Tape backing and adhere it in place on the calendar page. Adhere the blank calendar papers with Scor Tape.
4. All of the embellishment pages have similar shapes of images; tags, postage stamps, work strips, postcards, larger and smaller images. Mix them up on each page.
5. Add Stickles to accent your images. They make a huge difference and add the right touch of sparkle to your pages.
6. Add your own laces, ribbons, bling and other embellishments to add more interest.
7. Pop dot some of your embellishments. Just keep in mind that your calendar will stack...so try to keep the dimensional work very low to the base page.
Here are the list of products available at Simon Says Stamp that I used to create this beautiful easel calendar.


Candy! I love Graphic 45 but can not use them, I'm sorry to cut and stay there to look at them! Beautiful calendar and amazing tutorial! Have a great week! Barbarayaya
ReplyDeleteA wonderful calendar project Candy, fabulous pages made with those wonderful papers. Love this.
ReplyDeleteHugs Brenda xox
Wat a wonderful make...there is so much gorgeous detail in every month, this must have taken agenda, I am sure it will be admired the whole year long! Really wonderful! Hugs trace x
ReplyDeleteHey there Candy, what an AMAZING calender Graphic45 project, I am loving all the little detaills you put in there, fabulous colours and your tutorial is fabulous. Great job as allways Candy. Woww amazing hugs terry xxx
ReplyDeleteCandy, your calendar easel is fabulous! Your pages are so beautiful. I love the pockets! I made a calendar from these pages, well, I started ... I'm done through May. I never thought to put pockets on my pages. I do believe the rest of my pages shall have them. Great idea! I left the numbers off the calendar, so love your idea to reproduce & use removable tape. Thanks so much for another fabulous tutorial!
ReplyDeleteYour calender is really stunning, Candy! I get why that graphic45 paper pad had inspired you! Love it!
ReplyDeleteOhh you have a gelli plate too? Hope you have time to play with it soon. Can't wait to see what you create with it! Hugs, Sandra
Gorgeous calendar pages! I love those papers and you used them brilliantly! Thanks for the details step by step, so helpful! Love all that glitter too!
ReplyDeleteLove this Candy, so much work has gone into it as with all your fabulous creations. What a great idea to use removable calendars so that you can reuse the calendar every year! Thos Graphic45 papers are gorgeous and way too addictive lol! Maddy x
ReplyDeleteThe feeling's mutual - love your work too! Thank you so much for taking the time to visit, I really appreciate it. I must admit, I have been so addicted to making these hinged cards & notebooks that I have used nearly an entire pack of bamboo skewers lol! Guess what my lot will all be getting for Christmas this year :-) Can't wait to see your version Candy. It's a bank holiday here in the UK today, so I actually have some time on the PC and crafting. Trouble is, procrastination is too easy lol! Love Maddy x
ReplyDeleteI just posted the tutorial this morning Candy, but the cover looks quite similar to yesterday's card so you might not have noticed it was a different post. Basicaaly, I made two covers like the front one, each with it's own skewer and three hinges, then tied the two skewers together with smaller versions of the hinges to make a thicker spine, then you can fix a note pad inside. And here I am cutting up more dog food boxes for covers :-) Maddy x
ReplyDeleteFabulous idea and a fabulous reusable calendar that can be used year after year. I love that every page is colour coordinated and your use of imagery is stunning. Wonderful Vintage images too. I love the touch of sparkle you have added. Everything blends beautifully and coordinates seamlessly. Another wonderful detailed piece with fabulous detailed instructions. Tracy x
ReplyDeleteHi Candy, first of all, what a clever lady Jeanne is to come up with a base that fits G45 8 x 8 papers (they are too beautiful to cut up)! I love how the calendar months can be replaced year on year because this calendar is far too beautiful to get put away - I bet it looks amazing on your desk. It is absolutely gorgeous and so are those G45 papers - wow! Another truly inspiration make from you Candy! Hugs, Anne xx
ReplyDeleteThis is stunning Candy - an absolute creative feast. It must have taken an age and so much trying out of layouts etc but it is so worth it as it looks amazing. Nicola x
ReplyDeletewowee Candy, every page is gorgeous. Terrific use of those fab papers. Annette x
ReplyDeleteBeautiful work Candy.Simply beautiful!
ReplyDeleteWhat a beautiful calendar Candy!!! There is so much going on for each page...just awesome!!!
ReplyDeleteLovely calendar, and a detailed description on how to make this! I've read two posts so far, and seen this detailed description, do you do this every post? That's quite some work that goes into it! It is appreciated though, I'd love to follow those instructions and make something similar. Now I only need some time or an extra room. (With a separate room I can keep my craftingsupplies and project out on the table without risk of my toddler grabbing stuff and chocking/cutting/dying himself)(or 'helping' me with my project, hehe).
ReplyDeleteWow! Gorgeous calendar, Candy! I love how you went with a color theme for each month of the calendar :)
ReplyDelete*mwah*
Steph
Simon Says Stamp!
This is so beautiful Candy and a wonderful idea! Love the little pockets and all the special details and little touches. All the pages are super gorgeous. Great descriptions of what you did, as always.
ReplyDeleteWhat a heck of a calendar Candy! It will be a pleasure to turn each page as you go through the year. Hugs, Jenny x
ReplyDeleteThis is an awesome project Candy. Thanks so much for the wonderful tutorial, so well explained. I'm going to give this a try.
ReplyDeleteWhat a gorgeous calendar Candy!!! So many beautiful details and images ~ I just wanted to stop by and thank you for the link love to my blog...I so appreciate it!! I'm always searching for old postcards, photographs and other ephemera to scan and share with my readers. Thanks again! xxoo, Dawn
ReplyDeleteThey really are such inspiring papers, and your calendar is a completely beautiful creation... a great showcase for the papers, and for your amazing skills as a papercraft artist. Beautiful work, Candy, as ever!
ReplyDeleteAlison x
WOW dear Candy, what a breathtaking project, I'm fascinated and speechless. Such a beautiful calendar and so gorgeous decorated! You are always a great inspiration.
ReplyDeletexox Anja
thank you for the wonderful tutorial..I will give it a try..all the pages are gorgeous and so many details,
ReplyDeletethanks again
bibiana
Such a gorgeous calender. Love all the embellishment and details.
ReplyDeleteHugs, Dangina
Oh my word, Candy, this is AMAZING!! So many pretty details, like only you do and such fabulous explanations too! Just lovely!
ReplyDeleteHugs, Lisa x
Dear Candy, you have made this easel calendar simply DIVINE!!! You are such a fabulous creative talent!
ReplyDeleteWow!!!!
I love the Victorian feel of your beautiful and masterfully crafted calendar pages, filled with a plethora of elements in a cohesive design. It is no wonder your blog was named "Blogworthy" in Tim's May 6th post. Blessings, my friend!
ReplyDeleteWOW Candy,your calendar is so beautiful and amazing,very romantic style, i love all fantastic details on your calendar,you are inspirated me to much,love it all!!!
ReplyDeleteHugs Jeannette
Liebe Candy,
ReplyDeleteder Kalender ist traumhaft schön. Ich liebe die Farben, die Motive und die wunderbaren und liebevoll ausgewählten Dekorationen, mein Kompliment!
Liebe Grüße, Bärbel
Impresionante. Me he enamorado nada más verlo. Es una belleza de proyecto
ReplyDelete