Good Monday morning everyone!
I hope that everyone who was celebrating Mother's Day yesterday had a wonderful day. It was a beautiful day here and I was surrounded by my children and grandchildren. What more could a mother ask for on her special day? I am so blessed.
This week at Simon Says Stamp and Show, the theme is all about "a little paper". Now, we're not talking about just using a scrap of this or that; although you could include that in your project. We're talking about using those wonderful new smaller paper pads ~ the 6x6 or 8x8 sizes ~ somewhere in your creation.

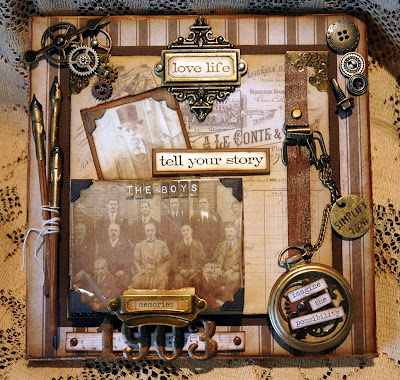
This week, I'm all about Tim Holtz. I am totally crazy about all of the things he released at this past winter CHA. His French Industrial Paper Stash is one of my all time favorites and I have used it to create this nostalgic 8x8 canvas. One of the things that I love about Tim's paper stashes are all of the different sizes of images and pages you get in the same paper pad. I get all of the 12x12 papers with those gorgeous images and beautiful backs! Then I get them all repeated into 6x6 sizes and combined on 12x12 pages. Then I get them all again in 2x2 sizes that are repeated on a 12x12 page. And finally, I get them all yet AGAIN in long strips that are printed on 12x12 pages. So, there is real versatility in this paper pad and I took advantage of that in creating this piece using so many of the different sizes of paper... all from one pad!

I began with a 12x12 piece of that gorgeous brown tone pillow ticking cardstock and cut it to an 8x8 size to cover the top of my canvas. I lightly sanded all of the edges to make it look more like the paper was fused onto the canvas. And of course, I distressed all of the edges with Gathered Twigs to instantly age them and make that sanding of the edges really pop. On the sides of my canvas,

I used the dictionary tissue tape from Tim's Symphony Tissue Tape to cover the sides. It is distressed with Gathered Twigs Distress Ink. When that was finished, I cut a piece of dark brown cardstock to a 6 1/2 x 6 1/2 square and centered it on the 8x8 canvas.

Next I cut a piece of chipboard into a 6x6. I chose one of the 6x6 images (there are four of them on a 12x12 page of paper) and glued it to the chipboard. I inked around the edges with Gathered Twigs and then a touch of Black Soot Distress Inks. Before I placed the 6x6 piece on top of the brown cardstock, I added lots of Ideaology elements to create that real nostalgic feeling and also a lot of dimension and interest to this canvas.

On the corners of the 6x6 piece, I first added three Metal Corners. I did not add one on the lower right corner because I knew that I would be adding on of Tim Holtz' Pocket Watches there. Next I wanted to incorporate one of my new favorite pieces of Ideaology ~ the buckles. So, I cut a strip of manila cardstock in a 1/2" width to create a "belt" that would slide into the buckle. I painted the cardstock with an Espresso Paint Dabber and let it dry. Then I painted Rock Candy Distress Crackle Paint over it. When that was dry, I cut the strip in half. I folded under one end and attached it to the buckle side with a touch of Glossy Accents underneath and then a Long Fastener (that comes with the Buckles) through the hole provided. That was one side of my belt. For the other side, I trimmed one end round on the edge (the end of the buckle) and poked three holes in the strip to represent the holes in a belt.

Then I attached both sides of the belt together through the buckle. Finally, I used a piece of 1/4" Scor Tape on either end of the belt to fold it over the 6x6 chipboard and attach the belt to the underside of the chipboard.
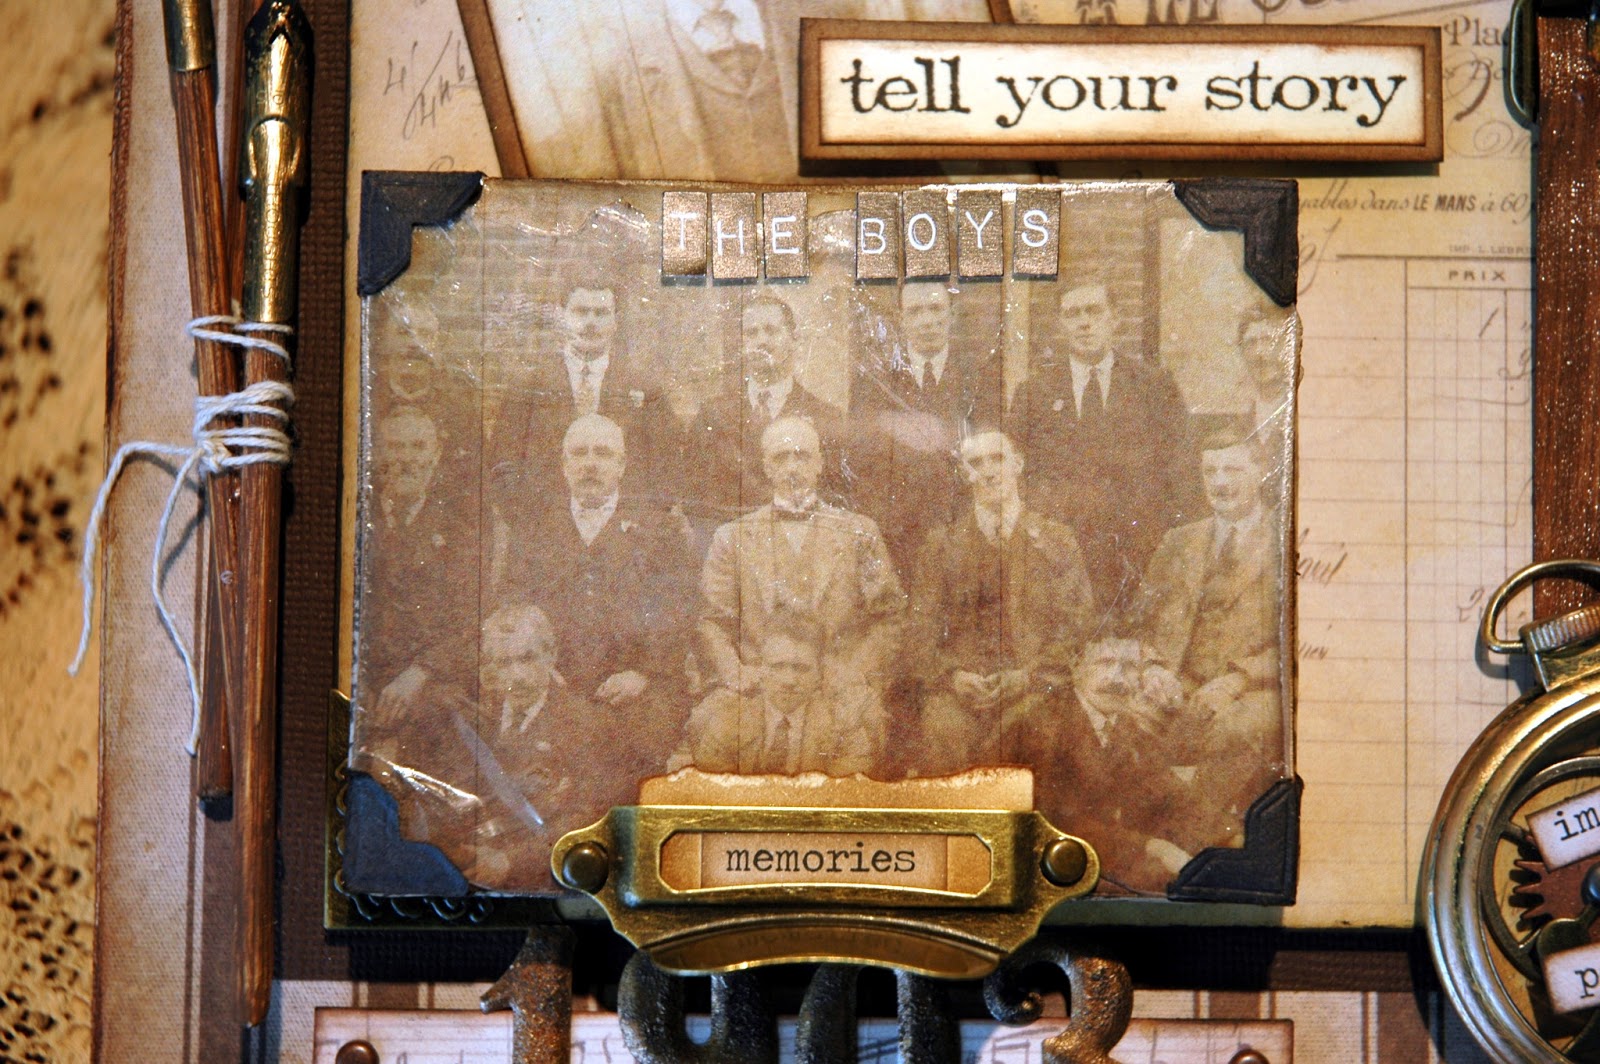
Next I created more dimension by adding another smaller canvas on top of the 6x6 piece. This canvas measures approximately 3 3/4 x 2 1/2. I covered the sides with Tim Holtz' Nostalgic Tissue Tape and distressed it with Gathered Twigs. Then I used one of the very cool photographs from a collage of a 12x12 sheet to be the cover of this smaller canvas. I found some Mica Sheets and decided to add a piece on top of the photograph. I attached it with touches of Glossy Accents in the corners. Glossy Accents dries clear and it's great to use with Mica. Next I added some old black paper photo corners and then glued it all in place on top of the little canvas with 1/4" Scor Tape. To give even more dimension, I added a Label Pull on top of the canvas. I put "Memories" from Tim Holtz' Chit Chat words onto a scrap piece of manila cardstock and distressed it all with Gathered Twigs. Then I tore the top of the paper, fit it behind the Label Pull and glued the paper in place with Glossy Accents. I added the two long fasteners and glued the Label Pull in place using Glossy Accents.

Underneath the smaller canvas, I wanted to add the Mini Numerals. Don't ask my why I chose "1903". Those numbers seemed to jump into my hands as I was picking through my numbers. They are originally silver. I wanted them antique gold. So, I simply changed their appearance by dabbing over them with a Gold Paint Dabber. Then I pounched the dabber onto the numbers a little bit to leave areas of texture. I dried them with my heat tool and then lightly rubbed over them with Gathered Twigs and a touch of Black Soot. I love their new, much more worn and distressed look! I mounted them onto a piece of the chipboard that is covered with a strip of some sheet music paper from Tim's paper stash. It is distressed with Gathered Twigs. I added the Long Fasteners at either end. When it was put down, this strip was put in place using black pop dots.

I love Tim's Pen Nibs. But, they are originally silver. I also wanted them to be antique gold so I did the same thing to them that I did to the Mini Numerals...painting them with a Gold Paint Dabber and then aging them with Gathered Twigs and a touch of Black Soot. Finally, I added the touch of black using at the tips of the pen nibs to look like black ink. This was done by dipping them into a little bit of paint from a Pitch Paint Dabber. I painted wooden skewers with an Espresso Paint Dabber and then attached them to the Pen Nibs using Glossy Accents.

I hot glued them together and then wrapped some string around them and hot glued them into place, after I had pop dotted the 6x6 piece in place.

I hot glued them together and then wrapped some string around them and hot glued them into place, after I had pop dotted the 6x6 piece in place.

The Pocket Watch was also silver...so again, I painted it with the Gold Paint Dabber and aged it with the Gathered Twigs. The interior base of the Pocket Watch is yet another piece from Tim's French Industrial Paper Stash. It is taken from one of the 2x2 squares. If you use a 1 1/2" circle punch, you will have the perfect circle for the base of your Pocket Watch! Then using Glossy Accents, I added the Sprocket Gears, the Chit Chit (that was distressed with Gathered Twigs) and glued them all together.

Once dry, I popped the cover back on the Pocket Watch, added the little bit of chain and attached it to the Swivel Clasp that fastens onto the Buckle. I also added a "Simplify" Philosophy Tag that was painted with the Gold Paint Dabber to change it's appearance.

I added "LOVE and LIFE" from Tim Holtz' Simple Saying stamp set to the Ornate Plate at the top of the 6x6 area. This was not a saying. I took two words from different sayings and stamped them together on a piece of distressed manila cardstock.
I almost had an "ooops" moment as I looked at the canvas and decided that I needed something else above the smaller canvas. I love the printing and the image of the 6x6 background paper but it was a bit bear to me in that area. So, I decided to take another photo from a 12x12 collaged page and mount it onto a piece of Kraft cardstock that was distressed with Gathered Twigs. I also added some photo corners to the picture before gluing it onto the kraft paper. Since I had already glued down my smaller canvas, I didn't want to rip it up and run the risk of destroying my background paper. So, I laid the photograph on top of the canvas, figured out the angle I wanted it to lay on my 6x6 area, drew a line with a pencil and then cut across the photograph. I shoved one end up against the canvas and glue the photograph in place on top of the 6x6 cardstock. It worked like a charm and I love how it fills up that space! Then I added "Tell Your Story" from Tim's Simple Sayings stamp set popped on top of the photograph. I love that saying. It says so much and when I look at this canvas, each of those men seem to be telling a story. I laid everything out and glued or popped it into place.

So there is is...my 8x8 canvas made from all sorts of different smaller papers but all from one paper pad! I hope this inspires you to create something using smaller papers and enter it at Simon Says Stamp and Show. For more inspiration, stop by the Simon Says Stamp and Show Challenge and check out the beautiful examples of art my talented design teammates have waiting for you. Then enter our challenge! You could be the lucky winner of a...

$50.00 credit voucher! And...you could be recognized as one of the TOP THREE entries for the week! Not an easy task, considering all of the wonderfully creative pieces we see each week!
So, go for it! I can't wait to see YOUR creativity!
Here are all of the products that are available at Simon Says Stamp that were used in creating this nostalgic canvas...


CAndy Wow! I do not know where to watch! I love everything about this work of yours! Every detail is to discover and observe, the colors, the style ..... really beautiful, exciting dive in the past!
ReplyDeleteOh my gosh Candy this is a wonderful and inspirational vintage canvas. I just love all the ideaology you have included on this piece creating such a fabulous masculine feel to it. TFS how you put this all together.
ReplyDeletehugs {Brenda} x0x
An amazing composition!! Just love the TH products, and how you have used them!! I am very inspired by this!! Thanks.
ReplyDeleteI love this one and all the little details.
ReplyDeleteWhat a completely brilliant vintage canvas! I also love those papers, and they look sensational here... and what amazing detailing - the belt and buckle, the bundle of wonderful pens, fabulous distressed edges to the canvas - it's simply brilliant, Candy!!
ReplyDeleteThank you so much for your lovely, lovely comments on last week's pieces - so very much appreciated.
Alison xx
Omg...Omg....Omg....how beautiful. This layout is really vintage perfection! Your arrangement of all these little bits and pieces is just brilliant. I love, how you used the pen nips and and the handmade leather looking strip with belt buckle.
ReplyDeletexoxo
Good to hear you had a fab Mother's Day Candy surrounded by your family......its just the best time.
ReplyDeleteLoving your wonderful canvas with all the fab embellies. Have a great week, hugs Annette x
Your eye for detail never ceases to amaze me Candy. The pens were a genius idea, love the layering of the canvases, the papers blend so well together to make such a beautiful vintage canvas. The 1903 just makes me want to know more about the people in the pictures (I know it is made up but I have a vivid imagination!). Love this beautiful work of art. Hugs, Anne x
ReplyDeleteWhat a nice Mother's Day. Beautiful project. I just love the close up photos to see all the wonderful details that you think of! Gorgeous design!
ReplyDeleteAbsolutely fantastic Candy, Inlove all the brown tones and my favourite bit the pen nibs added to skewers, neat idea. I really must use my gathered twigs Inkpad more as it has aged your piece beautifully . I love how,you added the smaller canvas onto the larger canvas and the images is wonderful set against your vintage backdrop . Beautifully embellished and I love the pocket watch too. Lovely Candy. Tracy x
ReplyDeleteI need directions to your house and then need to know when you'll be gone so I can safely remove most awesomest canvas and get it back to my house pronto! lol Oh my stars, I am floored by all this goodnes!!!!!!!!!!
ReplyDeleteLOVE it!!!!!
ReplyDelete~Linda
Gorgeous! I really love how you created those pens, brilliant idea! Love it!
ReplyDeletecandy this is wow! Love the vintage feel and there are so many fab things to look at...love how you have used the pen nibs, such a cool and clever idea.Ioovethispiecethere are just so many fab details! Hugs trace x
ReplyDeleteThis is AMAZING!! I love the pens...pure genius, wonderful work Candy!!
ReplyDeleteWow-o-wow Candy! This canvas is amazing! Love all those Tim goodies! Really pretty! Hugs, Sandra
ReplyDeleteThis is just perfect... Perfect...
ReplyDeleteHave a steampunk fun day! :)
Gorgeous project, Candy! I love the detailing in your embellishments :)
ReplyDelete*mwah*
Steph
Simon Says Stamp!
Oh my! I want this!! It is fabulous!! Great steampunk style.
ReplyDeleteLiebe Candy, die Leinwand ist atemberaubend schön geworden. Der nostalgische Look, das Papier mit dem schönen alten Briefkopf, die Metall-Embellishments, die großartige Idee mit den Schreibfedern, es ist ein grandioses Werk! Ich bin voll Bewunderung.
ReplyDeleteLiebe Grüße, Bärbel
That is just so brillaintly cool. I LOOOOOOOVE it. Great work. Totally drooling right now!
ReplyDeleteTotally awesome Candy! I love every vintage bit! Your design rocks! This would light up any space it's put!
ReplyDeleteGirrrrrrrrrrrllllllllllll.... you rocked out this canvas! Love all the details, especially all the fab metal. That mini pocket watch is to die for.
ReplyDeleteCandy, this is amazing! All the details are so wonderful and everything looks absolutely fabulous together. LOVE your clever pen nibs with handles, the clock, belt and everything else.
ReplyDeleteYour canvas is just mind-blowingly beautiful, Candy!
ReplyDeleteYou really know how to use embellishments without having them steal the show from the main focus! Awesome!
Hugs,
Claudia x
This is amazing, Candy! It never ceases to amaze me how you turn the simplist of ingredients into the most wonderful creations! This would be fabulous for any old family photos, to make a real feature of them! Your attention to detail, as ever, is what makes this piece so interesting - the painting of the pieces to match the colour, the ageing of the paper on the belt to make it look like leather and all those amazing ideaology embellishments...just fantastic! Love it! Lisa x
ReplyDeleteSo much to love here Candy. My favourites are the strap and buckle and what you've done with the pen nibs. You are always a source of inspiration. Hugs, Jenny x
ReplyDeleteGorgeous work Candy, you are truly AWESOME and you so inspire me!
ReplyDeleteYou are definitely the queen of faux finishes, Candy. Your album assemblage truly looks like an album left behind in times past. Blessings!
ReplyDeleteYes I agree too that you are awesome and I don't use the term regularly! Such a fantastic piece of art Candy. I adore how you have aged and added so many little details with frequent layering and overlapping. One of the magical aspects of this (in addition to fab creativity) is that despite so much going on it still has lots of space to balance. Outstanding creation! Hope you are having a lovely weekend. Nicola x
ReplyDeletegorgeous ! Your work speaks to me so well !
ReplyDeleteI shared a bit of your work on Facebook ! I had to... it is so beautiful !
ReplyDelete