It's every other Saturday and that means it's time for a new Compendium of Curiosities III Challenge! This week, turn to page 49 in your books and check out the technique and products used in Layering Stencil: Texture Paste. This is such a fun technique and adds some very cool dimension to your art. The Curiosity Crew has some really amazing samples of this technique waiting for you; so be sure to check them out!

My inspiration for this project was a little Tim Holtz Ruler Binding that I had laying around. I think these are so cute and are interesting bindings for mini books. So, I created this mini journal out of chipboard, manila cardstock and various Tim Holtz products.
Here is a list of items I used to create this little mini journal:
Two 3 3/8" x 6 1/2" black chipboard pieces, two 3 3/8" x 6 1/2" manila cardstock, two 3 3/8" x 6 1/2" scrap pieces (from French Industrial Paper Stash), Distress Inks: Peacock Feathers, Rusty Hinge, Vintage Photo, Scattered Straw, Pumice Stone, Black Soot, Gathered Twigs, Embossing Pastes: Crackled Paste, White Paste and Silver Paste, Remnant Rubons - Words, Stamp Sets: Purveyor, Typography and Mercantile, Ideaology: Long Fasteners, Texture Hammer, Ruler Binding, Philosophy Tag "Imagine", Heart Charm, Link Chain, Swivel Clasp, Jump Rings, Hinge Clip, Silver Eyelet, Stencils: Arrows, Clockwork, Dot Fade, Stars, Splatters, Latticework, Harlequin, Borders Industrious Stickers, Collage Glue Stick, White Fire Treasure Gold, Old paper cut into 6 3 1/4" x 1/4" pieces, Crop A Dile, Big Bite Crop A Dile, French Industrial Paper Stash, Tim Holtz Marker Spritzer

To begin, I cut my black chipboard and then I cut two pieces of manila cardstock to cover the chipboard and create the outside covers for my journal. I began by layering various Tim Holtz Stencils: first Clockworks using Rusty Hinge and Vintage Photo Distress Inks. Then I layered the Dot Fade Stencil on top of that and applied Pumice Stone Distress Ink.

I added even more stencils to the background. First Splatters using Pumice Stone. Next I stamped the gentleman from Tim's Purveyor stamp set followed by the little starlike images next to the man from Tim's Mercantile stamp set. These are stamped with Jet Black Archival. I then added the stencil letters from Tim's Cargo Stencil with Black Soot.
I have to be honest here ... after I added the stenciled letters, I didn't really like them. So, I decided to cover them up. I love Tim's style of art because typically, there are no mistakes, only "happy accidents!" In this case, I decided to cover up the letters with torn and distress paper. Sometimes torn papers layered on top of each other create the coolest vintage look! So, that is what I decided to do here and I really love the way the project finished out! Here's how I did it ...

I distressed a manila tag by tearing the edges, adding Vintage Photo and lightly stamping the background letters from Tim's Typography stamp set. Next I added more stenciled Splatters with Peacock Feathers Distress Ink. I stamped the writing fluid bottle on a separate piece of manila cardstock and colorized it using a Detailer Water Brush and Distress Inks. Then I glued the bottle in place (allowing room for the ruler binding) and added some of Tim's Words "JOURNAL" and "curiosity" (on the man's forehead) from Remnant Rubons.

Finally I added the little Long Fasteners and banged them with Tim's Texture Hammer and I added the Embossed Silver Arrow using Wendy Vecchi's Silver Embossing Paste and Tim's Arrows Stencil. One thing I will caution you on here is that Wendy's metallic embossing pastes are a tad bit thinner than her white embossing paste. So, you don't need to use as much of the metallic pastes when working with stencils. Remember a little goes a long way and you won't have the paste oozing out from underneath the stencil if you use it sparingly.
I added some shadowing around the man's head and some journaling thoughts on the perimeter of his head and shoulders using a fine point black permanent pen. The embossing adds even more dimension to several already layered stages. Very cool! I really like this cover much better than the one with the black letters!
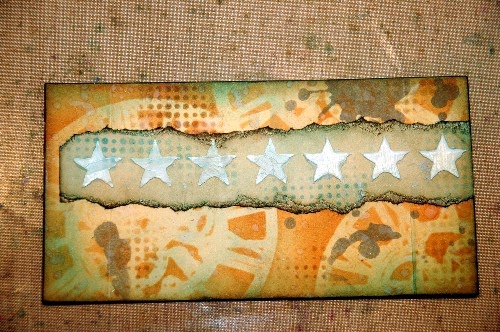
Here is the back after adding a strip of torn and distressed Manila cardstock to cover the letters. I first distressed the cardstock with Vintage Photo and Peacock Feathers Distress Inks. Then I added some Dot Fade Stenciling to the strip using Peacock Feathers. The stars are added thanks to Tim's Stars Stencil and Wendy Vecchi's Crackled Texture Paste.

I added some Peacock Feathers Distress Ink to the stars after they dried using a Detailer Water Brush. Then I lightly created a shadow effect around them using a Stabilo Black Pencil and the Water Brush. I also added two more arrows using Tim's Arrows Stencil and the Silver Embossing Paste. When dry, I added more Words Rubons; "OBSERVATIONS" and "DESTINATION" to the back as well as a metallic trim strip from Tim's Borders Industrious Stickers.

So here are the front and back covers; all layered with stencils and embossing paste added. The specific techniques for this are on page 49 of Tim's Compendium of Curiosities Book.
Now that the outside covers were almost finished, it was time to create the inside for the covers.
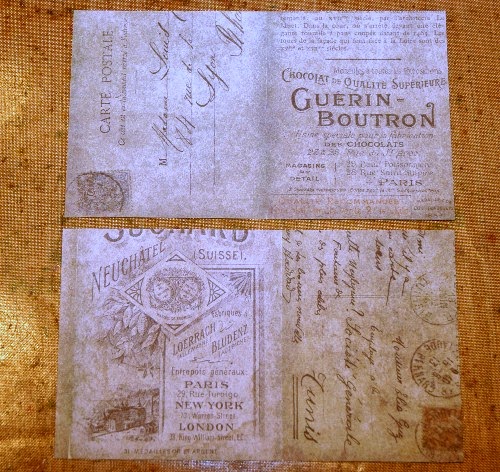
I began with these two pieces of cardstock cut from Tim's French Industrial Paper Stash.

The first layer consists of distressing with Rusty Hinge and Vintage Photo. Next I added some more Splatters using Peacock Feathers Distress Ink.

Through the magic of Tim's layered stencil and embossing paste technique, these plain cardstock pieces are transformed into a more artistic and interesting look.

Here you can see the richness of color, the many subtle patterns and the texture. As a finishing touch, I also added some White Fire Treasure Gold Guilding Wax over the embossed harlequins and around the edges. I also added White Fire Treasure Gold to the exterior covers around the edges.

Here are the finished interior papers once I attached them to the outside covers.

Now that the covers were ready, I needed to line them up according to the holes in the ruler binding and punch the holes using my Crop A Dile. Then I cut lots of papers to fill the journal with. These papers have a vintage feel to them.


Here is the finished back of the mini journal. Don't you love all of the layers of stencils pattern and the added embossed images?


To begin, I cut my black chipboard and then I cut two pieces of manila cardstock to cover the chipboard and create the outside covers for my journal. I began by layering various Tim Holtz Stencils: first Clockworks using Rusty Hinge and Vintage Photo Distress Inks. Then I layered the Dot Fade Stencil on top of that and applied Pumice Stone Distress Ink.
I added even more stencils to the background. First Splatters using Pumice Stone. Next I stamped the gentleman from Tim's Purveyor stamp set followed by the little starlike images next to the man from Tim's Mercantile stamp set. These are stamped with Jet Black Archival. I then added the stencil letters from Tim's Cargo Stencil with Black Soot.
I have to be honest here ... after I added the stenciled letters, I didn't really like them. So, I decided to cover them up. I love Tim's style of art because typically, there are no mistakes, only "happy accidents!" In this case, I decided to cover up the letters with torn and distress paper. Sometimes torn papers layered on top of each other create the coolest vintage look! So, that is what I decided to do here and I really love the way the project finished out! Here's how I did it ...
I distressed a manila tag by tearing the edges, adding Vintage Photo and lightly stamping the background letters from Tim's Typography stamp set. Next I added more stenciled Splatters with Peacock Feathers Distress Ink. I stamped the writing fluid bottle on a separate piece of manila cardstock and colorized it using a Detailer Water Brush and Distress Inks. Then I glued the bottle in place (allowing room for the ruler binding) and added some of Tim's Words "JOURNAL" and "curiosity" (on the man's forehead) from Remnant Rubons.
Finally I added the little Long Fasteners and banged them with Tim's Texture Hammer and I added the Embossed Silver Arrow using Wendy Vecchi's Silver Embossing Paste and Tim's Arrows Stencil. One thing I will caution you on here is that Wendy's metallic embossing pastes are a tad bit thinner than her white embossing paste. So, you don't need to use as much of the metallic pastes when working with stencils. Remember a little goes a long way and you won't have the paste oozing out from underneath the stencil if you use it sparingly.
I added some shadowing around the man's head and some journaling thoughts on the perimeter of his head and shoulders using a fine point black permanent pen. The embossing adds even more dimension to several already layered stages. Very cool! I really like this cover much better than the one with the black letters!
Here is the back after adding a strip of torn and distressed Manila cardstock to cover the letters. I first distressed the cardstock with Vintage Photo and Peacock Feathers Distress Inks. Then I added some Dot Fade Stenciling to the strip using Peacock Feathers. The stars are added thanks to Tim's Stars Stencil and Wendy Vecchi's Crackled Texture Paste.
I added some Peacock Feathers Distress Ink to the stars after they dried using a Detailer Water Brush. Then I lightly created a shadow effect around them using a Stabilo Black Pencil and the Water Brush. I also added two more arrows using Tim's Arrows Stencil and the Silver Embossing Paste. When dry, I added more Words Rubons; "OBSERVATIONS" and "DESTINATION" to the back as well as a metallic trim strip from Tim's Borders Industrious Stickers.
So here are the front and back covers; all layered with stencils and embossing paste added. The specific techniques for this are on page 49 of Tim's Compendium of Curiosities Book.
Now that the outside covers were almost finished, it was time to create the inside for the covers.
I began with these two pieces of cardstock cut from Tim's French Industrial Paper Stash.
The first layer consists of distressing with Rusty Hinge and Vintage Photo. Next I added some more Splatters using Peacock Feathers Distress Ink.
Through the magic of Tim's layered stencil and embossing paste technique, these plain cardstock pieces are transformed into a more artistic and interesting look.
Here you can see the richness of color, the many subtle patterns and the texture. As a finishing touch, I also added some White Fire Treasure Gold Guilding Wax over the embossed harlequins and around the edges. I also added White Fire Treasure Gold to the exterior covers around the edges.
Here are the finished interior papers once I attached them to the outside covers.
Now that the covers were ready, I needed to line them up according to the holes in the ruler binding and punch the holes using my Crop A Dile. Then I cut lots of papers to fill the journal with. These papers have a vintage feel to them.
You simply stack the back ruler binding, the back cover, add the long screws, stack the inside paper, add the top cover, add the washers then the top wing nuts. Here is the interior of the journal after it is assembled. See the little jump ring on the back cover? I will explain that next.
I wanted to add a closure to my book. So, I used an idea that I originally saw on a Kathy Orta book; an assemblage of several Tim Holtz products: a Hinge Clip attached to a Swivel Clasp and a silver eyelet.
Here is the closure assemblage from the back. I used my Big Bite Crop A Dile to punch a hole inside of the back cover and added the silver eyelet. Next I removed the jump ring from the Swivel Clasp and threaded the chain through the eyelet and then added the Jump Ring back in place, anchoring the chain. I then added two charms using Tim's Link Chain and some Jump Rings. The charms are a Heart Charm and ...
A Philosophy Tag. I swiped Spiced Marmalade Distress Paint over the entire surface of the Philosophy Tag and then wiped the paint off of the tag surface, leaving it down in the letters and numbers.
Here is the closure from the front, charms hanging from the Hinge Clip thanks to the Link Chain and the Jump Rings.
Here is the finished back of the mini journal. Don't you love all of the layers of stencils pattern and the added embossed images?
And again ... here is the finished front. I think the added torn paper to cover my mistake and extra stamping and stenciling really added some character to this cover. Happy accidents are the best, aren't they??
I hope you enjoyed this tutorial and it has inspired you to join in our challenge. Remember to share what inspired you to create your piece and be sure to mention our challenge with a link on your blog post. Then link up to our challenge and you could be the lucky winner of our fabulous prize packages from Tim and Mario and also our very generous sponsors, Inspiration Emporium and The Funkie Junkie Boutique.
This week our prize is a $25.00 gift certificate from ...
and a generous prize package full of Tim Holtz products from Tim and Mario!!
Good luck and have fun with this challenge! It's lots of fun!
Love everything about this!!! OMGoodness absolutely timeless. Great Job and thanks for posting....
ReplyDeleteYet again you have made something that makes my jaw drop. What a cool little journal. I love the masculine colors and all the texture and stenciling. Seriously love this.
ReplyDeleteWOW Candy! This is incredible! Love the way you've really accentuated the texture paste with the finishes applied. So much eye candy I could sit and stare for hours! Jenny x
ReplyDeleteSweet journal!
ReplyDeleteThese covers, inside and out, look amazing. The colours, layering and images combine to create a fabulous journal to work with. Love this Candy xxx
ReplyDeleteAbsolutely stunning Candy! Great combination of techniques and a great tutorial. Fabulous! Jennie x
ReplyDeleteFabulous step by step and a stunning result, love all the little details Candy, very inspiring!
ReplyDeleteWow - what a stunning journal Candy! Fabulous composition and colouring, great images and ephemera, executed perfectly, it's an absolute treasure trove. Thanks for sharing your step x step, too. Chris xxx
ReplyDeleteThis is faaaaaabulous; I clicked on yours first from Linda's page 'cause I love this so much! It can be so difficult to make projects that men will love and I think you've hit just the right note of whimsy combined with pure artistry. Nice work!
ReplyDeleteCandy!! This is such a way cool tag!! One of the coolest! Love your layers ,mediums and your elements you used-the Whole kit and kaboodle! heehee So very inspiring! hugs")
ReplyDeleteWhat a great journal! I love all of the different stencils you used.
ReplyDeleteCandy, I just love your little book. The fastenings are fantastic and go so well with the masculine theme of the piece. Your use of stamps and stencils is amazing. Fab!! Jean.x
ReplyDeleteFabulous Candy, love the stencilled background and those gorgeous textural stars. The splatters add a lovely touch too. This would be great to take on a trip away for all those keepsakes . Great design Candy as always. Tracy x
ReplyDeleteYes, Candy, happy accidents ARE the best. I love that you forged ahead with a great solution. The result was fantastic! And I love that closure idea. Gonna have to steal that one for sure.
ReplyDeleteSTOP IT! This is a fantastic mini. I love everything about it. Now I want to make one. Seriously amazing Candy.
ReplyDeleteAnother stunning piece Candy. You never disappoint. This is a real treasure. Karen.x
ReplyDeleteCandy this is wonderfully created... I love the way also that you have 'walked' us thru your process of this great little book... So very clean and yet so vintage and wonderful... love it all... love all the layers you have created on each level... Love, Light and Peace...Bonnie
ReplyDeleteGF, I REALLY think you *need* to send this to me. Really. (lol) It's awesome! This is why you are where you are and I'm just happy to wipe up the spills. Thank you for another project full of inspiration!
ReplyDeleteThis is stunning Candy! Soooo much to see and savor and yes sooo inspirational! Thank you for the great tut and photos! Have a wonderful day:) ~kim
ReplyDeletethis is really awesome Candy - love the pages - they are all so fabulous xx
ReplyDeleteYou never cease to amaze me with your inspirational projects. I love that TH binding, and that unique closure you created is amazing. Blessings!
ReplyDeleteI just love this project candy. the idea is fabulous and your cover looks amazing
ReplyDeletex catherine
Oh Candy I totally adore this little mini!!! The outside of the covers are stunning (great way to cover the mistake), the inside covers are totally fantastic too and I absolutely love how you put the closure together!! Really, really brilliant project again and a fantastic tutorial!!!!
ReplyDeleteGorgeous, all the layers and binding, so inspirational, thank you for sharing!
ReplyDeleteHello Rurh! I could not open your blog page for some reason. I hope you will see this. I wanted to thank you for the nice comment that you left on my blog! <3 Candy
DeleteAnother project with the wow factor! I love how you used the ruler binding, your stenciling is wonderful, love the stamping, love everything about this. You are such an inspirational crafter Candy! Hugs, Anne xx
ReplyDeleteI'm always amazing how something can change and evolve in just a few stages/layers, thanks for sharing the process of this wonderful book x
ReplyDeleteOH MY, OH my, OH my ... absolutely love this mini journal EVERTHING about it (being a Tim-A-holic this excited me) ... love all the elements ( might even set fire under me to finish a couple of projects... I've got a lot of these elements for a project)! Your stencil work is amazing; I see that paste girlfriend...you rocked this...
ReplyDeleteWhat a fabulous mini! I think you outdid yourself with this one! Great colors and design.
ReplyDeleteThis mini journal is just wonderful - love the wooden ruler and all of the details. Thanks for explaining each step. Love it!
ReplyDeleteOMGosh!!! Your journal is fantabulous! Love the covers and the images and textures!!!
ReplyDeleteLove, love, LOVE this, Candy! Every detail is so well thought out, and it's engaging and a little mysterious... in other words, it's perfect!
ReplyDeletexoxo
Fantastic mini album... Fabulous tutorial.. Love the layout... ( I even like the idea you've hidden the stencilled letters.. Sort of hidden from view concept).. Brilliant inspiration... I shall be joining in this challenge, when I get a chance, Px
ReplyDeleteI just wanted to say I love all the details to this little gem. Thanks for posting!!! I love the entire little book.
ReplyDeleteDear Candy, this journal is smashing, inside and out! The colors and layers are gorgeous as usual, and I love the binding.
ReplyDeleteGaby <3
Fabulous mini journal Candy! Love all the layering and the closing mechanism is awesome! Sue C x
ReplyDeleteI love your creation to bits
ReplyDeleteWow, Candy....the layers, the colors, the details....the layers!!!!!! Love the attention to detail in your work. I'm always amazed at your tutorials...how can you possibly remember every step along the way? The closure is a wonder and the finished product an absolute delight. Looks like you found it in an ancestor's attic...and that is truly a wonderful thing!
ReplyDeleteWow that is just amazing. Love the metallic paste-I may have to get some!! The inside covers are just as beautiful!! thanks for the inspiration! You are amazing!
ReplyDeleteI lack words to describe how awesome this piece is, so I must revert to my more primitive expressions: Dang, girl!!! Look what you did!!!! I have a fantasy of sitting in your studio, unnoticed, quiet as a mouse and watch you create. You're a genius.
ReplyDeleteDefinitely inspired to try the challenge. Enjoyed seeing how all your layers came together with your step by step instructions. Love the closure and I checked out Kathy Orta's blog. More amazing inspiration. Looking forward to seeing what you do for the next challenge!
ReplyDeleteGreat little journal Candy, so much detail and thanks for showing us the stages in putting it together.
ReplyDeleteHappy crafting, Angela x
I love this little journal and the detailed tutorial.
ReplyDeleteLove everything about your mini! I especially love the little glitz you put on the texture of the stars! You rocked this girly!!!
ReplyDeleteWow, you really outdid yourself on this one Candy! It's fantastic!
ReplyDeletewow, beautiful, I also inspired to try the challenge. Enjoyed seeing how all your layers came together with your step by step instructions, many thanks!! Hugs, Kerstin
ReplyDeleteThis is lovely, to be honest I always wondered what you did with the ruler binder, I didn't quite catch on. Now I know, first project I have seen and realised. A lightbulb moment. Thank you
ReplyDeleteSuper cool journal book !!! I love the way it turned out .. thanks for the step by step photos.
ReplyDeleteOh, Candy, this is amazing on so many levels! I love all the layering and the incredible texture, plus your fabby metal closure.... gorgeous!
ReplyDeleteWhat wonderful covers you created for your little book Candy! absolutely gorgeous - love the stenciling, stampings and layers! What a lovely place to hold some journaling or art pages! Got to go back and look in detail at each pic!
ReplyDeleteWOW!! I can't tell you how many times I've grabbed those little ruler pieces then set them down again. I love your mini book and your 'happy accident' turned out beautifully!
ReplyDeleteLove that it's horizontal. THANKS for the inspiration!
ReplyDeleteHi Mandy! Thank you for the very sweet comment you left on my blog ! <3 Candy
DeleteLove that it's horizontal. Thanks for the inspiration!
ReplyDeleteGreat little journal Candy! Nice tutorial too.
ReplyDeleteHi Peg. Thank to so much for taking the time to leave a comment. I hope you can join in on the CC3 challenge. <3 Candy
DeleteFantastic as ever Candy! Your compositions are so slick - you make it look easy! Nikki x
ReplyDeleteAmazing ! Loads of work has gone into this fantastic journal, Jx
ReplyDeleteI SO love this little book, Candy! You have so many beautiful details in it! The color combinations are perfect! Way to go!
ReplyDeleteI just LOVE this journal, Candy! You are so darn creative! I love all your step by steps as you have so many layers....it makes it so easy to follow! The colors are so beautiful too! Another Candy success!
ReplyDeleteWhat a nice mini-book. I especially like the crackle paste used for the stars. Sigh, yet another new product to try.
ReplyDeleteWOWZA!! Absolutely amazing, Candy!! Love all of the textures and different stencils you used on this FAB journal! Love everything about it!! Wonderful stencil/texture inspiration for us!! XOXO-Shari
ReplyDeleteWow,love this Candy,so much detail to look at,seriously impressed!
ReplyDeleteDonna.x
So many different Tim products and techniques in one spot-it's fantastic! Love it.
ReplyDeleteWow! I really like what you have done here Candy. I especially love the little fastener on the back and the white fire highlights it really brings it to life. Mo x
ReplyDeleteI love your little journal Candy, I wish I could have a hold of it, FAB!
ReplyDeleteAnother cool work of art!! TFS!!
ReplyDeleteCandy - This is so fantastic, so many great techniques and wonderful colors & ideas and the list goes on and on. I'm going to be trying some of these. Love it!!!
ReplyDeleteLOVE this mini album. The layers are amazing! I'm going to have to find and try some of the White Fire Treasure product you used. Looks like a product I would love and my style.
ReplyDeleteLOVE this mini album. The layers are amazing! I'm going to have to find and try some of the White Fire Treasure product you used. Looks like a product I would love and my style. Love the closeure too.
ReplyDeleteIf there was a Nobel Prize for Mini Albums Candy - you would win it hands down. I love the ruler as the book binder. I just love everything you make - your creativity and vision is phenomenal!
ReplyDeleteOh my word! Now I NEED to go get one of these binders and make something like this. I saw one at my local ss and will go tomorrow to see if they still have stock. I just love how you have used the technique on the cover. Brilliant inspiration, thank you.
ReplyDeleteYour mini journal is beautiful and chock full of inspiration. I loved your example of the harlequin texturing!
ReplyDeleteWhat a great masculine project. I like the rich colours too x
ReplyDeleteI love your album and happy accidents are also good. Thanks for this wonderful book as inspiration.
ReplyDeleteHi Susan. I could not get your Google Chrome blog to come up for me so I'm thanking you here for your sweet comment. <3 Candy
DeleteI have one of those ruler bindings and have been trying to think of a way to use it. Thanks so much for the inspiration!
ReplyDeleteHoly Cow! I SOOO want to touch this!! I love all the details you put in, and I am very intrigued with the guilding wax....cue google! LOL!
ReplyDeleteThank you for the tutorial on how you created your project. You have so many unique details. I must try to remember a few to add some pizzazz to my pieces. TFS
ReplyDeleteWhat a glorious creation, Candy... the colours are simply stunning, so zingy together, and the stamping and stencil work throughout is magnificent. A really gorgeous little mini-album - jaw-dropping attention to detail as always.
ReplyDeleteThinking of you lots, and with lots of love,
Alison xx
Utterly love your mini journal Candy! The stars on the back are totally gorge and the collage/mixed media style is superb and rich with the stencilled layers. Truly love it. Thanks for the yummy eye candy. :)
ReplyDeleteYour are talented!
ReplyDeleteGeorgeous project. Love your stamping, splashing, all colour... Beautiful.
ReplyDeleteOh Wow! what a beautiful Mini Journal Cheryl… I love this… the colours and textures are awesome! I love all the fab details… and thanks for showing us how you made it - wonderful photos! :-)
ReplyDeleteHope you have a lovely weekend!
Hugs Sue B xx
I'm speechless as always Candy! Really I love this, it's one of the most beautiful works that I' ve seen! Barbarayaya
ReplyDeleteCandy this is amazing as always, you keep inspiring me with your gorgeous tutorials ^.^
ReplyDeleteHappy accidents are indeed the best, I love how a project can evolve in front of your eyes and crafty hands. I really like the peacock feather splashes. The colour pallet you have used is really inspiring, it is good to see a masculine project that lighter and fresher looking. Fab job ;)
ReplyDeleteLovely, lovely piece, especially the chain, clever idea, thank you for the tut! :D Gay x
ReplyDeleteWhat a cool way to make a book. I will have to steal some elements from you as I will be making this for an adopted daughter who just graduated from pharmacology school.
ReplyDeleteDelightful mini book! I love every little detail you put into it.
ReplyDeleteAbsolutely fabulous tag book, I love everything about it!
ReplyDeleteThis project is both so clever and beautiful! Love your closure solution.
ReplyDeleteSuper cool album!!!! I really like the closure idea.
ReplyDeleteWhat a fabulous project , love any kind of mini books . All the metal is cool too
ReplyDeleteWow! What a beautiful project!!
ReplyDeleteLove the vintage steampunk look. I esp. love the embossed arrow.
ReplyDeleteSuch a neat piece!!! I love how you used the splatter stencil!!!
ReplyDeleteThis is a deliciously vintage project that makes me very curious and I want to have your booklet! It makes me want to go on a journey by train :)
ReplyDeleteCandy! As ever... AWESOMELY AMAZING art... I love your creations, each one has layers and layers of deliciousness for the eye to see x
ReplyDeleteTotally gorgeous - I love your happy accident and think your journal cover is all the better for it. Good when that happens :)
ReplyDeleteCandy, as always your creations are above and beyond amazing! I so love all the lovely stamping, layers and texture! You rock!
ReplyDeleteCandy, what a fun little mini! The layers and textures are just amazing. I especially like the pages with the splatters and harlequin. Thanks for the inspiration.
ReplyDeleteA great little album, love the layers x
ReplyDeleteThis is phenomenal! I love this!!
ReplyDeleteI really love this, its just phenomenal !!
ReplyDeleteGorgeous, Candy! Love this ruler book! The covers are so pretty! Hugs, Sandra
ReplyDeleteWhat a fabulous journal book. I had this it would be one of those items That would not get used but would be kept on display to be looked at like that special stash of paper we all have.
ReplyDeleteWhat a fantastic journal! Just love ALL the layers! Thanks for sharing!
ReplyDeleteLove how you shared your cover up Candy, I do that all the time lol. Amazing journal and just wish I could flip through each page. Thx for the inspiration!!!
ReplyDeleteCandy, totally wonderful as in everything you do.. Love the colors and the stamps. Don't ya just love those little ruler bindings? Thanks for sharing.
ReplyDeleteFab little mini book .... I love every detail. Linda xx
ReplyDeletewow wow and WOW!!! brilliant album!!! fabulous details!! =)
ReplyDeleteDear Candy, I`m so very delighted to see the journal you have created. I love your colors and all the pretty details that you have decorated them with. You have done a fabulous job! I love this!
ReplyDeleteSuch a cool ruler book! Looks like you had a lot of fun constructing it :-)
ReplyDeleteYour little ruler books is so cool. You did a fabulous job on the cover.
ReplyDeletelove it - loads to look at - I want one ! xx
ReplyDeleteHi Candy! I always love visiting your blog! It is so wonderful and your tuts are great and inspiring! Thanks so much for all your kind words and visits. Have a lovely day! ~kim
ReplyDeleteThis is sooo cool! Gorgeous layering and I love the gold guilding wax. That looks like fun! :)
ReplyDeleteLovely detail Candy....especially like the fact that you did a mini book and the 'imagine' tag with the swipe of distress ink....nice touch! Like the ephemera and your Tim Holtz stamp on the front....great job!
ReplyDeleteThis is SUCH a great project!!!
ReplyDeleteThis is a great album. I love your stamping, all the colours and textures and all the wonderful details.
ReplyDeleteHave a nice day, Eva
Oh, Candy...I'm enamored with this project! I struggle with making art that has no purpose and your project shows me that with a few additions (like a binding and inner pages) my play art can become a useful tool or a beautiful gift!
ReplyDeleteI love everything about this project and can only hope that one day I will be able to produce something half as good as this x
ReplyDeleteDenise x
Great layers - love your little book!
ReplyDeleteAwesome inspiration as always Candy!!…How fabulous is your little creative book..I like the the way you have made the closure from the idea-ology bits and pieces...may have to borrow that idea! ;) ... So many wonderful details!!… Looking forward to seeing what you do with the next challenge now…Jan x
ReplyDeleteThis is really cool Candy! I'm so inspired by your work!
ReplyDeleteOh my goodness this is fantastic! I just love love love handmade journals. Thanks for sharing!
ReplyDeleteOh my goodness this is fantastic! I just love love love handmade journals. Thanks for sharing!
ReplyDeleteFabulous Candy! I've been hoarding one of these Ruler kits and your gorgeous journal project is just the shot of inspiration I need to get started ! x
ReplyDeleteHello Miss Candy, holy moly 127 comments you go Woman,SO well deserved, oh man I love how the cover came together, your right no mistakes it was meant to be, funny how that happens, WOW the back is just as gorgeous, this insides are fabulous, this is just breath taking, your are a SUPERB CREATIVE artist you rock Miss Candy thanks so much for always sharing your inspiration, have a wonderful weekend, ((( BIG HUGS )))...
ReplyDeleteCandy - I am just speechless! You are just so good at those little details, that I think, so many of us miss. It would take me at least a half an hour to pour over those little journal covers. I wouldn't want to miss any little detail! Thanks so much for sharing with us. - Lisa H.
ReplyDeleteCandy - Your journal is just beyond words!
ReplyDeleteNot sure my other post went through. It's a masterpiece!
ReplyDeleteWhat a great little album. I love the way you have inked all the pages on top of all the detail on the cover. Thanks for the tutorial.
ReplyDeleteWonderful album, love the color combination and the dimension from the texture paste.
ReplyDeleteWow what a fantastic post - I just want to sit down and make something similar especially because you make it seem so achievable. I love all the details and its nice to know that sometimes even someone as talented as you does something they don't like the look off and then finds a way to 'fix' it.TFS.
ReplyDeleteTotally fabulous Candy. You have such a great eye for colour and design. Hopefully I will find time to play and join in with the CC challenge
ReplyDeleteHuge hugs Annie x