Ho Ho Ho Everyone! It's the first weekend in DECEMBER
and time for the latest Compendium of Curiosities III Challenge.
The lovely Linda Ledbetter of Studio L3 is hosting these challenges and we're all having so much fun sharing Tim Holtz' amazing techniques and products from his series of Compendium of Curiosities books with all of you. There are two fabulous prizes given away with every challenge; one awarded by the Curiosity Crew (NOT an easy task) and the other a random winner. If you're not already joining us, I hope you will! It's a great way to meet new friends, learn all sorts of fun new things, share your art with others and maybe win some cool prizes!
Turn to page 60 in your Compendium of Curiosities III book and check out Woodlands and Tinsel Twine. It's so close to Christmas now and THE PERFECT time to use these products from Tim's Ideaology line. Since this is a product challenge and not a technique challenge, I can share all of my steps in creating my project this week!
I love this time of year and these particular products so much that I decided to make TWO pieces to share with you. Since I'll be sharing all of the steps to create these, this post has lots of pictures. So grab a cuppa hot cocoa and enjoy!

I totally LOVE making little vintage Christmas ornaments. The two ornaments I am sharing with you today remind me of ornaments that hung on my childhood Christmas trees. Ah...what sweet memories! My globe ornament had an angel in it and it was given to me by my paternal grandparents. Oh what I would give to have that ornament now! The house is also similar to little village houses and ornaments we used to have.
Both the house ornament and the glass dome ornament are from Melissa Frances. The house measures approximately 4" x 2" (just the house) the base measures 5" x 3". They are just plain chipboard that you can paint, stain or cover with paper. For this newest addition to the neighborhood, I decided to use papers from Tim's Merriment Christmas paper pad.
The glass dome ornament measures approximately 3" square. I decided to use these two Melissa Frances items to show you that you can use Tim's products to give a real vintage charm to almost anything! His Woodland Trees and Tinsel Twine really perk up any Christmas home decor piece you are making.

Let's start with the glass dome instructions.

I began by painting the plain chipboard base (front and back) with Ranger's White Gesso and heat setting it. Once that was dry, I lightly distressed it with Vintage Photo Distress Ink to age that stark white finish. Then I painted some Matte Multi Medium in a circle on the base top and laid down a piece of "snow blanket" (you can find this at any craft store this time of year) that I cut into a circle to lay on the base. I also lightly sprayed it with some honey spray to age it. This snow blanket has little silver specks already in it for an even more vintage look.
**Important
note: Use the glue on the chipboard piece rather than the backside of
the "snow" before pressing into place. If you are using a white glue,
even though it is supposed to dry clear, if you dab the glue on the back
side of the "snow" and then press it into place, you will still see
where you have dabbed the glue. It is much better if you smoothly smear
the glue out onto the chipboard surface and then press it into place.
No gobs of glue visible!

I had a little Santa candle that I found at Home Goods recently while I was in California. I cut off the tea light style base and that made Santa the perfect height to fit under my glass dome. Next I used one of Tim's smaller Woodlands Trees from the Mini Tree Lot Collection to stand proudly next to Santa under my glass dome.

To give this tree a different look, I masked the middle and top of the tree.
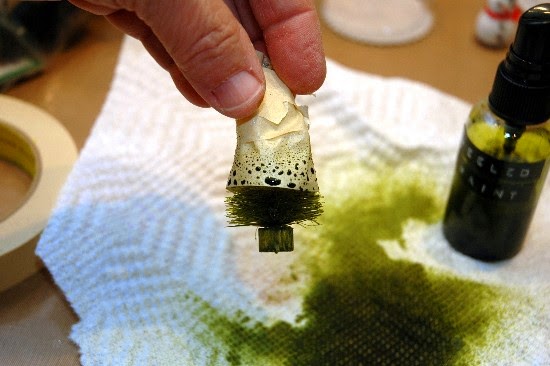
Next I sprayed the bottom with Peeled Paint Distress Spray and removed the masking tape.

When the green section was dry, I masked the middle and bottom (green part) of the tree and sprayed the top with Fired Brick Distress Spray.

I love the candy cane effect! Then I added some Glossy Accents (using my finger) to the tree by tapping it onto the branch tips and I sprinkled Ranger's Diamond Fine Glitter over the Glossy Accents. Man oh man! TALK ABOUT SPARKLE!!! It's amazing how much PAZAZZ you get out of just a tiny bit of that glitter!

I wanted to add a little string of beading to the Christmas tree but I didn't have any silver chain. No worries! I simply changed the color of an antiqued bronze ball chain to silver by dabbing it with my Distress Antique Pewter Paint Dabber. Easy peasy!

Once dry, I hot glued the chain at the back of the tree top, circled it around the tree and hot glued it at the bottom of the tree. I had hot glued a silver star to the top of the tree but later had to remove it because it was too tall to fit under the dome. (I also had to cut off the wooden bottom of the Woodlands Tree for it to fit under the dome.)

I hot glued the tree in place to the base and then hot glued Santa in his place next to the fancy tree. I added "Merry Christmas" in front with dabs of hot glue

and a small present to the backside of Santa and the tree. The present is just two little stacked pieces of plain chipboard wrapped in a scrap of Tim's Merriment paper and tied with a red bow.

Next I glued the globe to the base with Glossy Accents and held it in place for a minute or so to be sure it was holding. I used a piece of holly garland that I've had for a long time (also found at a large craft store) and wrapped some of Tim's Silver Tinsel Twine around it. That Silver Tinsel Twine really livened up the holly garland! I then started at the back of the dome and spot glued the garland all the way around the base using hot glue.

Finally, I added a piece of Tim's red Winter Tinsel Twine at the top of my dome as a tree hanger and a "Christmas Wishes" Tidings Token dangling from the hanger with a Jump Ring (seen in the photo at the top of this post).
On to the miniature house instructions.

This little house can be used as a Christmas tree ornament, under a glass dome as part of a little Christmas scene, or in a little neighborhood.

I began by laying the house pieces face up on top of my paper selections and tracing around them. Then I cut them out and using some matte medium, I glued the papers in place.

Once dry, I used Tim's Kraft Knife and a cutting pad to trim away the excess paper.
Next I added my embellishments to the house while it was still flat. I love these little metal pieces! They were sent to me by Gaby;
a dear friend in Germany who does some amazing art! We actually became
friends through blogging so that is what I mean when I say that you're
missing out if you're not getting involved with the Compendium
Challenges! Anyway ... back to my little Christmas house ...

I chose these sweet little
antique bronze metal pieces that Gaby sent to me and I painted them with
Tim's Antique Linen Distress Paint. Once dry, I gave them a quick
spritz of Biscotti Perfect Pearls Mist to give them a sparkly sheen. I
glued them in place on my house with Glossy Accents.

I added some Platinum Stickles accents to the metal pieces and also to the corrugated fence and the paper window and door frames (painted with Antique Linen) that would later be glued into place. The Platinum Stickles can take on lots of different colors, primarily gold or an antique silver and it compliments anything. I love how just a small touch of the stickles can add such a festive yet vintage feeling to so many things. When the Stickles were dry, I glued the windows and door in place using 1/8" double sided Scor Tape.

Once I was happy with the embellishments on my house, I glued it together at the back corner using hot glue to firmly hold it in place. Next I hot glued the roof in place.

The roof of my house would normally be pretty plain but with Tim's Winter Tinsel Twine collection, adding some green Tinsel Twine along the roof life really sets it off and adds that holiday sparkle! I added the Tinsel Twine with a bead of hot glue and worked in little sections at a time.

I used Tim's new Pine Twine to create a tiny wreath to place above the door of my house and I also created a garland to hang along the picket fence.

I fashioned some little bows out of red and green Christmas ribbon and hot glued them in place on my Pine Twine. I added sparkles of Platinum Stickles right onto the Pine Twine. Amazing how much just a touch of Stickles here and there adds to the Pine Twine!

Next I added the "snow" base onto the piece of plain chipboard that was included in the set. I started by painting all sides of the base with Picket Fence Distress Paint and letting it dry. Once dry, I added a piece of "snow blanket" just as I had done earlier on my glass dome ornament. This time, I cut a piece of the "snow blanket" a little bigger than the base. Once it was glued in place, I cut around the base to get rid of the excess snow blanket.
Time
to add snow to the roof! I cut a piece from the snow blanket about the
size of the roof and laid it on top of the roof. Then I began snipping
away at the snow blanket so that I had some snow on the roof but it was
not completely covered. I also cut a hole in the center for the
ornament hanger to push through. I glued the snow on the roof in place
just as I had done on the base, pressing until it was firmly in place. I
hot glued the little wreath in place above the door.
I decided to add a bit more of a vintage feeling to my ornament so I added some more of Tim's green Tinsel Twine from the Winter Collection completely around the outside edge of the base. I glued the twine in place with a bead of hot glue, working in sections just as I had done with the roof line.
My house was "built" and it was time to put the little ornament kit all together. I hot glued the picket fence to the right side of the base. Then I hot glued the house in place on top of the snow base. Time to add Tim's Woodlands tree to the left of the house!

I used another of the smaller trees from Tim's Woodlands Mini Tree Lot. They are cream colored so you can make them any color you want. I love that! I cut off the base of the tree so that it would not be quite so tall. This time I sprayed the tree first with Shabby Shutters Distress Stain followed by spritzes of Peeled Paint Distress Stain. Once dry, I added some Glossy Accents (using my finger) to the tips of the tree and sprinkled it with Ranger's Diamond Fine Glitter. Next I added little touches of White Embossing Paste and sprinkled a tag more glitter over it while wet. Once dry, I hot glued the tree into place on the snow base. Next I added little "ornaments" to the tree using Candy Cane Stickles that I simply squeezed onto the tree in a little round ball shape.

While the "ornaments" on the tree were drying, I found a tiny reindeer that I had in my stash of Christmas stuff and added a little snow to her back using White Embossing Paste and the Diamond Glitter. Then I hot glued her into place next to the tree in the front yard.

I stuck the ornament hanger (included with the ornament kit) in place. To the back of the roof I hot glued another of my Christmas stash stuff; a plastic red script "Merry Christmas". I love the vintage look it adds!

Finally, to give an even more vintage look, I lightly sprayed areas of my ornament with spray adhesive and gently sprinkled them Mica Flakes "snow". I love that finished look that the Mica Flakes give and when I look at these little ornaments, I am taken back to when I was a little girl. I remember those Mica Flakes sprinkled on Christmas ornaments and some decorations to give that look of vintage snow. I'm so glad that that snow is still available. I usually buy a box or two when I run across it this time of year.

I just keep adding to my Christmas collection of new handmade "goodies" this year! These little ornaments are so much fun to make and display and they have so much more character than I can capture with the camera!
Now it's YOUR turn to create something using Tim's Woodlands trees and Tinsel Twine. Then link up to our challenge and join the fun! This challenge's sponsor are the wonderful people of Inspiration Emporium who are offering a $50.00 gift certificate to one of our lucky winner. Thank you Inspiration Emporium for your generous prize!

And as always, there is a wonderful selection of Tim's products awaiting our other lucky winner. This generous prize package was donated by Tim and Mario and all of us at The Compendium of Curiosities Challenge THANK THEM for their support!
Good luck everybody!!
Gorgeous scene, thanks for sharing how you made this.
ReplyDeleteTotally enchanting pieces Candy, will look great on the tree. Happy Christmas, hugs Annette x
ReplyDeleteHOLY SNICKER-DOODLES!! These are absolutely amazing Candy! I just love all of the added glitter and tinsel, everything is so sparkly and shimmery! Love the candy cane tree, that was genius! So many wonderful details, I just love every bit! hugs :)
ReplyDeleteCandy!! Your pieces are just delishous!!!
ReplyDeleteI love how you tri colored that tree! You are the Christmas queen in my book!! delightful! xo
SO PRETTY!
ReplyDeleteI love the detail of the tree in the three colors too!! TFS Awesome job! :D
Dolly
Could you be any more fabulous? Seriously..I read this post so slowly so I wouldn't miss a word. Your photographs really bring me into the project and I feel like I've sat and watched you work....what fun!! Your vintage ornaments are just two little masterpieces. Absolutely LOVE them!!! Love, love, LOVE them.
ReplyDeleteWow!!! These really do look vintage and wonderful!ly so! Love them
ReplyDeleteBoth! That glass dome is too cool!
I wanna move in!!!!!!!!!!!!! So, so cute!
ReplyDeleteCandy--These ornaments are Amazing!! I could have sworn that the little house was a vintage glass ornament!! Just WOW!! I love Santa in his little clear bauble, just too darn cool!!! Two Fabulous creations for CC3, Candy!! You've really got me in the Christmas spirit, now!! HO HO HO!!! Merry Christmas!! :) XOXO-Shari T.
ReplyDeleteOMG! This little Christmas house is so ultra adorably yummy! Love its glittery presence and all the delightful teensy details! The greenery around the roof is brilliant! Beautiful construction!
ReplyDeleteHi Candy, you tree decorations are so nostalgic and perfectly made to every last little detail. I love them. Must make a point of getting my entry in to this challenge.
ReplyDeleteHave a lovely weekend, Julie x
Candy, this is yet another over the top fantastic project, absolutely wonderful! Specially love the gorgeous little Christmas house! So much wintry gorgeous detail, love it!!
ReplyDeleteCandy love your little house!!! Always a lot of detail and sparkle in your makes. Your little
ReplyDeleteSanta under the glass is adorable! Both are delicious and an enjoyment for many years to
come!
CANDY! This little duo left me feeling all giddy and Christmas-y inside! Every time I see one of your pieces, your holiday pieces in particular, I am reminded of so many happy things. Your art is nostalgic, yet totally original and unique and creative times a billion. Thanks for spending some much time on the meticulous details, which never cease to inspire. I thought your tri-colored tree was brilliant! This made me want to do a better job of decorating my own house! You've done it again...and you keep doing it every time with your projects. They are inspiring, absolutely YOU and beautiful!
ReplyDeleteOMG you girls have out done yourselves... I'm running out of words, stunning, gorgeous, creative ... they don't capture it all Little Christmas Manor ... I named it! The details are fabulous ( great tutorial BTW) ... made chills go through me! And the dome so fun... the trees are awesome !!!
ReplyDeleteI envyyou your skill eith tiny bits and pieces! My fingers would be all klutzy and sticky with glossy accents and glue and the final piece would never look so polished. Another poster said it loomed like a blown glass antique... I agree totally!
ReplyDeleteCandy, wow, very creative and beautiful ornaments, I wish I could play in this challenge, unfortunately, I'm moving right now to a newer house...
ReplyDeleteStop it Candy... I love it! Wow this is amazing and I have the PERFECT spot for it on my tree. You always create the most amazing vintage pieces. Love the tree. I want to live in that house.
ReplyDeleteWow! Wow! Wow! I am totally blown away by both of your ornaments, Candy! So much attention to detail. They truly are works of art.
ReplyDeleteCandy, I substituted a mug of soup for hot cocoa as I sat down to read your blog post. I love your ornaments...they remind me of the houses that used to sit below my grandparents tree. My brother has them now and I am happy to say that they are gracing their tree some 70 years later. I loved how you used the Glossy Accents and Ranger's Diamond Fine Glitter. Thanks for taking me back.
ReplyDeleteDid you hear that loud THUD? That was my jaw hitting the table. I am so in love with both of these precious ornaments. Your love for Christmas and vintage has never been more apparent than in this wonderful tutorial. That little house....I want to live there during the holidays! It is so dear..and festive...and whimsical. I love the shutters you created and the snowy blanket and the beautiful trees, too. And the globe ornament is just so sweet with just the right amount of sparkle. So darling! Thanks for sharing this wonderful tutorial! Now it can be Christmas!
ReplyDeleteHello Miss Candy, WOW THIS IS SO CREATIVE, so vintage looking, beautiful as you do,, love the trees, your house must look fantastic, thanks for sharing hope you have a wonderful week....((( BIG HUGS )))...
ReplyDeleteCandy, I just loved reading through your post this morning while enjoying my coffee. These ornaments are so, so pretty. I love all your little touches and addition of sparkle here and there. Thank you for your tips along the way. We all learn something new from you each and every time. You're amazing, girl!
ReplyDeleteI know by this point I shouldn't be, but I am always AMAZED by the level of detail and the incredible amount of thought and care you put into your projects. Every small aspect is perfection in your projects. I always appreciate how you take us through the entire creation too. Two totally gorgeous keepsake ornaments!
ReplyDeleteHugs,
Linda
No one does Christmas like you, Candy! Your grandkids must have all eyes glued to these creations. LOVE how you've colored the tree (and thanks for the visual - I was wondering how that worked) and all your fabulous embellishments.
ReplyDeleteTwo more brilliant retro holiday creations, Candy - absolutely enchanting. The tiny house is just adorable, and I love the red, white and green tree - very cool! Lovely, lovely stuff.
ReplyDeleteAlison xx
My goodness Candy - you make the most wonderfully detailed vintage decorations! Love the Santa and tree under the dome - and your beautiful Christmas house!
ReplyDeleteOh my, you've done it again. I am so in awe of these incredible pieces. The details are amazing. I just know you have magic in your hands. <3
ReplyDeleteDear Candy, these are the most beautiful Christmas ornaments I have seen this year. Your little Christmas house is too cute and I LOVE your glass dome ornament!
ReplyDeleteYou are my Christmas Queen <3
Thanks for adding a link to my blog! That's so sweet of you!
Sending big hugs your way!
Gaby
You make the best vintage looking Christmas decorations! I think these ornaments are some of my favorites so far. =)
ReplyDeleteCandy, your ornaments are absolutely beautiful! Once again your attention to detail shines! Love how you trimmed everything with the tinsel - it added the perfect bling to for the finishing. I love the dome used on the Santa and the tri-colored tree - fabulous! Boy, the house was a ton of work too! It turned out so beautifully!
ReplyDeleteStunning pieces - so much detail - amazing
ReplyDeleteCandy, you just blow me away every time you blog!! OMG, this is beyond incredible with all the festive details and little bits and pieces! You rock, GF! Love these both!!! Hugs!
ReplyDeleteThese are simply adorable and marvelous and so filled with wonderful details. You give me the itch to go create, create, create! Thank you so much for sharing your process; I was completely absorbed in all the little steps it took to get to these little wonders!
ReplyDeleteAh Candy. Can I be like you when I grow up?! I want to make everything you do!
ReplyDeleteJess
AMAZING!!! Candy your Christmas trees are Fabulous. If that wasn't enough you've also created a gorgeous little cottage. I love all the snow, which we can only dream about here in Australia this time of year. The little reindeer is so cute too. Love it all!!!! Karen.x
ReplyDeleteWow these are stunning Christmas décor creations. So festive and full of gorgeous details.
ReplyDeleteHugs
Desíre
{Doing Life – my personal blog}
Girl...you must have the most awesome Christmas displays in your house! Beautiful...reminds me of when I was a kid. Love what you created...love how you did multi colors on the tree!!! Fabulousness I say!!! hugs.
ReplyDeleteOh my! You have done an incredible job with these ornaments Candy, I love them both so much but the little dome with the candy coloured tree, silver beading and gorgeous Santa has just stolen my heart! I love glass dome ornaments! The house is so pretty and also reminds me of a childhood ornament. Thanks so much for sharing your talent with us! Hugs, Anne xx
ReplyDeleteSuch intricate details!! Beautiful work :)
ReplyDeleteAll I can say is WOW. These are stunning. Sooo wonderful.
ReplyDeleteI love your ornament - and how cool to do a striped tree - fabulous!
ReplyDeleteWow, these are fantastic Candy and the striped tree is so cool. I love all of the vintage goodness on your ornaments. :)
ReplyDeleteYou always amaze me...the ballchain as a tree decoration is brilliant! Lovely vignette.
ReplyDeleteHoly Cannolli!! if you ever run out of room for your decorations, keep me in mind!!!! Absolutely Fantastic!! Have a Very Merry Christmas!
ReplyDeleteHow wonderful that you were able to create a few ornaments that are reminiscent of your childhood. The ones I would create from my childhood would be made out of construction paper and salt dough and not near as pretty. . .but still sentimental. I think it's wonderful that you have these now in your life. Thank you for sharing the memory and the instructions.
ReplyDeleteThese ornaments are so beautiful and vintage looking. Love your handmade snow globe. I want to try one of these! Your house is so intricate and beautifully sparkling! You have inspired me to make a little house! I love your work. It's so beautiful and vintage and overflowing with personality!
ReplyDeleteOh, Candy! These ornaments are fantastic! I have to say my favorite is the house, because I SO wanted to make a Putz house this year. Just not in the cards for me, but I can drool over your beauty here! So cute with the tiny deer out front and love the Mica snow! It just gives it that perfect vintage feel. The glass dome ornament is so sweet, too-love the little Santa. This would look perfect amongst my other vintage Santas in my china cabinet! Love your gorgeous work!
ReplyDeleteSo beautifully vintage, they remind me of Christmas past when not everything was bright shinny plastic. Simply beautiful.
ReplyDeleteCandy, I forgot to mention how I am happy that you have taken us through all the steps that went into making these lovely little ornaments! It is always a joy to read your blog; a great addition to those wonderful photos! Hugs!
ReplyDeleteCandy you are an incredible artist! Your glass ornament with Santa is stunning! And the little house is so festive and beautiful! As Always : wonderful work!!!! Barbarayaya
ReplyDeleteI love the way you striped the tree!! I'm going to try that technique!! The house is so cute! The cute vintage style is awesome
ReplyDeleteAbsolutely stunning Candy, love your step by steps. I adore the ornate windows and the dome, as always wonderful attention to detail. I hope you have a wonderful peaceful Christmas my friend. Hugs. Tracy x
ReplyDelete