Hello Everyone!
Happy Saturday and welcome back!
We are counting down the Compendium of Curiosities III Challenges. Hard to believe we are already on 30 out of 34 challenges! I hope you all are having as much fun as myself and the Curiosity Crew are having. Your entries have been amazing and inspiring to us as we all travel this art journey together.
Turn to page 54 in your Compendium of Curiosities III books and check out Faux Cracked Glass. This is a very fun technique with really awesome results. One of my favorites, especially at Christmas time when I'm trying to create something vintage to look like cracked or faux Mercury Glass.
The first thing that came to mind for this Faux Cracked Glass technique was a Tim Holtz Mason Jar introduced at this past CHA in January. I love these little guys!
So, I popped one out of the 3-pack that they come in and went to work using the technique to transform the plain Mason Jar into somewhat of a Victorian little jar that will probably end up storing vintage buttons.
I cannot tell you how I did the Faux Cracked Glass technique but I will tell you that I tinted the glass using Wendy Vecchi's Archival Ink Cornflower Blue Refill Ink color. And ... one other useful hint. Instead of using Matte Medium as the base, I prefer to use Wendy Vecchi's idea of the Glue N Seal as a base. From my experience of working with this technique; both products will work. But I seem to get better results with the Glue N Seal as my base ... less of a potential for the stuff peeling off of the glass.

Here is just the jar after I finished the technique and had tinted it with the Archival Ink refills. Don't you LOVE the cracked glass look? For me, adding a tint of color really enhances the cracked glass and adds to the vintage look.

I wanted to "doll up" the plain top of my mason jar so I pulled out some Prima Trinkets, Junkyard Findings, some half pearls and the cut off top from a Maya Road Vintage Pearls Trinket Pin ...

After a little stacking and hot gluing, here is lid during the altering process.

After a light basecoat of White Gesso, I covered the lid in Burnt Umber Acrylic Paint. When that was dry, I added a layer of DecoArt Crackle Medium and let it dry.

Continuing with the altering/aging process, I added a topcoat of DecoArt Lace Chalk Paint and within seconds watched the magic start to happen as the paint began to crackle and reveal the brown layer below. I did not heat set this but rather, let it air dry.
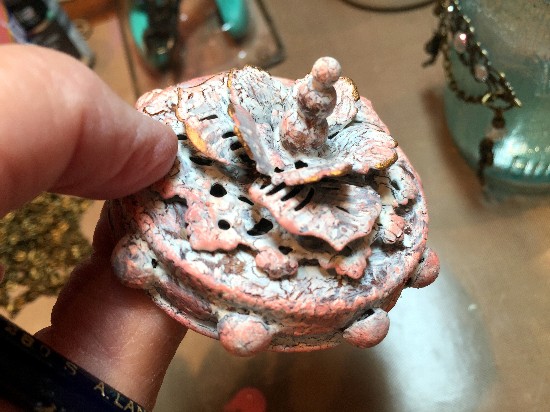
After the paint dried, I added a layer of dry brushing using a Melon Acrylic Paint to bring out the highlights of the edges and give some added depth to the evolving vintage lid.

To give added definition to the edges, I added a touch of Renaissance Guilding Wax to the edges (using my finger.) After everything was dry, I added a layer of DecoArt Ultra Matte Varnish to protect and seal the lid.
The jar was coming along nicely but looked a bit "naked". So I decided to give it a real Victorian look by adding some metal embellishments.

I used these pieces above to create a decorative band that would encircle the mason jar. These pieces are bendable, so they would better fit the curvature of the corners of the mason jar. I joined them together using Tim Holtz' larger Jump Rings.

Next it was time to fashion some charms to dangle from the metal band. I created these little charms using "stuff" from my stash. The one step looper helped create a uniform upper loop to attach to my jump rings. I used little antique bronze ball and keys and a Swarovski crystal on each charm.

Here is what I thought would be the finished metal band to add to the mason jar. But after I got it in place, I decided to add yet another dangling chain between each key and some rhinestones. You see those in the next photograph.

Adding the metal band to the mason jar was a bit tricky because of the curvature of the jar. But, I managed it by bending the metal band to fit as best I could. Next I added a 1/8" piece of Double Sided Adhesive Scor Tape to the underside of each long lacy metal piece. Starting in the center back, I attached the metal piece and then pressed the two side pieces in place. Immediately I brushed Ranger's Matte Medium over each of the lacy metal pieces; working the brush in and out of the intricate metal to ensure it's hold but also not to leave clumps of Matte Medium. It dries clear and is a great glue and sealer!
Once the metal bands were holding, I added the rhinestones to the metal bands and then the lid using Glossy Accents. Another wonderful Ranger product that dries clear and works as an amazing glue and sealer.
When all of the gluing was finally dry, I added the pieces of chain between each of the keys. I like how they look and they definitely add to that vintage Victorian feeling that I was going for.

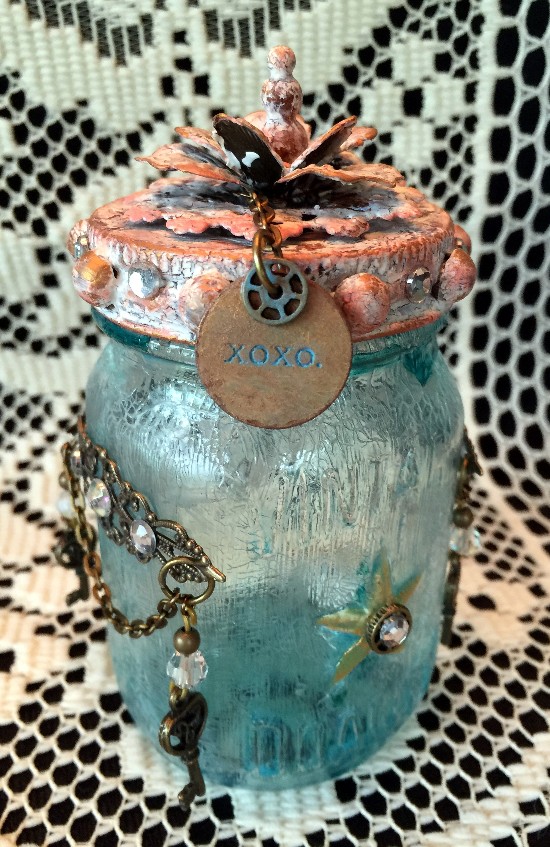
I decided to add a dangling token from the top of the lid. Here you can see the transformation from Tim's original brushed nickel silver finish to an Antiqued Bronze finish with a blu-ish "xoxo" in the center to bring out the blue of the faux cracked glass mason jar.
To do this, I simply mixed Gold and a touch of Burnt Umber Acrylic Paint together and using my finger, kept touching and adding paint to the surface of the silver metal until I was happy with it's appearance. I heat set the new antiqued bronze finish and then using my finger, I added a slight seal using the Ultra Matte Varnish and heat set it. Then I added Tim's Broken China Distress Paint over the "xoxo". I then wiped away the paint on the surface of the token, leaving it to fill the "xoxo" area. Finally, using my finger, I added just a touch of the Ultra Matte Varnish over the surface of the token to seal it.

Here is the finished back side of the jar. I really like how it turned out and I LOVE the Faux Cracked Glass technique! It's a real winner when it comes to totally altering a glass or clear plastic piece to look incredibly aged and vintage.

After attaching the token with an extra piece of the chain to the top of the lid, I decided to add a small metal piece, adding a rhinestone to the center of the molded star on the front of the jar. I then carefully painting the molded star with a little paint brush using gold paint. I may decide to go back and attempt to paint the "Vintage Quality" lettering also molded into the front of the jar. I think that might look really cool. But anyway ...
This is my altered "Faux Cracked Glass" piece to share with you. I hope that you learned something from the techniques that I could share with you and I hope you will pull out Tim's book and read up on how to create the Faux Glass look. Then make your own creation and link it up to the Compendium of Curiosities III Challenge!
We have TWO lucky winners with each challenge; one chosen by the crew for their interpretation and execution of the technique and the other is randomly chosen to receive a wonderful gift certificate from our wonderful sponsors.
Our sponsor for this challenge is the lovely and talented Linda Coughlin of The Funkie Junkie Boutique ... a fabulous online store supplying you with all sorts of your crafting needs; specializing in those fun little metal piece and laces that you don't see everywhere else. She is offering a $25.00 gift certificate to our lucky winner.

Click on the banner above to be taken to The Funkie Junkie Boutique.
And as always, Tim and Mario are such generous and supportive guys! They have donated a huge bunch of Tim Holtz products to be given away to each of our lucky chosen winners. So, don't miss out on your opportunity to win some awesome goodness from Tim and Mario!
Good luck!
A stunning transformation using this great technique from CC 3. This brought back memories of when I first discovered your blog a few years ago and you had a tutorial on this technique and the most beautifully decorated bottles I had ever seen. Of course I decorated a bottle, which sits pride of place in our wee Bothy x thank you for your wonderful inspiration x
ReplyDeleteTFS and best wishes
Annie x
OMGOSH!! Candy this is outstanding!! I love what you did with the jar- from the faux to the distressed embellies- exquisite!! xo
ReplyDeleteLook at all the vintage goodness. So beautiful and I love all of the embellishments. I didn't even realize this was one of Tim's minis until I started reading. Amazing!
ReplyDeleteWhat a fabulous piece Candy. This is one of my favourite techniques and I use it all the time. I love the cornflower blue you've used. Very vintage. I just made something yesterday with one of these mini mason jars. They are so much fun. Stunning inspiration.
ReplyDeleteWow Candy, this is drop dead gorgeous!! I am just loving how you built the topper, I've just added a bunch of things to my wish list, lol! What an amazing transformation! hugs :)
ReplyDeleteWOwza...I LOVE LOVE LOVE what you did with the challenge! SO clever and SO pretty!!! Yep...I can see myself doing this, wink. Great job sweets! Big hugs...love ya.
ReplyDeleteOh, to see with your eyes! You've dressed up your little jar beautifully!! I love the ornate hat you've given it and the little bracelet around is so lovely. Can't wait to try the layers you've used on the lid, GREAT effect. You da bomb, baby. ;-)
ReplyDeleteYour crackled blue mason jar is just lovely Candy! Wonderful layering on the cover - thanks for sharing all the steps and materials you used - what a lovely project!
ReplyDeleteWAY FUN!
ReplyDeleteStunning results Candy and I adore your trinkets.
ReplyDeleteJulie x
I've seen a lot of mason jars in my day - canning, preserving, storing but this is BY FAR the most INCREDIBLE ONE EVER!!! (Well, unless it was sitting next to my aunts tomato preserves back in the day!!!) This is just WONDERFUL Candy. That topper is BREATHTAKINGLY lovely and I love the way you dressed your jar too. Those side embellishments are just the PERFECT TOUCH. Sooooooo inspiring...j.
ReplyDeleteΈνα μικρο εργο τεχνης!!!!!!!!
ReplyDeleteOh....I'm swooning! This is so deliciously vintage and totally gorgeous! The color tint is perfect, and the topper on the jar is outstanding. Thanks for all the wonderful tips and the amazing step out. You are so fabulous, my dear!
ReplyDeleteWow this is stunning love all the little charms and metal pieces you added sure makes it vintage . Thanks for another easy step by step tutorial . I have tons of mason jars so may jus pull one out and give this tech. a try . Guess I'm going to have to break down and buy Vol.3 of Tim's book.
ReplyDeleteOh wow - incredible transformation - the way you have vintaged and embellished is really fantastic!! Just love the 'bracelet' like surrounds! Nicola x
ReplyDeleteCandy, your projects always blow me away. This is too beautiful! I havent been around the blogs in a bit and I can already see all the awesome stuff that you have created that I need to go look at more closely - I wish I could steal you and bring you to my house, I am redecorating and going with a steampunk meets vintage grunge look. I would love to have you decorate for me with all your awesome pieces! Nice to be back here again. -the other Candy- (aka Tincan Crafter)
ReplyDeleteOh my Candy this is just amazing, I love it.
ReplyDeleteHugs Brenda xxx.
Wowzers! From the metal embellies, to the pearls stacked on top-this jar is exceptional! Wonderful cracks on the jar and the lid. That burnt umber color is now on my wish list! Awesome sauce! ~Niki
ReplyDeleteI love your jar!!!
ReplyDeleteSandy xx
Amazing, Candy! I wish my mind thought like yours! The jar lid transformation is amazing with all the layers and the bracelet around the middle awesome! I love everything about this fabulous project!
ReplyDeleteYour little Mason jar is a sure home run hit, Candy!!! That is SUPER cool, gurl, and if I thought you couldn't teach me any more tricks...you just proved me oh so beautifully wrong with that lovely lid !!! As for the key/bead pieces; I just LOVE doing those!! I think that's my fave part of the tags is finding just the PERFECT little thing to leave hanging. I can spend FOREVER looking at charms, beads, and wiring, etc...just trying to decide which ones I want to fiddle with next for a bracelet or anklet. And I always have to buy more than one pkg, so I have enough to make at least one more for someone else. Or what fun is it if it can't be shared?!? You are waaaaayyy too talented, hon....but I'm LOVIN' it!!!! And YOU, 2!! 💗✌😎👍
ReplyDeleteCandy your jar is awesome! So many great details, especially those handmade charms. Love it!
ReplyDeleteHoly moly, Candy, this little jar is full of fabulous techniques! Thank you so much for educating us. I always learn something new from you. I love how you created those little key charms, you creative girl. They are the perfect dangles for the filigree and chain pieces. (Psst, I almost used Timmy's little jars too, but changed my plan at the last minute.)
ReplyDeleteI can only echo what others have already said... this is just stunning, a wonderful transformation. I love how you built up and aged the top and the decoration around the middle just takes your jar to a whole new level. Like you, (and Wendy) I prefer the Glue N Seal too. Hugs, Anne xx
ReplyDeleteOh WOW, Candy!! Look at what you did to this, once plain, mason jar!! I LOVE it!! All of your adornments are vintagey, posh delights!! I love how you treated the metal embellies on the lid, too--Just WOW!! :) Totally inspiring, totally fab!! XOXO-Shari
ReplyDeleteWow! What an excellent tutorial! Love the glass and metal! Love the colors. You took a mason jar and made it old world! Love your projects!
ReplyDeleteThank you for the inspiration, love this little jar, it is awesome!
ReplyDeleteThanks for the Glue & Seal tip...i got some flaking on one of my little bottles that I had to disguise with a label and I would have loved to avoid that.
ReplyDeleteI really like how you used jewelry findings to create that metal band. And the lid is fab!
What? There's only 3 more challenges? Then what will we do? ... Love your project. Especially the lid. Great antiquing.
ReplyDeleteOMG, what a stunner! Perfect transformation and a great use of Tim's amazing technique! I adore the lid, it's fantastic! Brilliant make, Candy!
ReplyDeleteHugs :)
Branka xxx
Beautiful job as always Candy!
ReplyDeleteOh wow, Candy. Have I told you recently how much I love your work! Lol. There is a mason jar upstairs that is waiting for me and now I am truly inspired! Nikki xx
ReplyDeleteCandy, you have so worked this Faux Cracked Glass beautifully! The jar lid is so clever and lovely! Hugs!
ReplyDeleteWhat a fabulous work of art. Love the antique feel to the lid and the metal work round the jar. Fantastic colours too.
ReplyDeleteLove this step by step tutorial for using all those vintage metal pieces. You are inspiring!
ReplyDeleteCandy, I completely lost my very long comment! First, let me say this is the most beautiful jar I've ever laid eyes on! The coloring and Cracked glass technique is just perfect. And the shabby lid is just mouthwatering. I love the melon and gilding wax that really makes this so special. And you are a woman of many talents--jewelry making??? This adds the perfect finishing touch to an already lovely make!
ReplyDeleteGorgeous Candy, I adore the top dressing of your jar and of course a coat of Crackle always makes it extra special with highlights of gold wax, perfect. Love how you stacked the embellishments to make such an ornate top and I love the chain around the jar, just the perfect amount of embellisment. Hugs. Tracy x
ReplyDeleteI love how your jar turned out and thanks for the added tips and advise. It saves me doing the testing...I am forever testing out ideas and products and pushing boundaries...it is how I learn best. The colour you chose and the piece you created for the lid is really beautiful.
ReplyDeleteThis is amazing! It looks like you just discovered it from an historic dig!! (that's a good thing..really!) I love the embellished band, so Victorian!
ReplyDeleteLove this! The jar color is beautiful-wonderful project!
ReplyDeleteWhat a great work and how much technique there is in this little jar! Thanks for sharing valuable indications!
ReplyDeleteStunning result Candy with a great technique and such wonderful embelli's!!
ReplyDeleteSo amazing, love the techniques every step of the way, great faux glass technique. My favorite part is the lid, absolutely love how you created it ... just looks so cool !
ReplyDeleteThis is so gorgeous, and I love how you photograph and explain each step. I'm intrigued by the idea of doing faux mercury glass with this technique; how do you go about it?
ReplyDeleteHi Candy, this little jar is transformed with the technique. I love all the metal and ageing processes you used. Jan x
ReplyDeleteYour jar looks amazing, love how you decorated the lid.
ReplyDeleteCandy, this is lovely! The blue is perfect and the technique on the lid is fabulous! I'll have to try it. I can imagine how cool this will look full of buttons. Nice!
ReplyDeletethis is sooooo cool, especially the top!
ReplyDeleteCandy...you had me at the lid. I love how you altered the lid with the trinkets which you painted with gesso etc...just lovely. Your lid is only outdone by the jar itself. The technique is beautiful on the the mini jars...great idea to alter for Christmas, birthdays etc. Love how you added the metal embellishments...you are so creative! Thanks for the great tutorial.
ReplyDeleteGorgeous crackled glass, and the lid is absolutely fabulous - so much vintage grungy texture - I love it!
ReplyDeleteAlison xx