Hello everyone!
I am so excited to begin this new art journey with some of my most favorite people in the whole world: Annette Green, Cheryl Grigsby, Hels Sheridan, Linda Ledbetter, Susan Mostek and Yvonne Blair.
When we finished the Compendium of Curiosities challenges, we knew we didn't want that to be the end. Out of that desire, Creative Carte Blanche was born. A community where you can come and share your art in a non competitive atmosphere. You won't be told what products to use. You won't be pigeon holed into a certain style. You are completely free to use whatever you want to use and create whatever you want to create.
We will give you a prompt to work with but other than that, LET YOUR CREATIVITY FLOW!!! Then share your work with others through Inlinkz at Creative Carte Blanche. We can all learn about different styles and products, our art experiences and what drives us as artists from each other.
We will give you a prompt to work with but other than that, LET YOUR CREATIVITY FLOW!!! Then share your work with others through Inlinkz at Creative Carte Blanche. We can all learn about different styles and products, our art experiences and what drives us as artists from each other.
The prompt for our first creative adventure is "ANYTHING GOES" BUT you must include something that you've never used or done before. Step out of that comfort zone and either try a different style, a different color palette, different mediums; just something that you've never done before.
I have created a couple of art journal pages doing something I've never done before: sketching a face and hand and USING them. It scared the stuffings out of me! But I faced that fear head on and I actually like the way the pages turned out. I also did some other things that I've never done before but the face and hand were my biggest fear.
I think if you will allow yourself to just "TRY" something new, you experience a real sense of freedom and satisfaction in facing that fear that holds you back from moving forward in your artistic journey.
Here are my art journal pages ...

I am taking a year long online class called Wanderlust 2016. There are different artists sharing their styles and techniques each week. There are also informative videos on everything from types of pens and markers to different mediums I had not heard of. So, it's been an interesting and fun experience; opening myself up to all sorts of new ideas.
There is also a year long art journaling section. No tutorials or lists of products to use...just a prompt and the rest is up to you. I love that!
These pages were born out of a prompt "What I really want is ...".
When I was thinking about what I wanted to do for that prompt, I was also thinking of this first post and wanting to include something that I had never done before. So now, I will share with you what products I used and how these pages developed.
As you will see, I've used a variety of products. Of course, I love DecoArt and Ranger products so I use them quite frequently. But you are free to use whatever products you find work for you. Hopefully during this tutorial, you will find something that inspires you.
Supplies needed for these journal pages:
- 6" x 8" Inky Journal (Yvonne Blair Designs)
- Tim Holtz Glove Sizzix die cut
- DecoArt Media White Gesso
- DecoArt Media Matte Medium
- DecoArt Media Modeling Paste
- DecoArt Media Fluid Acrylics Metallic Gold
- DecoArt Media Fluid Acrylics Phthalo Green-Blue
- DecoArt Media Fluid Acrylics Titan Buff
- DecoArt Media Fluid Acrylics Burnt Umber
- DecoArt Media Fluid Acrylics Paynes Grey
- DecoArt Media Fluid Acrylics Yellow Oxide
- DecoArt Media Fluid Acrylics Titanium White
- DecoArt Media Fluid Acrylics Medium Grey Value 6
- DecoArt Media Fluid Acrylics Transparent Yellow Iron Oxide
- DecoArt Media Fluid Acrylics Cobalt Teal Hue
- DecoArt Media Fluid Acrylics Carbon Black
- DecoArt Media Ultra-Matte Varnish
- DecoArt Americana Flesh Tone Acrylic
- Neocolor II Watercolor Crayons
- Ranger Antique Bronze Acrylic
- Seth Apter Impression Obsession Pattern Play stamps
- Seth Apter Impression Obsession Solar System stamps
- Ranger Archival Ink Water Can
- Ranger Archival Ink Saffron
- Heavy White Cardstock
- Scraps of cardstock or other papers
- Scraps of vintage lace
- Scraps of distressed or dyed fibrous fabric
- Glue stick
- Palette Knife
- Exacto Knife and pad
- Various paint brushes
- Detailer Water Brush
- Baby Wipes
Instructions:

1. Using a palette
knife scrape DecoArt White Gesso over the surface of the art journal
pages. Set aside to dry. I LOVE Yvonne Blair's Inky Art Journal because it lays so flat and the pages are a heavy manila type base. It's a dream to work with.

2. Using Heavy
Cardstock, cut two Sizzix Globes and glue them together using DecoArt Media
Matte Medium. I used two globes because I wanted more depth and texture.

3. Sketch a face
and hand onto a piece of paper to fit the globe. Transfer that image to a piece of Heavy
Cardstock and cut it out. Place the face
over the globe and turn it over. Use an
Exacto Knife to cut out the grid areas of the globe on the face and the section that
will be placed over the globe die cut.

4. Glue the face
in place on the globe using DecoArt Matte Medium or a glue stick. Gently heat set or let air dry.

5. Use a paint
brush and begin stippling DecoArt Media Modeling Paste on the map section of
the globe. Pulling the brush up and down will create peaks and valleys, creating a typography of the countries. Let air dry.
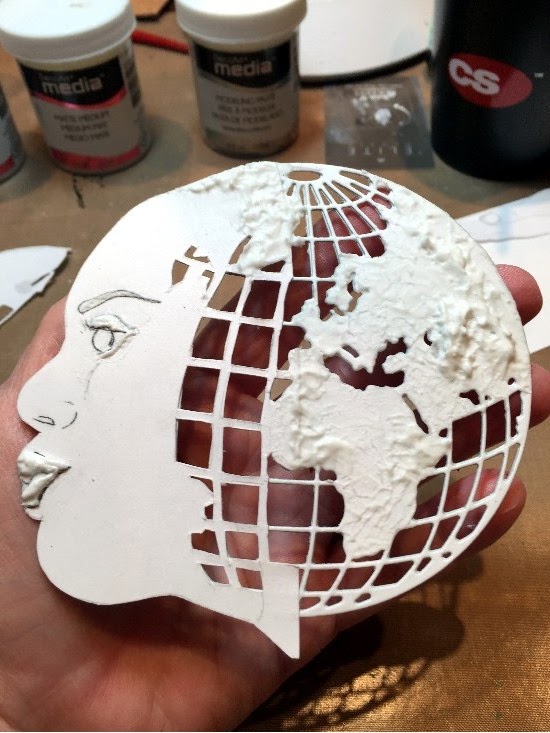
Also create an eyelid, lips and eye brow
using the Modeling Paste. This adds some nice dimension to an otherwise flat face. Let air dry.

6. Paint the basic
skin of the face using DecoArt American Flesh Tone Acrylic paint. Let dry. Shade the
face using Neocolor II Watercolor Crayons and a Detailer Water brush. Also paint the hand and shade in the same
manner as the face. I love the Neocolor Watercolor Crayons. They go on so creamy and blend so easily with the water brush. Gently heat set. Since the crayons are water reactive, I sometimes will spray them with a permanent fixative to seal them.

7. Paint the grid
of the globe first with Ranger’s Tarnished Brass Acrylic paint followed by
highlights from DecoArt Media Fluid Acrylics Metallic Gold. Let air dry or gently heat set.

8. Add color to
the countries using DecoArt Media Fluid Acrylics. First paint with Yellow Oxide followed by
Burnt Umber, Titan Buff, Phathalo Green-Blue and a touch of Paynes Grey to add
more depth and definition around the perimeter, mountains and valleys of the countries. Let
air dry or gently heat set.

9. Tear or cut strips of
paper, book text, fibrous fabric, lace; really anything that adds texture. Overlap and arrange the scraps on the pages using a vertical and/or
horizontal pattern. It's best to use odd numbers of strips. Glue in place using a glue stick or DecoArt Matte Medium. When all are in place, brush over them with the Matte Medium to seal them. Let air dry or gently heat set.

10. Add color to
the pages using DecoArt Media Transparent Yellow Iron Oxide and Cobalt Teal
Hue. I used a baby wipe, my fingers and
also a brush to add the color to get varied looks of the colors. I also added more DecoArt Media White Gesso
using a palette knife over sections of the pages after the paint colors were
dry. Let dry.

11. Lay your globe
lady and hand onto the pages to get an idea where they will be placed. Sketch the word “Peace” onto the pages as if
the globe lady were moving the word as if blowing a kiss.

12. Using DecoArt
Media Fluid Acrylics Cobalt Teal Hue mixed with Titan Buff, create what looks
like air movement from the lips of the globe lady in the area where “Peace” has
been sketched. Add highlights using a
mixture of DecoArt Media Fluid Acrylics Medium Grey Value 6 and Titanium White. Let dry.

13. Place the
globe lady and the hand onto the pages and glue them in place using a glue stick or DecoArt Matte
Medium. Once they are dry, brush over the
both using Matte Medium to seal them. Let
dry.

14. Wipe DecoArt Media Fluid
Acrylics Paynes Grey randomly around the edges to define the pages.

15. Paint “Peace”
using DecoArt Media Fluid Acrylics Paynes Grey and a small brush.
Let dry. Add a few more puffs of
air using a mixture of DecoArt Media Fluid Acrylics Medium Grey Value 6 and
Titanium White. With an almost dry
brush, lightly brush over “Peace” with the grey and white color combination to
soften the darker Paynes Grey color and blend it into the puffs of air.
16. Add a few
random streaks of DecoArt Media Fluid Acrylics Carbon Black around the edges of
the pages to frame them.

17. To fill in
what seem like areas that need something, I added a few vertical lines from
Seth Apter’s (of The Altered Page) wonderful Pattern Play stamp first with Archival Ink Saffron followed by
Archival Ink Watering Can, moving the stamp just off center from the first
stamping. I did the same thing with two
of the circle patterns from Seth Apter’s very cool Solar System stamp set. I love Seth's stamps because they are perfect for art journaling. Funky images and fun to stamp independently or overlap.
So there they are, my art journal pages using a face and hand (something I've never done before) and using the prompt "All I Really Want Is ... "Peace"; a peaceful coexistence among people of the world as well as that personal peace from which so many positive things flow.

Come join us at Creative Carte Blanche! Create your piece and link it out our blog. Between everyone sharing their art, new projects being posted for your inspiration, new prompts to explore and inspirational guest artists, there will be lots to share.
Discover and embrace your own artistic style!

Come join us at Creative Carte Blanche! Create your piece and link it out our blog. Between everyone sharing their art, new projects being posted for your inspiration, new prompts to explore and inspirational guest artists, there will be lots to share.
Discover and embrace your own artistic style!
What beautiful pages! Yes this is what our whole world needs now. Thanks for sharing your techniques!
ReplyDeleteFabulous!! One reading through your tutorials is never enough got me. Once to get the idea and a second time S L O W L Y..... The freedom Creative Carte Blanche gives us is going to unleash new levels of expression that is SO exciting. You've demonstrated that beautifully here. I'm inspired!
ReplyDeleteOh - my - gosh! I don't think I could trace a photo of a hand and face and have them end up looking a fraction of what your freehand versions do! Gorgeous! The whole piece is just spectacular!
ReplyDeleteAbsolutely fantastic, I adore how,you combined the globe with the face, very clever idea . Your drawing is fantastic Candy and I love your background too. Tracy x
ReplyDeleteWowzers and golly gosh! This is so fun to "watch" your process and the way you designed and then out together the globe and face-genius! Love the paint choice on the globe as well. Metallics and me are like caramel and machiatto. Looks like I will be facing my fear of Art journaling through this Creative Carte Blanche journey. :) Hugz and thanks for the inspo! ~Niki
ReplyDeleteHOLY ROCKETS, girl, this is incredible! You go!
ReplyDeleteThanks for taking the time to share such a detailed step-out post Quite amazing face and hand for a first time. In fact, impressive for any time!
ReplyDeleteThank you, Seth. I am honored by your comment. ❤️
DeleteWowsers! What a magnificent journal page. Just love the creativity. Thanks for the tutorial. I plan to follow it to a tee.
ReplyDeleteI didn't see a way to contact you, so hopefully you will see this. Thank you so much for stopping by my blog and leaving such a nice comment. I'm glad that you found my tutorial so helpful. Shoot me an email when you get your project finished! I'd love to see what you've done! <3
DeleteWOW truly amazing. Love it and the tutorial... I really want to give drawing a go but I have a hard time drawing a straight line :D
ReplyDeleteYour page is just AMAZING and great to see the progress!
ReplyDeleteI will have a visit to the new place - sounds very good !
Thank you for your lovely comment on my blog!
Happy a great rest of the week!
oxo
Susi
Candy, good for you! this is brilliant!
ReplyDeleteI really love the way you created earth and blended it with your face-so clever!
best wishes on the new endeavor you gals have started!I hope to play along!
hugs,Jackie
OH OH OHHhhhhhh - it's INCREDIBLY FABULOUS Candy. Wow... you really HIT A HOME RUN! First of all... the face is STUNNING and attached to the globe with all that YUMMY texture... it's just such a statement piece. And second... your hand looks near PERFECTION to me girl!!! Wow. I heard someone that paints portraits say that if you can draw a hand - you can draw most anything. AND YOU DID IT!! Third.... your PEACE... flowing out over us all.... that just touched my heart. I pray that your journal pages can become REALITY... it's totally INCREDIBLE Candy. I am sure hoping some magazine picks it up and it's published for all the world to see. XX j.
ReplyDeleteThis is beyond brilliant!!! The head made from the globe...oh my word! Completely pinned!!! Congrats on this new journey!!!
ReplyDeletemagnifique page, j adore. Merci pour ces explications.
ReplyDeleteSo clever, unique and inspiring as always Candy. Love your pages xxx
ReplyDeleteOh gosh Candy, I am nearly at a loss for words... how clever of you to put the face together with the globe, it looks amazing! Your hand drawn face is beautiful and so is the hand. I also love the texture you created on the globe and the colouring of it is superb. The whole piece is a wonderful way to represent the wish and need for world peace! It is beautiful! Hugs, Anne xx
ReplyDeleteStunning as always! I adore your clever use of Globe die! Barbara
ReplyDeleteA beautiful and inspiring journal page Candy, brilliant idea to use the globe as the form for your beautiful face and well done on your face and hand sketch, they are amazing! Thanks so much for sharing your techniques, Deb xo
ReplyDeleteThis is amazing! You always wow me with whatever you create.
ReplyDeleteOh so unique, Candy! I love what you did with the globe and all those amazing details! Hopefully soon, I will be able to join in. Lots going on over here. Happy Monday!
ReplyDeleteWow Candy, what an amazing page and oh what a treat to watch you go through your process! I just love the creativity with the globe and your incredible work with the paints!! Just fantastic! hugs :)
ReplyDeleteI admired it on the Creative Carte Blanche blog and now even more as the fantastic tutorial unfolded. Love how you've combined the globe and face. Jenny x
ReplyDeleteOh, this is stunning and so inspiring, Candy! And I love to see the process, there's so much to learn from you every time.
ReplyDeleteWow this looks wonderfull, I love the way you gave a face at the earth!!! and how you created the piece wish!!! You are really a great artist!!!
ReplyDeleteGreetings
Maria
Thank you for your kind comment, Maria!! I could not see your blog to leave a comment for you there. I hope that you get this reply.
Delete