Good day blogging friends!
It's a new theme at Creative Carte Blanche brought to you
by the lovely and very talented Yvonne Blair.
This month's theme is "Sun, Moon and Stars". So many possibilities!!

I have created a sweet little vintage card using a couple of my favorite things: the sentiment from Tim Holtz' Life Quotes stamp set, the sweet image of the little boy and my DecoArt Media line products.
My whole inspiration for this card was from the sentiment. While Tim Holtz did not originate this sentiment, I really liked the font he used on his stamp. When I thought of "moon", I thought of Tim Holtz' Crescent Moon and Stars die cut. Perfect for this theme and perfect for my card design!

Here are the basic things I used to create my design for the card. Pretty simple but through the magic of color, amazing things can happen!

Here is the little boy image I used for my card. You can just right click on him to save him to your computer. Isn't he adorable?
Here are the basic things I used to create my design for the card. Pretty simple but through the magic of color, amazing things can happen!

Here is the little boy image I used for my card. You can just right click on him to save him to your computer. Isn't he adorable?
Now let's move on to the tutorial as to how to create this card.
I am listing the actual products that I used but you can substitute products you have on hand or prefer. Totally up to you. Let's begin ...
I am listing the actual products that I used but you can substitute products you have on hand or prefer. Totally up to you. Let's begin ...

Begin with a piece of 5 3/4" x 5 3/4" white cardstock and apply DecoArt Media White Gesso over the entire surface using a palette knife. Heat set to dry.
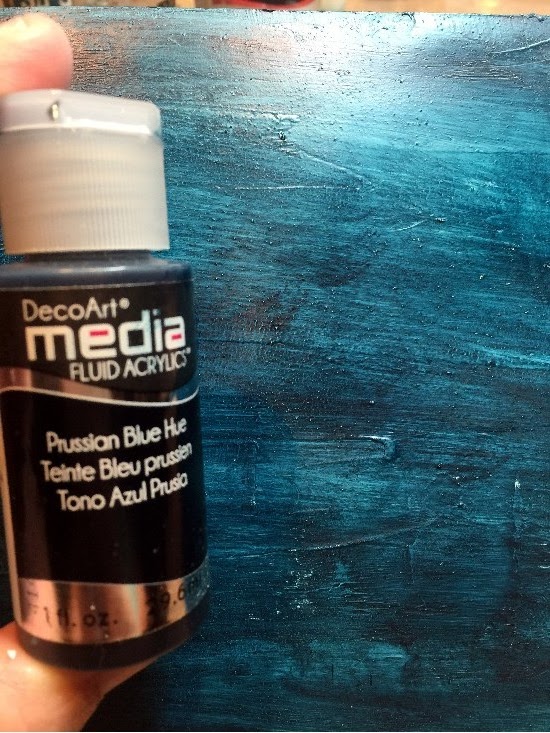
Paint over the gesso'd surface with DecoArt Media Prussian Blue Hue Fluid Acrylics. Let dry or heat set.

To lighten the Prussian Blue Hue, add a touch of DecoArt Media Tinting Base to the paint and randomly add this color over the surface of the cardstock to create a "night sky" effect.

To give a bit of a shimmer or a "star shine", lightly add some DecoArt White Pearl Dazzling Metallics to the surface. Let dry.
Now that the background is in good shape, let's move onto the design of the card.

Die cut the moon and stars from Tim Holtz' Plain Grungeboard. Cover the surface of the moon using DecoArt Media Texture Sand Paste to give a rougher, dimensional texture to the lunar surface. Let dry or gently heat set.

Paint the surface of the Grungeboard stars with a mix of DecoArt Media Yellow Oxide and Hansa Yellow Media Fluid Acrylics. Let dry. Then using your finger, give a light coating of Mercury Glass then Stardust Stickles to the surface of the stars. Let the Stickles dry between coatings. This will add a bit of a starry shimmer and give the stars more of a vintage look.
Now that the background is in good shape, let's move onto the design of the card.
Die cut the moon and stars from Tim Holtz' Plain Grungeboard. Cover the surface of the moon using DecoArt Media Texture Sand Paste to give a rougher, dimensional texture to the lunar surface. Let dry or gently heat set.
Paint the surface of the Grungeboard stars with a mix of DecoArt Media Yellow Oxide and Hansa Yellow Media Fluid Acrylics. Let dry. Then using your finger, give a light coating of Mercury Glass then Stardust Stickles to the surface of the stars. Let the Stickles dry between coatings. This will add a bit of a starry shimmer and give the stars more of a vintage look.

Once the Texture Sand Paste is dry, brush on a layer of DecoArt Media Yellow Oxide Fluid Acrylics.

For a deeper, richer lunar surface, randomly add DecoArt Media Raw Sienna around the perimeter and center of the lunar surface.

Next add touches of DecoArt Media Quinacridone Gold randomly at the perimeter edges and along some of the ridges of the lunar surface. I even used some of the Quinacridone Gold to create a subtle "blush" effect on what would be cheeks if the moon have a face.

Finally to better define the edges and some of the detail of the surface, add touches of DecoArt Media Burnt Umber Fluid Acrylics. Let dry.

To create a shimmer from the glow of the stars in the night sky, add touches of DecoArt Media Metallic Silver and Gold to the ridges and edges of the moon's surface by using your fingers to lightly apply the paint. I also added Silver and Mercury Glass Stickles around the outside edges of the moon top better define the edges and give it more of a vintage look.
Now to colorize the sweet little vintage boy ...

Using Neocolor II Watercolor Crayons, apply color to the little boy. He was originally printed out using an inkject printer and semigloss photo paper. The color was applied with a Tim Holtz Detailer Water Brush. The color was brushed from the crayon tip then applied to the surface of the photo paper. Let dry then cut out the boy and use a Black Distress Marker to blacken the white edges around the boy.
Now to colorize the sweet little vintage boy ...
Using Neocolor II Watercolor Crayons, apply color to the little boy. He was originally printed out using an inkject printer and semigloss photo paper. The color was applied with a Tim Holtz Detailer Water Brush. The color was brushed from the crayon tip then applied to the surface of the photo paper. Let dry then cut out the boy and use a Black Distress Marker to blacken the white edges around the boy.

Lay out the little boy, the moon and the stars on the card top to get spacing. Glue everything in place (minus the boy) using Glossy Accents. Leave an open section on the moon's edge where the little boy will be placed.

Add a narrow decorative metallic gold Dresden trim around the perimeter of the card front using 1/4" Scor Tape to secure the trim in place.

Next secure the little boy in his place sitting on the moon by adding adhesive pop dots on his backside. Then position him and glue in place.

Paint a light coating of DecoArt Media Metallic Gold Fluid Acrylics onto a piece of scrap white cardstock. Heat set. Heat emboss the sentiment onto the gold surface by stamping the sentiment onto the cardstock with clear Embossing Powder. Sprinkle Fine Black Embossing Powder over the Embossing Ink, remove the excess powder and heat set. Cut out the individual words, ink the white edges with a black Distress Marker, lay out and glue in place using Glossy Accents.

Add an antique gold brad to each corner and pound them to give them a vintage look using Tim Holtz' little hammer and pad. Set the card top to the side.

Cut a piece of cardstock to create the greeting card. I used a piece of taupe cardstock that was cut in a 6" x 12" strip. Fold the card in the center. Using your finger, add a strip of DecoArt Media Metallic Gold Fluid Acrylics to the outer edge of the card.
Add 1/4" Scor Tape to the back outer edges of the vintage card top you've created and glue it in place evenly on the greeting card surface; centering the top onto the backing. I left the inside of the card blank so that a personal thoughts and message could be written.

And here is the finished vintage card!
Thanks so much for stopping by my blog and checking out my "Sun, Moon and Stars" piece for Creative Carte Blanche!
I hope that this has inspired you to come join us by creating anything your heart desires as long as it follows the theme. Then link it to The Creative Carte Blanche website so that your art and your process can inspire and educate all of the lovely artists in our community!
Sending hugs out to all ...
Next secure the little boy in his place sitting on the moon by adding adhesive pop dots on his backside. Then position him and glue in place.
Paint a light coating of DecoArt Media Metallic Gold Fluid Acrylics onto a piece of scrap white cardstock. Heat set. Heat emboss the sentiment onto the gold surface by stamping the sentiment onto the cardstock with clear Embossing Powder. Sprinkle Fine Black Embossing Powder over the Embossing Ink, remove the excess powder and heat set. Cut out the individual words, ink the white edges with a black Distress Marker, lay out and glue in place using Glossy Accents.
Add an antique gold brad to each corner and pound them to give them a vintage look using Tim Holtz' little hammer and pad. Set the card top to the side.
Cut a piece of cardstock to create the greeting card. I used a piece of taupe cardstock that was cut in a 6" x 12" strip. Fold the card in the center. Using your finger, add a strip of DecoArt Media Metallic Gold Fluid Acrylics to the outer edge of the card.
Add 1/4" Scor Tape to the back outer edges of the vintage card top you've created and glue it in place evenly on the greeting card surface; centering the top onto the backing. I left the inside of the card blank so that a personal thoughts and message could be written.
And here is the finished vintage card!
Thanks so much for stopping by my blog and checking out my "Sun, Moon and Stars" piece for Creative Carte Blanche!
I hope that this has inspired you to come join us by creating anything your heart desires as long as it follows the theme. Then link it to The Creative Carte Blanche website so that your art and your process can inspire and educate all of the lovely artists in our community!
Sending hugs out to all ...
I always love reading your posts and seeing how you create your amazing projects and this one is no exception. I really like the texture created by the Texture Sand Paste on the moon and I love the way you coloured it. The little boy is adorable and the sentiment always reminds me of my dad, he used to say that to my mum all the time... Anne xx
ReplyDeleteOh Candy this card is utterly delightful and full of wonderful textures and ideas. The contrast of the deep blue sky and golden stars and moon is fabulous and I just adore the gorgeous vintage boy sitting in it. Another beautiful creation xxx
ReplyDeleteOow Candy, another great masterpiece. The detail of texture on the moon is fab, I have never thought of colouring a photo ( clever you) and the sentiment is spot on! Xx
ReplyDeleteOmgosh- your crescent moon turned out just delish! Your texture and colors perfect Candy!!
ReplyDeleteWhat a sweet piece- and at first I thought the lil guy was a grandson! Thank you for the share- he is too sweet!
Hoping all is well in your world and thank you always for your wonderful and sweet comments,my friend! xo
Jackie....you are such a doll! Thank you so much for all of your super sweet and uplifting comments!!! I love your creative, sharing spirit!
DeleteThis is picture perfect Candy, i think i will be copying this one, or trying to at least. LOVE your nightsky and lunar results. All the decoart metallics look to give a fantastic shimmer. Youve coloured the little boy beautifully, he is a perfect match for your perch. Like the dresden trim too. Have a lovely weekend. Nicola x
ReplyDeleteI think this is a lovely piece of Art, I would like to try and do something similar. Thanks for the inspiration.
ReplyDeleteThank you so much Lynn Dalby! ❤️
DeleteA wonderful canvas!
ReplyDeleteoxo Susi
LOVE LOVE LOVE, and the way you've altered him is fabulous!!!
ReplyDeleteThis is a card?! Wow, how lucky someone would be to receive this. It's a work of art, literally! I love how you texturized the moon. (I'm saving that idea). Love the feel of the background. It's perfect for the theme!
ReplyDeleteThis is fabulous! Girl....you are so gifted with all the textures and deco arts products!!! I LOVE your card...to the moon and back! Yep...one of my favorite sayings! hehehe...Perfect!!!!
ReplyDeleteI so need some more DecoArt Media colors! This is just fabulous. Love the texture on the moon and your little guy fits so nicely, seated on the curve. Love it!
ReplyDeleteStunning, your work is stunning as always! love so much the way you customize the moon, colors and textures are fabulous! The little boy is absolutely adorable! Barbara
ReplyDeleteDear Candy, this card is as sweet as can be! The image is simply adorable and I love the lush blue background with the shimmering stars. Thanks for the inspiration!
ReplyDeleteThank you so much for the sweet comment you left on my blog :)
Sending big hugs across the miles!
Gaby
Hi Candy, such a gorgeous piece and I love the way you've used the photo. The blue background is lush. Happy crafting, Angela x
ReplyDeleteGorgeous card and the wee boy is so cute. I love how you've coloured him so perfectly, you'd think it had been a colour photo to start with. The texture on the moon is great too. I'm grinning like a Cheshire cat now because the quote is from the end of the book I remember reading to my daughter when she was a wee girl, "Guess how much I love you" Thanks Candy, I've got these lovely memories in my head now this morning. Alexandra xx
ReplyDelete