It's October ... a gorgeous autumn month and home to the Halloween holiday!
I love creating and decorating for Halloween.
I hope that you've been enjoying the very creative and original "Witchy Woman" pieces especially for you from my Creative Cohorts at Creative Carte Blanche.
Our adventure for this month was inspired by an old Eagles song, "Witchy Woman", I thought this would be an open ended creative adventure whether you are a fan of Halloween or just of women with an attitude!

I am wrapping up the month sharing my creation with you....my Halloween Witch Doll that started out by my using an old dark brown, drab thread cone. I used it for the lower body and went from there.
I hope that you've been enjoying the very creative and original "Witchy Woman" pieces especially for you from my Creative Cohorts at Creative Carte Blanche.
Our adventure for this month was inspired by an old Eagles song, "Witchy Woman", I thought this would be an open ended creative adventure whether you are a fan of Halloween or just of women with an attitude!
I am wrapping up the month sharing my creation with you....my Halloween Witch Doll that started out by my using an old dark brown, drab thread cone. I used it for the lower body and went from there.
Let's get started on the steps to create this fun gal. She's easy to do and wouldn't she be fun to have sitting out next to your Halloween candy you'll be passing out to trick or treaters? A real one of a kind original Halloween decoration!
Let's go through the steps now so you can create your own Witchy Woman!

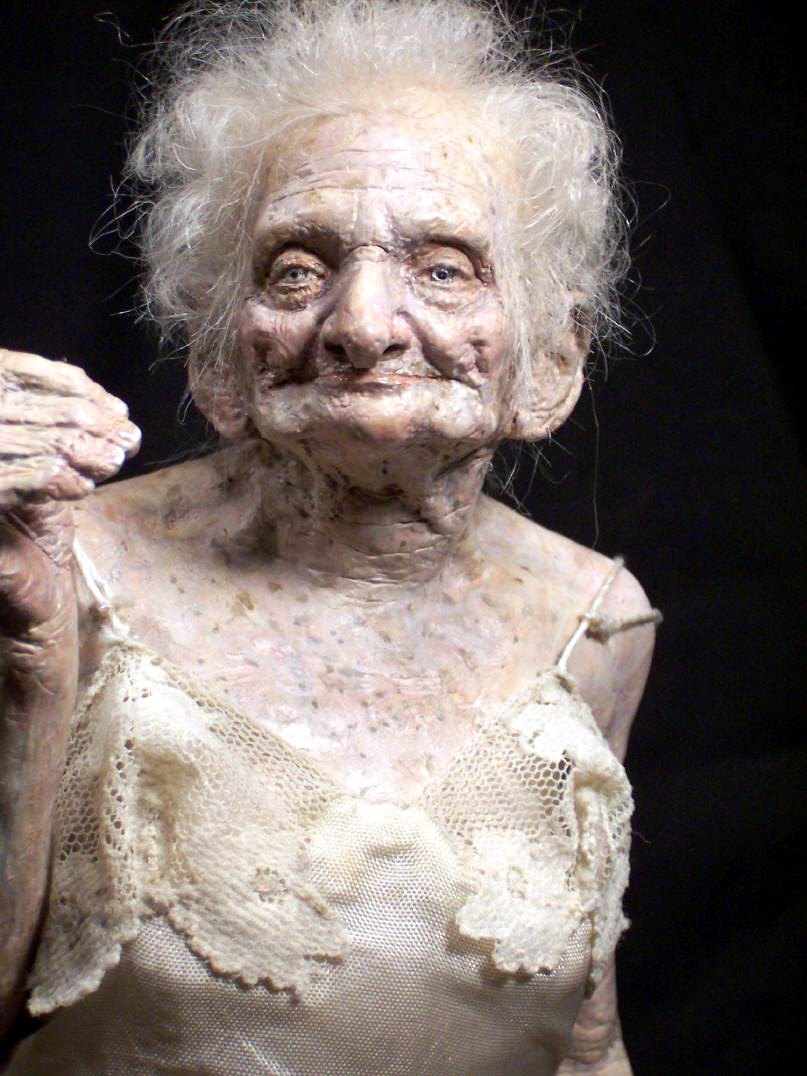
First, you're going to need a vintage picture with a face worthy of being transformed into a witch. Wha-lah! Here she is! I found this lovely lady a long time ago on the internet. She is someone's daughter, mother, relative or friend. I mean no disrespect. She just had the perfect face for my doll!
If you right click on the photograph, you can save it to your computer.
As I stated, I began with an old thread cone.

I had some old black lace and soft black netting laying around. They would be perfect for covering the thread cone. So I cut off enough of the lace and the netting to gather and use for a "skirt".

Using a needle and black thread, I gathered the black lace first and made a skirt. Then I gathered the black netting, leaving enough for a fairly full skirt. I gathered it at the top, measured how large I would need to leave the opening at the top, pulled the netting to that measurement and then stitched it together, creating a ring around the cone top. Then I hot glued the black lace and then the netting into place, leaving the top of the cone open to later insert the doll's soft upper body.
I had some old black lace and soft black netting laying around. They would be perfect for covering the thread cone. So I cut off enough of the lace and the netting to gather and use for a "skirt".
Using a needle and black thread, I gathered the black lace first and made a skirt. Then I gathered the black netting, leaving enough for a fairly full skirt. I gathered it at the top, measured how large I would need to leave the opening at the top, pulled the netting to that measurement and then stitched it together, creating a ring around the cone top. Then I hot glued the black lace and then the netting into place, leaving the top of the cone open to later insert the doll's soft upper body.
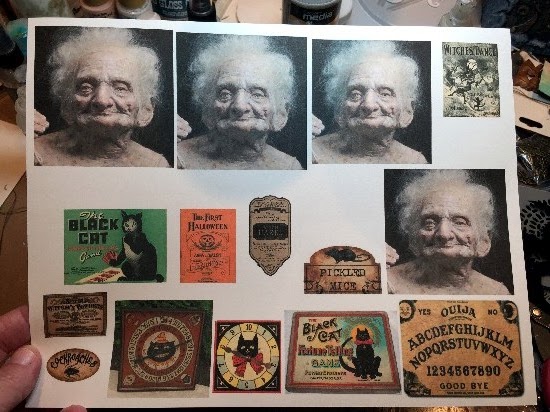
Next I generated a face and several other elements I might want to use on my doll. I sized them to be correct size for the doll's body and then printed them out on an ink jet computer and heavy white cardstock.
I brushed over the cardstock with DecoArt Media Matte Medium to seal all of the images. It goes on clear and dries to a matte finish.

I cut out all of the elements and backed several of them with black chipboard for strength and also as part of the piece. For example, the black chipboard backing on the Ouija Board and Black Cat game board look very natural.

I created a little box for the Black Cat game using kraft cardstock. I laid the Black Cat game cover down and then measured 1/4" all the way around it. This would allow for the sides of the box. I cut it out, folded it into a box shape, clipped the four edges so that they could be folded under, glued and create the lid of the box. I repeated this for the game box bottom (minus the Black Cat label). I distressed the edges using a Black Sepia Cats Eye Ink Pad to instantly age the box.

Now it was time to start working on my witch's body. I glued her head onto a piece of black chipboard for strength. I also left a little piece at the top that would later be hidden by her witch's hat.

Next I determined how big the brim for her hat needed to be and made a circle measuring 3 1/4" across on a piece of black cardstock. I cut it out, folded it in the center and cut a slit for her head to poke through. I glued her head in place with a little bead of Glossy Accents to hold the brim in place. I'd finish the hat later but now ... on to the soft body.

I fashioned a "body" out of a piece of white cardstock to lay under the head for the purpose of getting the correct size body for my doll (plus a little extra length that would be gathered and shoved down into the thread cone opening).
I laid some old looking black fabric right sides together, drew out a pattern for the body and arms and cut it out.

Then I sewed a small seam all the way around the body; leaving the neck, sleeve holes and bottom open for stuffing.

Next I placed the material body over a long craft stick that I had added wire arms to and glued in place. I left a piece of the stick sticking out at the top to represent a neck and help support the head once it was glued in place on the stick. The wire would represent arms that could bend and move. I gathered some fluff fill and began filling the body, using a pencil eraser end to move the fluff down the sleeves with the inserted wire first. Then I moved to the main body and stuffed around the craft stick in the center.

I wanted to create some wild gray hair for my witchy woman so I took some of the white fluff fill and sprayed it with DecoArt Media's White and Black Shimmer Sprays. I kept lightly spraying until I got a cool gray color. I then kept dabbing off the excess color with paper towels until the "hair" was dry. Next I hot glued the back of the witch head to the craft stick and then covered that up with the gray hair. Perfect!

Time to add some skeleton hands (from some cheap little plastic skeletons I get at the craft stores around Halloween). I kept part of the skeleton's arm attached to the hands and then hot glued them up inside of the sleeves. I then added some decorative gathered black netting (the same as on the skirt) around the neck and sleeves. I sewed them into place.

Next I gathered up the bottom of the witch's soft body and wired it tighter. Then I hot glued around the inside opening of the thread cone and shoved the body in place. I added a long piece of black ribbon (wrapped around the body twice) and tied it in a bow in the back of the doll. Then I added a spooky cape made out of the same black netting; tore it on the ends and then tied it in place. I added a couple of hot glue drops under her hair in the back and under the tied knot in the front to hold the cape in place. I love how she is draped in the black netting. It gives her a spooky vintage yet not scary appearance.

Now she is really coming together!! Time to finish the witch's hat! I created a cone shape for the top of the hat using a piece of black cardstock. I glued the cone in place using 1/4" Scor Tape double sided adhesive tape. Then I cut the bottom of the cone to the length of hat I wanted. I hot glued the top of the hat into place on the brim.

I added some more soft netting to the top of the hat and around the brim to hide where I had glued the hat together. Then I added Black Diamond Stickles to give the hat a magical glow.

I added some more soft netting to the top of the hat and around the brim to hide where I had glued the hat together. Then I added Black Diamond Stickles to give the hat a magical glow.
The basic cone doll was finished now and I just needed to add the embellishments. I hot glued the Ouija Board and Witches' Dance sheet music to the right hand and the Black Cat box and game board to the left hand.


Here are closer up photos of the embellishments for better detail ...

Here are closer up photos of the embellishments for better detail ...
I hot glued "Happy Halloween" to the hat and one of Tim Holtz Ideaology Spider Charms to the bodice of her dress. I still have little labels if I would decide to add little bottles or other things around her but for now ... I really love how she turned out!

Thanks for stopping by and I hope that you've been inspired to join in on the fun over at Creative Carte Blanche with our "Witchy Woman" theme this month! It's still not too late to join us! Please link your creation to our blog so that everyone can see your creativity and your process in creating your piece.
Next month, the lovely and talented Annette Green will be hosting our next adventure!
Have a safe and Happy Halloween! It'll be Thanksgiving before you know it!
Next month, the lovely and talented Annette Green will be hosting our next adventure!
Have a safe and Happy Halloween! It'll be Thanksgiving before you know it!
Absolutely stunning Candy! Your creativity is just amazing and I have just been sitting here absolutely engrossed in all the details. Absolutely Fabulous !!! Have a wonderful weekend. Jennie x
ReplyDeletetotally love your Witchy Woman Candy x Wonderful details in the creation....you are so super talented !!! Sending you my best wishes and thank you for sharing
ReplyDeleteAnnie xxxx
Spooktacular! Your witch is AMAZING!
ReplyDeleteI LOVE the 'I mean no disrespect' part!!! She's perfect for your project, and WOW!!! This is totally cool, and so creepy too! LOVE the step outs. Have fun Trick-or-treating with those gorgeous grandbabys!!!
ReplyDeleteWell, hello Witchy Woman!! Candy, I think this might be one of my most favourite of your projects yet! That woman's face is an absolute delight - she looks like someone with real attitude. I love how you made the upper body, the skeleton hands are such a clever idea. Love, love, love your Witchy Woman.
ReplyDeleteThanks so much for your comment on my spooky house from a couple of years ago, it is one of my favourites, I really appreciate your visit! Anne xx
Incredible, truly Candy! I love the image you chose! That old girl's face is full of years, isn't it? I'm amazed at the way you dressed your thread cone, you really worked a transformation for this project. Beautifully done. :-) Love you always.
ReplyDeleteAs always your creativity amazed me! Love love love this witch! Barbara
ReplyDeleteAmazing Candy!! Wow the steps you used to make this witch are pure clever! Thanks for sharing these!
ReplyDeleteYou are right, she is a perfect partner for handing out candy! teeheeheeeee
xo Jackie
Candy, you have absolutely blown me away! I just love the way your brain works! This is truly a fabulous doll! Every detail you put into it is just amazing! Love, love, love!
ReplyDeleteYour witchy woman is fantastic, what a wonderful idea using that piece for the body , very creative, the cone works perfectly . Love the face and the transformation is brilliant. Well thought out and beautifully executed. Tracy x
ReplyDeleteGreat project and such a nice job!!! You are very talented!!!
ReplyDelete