Happy December!!
I am reminded of the lyrics from a treasured Christmas Song, "Deck The Halls" ... "Fast away the old year passes ... Fa La La La La ... La La ... La La!"
Here is it ... December 2013!
I hope everyone had a warm and wonderful Thanksgiving holiday. I truly am blessed and humbled that God has given me so much to be thankful for.
Simon Says Stamp Monday Challenge is ushering in December with a challenge that is all about flourishes.
Since December IS the Christmas month and Thanksgiving is over, I am ramping up my Christmas creativity. I decided to take a different approach to this challenge by creating a Festive Flourish Vintage Ornament.


This ornament was created to mimic the feeling of a delicate vintage mercury glass ornament that sort of resembles an intricate snowflake.

It is made from eleven Mini Flourishes die cut on Plain Grungeboard. I used the complete flourish (6 of them) on the bottom layer of my ornament and I cut away part of the top 5 flourishes to create a smaller delicate layer.

It is made from eleven Mini Flourishes die cut on Plain Grungeboard. I used the complete flourish (6 of them) on the bottom layer of my ornament and I cut away part of the top 5 flourishes to create a smaller delicate layer.

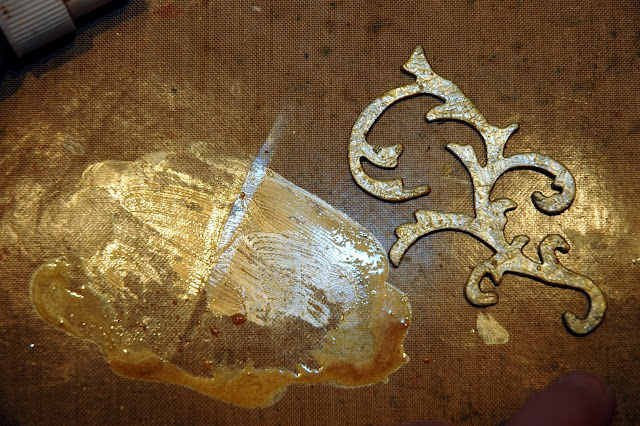
I took all of the Grungeboard flourishes and first painted them with Brushed Pewter Distress Crackle Paint. When that was dry, I "washed" them with a mixture of Gold Paint Dabber and water that I combined on my craft sheet. I used my finger to rub the wash over the silver flourishes and then used a paper towel to remove the excess. In my eye, this created a more combined metallic look; like faux mercury glass.

(The flourishes before and after the gold washing. Sorry the lighting is not great in this picture.)

To give the flourishes a real faux mercury glass look, I inked them (one at a time) with Versamark Champagne Embossing Ink. Then I laid them onto a piece of paper and sprinkled them completely with Clear UTEE. After I finished covering the flourish with UTEE, I used the paper to transfer the excess UTEE back to the UTEE container. That way, you have no waste. Then I melted the UTEE to create a clear, slick glass type finish on each flourish.


To give the flourishes even more definition and a vintage feeling, I then used Mercury Glass Stickles to edge each of the flourishes. Stickles give such a wonderful shimmery look with no mess! And Mercury Glass Stickles are a fabulous color ... alot like Platinum! It can take on a silver or gold hue, depending on what you are adding them to.


Next I used a 2" circle out of Grungeboard (painted gold) as the base for my ornament. I arranged six flourishes in a circle, barely touching their gorgeous curves one to another and hot glued them into place.


The next layer is one of a cream "vintage" lace that I gathered in a circle with needle and thread. I hot glued it in place and lightly went over the edges of the lace with Mercury Glass Stickles.


The next layer is five more flourishes that I cut shorter to add more depth to my faux glass "snowflake". I arranged the five of them in a circle and glued them into place on top of the vintage lace.


The top layer is created from some crepe paper that is gathered and taped (using 1/4" Scor Tape) to the back side of a Maya Road 2" bottle cap. Originally silver, the bottle cap is transformed into a golden glittery centerpiece thanks to Mercury Glass Stickles. (Before gathering and attaching the crepe paper to the bottle cap, I sprayed it with some Honey Stain to "age" the creme crepe paper and I also added some sparkles to it by spraying it with Gold Glitter Dust.) Finally, I added Mercury Glass Stickles to the edge of the gathered crepe paper.
I found a sweet vintage image of Santa and a child online and cut it out to fit inside of my bottle cap (1 3/4"). **NOTE - you could just as easily add a picture of grandchildren or some other special family member or friend to this center piece and give this as a very special gift.
I added Mercury Glass Stickles to the inside sides of the bottle cap. Once dry, I hot glued the bobble cap center in place.
Finally, I added a gold braided cord to the top flourish so that this ornament can proudly be displayed on my Christmas tree this year.


That's all there is to it! Very simple but very dimensional. I actually love the way it turned out. When I showed it to my husband, his first word was "Wow!" This ornament is very showy and would make a wonderful gift.
What will you decide to do with a flourish? Whatever it is, I hope you will join our challenge at Simon Says Stamp Monday Challenge. You could be the lucky winner of our

$50.00 credit voucher. Now wouldn't THAT come in handy this time of year?!
Your art might also be chosen to be featured in our

This is a very nice honor to those artists whose work is considered unique and inspiring for the week.
So good luck and come join us! I can't wait to see how you "flourish" with this challenge!
Here is a list of all of the products available at Simon Says Stamp that were used in creating this Festive Flourish Vintage Ornament:


