It's Monday, it's Spring and LIFE IS GOOD!
Time for another Simon Says Stamp and Show Challenge! This week, our challenge is themed "FLY". Things with wings or things with feathers; whatever inspires you to join our challenge and "take flight" with your creativity!
I loved this challenge because I love birds, love shabby chic, love Spring. So I combined all of those things that I love to create this ...

a plain paper mache book into a cozy little shabby chic habitat of pull out drawers, dimensional nests and serene scenes.

Here is what I started with ... a plain paper mache book measuring 7 1/2" x 4 3/4". The interior is 2" deep...deep enough to create a set of four drawers out of chipboard and cardstock!

I used my Tim Holtz Design Ruler to figure out the dimensions I would need to create a "cabinet" to hold the four drawers and then the dimensions of the drawers themselves.
The Cabinet To House The Drawers
2 - chipboard pieces 4 1/8" x 1 3/4" - these create the top of bottom of the cabinet
2 - chipboard pieces 1 3/4" x 2" - these create the two ends.
1 - chipboard piece 4" x 1 3/4" - this is the center divider for the drawers to sit on horizontally
1 - chipboard piece 1 5/8" x 2" - this is the center divider piece that will separate the two sets of drawers vertically. You need to cut a slit in the center of this piece so that the horizontal shelf can slide into this piece and fit flush in the front.
I lightly colorized all of the chipboard with an Espresso Paint Dabber on anything that would be visible. Then I simply taped the outside of the cabinet together to form a rectangle and slid the center sections in place. I added a bead of Glossy Accents to hold the center dividers in place. Next I covered the top of the cabinet with a piece of paper from 7 Gypsies Conservatory papers. This is the only part that will be visible and the only part that needs covering.
The Construction Of The Four Drawers
4 - plain cardstock 3 1/2" x 3 3/4" pieces.
4 - patterned cardstock 1 3/4" x 2" to "line" the drawer at the bottom.
4 - patterned cardstock strips approximately 8" x 1" to cover the exterior of the drawers.
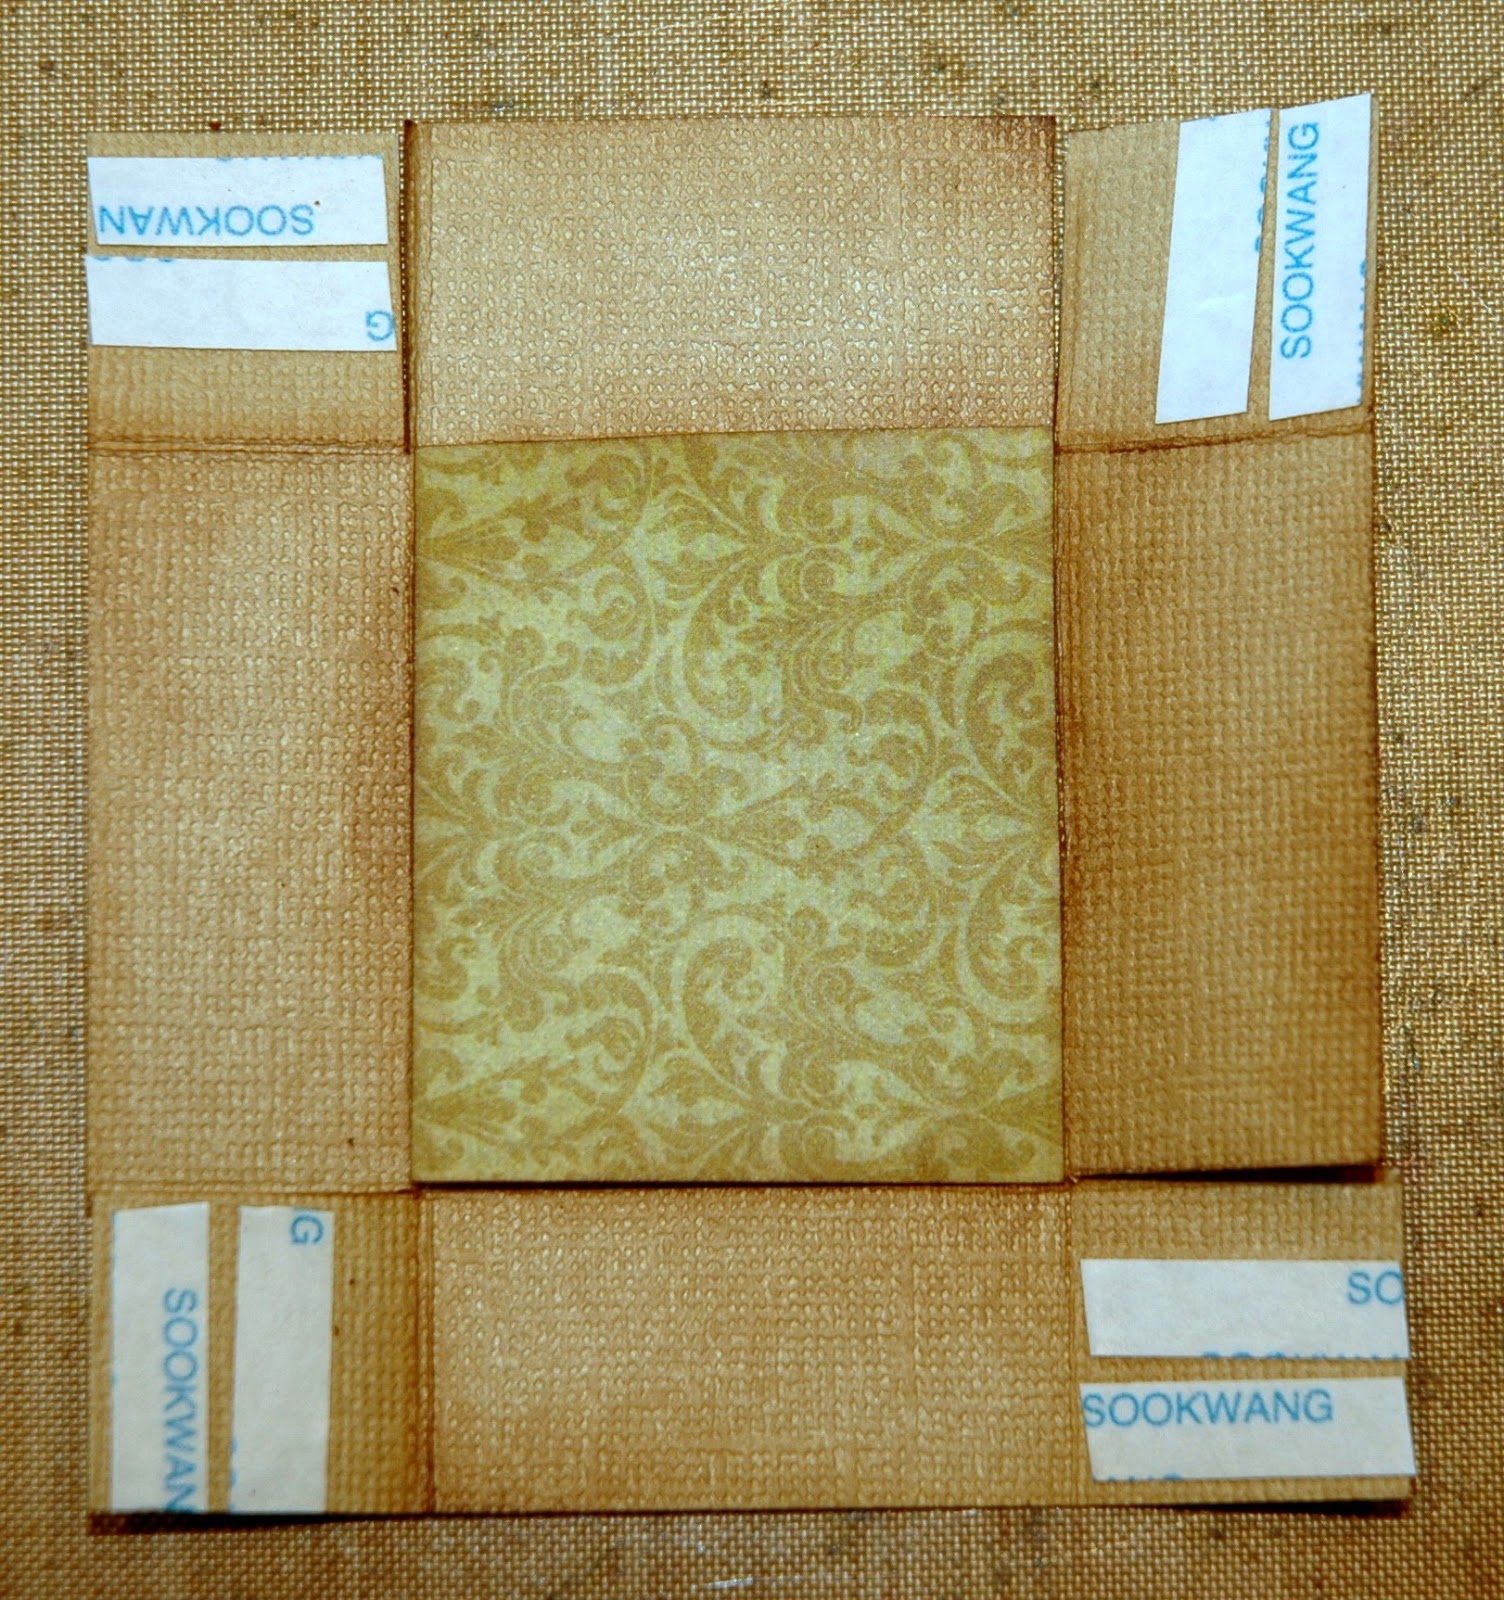
On the 3 1/2" side, score the cardstock at 7/8" and 2 5/8". On the 3 3/4" side, score at 7/8" and 2 7/8". Cut one slit at each of the four corners and apply double sided tape to each "flap". Distress all of the interior folds and edges. Fold the "flaps" over and glue in place to create a little rectangular "box". Start at the back of the drawer and glue a cardstock strip to the exterior of the drawers and continue all the way around until the exterior of the drawer is covered with patterned paper. This will increase the strength of the drawer and also decorate it. Trim the excess paper. Ink all of the corners and edges.

With the smaller hole punch on a Crop A Dile, center a hole on the drawers and punch a hole. Add a Tim Holtz Hitch Fastener to each drawer as a knob. Slide the drawers into the "cabinet" and set to the side to be added to the book later.
*Note - each book will be different so these measurements may vary a little.

Next I washed my paper mache book first with Classic Teal Studio Paint followed with a wash of Traditional Tan. When I got the look I wanted, I let it dry. It was a little bright but I knew I would be adding another wash of Burnt Umber and water that would dull it down considerably.

This is a paper mache book, so I wanted to make my "pages" look very shabby and like old dog earred pages of an old shabby chic romance novel. To do this, I knew I wanted to experiment with Wendy Vecchi's Embossing Paste...my new favorite toy! I love the feeling of her paste when it dries. I love how easy it is to work with and what great dimension it adds! I didn't want my pages to be white so I thought I might play around with adding color to the white embossing paste before I applied it. It worked perfectly! I combined a little Vintage Photo and then Antique Linen Distress Ink Refills (just a couple of drops) to the embossing paste and really stirred it up. Using a plastic craft knife and a regular angled paint brush (wash after using), I fashioned my paper pages onto the paper mache book.

When I was happy with the coverage, I added some extra detail with an old hotel room key and let it dry.

Here is the finished result of the tinted Embossing Paste and fiddling around with it to make it look like paper. I was pleased with the results. LOVE the color and the texture against the teal-ish book covers.

What is a nest without eggs in it? I had these plain little eggs but wanted them to look more like robin's eggs. So, I lightly spritzed them with some Broken China Distress Stain that I converted into a 2 ounce Mister Bottle and dabbed with an Ink Applicator. FAST and perfect color!

Ahhh!!! The inspiration for this entire piece! This simple yet beautiful saying from Emily Dickinson. This sentiment is part of Artistic Outpost's Quotable Quotes stamp set. I stamped it onto manila cardstock using Coffee Archival Ink. I lightly distressed the cardstock using Vintage Photo Distress Ink.

I wanted the sentiment to look "earthy" yet shabby. So, I found some craft sticks that I had, spritzed them with Vintage Photo Distress Stain that I had converted into a 2 ounce Mister Bottle and colored the sticks. Then I fashioned this rustic little frame for my sentiment. Simple to do and very effective on this piece.

Here you can see the frame in place sitting on top of a background of text paper from the 7 Gypsies Conservatory 8x8 paper pack. The paper was torn and distressed with Gathered Twigs Distress Ink. I also added Antique Linen Distress Ink and then did Tim Holtz' spritz and flick method to further age and mottle the paper background. Then I stamped the eggs in the nest image using Coffee Archival and colorizing the flowers, nest, eggs and butterfly with Wild Honey, Scattered Straw, Victorian Velvet, Squeezed Lemonade, Tumbled Glass and Shabby Shutters Distress Stains and a Small Sakura Water Brush.

I added Glossy Accents to the eggs in the nest to give them a little more dimension. I stamped the pink flowers and the butterfly twice, colorized them and stacked them on top of the each other, creating more dimension. I added a few little bits of feathers and fluff to the next using Glossy Accents. Then I stamped a few wheat stalks and colorized those around the nest. Finally, I added a feather and three little colorized eggs. The interior cover of my shabby chic book was complete.

I fit the drawers into the book cavity and added some "nesting" material and the sweet little eggs. I also added a few more little feathers and a touch of cut ivory Melissa Frances Tulle underneath the nest resting on the drawers. The top of this side needed something though. It had some really cute egg paper as a background from the 7 Gypsies Conservatory 8x8 Paper Pack but it needed something!

I cut a Hardware Findings piece from plain Grungeboard and heat embossed it with Antiquities Verdigris Powder! Love that rustic patina look. But let's go a step further...

Let's add some Antiquities Rust Embossing Powder on top of that! Love it! (I had to cut off the tip and a little of the other end so that it would fit in my book).

Now, let's make another sign like I did with the sentiment. Only this time, let's suspend it from the Hardware Finding and on three large Jump Rings. Yep...just what that spot needed! It's shabby, it's dimensional and it swings!

Oh! In case you were wondering what the outside of the book looks like ...

Here it is. I just left it shabby and plain. I wanted the interest to be centered to the interior of this book.
I hope that this has inspired you to create something fun and enter our challenge at Simon Says Stamp and Show. You could be the lucky winner of our

$50.00 CREDIT VOUCHER! And...if you are one of the TOP THREE entries for the week, you receive special recognition for that feat as well! I hope you'll enter. I'd love to see what you inspires YOU!
Here are the products available at Simon Says Stamp I used on this shabby chic book:


Candy.. are you KIDDING ME with this?!? GORGEOUS!! Like.. SERIOUSLY astounding :)
ReplyDeletecandy a beautiful make with so many beautiful details, lovethose tiny little eggs they are gorgeous! Hugstrace x
ReplyDeleteBeautiful project.
ReplyDeleteJoanna
Totally awesome Candy.......!!!!!! I love this week's project your imagination is fantastic and the end result stunning.
ReplyDeleteHave a great week and wishes to Cooper
Annie x
This is just adorable!
ReplyDeleteCandy, this is over-the-top adorable!
ReplyDeleteLove this, Candy! Thanks for sharing your process in creating this. So darling.
ReplyDeleteThis is so absolutely gorgeous, Candy!
ReplyDeleteI fell in love with it at first sight and at second, third and... wow, loads of lovely details and so much thought put into this awesome piece of crafted poetry!
Hugs,
Claudia x
Hi Candy, I do love to visit you on a Monday as I know you will lift my spirits - well, today they are soaring after seeing this most wonderful of creations! Your attention to detail is second to none and your creativity abounds in this gorgeous little bird haven (or should that be heaven!). The sentiment is perfect and I love the little 'nest' wall hanging too. Stunning! Hugs, Anne x
ReplyDeleteWow Candy what a transformation. Love the patina colour on the outside of the box and the interior, well perfection. Love the images and the hardware is fantastic, the embossing really looks so effective using both embossing powders. Love how you added draws to the inside, phew there was some measuring there, I am not too good on 1/8" etc lol. So detailed. Love how you made NEST look so rustic with the added sticks around the edges, it's little touches like these that make a piece for me. Love this Candy. Tracy x x
ReplyDeleteJust gorgeous, another masterpiece to add to your long list of yours!
ReplyDeleteThanks for the super lovely comment on my blog, Candy! :-)
it's simple...I LOVE this...
ReplyDeletebeautiful colors & I LOVE your embossing paste pages!
Simply beautiful; just love the things you make.
ReplyDeleteI am fascinated by the embossing paste...I am going to have to give that a try. Gorgious project!
ReplyDeleteHugs
The Glitter Tart
What can I say but this is just magnificent! I wish I could do more pieces like this but unless I can find appropriate wall space for more shelving, it's an instant cat toy. Sigh.
ReplyDeleteWTG Candy! This is fabulous!!!
ReplyDeleteOMG!!! I LOVE THIS!!!! ABSOLUTELY FABULOUS!!!! You have given my ideas sweets!
ReplyDeleteloving this project - and thank you for sharing such a fantastic how-to as well!
ReplyDeletemay
This book is just beautiful! Love it.
ReplyDeleteWhat a gorgeous book nest :) The detailing that you think of and plan out always floors me, Candy! This piece is not an exception...lovely work!! :)
ReplyDelete*mwah*
Steph
Simon Says Stamp!
WOW Candy, I love this!! All the details are amazing. Love how you did the faux pages, such a clever idea. The cover look wonderful and those eggs too. Fabulous hanging sign and the wood sticks are just perfect. What a clever idea to add drawers too. I saw one of those paper mache books in a craft shop, I wish I had gotten it (it is too far away now).
ReplyDeleteOh wow, wow and triple wow Candy, I love this! It has all my favourite things :-). I had to look closely, it could have been a book card. Don't know what it is with me and book cards, I just love the nature of the triptych I guess :-). I adore the little blue eggs, and the straw spilling out from the drawers, and those drawers are just wonderful! Thanks so much for sharing your incredible art. Maddy x
ReplyDeleteA superb creation Candy, I absolutely love it and its a totally inspirational piece of art! Hugs Chris x
ReplyDeleteWow, Wow, Wow! Another stunning creation that speaks to my soul! This is just beautiful! You truly are talented!
ReplyDeleteWow Candy ! Another fantastic project, so many details and what a perfect reflection of Spring. I love it ! Sue C x
ReplyDeleteI love the shabbiness of this piece Candy and such a perfect scene to hit your eyes when you open the book.
ReplyDeletehugs {brenda} x0x
This is fabulous! when are you going to come over and sit and let me watch you create? I love how you see different projects from bits and pieces. This is gorgeous! The drawers inspired and the tiny moss / grass hanging out is inspired! I love this project!
ReplyDeleteStunning! I love this tutorial! So much yummy stuff to look at. Your altered box is awesome!
ReplyDeleteStunning! I love this tutorial! So much yummy stuff to look at. Your altered box is awesome!
ReplyDeleteTotally loving your gorgeous filled Nature cabinet, so many wonderful details, its a joy to look at Candy, also I love the quotation. A perfect place to nest. Hugs Annette x
ReplyDeleteMy, my how talented you are! I just love your inspirational blog and the detailed instructions you give.
ReplyDeleteThanks,
Vee x
WOW!!!...WOW!!!!....WOW!!!.....Oh goodness this is just wonderful, beautiful, amazing...I want to make one, but don't think it could ever be as beautiful as this! Lots of love from Laura xxxxx
ReplyDeleteCandy - I totally love this book. Your attention to detail is wonderful. Thank you so much for your information on how to make it. I am definitely going to try this! My husband and I were just down in Branson for a couple of months and traveled to Springfield twice during that time to go to the Scrapbook Generations store. It is such a wonderful store. My husband and I ate at Hu Hot where they cook the food right in front of you and toss the eggs around (at the mall) really enjoyed that also. Loved the area so much warmer than Wisconsin.
ReplyDeleteYour project is amazing! I bet Tim Holtz looked at it and said "That's Awesome."
ReplyDeleteSo great- all the details are just perfect. Love it!!!!!
My oh my, what a gorgeous altered book box. So beautifully done. It's a stunning piece of work. Love all the details, so full of spring! Hugs, Sandra
ReplyDeleteUtterly gorgeous!! Would you like to come and do a stint on the dollshouse restoration with us here in the Czech Republic!?! Only a month til we open the museum for the first time...
ReplyDeleteThis is such a glorious project - a little world I'd love to walk right into - every detail is delicious!
Alison xx
Adore this more than I can say! Just love all those little draws. Kim
ReplyDeleteCandy, It has been such a long time since we have talked. This is a wonderful project. I was so excited to see that you are doing workshops for Scrapbooks Forever. I would have loved to been able to take the Friday and Saturday class but already had plans. I was thrilled to see that you are using B Line Stamps. Several years ago I found those stamps in Tenn. and have bought several. I can't wait to see what you do with them and all the direct stamps at the store. Let us know what you are doing next.
ReplyDeleteLinda Robbins
LINDA!!! It is so good to hear from you! Girl, send me your email address so that I can keep you up on classes or check Scrapbooks Forever's newsletter. I am so excited about teaching there. It's such a warm and friendly atmosphere...very reminiscent of Forever Memories. I am so glad that Shirley is going to start carrying the B Line stamps. They are gorgeous vintage images. <3 Candy
DeleteTripple WOW!!! There are so many details about this amazing project to choose from, that I don't know where to start. I love the way you created the feeling of pages using the hotel key, the patina you created on the hinge is amazing, I love the little drawers… I could go on for a while. You are truly an inspirational art muse, Candy. Blessings!
ReplyDeleteWOW Candy!!!! This is GORGEOUS!!! What a transformation! I love the drawers! The nests and eggs, what an imagination! Just perfect in every way! Fabulous!!!!?
ReplyDeleteOh my GOSH Candy! Anither absolut AMAZING prject of you!
ReplyDeleteFabulous!
xxx Susi
FROEBELSTERNCHEN FROM AUSTRIA
ART-JOURNAL-JOURNEY
MOO-MANIA-CHALLENGE
Oh my word, Candy, this is delightful! You never cease to amaze me! It's hard to believe that this started life as a plain, brown paper mache book and now looks like this! Your attention to detail is just phenomenal! Hugs, Lisa x
ReplyDeleteI've only just seen this beautiful piece and had to pop over and leave a comment. I thought the finished piece was stunning but to see how you created it makes it even more special. I am in awe of your talent and creativity from the addition of the little drawers, the re-colouring of the eggs and to the creation of your 'hardware'. Inspirational piece. I always admire your work but I really should have visited before now!
ReplyDeleteHave a wonderful weekend.
Juliax
Wauwwwww candy, o my gosh,this is amazing beautiful creation of you, i love,love,love it to much.
ReplyDeleteand all Little Details and colors are soo wonderful.
Hugs and have a nice Weekend Jeannette
Oh Candy, you have again made quite fantastic artwork! Really adorable!
ReplyDeleteThis is such a vintage beauty!
ReplyDeleteCandy, When I saw this on Simon Says I fell instantly in LOVE!!! What a fabulous nature box!!!!
ReplyDeleteHugs Lynn
Oh Candy,
ReplyDeletethat is a breathtaking art work, I love the colors the combination of all elements and the amazing decoration. I think taht is really an exquisite masterpiece!
xox Anja
How wonderfully creative. You've done an amazing job. Karen.x
ReplyDeleteWOW!!! This is amazing! Thanks for sharing the how to steps and all the incredible details!!
ReplyDelete