Words ... they are very powerful.
Today at Simon Says Stamp Monday Challenge, we are stamping with letters or words.

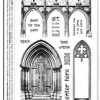
I love inspirational quotes. I love beautiful, intricate stamps. So, I married the two in this inspirational mini tag book. The beautiful gothic archways are from Darkroom Door's Gothic Archways stamp set. It also includes beautiful long windows and some wonderful sentiments. I have used one of them in the center archway, "Art is the window to the soul". Just think about that for a second. Isn't that a profound statement? I truly do believe that our art reflects who we are. So, throughout this book, you will see inspirational quotes that hopefully reflect a little of me.

I began this mini book by cutting 3 1/4" x 5" front and back covers and two 1" x 3 1/4" spines from chipboard. I then added a hinge to each cover with a 1" piece of kraft paper scored down the middle and a piece of 1/4" Scor Tape added to each side. In the photo above, you see the hinge attaching the cover and spine together at the top. At the bottom, you see the finished inside cover with paper added on top of the hinge assemblage. (To attach the hinge-simple add one side of the kraft tape to the underside and along the edge of the cover. Then hold the spine piece at a 90 degree angle along the edge where the kraft paper hinge has been added. Hold the spine with one hand and with the other, simply raise the taped kraft hinge up to attach it to the spine. Then let the spine fall and rub your fingers over the kraft paper to secure the hinge. This method gives you a perfect "canal" between the two pieces of chipboard to allow for the bending of the cover. Then apply a little glue or Glossy Accents down in the channel, and glue or tape the covering paper in place on top of the chipboard. Use a bone folder to work the paper down into the "canal".)

When the inside of the book covers were finished, it was time to do the exterior covers. I coated the chipboard with a light coat of white gesso. When dry, I added a basecoat of Espresso Adirondak Paint. Next came a middle coat of Paper Artsy's Fresco Finish Crackle Glaze and finally when that way dry, I added a top coat of Fresco Finish Snowflake. Love that crackle! To add some more depth, I distressed the covers first with Scattered Straw then Wild Honey and finally edging with Black Soot Distress Inks.
I recently ordered the Darkroom Door Gothic Archways stamps from Simon Says Stamp.
I could not wait to do something with them as
I love the images and the sentiments on this set!

The two wistful ladies in the archways are from Graphic 45's Romantique collection. I thought adding these beautiful images rather than more words or nothing at all was a good compliment to this thought provoking sentiment.
I stamped the archways twice onto Specialty Stamping Paper using Jet Black Archival Ink. I colored the stones and marble archways using my Detailer Water Brush with Pumice and Weathered Wood Distress Inks to give that old stone look. I then cut out the archways. I stamped "Art is the window of the soul" onto transparency film using Stazon Black Ink. Because of the surface of the transparency film, Stazon dried on transparency film where the Jet Black Archival would not. I then cut out the transparency film and using 1/4" Scor Tape, I attached the stamped film to the back side of the arches. I then added the ladies and the background piece behind my sentiment with more Scor Tape. Finally, I pop dotted that assembled front on top of the other stamped gothic archways for more dimension.
At the very top of the page, I added a piece of Vintage Lace across the top of the arches with a 1/4" strip of Scor Tape. I then added an "ink pen" by coloring a sized dowel stick with an Espresso wash. I then added a Tim Holtz Pen Nib to the top with Glossy Accents and clamped it back into place. I added some Pitch Paint on the end of the pen to symbolize dried ink.
At the very top of the page, I added a piece of Vintage Lace across the top of the arches with a 1/4" strip of Scor Tape. I then added an "ink pen" by coloring a sized dowel stick with an Espresso wash. I then added a Tim Holtz Pen Nib to the top with Glossy Accents and clamped it back into place. I added some Pitch Paint on the end of the pen to symbolize dried ink.
All of the pages in the interior of the book are sprinkled with inspirational thoughts from Unity's (Donna Downey) Empowered Words stamp set. I hope you enjoy them as we peek in between the covers.

I have to admit that I got so engrossed in putting this little book together that I forgot to take a lot of pictures of the construction. Does that ever happen to you? You get on a creative roll and you just can't stop? (smile) But, I can tell you what I did and what products I used on each page! This page began by cutting various sizes of scrap papers and gluing them onto this #8 Manila tag. I followed that with a light coat of white Gesso. When dry, I sprayed the tag using Heidi Swapp Primrose and Mustard Color Shine Sprays. I just tried these for the first time and I really like them! Their color is bright but soft at the same time and I love the subtle shimmer.

My thought was to keep my pages of art fairly simple so that the WORDS are what you see. I added a little shading around some of the rectangles with a black Stabilo pencil. I also added Dina Wakley's Lonely Girl stamp; stamped onto Manila cardstock using Jet Black Archival ink. All of the word boxes are also stamped onto Manila cardstock and edged with Black Soot.
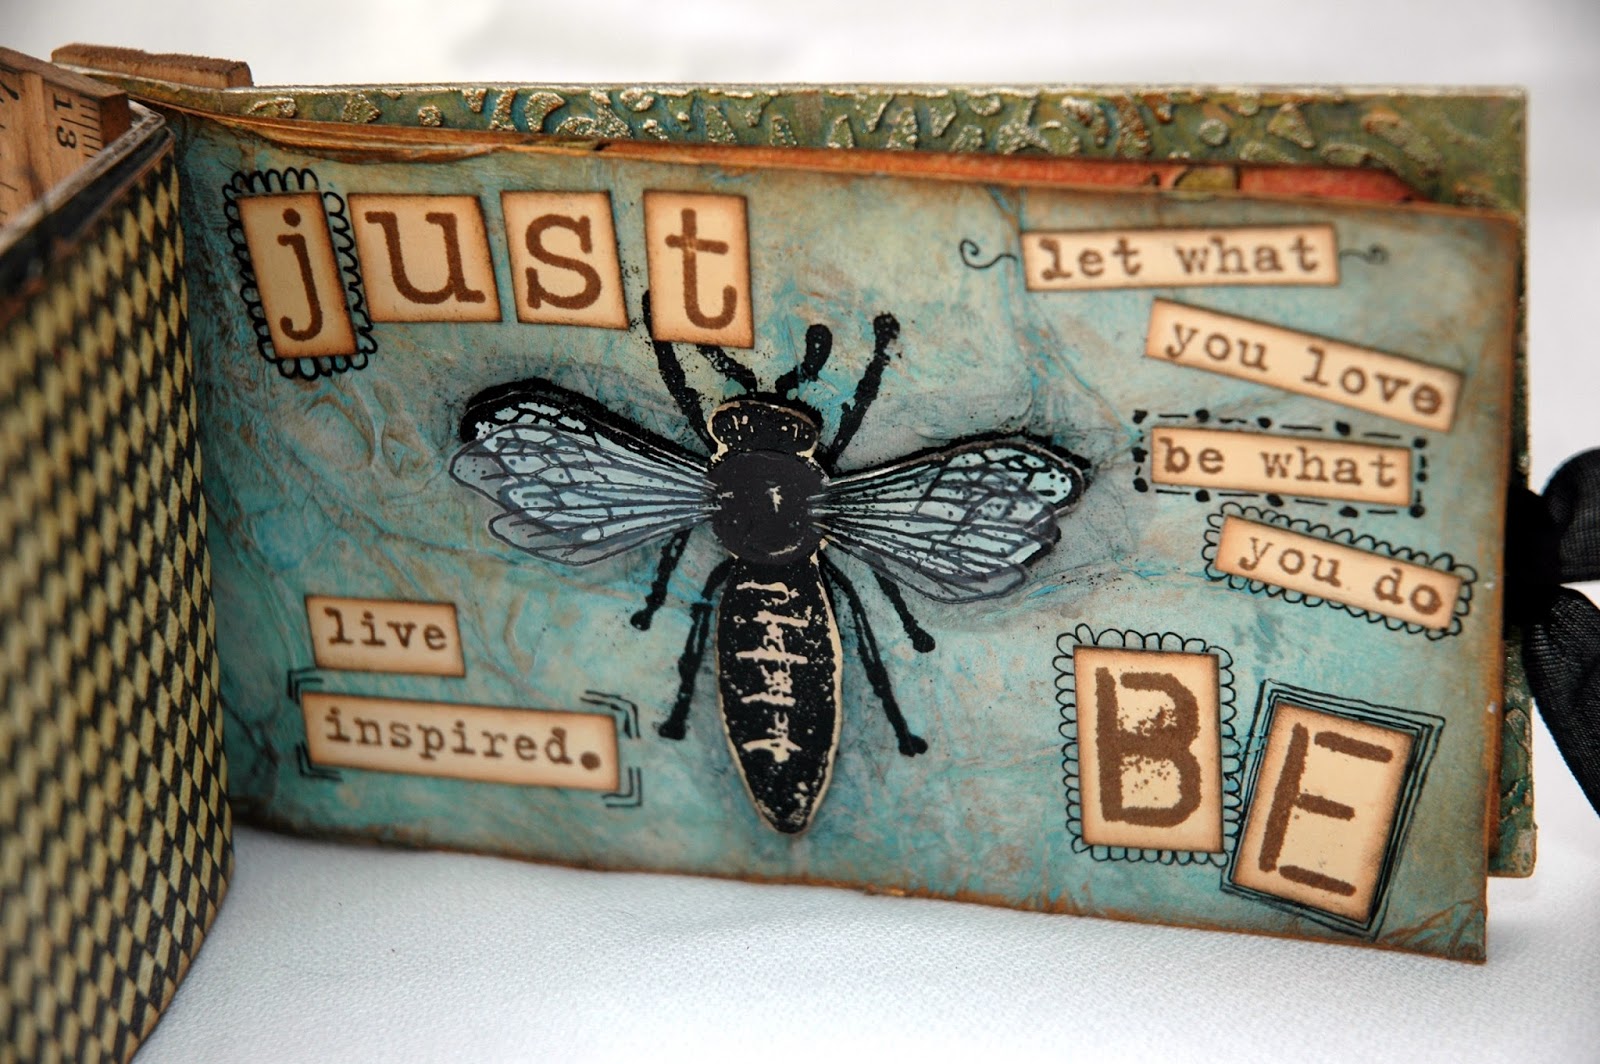
My "Just Be" page. I started with white tissue paper glued onto a #8 Manila Tag with Matte Multi Medium. I then painted over it with a Broken China Paint Dabber followed by some light misting sprays with Picket Fence Distress Stain that I changed over to a 2 oz. Mister Bottle. I then distressed the edges using a Chestnut Roan Cats Eye Ink Pad and a touch of Treasure Gold Florentine Guilding Wax. The sentiment "Just BE" comes from two different stamps. "JUST" is from one of my favorite alphabet stamp sets ... Graphic 45's Antique Typewriter". "BE" is from Wendy Vecchi's Art For You stamp set. It is also were I got that gorgeous vintage bee image. I stamped all of the letters and sentiments on this page onto Manila cardstock using Coffee Archival Ink and cut them out. I lightly edged around all of the words and letters with a Chestnut Roan Cats Eye Ink Pad and a touch of Black Soot along the paper edge. I laid out where I wanted the words to go and then moved them off of the page so that I could emboss my bee using Black Embossing Ink.

I also embossed him onto Manila Cardstock and stamped just the wings onto transparency film using Stazon Black Ink. I added a little Scattered Straw to the body and Broken China to the wings of the manila bee and cut out just the wings and body. I pop dotted it in place on top of the embossed bee on the tag. Then I added a little Glossy Accents to the top of the body and added the transparency wings for more dimension.
Then I glued in place all of the word boxes and letters and doodled around some of them. The word boxes are more of the Empowered Words stamp set. Don't you love them?

The next page (#8 Manila Tag) began with Embossing Paste and Dyan Reaveleys' Luscious Leaves 5x8 stencil. When dry, I sprayed more of Heidi Swapp's Primrose and Mustard Color Shine sprays, wiped them off of the leaves and colored the leaves with Peeled Paint Distress Ink and a Detailer Water Brush.

Again, keeping the pages of art fairly simple, I added a flower and flourishes from Wendy Vecchi's Daisy Art stamp set and colored in the daisy using Mustard Paint Dabber and a Detailer Water Brush. This sentiment was also stamped onto Manila cardstock, distressed, cut out and glued onto this page with a little doodling added around the edges.

The back inside cover ... I'd also recently bought Pink Paislee's wonderful Christy Tomlinson Vintage Lace mask (or stencil) and I love how it looks here. I used White Embossing Paste to create the dimension and then lightly painted over it with White Gesso. I colored sprayed it using Heidi Swapp's Tropicana Teal Color Shine. To add a real vintage and almost metallic look, I added touches of Treasure Gold Florentine and White Fire Guilding Wax.

That was enough background art. So, I simply die cut a label from Spellbinder's Parisian Accents out of Manila cardstock, stamped my sentiment onto the center of it in Jet Black Archival and added the Mercury Glass Stickles Accents the to perimeter. When dry, I glued it in place in the center of the page.

Finally, I lightly washed the Binder Rulers with an Espresso and water mix and wiped away the excess. I marked the holes on my covers and tag pages for Tim Holtz' Ruler Binder and punched all of the holes using the larger hole on my CropADile. I threaded the covers and tag pages through the screws, added the nuts and washers and it was finished! I love that little wooden ruler binder! It is approximately 3 1/4" tall and a really cool alterable and dimensional binder for mini books.
I hope you enjoyed this little inspirational tag book and it has inspired you to create something wonderful using letters or words.

The Stamptember celebration continues over at Simon Says Stamp! Check out the new products and kits available now!
And .... don't forget about our very generous sponsor's

$50.00 gift voucher as a weekly prize at Simon Says Stamp Monday Challenge when you enter! You could be our next winner!

And if your work is exceptional, you might also be featured on our Designer Spotlight! This is voted on by the Design Team as our way of saying "THANK YOU" for being so loyal to us and sharing a piece of yourself with us through your art!
Here are all of the products available at Simon Says Stamp that were used in creating this inspirational mini tag book:


A gorgeous mini album Candy, each page is very special with the techniques, images and sentiments you have chosen to use.
ReplyDeletehugs {brenda} x0x
Candy, I love your mini! Such beautiful pages. Thank you for taking us through the process. This is an exceptionally gorgeous creation.
ReplyDeleteWow, wow, wow Candy, - I love little books and this one is completely out of this world!! Every page is stunning and as for the covers? What can I say, they are just brilliant! The colours, the textures, just everything. I totally understand you got so caught up in the process you forgot to take pictures, - happens to me all the time..... Loved how you did the covers and thanks for the 90 degrees tip, makes for a perfect neat finish indeed. Another inspirational piece from you, thanks for that!
ReplyDeleteI love everything about this! Gorgeous!!!
ReplyDeleteWow! I love this little album. What great techniques, thanks for the tutorial!
ReplyDeleteBeautiful! I love the crackle finish on the cover with the elegant arches and beautiful images. The inside pages had such strong quotes and sentiments with beautiful images! LOVE it!
ReplyDeleteReally, really lovely......
ReplyDeletecandy, this is truly gorgeous in every way! Love all the different quotes and techniques you have used , a really wonderul Mke hugs xxtrace x
ReplyDeleteA-mAZ-INg!! I'm blown away again Candy! Verrry inspirational in both its words and overall creative artistry. You are superb with so many little delightful details - it is such fun to study all you do. Congrats on clearly wording how you did the hinge canal - not easy to compose. If I was to pick out one detail it would be the pen on front cover but you make it well nigh impossible to only select one! Thank-you so so much for your fab comment on my blog today too! Have a lovely week! Nicola x
ReplyDeleteLoving your terrific album full of textures and wonderful quotes, truly inspirational, hugs Annette x
ReplyDeleteHi Candy, I have to say I absolutely love that lace mask , it looks so textural here in your piece and those gothic arches are amazing. My favourite touch is that sentiment in the middle window, it is just perfect for those arches as are the two feminine images. I love the inspirational quotes and wording you have used in the inside too. Wonderful design and texture too. The bee is gorgeous and I love the alphabet you used. Love this piece my friend, as always. Tracy x
ReplyDeleteWow... Candy, this is such a beautful album. All the details on each page are amazing. I love the gorgeous effect that embossing paste created. All the elements are just pretty. :)
ReplyDeleteWow Candy! What a stunning project! I'm lovin all the texture and beautiful backgrounds that you created! What a fabulous showcase of products! So much detail to drool over!
ReplyDeleteCandy, I just love your mini booklet with those beautiful inspirational quotes! Love the cover very much with the crackling on the back and all those stunning pages! Really gorgeous! Hugs, Sandra
ReplyDeleteSuper cool & unique tag book, Candy! I love the embellishments you chose :)
ReplyDelete*mwah*
Steph
Simon Says Stamp!
You really are magnificent, you know that? I love every incredible detail of this very beautiful book. The sentiments and the artwork just go together so well. Amazing texture, color and design. What a wonderful, wonderful work of art!
ReplyDeleteYou're a rock star, Candy! This is so gorgeous in every possible way. I love how you used the Darkroom Door arches and the Dina Wakley gal.
ReplyDeleteCAndy I do not know what words to use! All your work is an inspiration for me! Beautiful and full of details to look at!
ReplyDeleteOh my word Candy! This is absolutely stunning in every way - it definitely reflects YOU - all the detail - that embossed page is fabulous, love all the inspirational quotes, the bee gets a big thumbs up from me, but the front cover - wow! I keep going back to look at that DD arch stamp, it is amazing and you have given it such a 3D look, it really does look like stone....... You really are one of the most inspirational people I have ever come across, you never disappoint, you always impress, you are an amazing lady..... thank you so much for your inspiration. Hugs, Anne x
ReplyDeleteI know , every time I see a new piece from you, I think, ah this is my new fave one, but I think it all the time, can't help. The cover is gorgeous in itself, no need more pages, but you added them , and every single one is amazing. Especially the last one with the Christy stencil, ...belllaaa, bella , bella!
ReplyDeleteYour book is gorgeous. Love the colors and dimensions. Dyan's leaves look
ReplyDeletefabulous. I'll have to make a book of my own with all the quotes I've been
collecting.
Wow Candy, another super gorgeous project! Love the covers and every single page. Wonderful quotes and sentiments and the textures are amazing. All the pages are so different from each other. Love all the stencil work too, and those cool crackles!
ReplyDeleteThis all is absolute gorgeous Candy!
ReplyDeleteA stunning journal Candy. Love all that crackle and the covers/pages are wonderful.
ReplyDeleteTFS
Annie x
Candy, such a wonderful project journal! Thank you for carefully photographing each page so beautifully to help us see the details. Love all the textures and amazing colors! hugs, de
ReplyDeleteStunning work, Candy... I agree with you about that first quote, and I simply love the etched glass effect you've created for it. Beautiful images in the other arches, and so many glorious pages of beauty! What a wonderful reflection of your soul in this amazing creation...
ReplyDeleteAlison xx
Hi, Candy! What a SPECTACULAR mini-tag book...& BEAUTIFUL work-of-art!
ReplyDeleteEach page is filled with lots of FABULOUS details to admire!
I love the texture, colors, & quotes you've chosen!
You are one GIFTED artist!
Ohhhhh! This is the perfect marriage between classy and edgy! I really love the elegant images and delicate arches paired with the industrial nuts and bolts and ruler. This is BRILLIANT in all caps for sure! Another amazing piece!
ReplyDeleteEvery page is a joy Candy and there are so many inspiring recipes here to try. You never fail to amaze me. Jenny x
ReplyDeleteYou are so amazingly creative, and your craftsmanship is always flawless. Blessings!
ReplyDeleteHello my dear Candy, shesh I've missed 3 amazing post, whaa still not receiving them, thank goodness we visit the same blogs... OMG this has got to be my favorite creation, I think you make everything so fantastic, everything I looooove is one there, the cover is SUPERB, love the arches, I must try to cut some out, the pen and nib, they make me weak :), thaaaaat crackle, sorry I'm screeching, is soooooo beautiful, those arches to die for OMGOODNESS, images, sentiment beautiful and perfect, stunning pages , how koooool is that Bee, the next two BLEW ME AWAY... This was an excellent tutorial, they always are, I hope the owners of Simon says are happy you show cased their products splendidly, thank you so much..
ReplyDelete