Hello friends! Welcome to my blog.
Once again, I am honored to be a guest designer for the lovely and talented Heather Hudson of My Artistic Adventures. The theme of this week's challenge is "On the second day of Christmas my true love gave to me ... TWO ..." emphasis being on Christmas and on the number TWO.

I love Christmas any time of year and making this vintage Christmas canvas for Heather's challenge using her lovely collage sheet was a lot of fun!
I have been working on a project using papers from the Twelve Days of Christmas, so that song has already been revolving around in my head for over a week. So when Heather told me the theme for this challenge, I immediately thought of "two turtle doves". While the birds I used on my Christmas canvas are not turtle doves, I could not resist the two gorgeous blue birds on Heather's Shabby Vintage Chic Victorian Blue Birds/Music Tags.
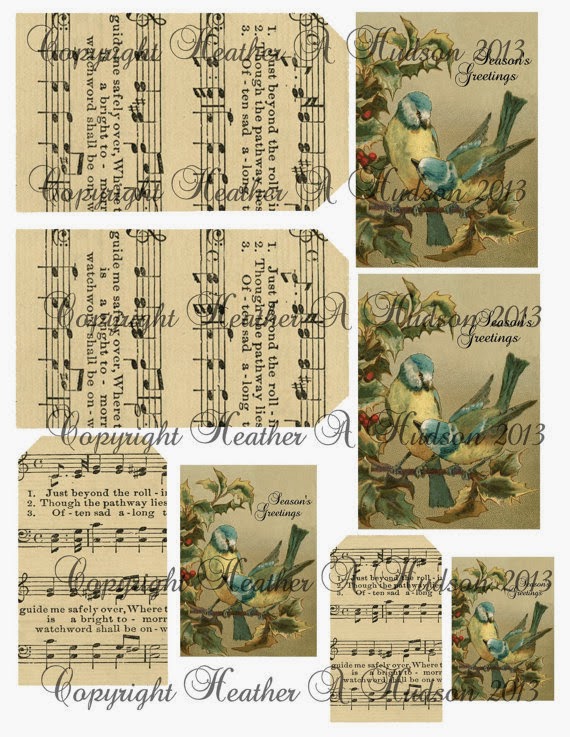
(Click on the photo to see this collage sheet at Heather's Etsy Store)
Wouldn't this collage sheet make the most gorgeous Christmas gift tags? In this tutorial, you will see how to create the tag I used on this canvas as well as the embossed canvas that it is attached to. So, sit back, relax and enjoy!

1. Place Tim Holtz' Holly Bough Stencil on the right side of a 5x7 canvas. Using something like a hotel room key or an art spatula, wipe Wendy Vecchi's White Embossing Paste (love this stuff) onto the canvas. Remove the stencil and immediately rinse it and the spatula off. Gently heat set the embossing paste and repeat the process on the other side of the canvas.

The canvas will then look like this. Pretty, huh?

2. Paint over the entire canvas using an acrylic brown paint of your choice and mixing it with a little water to dilute the paint just a little bit. I used DecoArt Americana Light Cinnamon. (I did this because I wanted the base of my canvas to be brown).

4. Next add 1/4" Scor Tape to all of the sides of the canvas and then top it with one of the rolls from Tim Holtz' Seasonal Tidings Tissue Tape. (I used the Scor Tape to help assure that the Tissue Tape would hold.) Then lightly brush a bit of brown paint/water mix on top of the Tissue Tape.

5. Paint Wendy Vecchi's Crackle Texture Paste (love this stuff even more!) over the canvas. The heavier the coat, the heavier the crackle. Some areas of this canvas are painted heavier than others. Let dry.

See the gorgeous crackling effect from the texture paste? The brown will show underneath the crackling. I also dabbed some of the crackle paste with a paper towel to remove bits of it as I was brushing it on. To the far lower left, all of the tiny crackles are where I dabbed away some of the crackle paste with a paper towel. Fun to experiment!
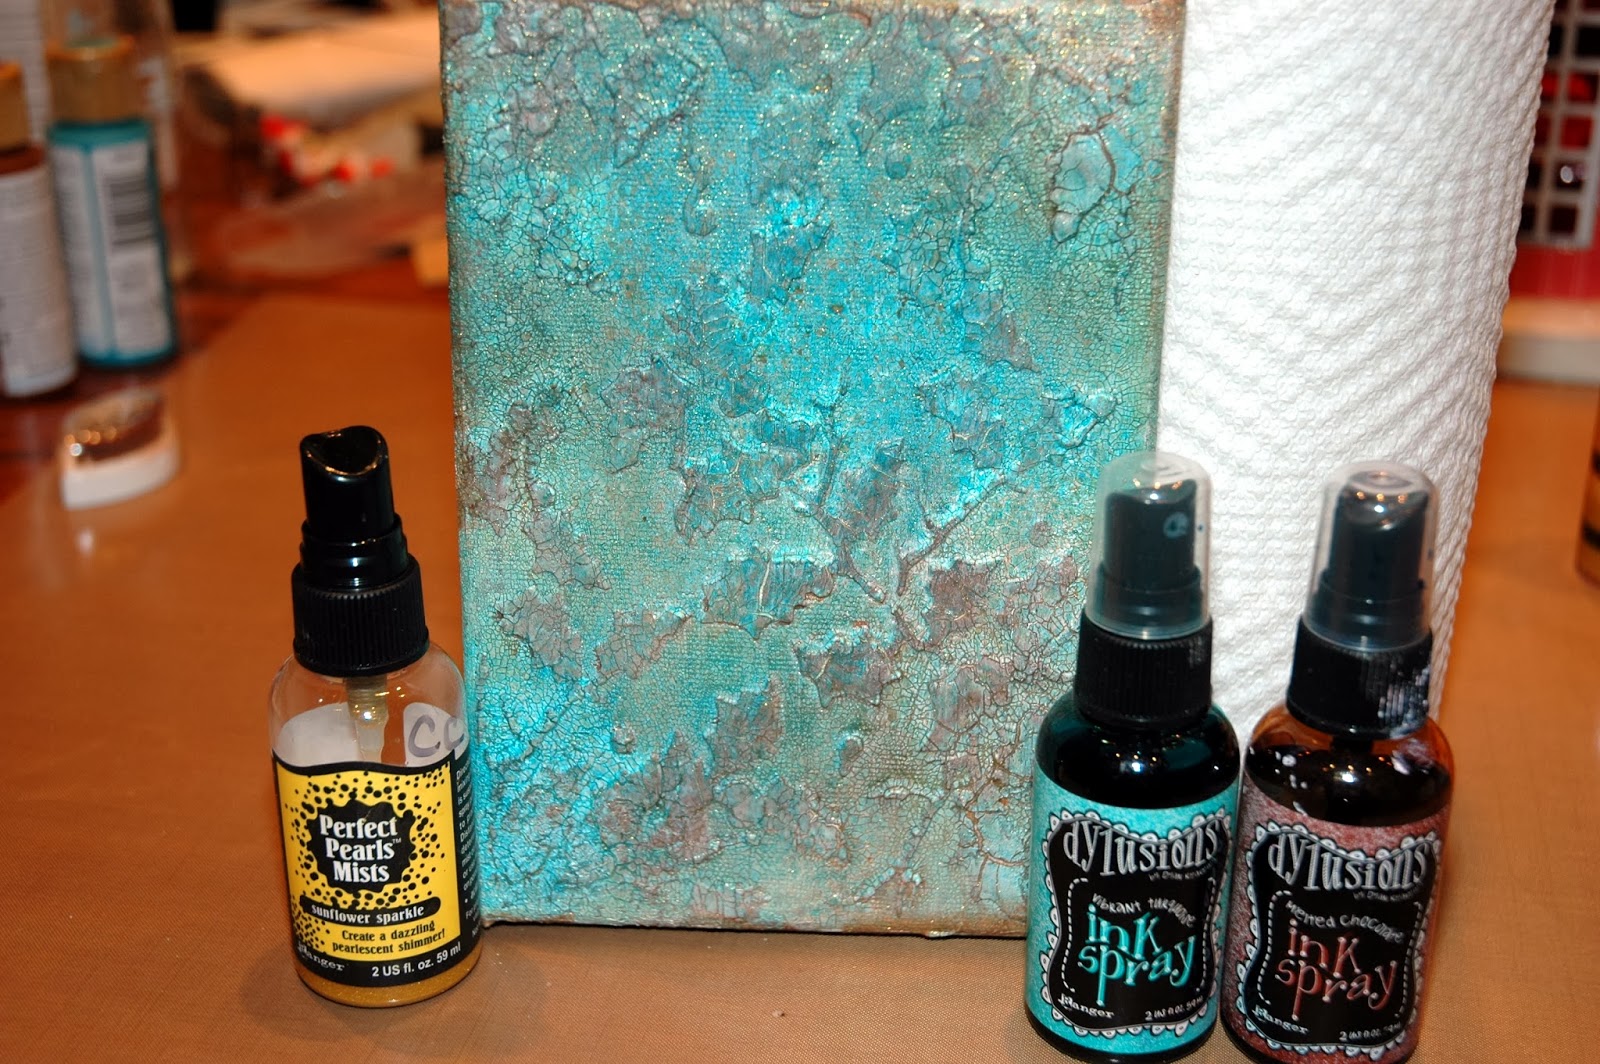
6. Spray the textured and crackled canvas first with Dylusions Vibrant Turquoise and dab off excess with a paper towel. Repeat until the desired hue is achieved. Then spray Dylusions Melted Chocolate in random areas of the canvas. Dab off the excess spray. Repeat if needed. Heat set the ink spray. Lightly spritz the canvas with Sunflower Sparkle Perfect Pearls Mist. This will also reactivate the Ink Sprays so heat set quickly.

7. Using your most sensitive finger (mine is my middle finger) lightly add Florentine Treasure Gold Guilding Wax over primarily the raised areas of the holly and branches. But also gently add some wax in the low areas of the canvas for added interest. Also rub some wax on the sides of the canvas. Then add some Aquamarine Treasure Gold Guilding Wax on the canvas to bring out more of a goldish teal in certain areas of the canvas and sides.
** Note - if you do not have Treasure Gold Guilding Wax, Rub 'N Buff or even a very light coating of an acrylic paint close to the wax colors would work. Add some distressing at the edges using Walnut Stain Distress Ink and a touch of Black Soot.

In this photo, you can see the detail of the raised embossed holly and branches, the brown showing through those gorgeous crackled areas and the lovely highlights that the guilding wax provides.

9. Spray a piece of kraft paper with some Melted Chocolate to create a darker background for the sheet music tag to be mounted to. Here you can see the ink spray on the left side of the kraft paper behind the tag. Dab the excess ink spray and heat set. (I distressed the sheet music tag with Tea Dye Distress Ink and distressed the edges with a Chestnut Roan Cats Eye Ink Pad. When I had finished dabbing up the excess Melted Chocolate spray, I lightly wiped the paper towel over the tag and added a bit more brown to it).

10. Die cut a piece of Tim Holtz' Vintage Lace from a piece of plain kraft cardstock. Rub over it with a Gold Paint Dabber. Heat set. Then lightly go over the painted cardstock with Mercury Glass Stickles. In the photo above, you can see the progression of this step: the far right is plain cardstock, the center has been rubbed with a Gold Paint Dabber and the left side has been stickled with Mercury Glass Stickles. Let dry.

11. Place the darkened kraft paper behind the sheet music tag and cut out around it, leaving a visible edge. Using a Tonic Paper Distresser (or scissor edge) distress the edges of all of the two tags and the blue birds post card. Distress the edges of the kraft tag the heaviest, a little lighter on the sheet music tag and very little on the blue bird post card. Then distress ink all of the edges using Gathered Twigs or Walnut Stain Distress Ink (or a Chestnut Roan Cats Eye Ink Pad) followed with random areas of Black Soot. Gently crumple up all of the tags to give a more aged appearance. (That was not done on the kraft tag or the blue birds postcard in this picture). Add a piece of vintage lace to the bottom of the sheet music tag using 1/4" Scor Tape. Leave enough lace to turn under on the sides of the tag when they are all put together.

12. Find a piece of paper to create a rosette. In this case, it is a scrap from Graphic 45's Communique papers. I sprayed over it with a mix of Gold Paint Dabber and water in a mister bottle and heat set. Then I die cut the largest rosette from Tim Holtz' Mini Paper Rosettes. Use Glossy
Accents to glue the two ends together and let dry. When dry, form the
rosette and hot glue the center to the backside of the rosette to hold
it in place. Lightly ink the edges of the rosette with a Chestnut Roan
Cats Eye Ink Pad and then lightly add Mercury Glass Stickles to the
raised folds and the outside edges of the rosette. Hot glue a little
gold tinsel trim to the center and then add the top of the middle of the
rosette. Dab a Gold Paint Dabber over the Tim Holtz Mini Numerals "25" and heat set. Hot glue in place in the center of the rosette and lightly add Mercury Glass Stickles. Let dry.
**Note - after
cutting the rosette, add a strip of Scotch Tape on the BACKSIDE of the
rosette strip. This will give it more strength on the perforated lines
so that the strip won't rip apart when you accordion fold the rosette.

13. Put the tag together by adding 1/4" Scor Tape to the underside of the sheet music tag and pressing it in place on top of the crumpled kraft tag. Be sure NOT to flatten the tags. Just add the Scor Tape around the outside under edges of the tag. Add the distressed vintage blue bird post card to the top of the tag in the same manner. Turn the Vintage Lace die cut and the vintage lace to the underside of the kraft tag and hold in place with a little piece of 1/4" Scor Tape. Lightly add Mercury Glass Stickles highlights to the postcard and finish off by adding Xmas Red Stickles to the three holly berries to the left. Let dry. When dry, punch a hole in the center and add a vintage tinsel tie at the top. I also added a vintage bell and a small gold jingle bell that I then added Mercury Glass Stickles to. (You can see those in the final project).
**Note - this would make a lovely gift tag for a Christmas present. You could also make a pocket tag out of this by only adding Scor Tape to the bottom and sides of the tag or the blue bird post card when stacking it onto the kraft paper tag.

14. Add a Tim Holtz Seasonal Word Stick to the bottom of the canvas using twine. Before I added the word stick, I used a very small amount of Florentine and Aquamarine Treasure Gold to colorize the antiqued silver word stick into more of a gold-ish with a hint of teal metal piece.
15. Then arrange all of the remaining pieces on the canvas and glue in place.

First I hot glued the tag in place by gluing the bottom left and top right sections to the canvas; leaving the tag to be raised and crumpled. Aren't those two blue birds just beautiful? They are my "surrogate two turtle doves".

Next I hot glued the rosette in place in the upper right corner.

Finally, I thought my canvas needed something to the right of the tag, so I die cut these branches from Tim Holtz' Bird Branch die cut onto kraft paper, painted them with a Gold Paint Dabber and then added Mercury Glass Stickles. (The branches to the left are complete). Let dry.

When dry, I cut them into small branches and hot glued them underneath the tag. I think they add an "airy-ness" to the canvas and delicately fill up that space.
So, did you enjoy my Christmas canvas and tutorial today? I hope that maybe you learned something about my creative thought process or perhaps a technique or two. I'm wishing you a happy, healthy week and some time to PLAY! Remember...it's SOUL FOOD!
Be sure to check out Heather's My Artistic Adventures Challenge and see if you'd like to play long. Her Etsy store has all sorts of beautiful collage sheets.
I am also linking this piece up to Craft Hoarder's Anonymous Challenge Blog where they are having their first challenge ... Your Style. There is some awful pretty stuff over there!
Until next time ....
It's beautiful Candy. OMG I just love your stuff, total eye "Candy". I REALLY need this paste. All the colours you used make it pop. It amazes me the amount of layering you manage to fit on here. WOW!!! Thanks for your Sizzix vote! I need all the votes I can get. Keep voting.... I have until Feb 26th. Fingers crossed I win
ReplyDeleteThat is fantastic Candy. I love the idea of using the birds with all those embellishments and then, that canvas! LOVE the way you've worked the crackle paste with the stencilling and sprays. Gorgeous. Jenny x
ReplyDeleteStunning backdrop Candy, the crackle is so eye catching as is your colour with the touches of wax, just beautiful and a wonderful backdrop for stunning image, I love texture and layers in a design so this is a hot favourite for me . Love the word band and touch of twine too. Tracy x
ReplyDeleteI love the feeling I get from your canvas and I do adore those birds. Thanks for sharing all of the steps you took and so many great tips! Hugs, Sandi
ReplyDeleteWhat a gorgeous holiday piece! With more snow last night, we're looking like December should, so your art is just perfect for today!
ReplyDeleteBeautiful work as always Candy, Annette x
ReplyDeletehttp://nettysartadventures.blogspot.co.uk/
Stunning make Candy as always. So beautifully gilded and sparkling - perfect for Christmas. Love that crackled texture paste. Hope your house plans are progressing well and that the snow has departed. Nicola x
ReplyDeletebeautiful!! I loved seeing your creative process! Thanks for sharing it with us at Craft Hoarders!
ReplyDeleteI'm in love with this. The colors you used are beautiful and I love seeing your creative process. Thanks for playing with us at Craft Hoarders Anon :)
ReplyDeleteHello, Candy! I'm in love with all the wonderful texture and crackle effects in this gorgeous canvas. The vintage images are just beautiful, and the tag is stunning. Wonderful step out...no one does it better than you! I'm so glad you joined in on the very first challenge at Craft Hoarders Anonymous. Hope you'll be able to play along again soon!
ReplyDeleteI am beside myself with how great this is! I love your tutorial and...well, I love everything! Just wonderful. Thanks for joining us at Craft Hoarders Anonymous for our very first challenge!
ReplyDeleteVery beautiful projects! I'm so excited that you joined us for the launch of Craft Hoarders Anonymous Challenge Blog. I hope you come to play often! Ginny from Polly's Paper : )
ReplyDeleteOh, Candy! One thing I always love about your art is your incredible attention to detail! This gorgeous piece is "filled to the gills" with lovely little touches! I loved your advice about using tape on the sides of the canvas and I would've never thought to heat up the ink sprays to get it to dry and set faster. Genius alert! Genius alert! You are always inspiring and I love your pieces, but I also always appreciate the help!! You give me great ideas constantly! Thanks for another stunning creation!
ReplyDeleteWow Candy, this is gorgeous! Love the tutorial...all the techniques! Beautiful coloring ... great with Heather's digi!
ReplyDeleteSwoon! This is gorgeous and loved seeing the tutorial! Amazing amount of work, but a lovely result! Love the colors and the textures and the glitter and that tiny twist of tinsel! Thanks for sharing your style with us at Craft Hoarders Anonymous!
ReplyDeletewow! what a very pretty canvas! just stunning!
ReplyDeleteYou always use such wonderful techniques! Love the tutorial and cool details. Your project has great texture.This is a fabulous Christmas project :)
ReplyDeleteThis is an amazing canvas! I love the detailed tutorial. It makes me want to pull out my mixed media supplies and play. Thanks for joining us at Craft Hoarders Anonymous!
ReplyDeleteCAndy what a wonderful piece! You know I love Christmas and your vintage style is totally amazing! Wonderful tutorial as always! hugs BArbarayaya
ReplyDeleteJust adore your beautiful canvas Candy, the textured background with the layers of paint and crackle is superb and those gorgeous images are the icing on the cake. This is just stunning xx
ReplyDeleteLove the techniques you have used and the end result is stunning.
ReplyDeleteI love the Victorian feel of this piece. That gesso background you created is a piece of art on it's own too. Blessings, my friend!
ReplyDeleteAbsolutely stunning Candy. What a beautiful piece. Karen.x
ReplyDeleteCandy, this is gorgeous! I love all the layering. Thanks for sharing the process and all the techniques. I just love this piece, and am learning so much from you.
ReplyDeleteI love this, Candy! It is just fabulous. Adore all the layers. Thanks for sharing the process and the techniques. I always learn so much from you. Love your work!
ReplyDeleteCandy, your canvas is gorgeous!!!!!!!!!!!! I love all the details!!! You are so good with lots of details!!!!!!!!!! It was wonderful getting all the step outs!!!
ReplyDeleteOh my goodness, Candy, your background is utterly amazing! Absolutely gorgeous - thank you so much for the step by step showing us how you created it. I love the colors - I'm always afraid of the intensity of the Dylusions sprays but you have made me want to give them a go. Love the way you created the double tag too. This is just such a lovely wall hanging!
ReplyDeleteHugs,
Linda
Oh my! This is gorgeous, the birds are just beautiful and I love how you layered up the tags underneath them. As for the canvas - it really does have the wow factor - I am not brave enough to use my Dylusions but you may just have given me the confidence to try! I also love how you used Wendy's crackle paste, I have been experimenting, it is wonderful stuff. Thank you so much for sharing how you did this gorgeous canvas and yes, I did enjoy it - very much! Hugs, Anne xx
ReplyDeleteLove this project, great tutorial :)
ReplyDeleteLove this project, great tutorial :)
ReplyDeleteWowzer! Stunning textures in that background (think I'm gonna have to get me some of that crackle paste... can you ever have too many crackle pastes?!?), and the gilding with the turquoise is so beautiful. Charming vintage image and, as always, terrific photos of your amazing creative processes - thank you!
ReplyDeleteAlison xx
This is stunning, I love how you took me step by step through how you created it it too! The background with the paste is amazing, I really want to try that! Love all the beautiful details and love to see all the Stickles, always my fave! Heathers work is always gorgeous, she is so fortunate to have you showcasing her work too, what a winning combination you 2 make! ~Diane
ReplyDeleteOh wow Candy, what a stunning project yet again! That turquoise background is so beautiful, with the golden highlights, it almost seems like a shame to cover it up....stunning! The bird image is lovely too though and you certainly have finished the whole hanging is such a creative way, - just beautiful!!
ReplyDeleteOMG Candy, this is so stunning! I love everything about it!
ReplyDeleteCandy this is so gorgeous and so very you! the vintage goodness shines through and the background is just gorgeous x hugs trace x
ReplyDeleteCandy, lots of wows from me! Your background is jaw-dropping gorgeous and I love all the frosty details! Love this canvas!
ReplyDeleteThis is such a stellar canvas .... sumptuous and gorgeous!!!
ReplyDeleteCongrats on being chosen as a favorite 1n the very first Craft Hoarders Anonymous Challenge! Your project was absolutely beautiful! Hope you will join in again soon!
ReplyDeleteThis is such a gorgeous piece, Candy. All the details are amazing. I love all those beautiful glitters. :)
ReplyDeleteOh my word! This is old world vintage Christmas in all it's glory! Breathtaking indeed!
ReplyDeleteWell Miss Candy this is FAN-TAS-TIC, soooooo gorgeous, love those birds, the background with all that crackle is awesome, I saw this in Craft Hoarder's Anonymous Challenge I recognized your work right away, the tutorial was fabulous, I sat back, had my tea and thoroughly enjoyed my self, thanks for sharing all your fabulous creativity, hope you have a wonderful weekend... ((( BIG HUGS)))...
ReplyDeleteThis is wonderful, my friend!
ReplyDeleteLOVE all the gold and bling on this festive and nostalgic make! Utterly adorable (as usual ;)
Hugs,
Claudia x
Hi Candy, your creations are always amazing.This Vintage Christmas Canvas looks fantastic! I love the way you blend it all together! Thanks for the detailed tutorial!
ReplyDeleteHugs,
Gaby
Hi Candy, your creations are always amazing. This Vintage Christmas Canvas looks fantastic! I love the way you blend it all together! Thanks for sharing the detailed process.
ReplyDeleteHugs,
Gaby
Candy, saw this on Gloria's blog (Craft Hoarders) and it is gorgeous as usual.
ReplyDeleteThis is just gorgeous Candy! Every detail - and love the images you used!
ReplyDeleteWow. Thank you for your generosity in sharing your technique. Fran :)
ReplyDeleteWow. Thank you for your generosity in sharing your technique. Fran :)
ReplyDeleteGorgeous Candy! I love the shimmery textured detail and the sweet image!
ReplyDelete