Hello friends!
Can you believe that we're already on to the 25th challenge in our journey through Tim Holtz' Compendium of Curiosities III book? It has been such fun for myself and the Curiosity Crew over at the Compendium of Curiosities III Challenge. I hope that you've learned some new techniques, some things about Tim's products and we've inspired you to try new things.
This challenge is more of a product challenge rather than a technique challenge. It's all about Tim's Frameworks ... those wonderful little 5 1/2" x 2 1/2" pieces of magic that can add so much texture and dimension to your art pieces. There are six in all: the Courtyard, Honeycomb, Chevron, Trellis, Lattice and the newly released Wave. So turn to page 64 in your books and check out Frameworks.

Here is my finished project, using the Chevron Frameworks along with Tim's new Correspondence Paper Stash and the matching stamps, Special Delivery Remnant Rubs, and Paper Twine. Unfortunately, I have not received the matching Tissue Tapes yet or I would have used them as well.

I began this project with a 6" x 6" stretched canvas. I covered the top with a square from Tim's Correspondence Paper Stash. I glued it in place using Ranger's Matte Medium. Then I added a variety of washi tape designs that I already had and thought would go well with a travel or "air mail" theme. I pretty much covered the sides of the canvas with the washi tape and added a few strips on the top for more interest.

I wanted to add some dimension to the top of my canvas; something that would lend a grunge feeling without being overpowering. So I decided to use Tim's Bricked Stencil and add some of that multi-talented artist, Wendy Vecchi's wonderful white Embossing Paste colored with a little Carnation Red Archival Reinker.

I simply laid the Bricked Stencil on top of the canvas and while holding it in place, I randomly scraped the colored Embossing Paste through the stencil.

Happy with my design, I brushed a coat of Matte Multi Medium over the entire surface of the canvas to seal it. Matte Multi Medium is an excellent adhesive and sealant. It goes on smoothly and dries to a clear, matte finish. You can let this air dry or gently heat set it.
(**Notice that I still am using my Claudine Hellmuth Matte Medium? It also lasts a long time!)

When the Matte Medium was dry, I wanted to pull everything together so I lightly brushed over the canvas first with Frayed Burlap Distress Paint mixed with a little water to dilute it a bit. Then I added some darker brown tones with Gathered Twigs. I wiped away any excess paint from the bricks and areas that I wanted lighter. Then I used a bit of blue acrylic paint on my finger and added some defining edges to the canvas.

Here is a photograph of one side of the canvas. The washi tape really does create a very cool design and when brushed over with the paint, it really blends together beautifully.
Now that the canvas was ready, it was time to make my embellishments.

I die cut three of Tim Holtz' new Butterfly Duo die cuts and embossing folders in one set. LOVE THEM!! I die cut my butterflies onto watercolor paper. Then I randomly rubbed some glue onto the paper surface using my finger so that when I began adding my Distress Ink colors, the glue would cause the ink to really stick in a grungy way onto the areas where the rubbed glue was on the paper.

I began with a light coat of Scattered Straw over the entire butterfly. Then I started in the center and started working my way out. I added Peacock Feathers over a light coat of Faded Jeans. The next area was a done with Wild Honey. Next I added Worn Lipstick then a light coat of Fired Brick on top of the outer edges of the wings.
Next I brushed on a light coat of Crackle Glaze over the butterflies and let it dry. When dry, I rubbed some Raw Umber Antiquing Cream over all of the butterflies and wiped away the excess, leaving this very antiqued matte finish butterfly. The body was added on what would be the top butterfly using Wendy Vecchi's Black Embossing Paste and I let it dry.

Then I glued the two lower bodies together. I added the wire antenna to the underside of the top butterfly with the embossing paste body and then using Glossy Accents, I glued the top butterfly onto the other two already joined together. In the inset picture, you can see the dimension and the fluttering effect that the three butterflies glued together gives.

Since the theme of this piece was about correspondence and mail art, I created a little envelope out of scrap cardstock. You can see the dimensions of the finished envelope front here. I added 1/4" tabs that were scored and clipped and the top envelope flap was freehanded and cut out. I then slipped the back of the envelope in place, added 1/8" Scor Tape to the tabs and put them together. Next I added some stamping and some washi tape to the envelope and finally distressed it using Gathered Twigs and Black Soot Distress Ink to give it that vintage, aged look. You will see the final envelope in the next photo.
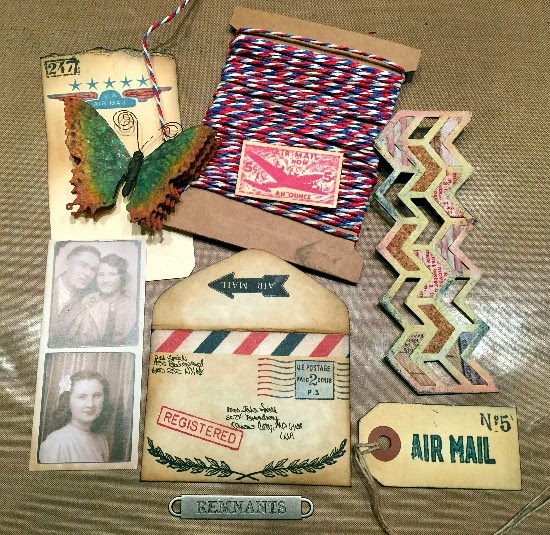
Here are all of the elements that I decided to add to the canvas: the butterfly, the envelope, a card from Tim's new Photo Booth photos (minus the top photo because I wanted the couple's picture to stick out of my envelope), various stamped images on the envelope, cardstock scraps and mini tag, Tim's New air mail colored Paper String, a Word Band and the Chevron die cut.
The Chevron was cut out of plain Grungeboard and then painted with Antique Linen Distress Paint as a basecoat. I then added Scattered Straw, Faded Jeans and Fired Brick Distress Inks to give it color and texture. Some of the insets are left blank. Others are filled with pieces are fabric covered remnants, cork and distressed corrugated paper.

Here is a closeup of the finished envelope, stuffed with all sorts of stamped memorabilia and the Photo Booth photograph. Those add such a vintage feeling! The red and blue stamping on the envelope and memorabilia inside was done with Wendy Vecchi's Cornflower Blue and Vermillion Archival Inks. I also added a Remnant Rub from Tim's new Special Delivery set to the envelope. It's the little airplane and "AIR LETTER" writing underneath. So cute!
Behind the envelope, you can see the dimensional bricks. I think they add a lot to this canvas and give it a bit of a grunge feeling.

Finally the Word Band was added across the bottom and held in place with Tim's new Paper String. I love how the paper string seems to also pull everything together.

So that's it!!!
Now it's YOUR turn to use one of Tim's Frameworks die cuts and incorporate it into anything you can imagine to create. Then enter our Compendium of Curiosities III challenge.

The wonderful people at Inspiration Emporium are hosting this challenge and awarding a $50.00 gift certificate to one of our lucky winners. We thank them so much for their generous support!
And ... as always, Tim and Mario have been so kind to donate a mountain of Tim Holtz products to be given away to our second winner of EACH challenge! Thank you Tim and Mario for YOUR continued support as well!
Have fun with this challenge! I can't wait to see all of the lovely art that will be posting!
Behind the envelope, you can see the dimensional bricks. I think they add a lot to this canvas and give it a bit of a grunge feeling.
Finally the Word Band was added across the bottom and held in place with Tim's new Paper String. I love how the paper string seems to also pull everything together.
Now it's YOUR turn to use one of Tim's Frameworks die cuts and incorporate it into anything you can imagine to create. Then enter our Compendium of Curiosities III challenge.
The wonderful people at Inspiration Emporium are hosting this challenge and awarding a $50.00 gift certificate to one of our lucky winners. We thank them so much for their generous support!
And ... as always, Tim and Mario have been so kind to donate a mountain of Tim Holtz products to be given away to our second winner of EACH challenge! Thank you Tim and Mario for YOUR continued support as well!
Have fun with this challenge! I can't wait to see all of the lovely art that will be posting!
Very nice Candy always love your work.
ReplyDeleteI am sorry Candy but I am speechless and drooling!! This amazing canvas just wants to be touched and scrutinised for all the details. You are so inspiring, thank you for sharing all the steps to creating the piece. I love it! Jan x
ReplyDeleteWOW Candy what a feast for the creative mind!!! I love all your detail and your duo butterflies are great. I just made some the other day on watercolour paper but I didn't use glue. That's a must try. Well I have the stamp set, I have the envelope die but how did I miss the coordinating paper. Adding that to my list! Thanks for sharing such a great piece. I'm inspired to find that paper.
ReplyDeleteBrilliant canvas Candy, - beautifully put together and such great use of all those wonderful Tim products! Love the way the butterflies turned out, that tip of the glue stick is definitely one to remember, thanks for that!
ReplyDeleteWow, wow, and wow again... this canvas is fabulous; I love every detail ( I just got that paper stash in the mail last week... it's so fun ) of what you did with the stash... just amazing and the embossing paste stencil work WHEW !!! And the cheron framework ... OMG !!!
ReplyDeleteWell, you had me at the canvas base, it looks amazing! And then the butterfly - that really has the wow factor (love the antiquing) and then you add the fabulous chevron (my favourite f/w) - wow - your whole piece just has the wow factor, I love it! Your pieces are always so inspiring - must remember the glue tip... Hugs, Anne xx
ReplyDeleteYour canvas alone is amazing even before you add all the wonderful elements you created. WOW! Love this!
ReplyDeleteWOWIE, Candy! AMAZING! There are so many fun little details to look at on this fabulous canvas! I do love how those rustic bricks peek out from behind the layers of vintage postal goodness and I really like how you've filled some of the open spaces of the chevron die, too! So much to look at and touch and that butterfly--It looks like it's going to fly away any moment! Such an amazing creation for CC3 #25, Candy! Inspiration Galore!! Happy Saturday to you!! XOXO-Shari
ReplyDeleteWhat a wonderful canvas! Love your butterflies and what a great tip to use the gluestick for some extra 'grunge', thanks so much for sharing your techniques!
ReplyDeleteCandy, your project for this Challenge is my very FAVE!!! Oh, that R, W, & B new Correspondence stash paper Tim has out..LOVELOVELOVE!!!! Gonna have 2 find me some of that for this summer!!! 1- Your explanation of the sealing medium helps me out & it just might be what I need to do for the 'Westward Ho! Folio'. I keep thinking how it can get traveling & trying to keep things nice too. 2- Your use of the details in the canvas items...right down to putting the 'air-mail' pin upside down as it would normally be on a real envelope when opened up showing the frontside. I am an OCD/must-always-detail person, so it kinda goes against me when there's a deadline. But I usually get a very satisfied feeling when it's DONE. Bet you did here, too!! ;)
ReplyDeleteGreat use of Framework dies on this beautiful canvas! Thank you for sharing your step by step!
ReplyDeleteSo cool Candy...every bit! So much to see and love! I love the butterflies and all the paper!
ReplyDeleteWow this is soooo cool! Love the butterfly, so much dimension. Brilliant!
ReplyDeleteOh Candy, I do LOVE this canvas. I am so jealous as I'm still here waiting for my Correspondence papers to show up. I love everything about this. And hey, I recognize that British flag tissue tape!
ReplyDeleteI really like your "postal" collage! That envelope looks so "Authentic", I could have sworn it from him to her (or vice versa!)
ReplyDeleteHmm... gotta get that "Wave" die and the "Brick" stnecil...
What a stunning canvas Candy. Wonderful and inspirational details as always. TFS and best wishes
ReplyDeleteAnnie x
Wow a truly unique and lovely piece to treasure. So much eye candy!
ReplyDeleteLove your canvas Candy! So wonderful and so many wonderful things to see! Love the vintage color and mail you created. Thanks so much!~kim
ReplyDeleteNow that I am back from WI, I am catching up! Candy, again I am blown away by your artistic talents! Love this canvas! The brickwork is fabulous and I also use the matte medium to seal and keep all those inks, etc., in place! Love this!!!
ReplyDeleteSo gorgeous, love this creation! Hai fatto un grande lavoro!
ReplyDeleteWow - just wow! I wanted to remember to mention the brick stenciling, which is SO cool - couldn't wait to see how that was done, and also the glue on the butterflies to give them texture. What an awesome idea! The Curiosity Crew always inspires; I'm so glad to have visited today!
ReplyDeleteCandy !!! lt is so long time that I don't leave my comment on your blog
ReplyDeleteand I apologize for that! But I follow you forever and I hope to find time to do everything that I want! As always you are a great inspiration
for me, this work is simply beautiful, as everything you do! Especially I love your red stencil, it's absolutely a great touch of color and it's fantastic as background! Happy Easter BArbarayaya
Oooh lah lah! Love this beautiful collaged piece, Candy. Wishing you a very Happy Easter!
ReplyDeleteI love the vintage feel of this piece and the way you incorporated the framework. Beautiful!
ReplyDeleteIn my opinion the best pieces of art are the ones where I can feel the artist as I examine. And this has you all over it. What a great piece.
ReplyDeleteLove all the pics too. Helps break it down into steps that makes me think I could attempt something like this. Thank you for sharing!
Fabulous tutorial as always, Candy! I love every detail you put into your projects! It was nice to see a project done with Tim's new Correspondence Stash - love it with the Chevron Frameworks die! I also love the handmade envelope to go with your beautiful collage! Perfection!
ReplyDeleteWow Again! I love all the components you used on this canvas...and love the idea about using glue first on the butterfly...great idea. And the Chevron was the perfect choice for this topic. Love it!
ReplyDeleteWonderful layers on this lovely canvas Candy - love the brick stenciling and travel theme!
ReplyDeleteAw, Candy. I wish I could embellish like you!! You create such texture and so many layers to each one of your embellishments. This is stunning, as always. Fabulous use of frameworks, of course. Love this, love YOU!!
ReplyDeleteAnother beautiful piece...so much detail it's just astounding...love love love the butter fly
ReplyDeleteThis canvas is amazing!! love the way you colored the bricks. Beautiful
ReplyDeleteOh, Candy. When can you come over and play. You just make the most amazing things! I so love all the details on here.
ReplyDeleteCandy, Your canvas is gorgeous. So many details and the colors just blend beautifully. Great use of the Framework die...it fits with this piece so well.
ReplyDeleteGreat background (I could never have covered it!), wonderful collaged elements and stunning butterflies. Thanks for sharing Candy. Nikki xx
ReplyDeleteI love your style so much, Candy! Your canvas is absolutely awesome! Love the background and a stunning butterfly! Brilliant!
ReplyDeleteBranka xxx
You sure packed a lot onto this card and I love it all! Very clever to tint the embossing paste. I'd like to try that .
ReplyDeleteLove the canvas. I have never tried the glue with distress technique,thanks. I'm off to die cut some butterflies.
ReplyDeleteAmazing as always candy!
ReplyDeleteAwesome, Candy!
ReplyDeleteLOVE that red brick wall and all the fab layers you have created! A fab and very inspiring creation (as usual)!
Hugs,
Claudia x
Oh, Candy, who needs a prize when we've already won by getting to see this amazing canvas?! This makes me want to swoon! The texture, the vintage-ness and the butterflies all are jaw droppers! Beautiful!
ReplyDeleteYou are so clever Candy! I am amazed by your talent and creativity. LOVE this!!!
ReplyDeleteI love this Candy!! =)
ReplyDeleteI love your work. It's amazing.
ReplyDeleteI became a follower. Would love to see
more of your work.