Boo!
Welcome to my blog and DecoArt's "Haunted" Mixed Media Challenge for the International Design Team. What fun we all had in creating our spooky surprises for you!

Welcome to my blog and DecoArt's "Haunted" Mixed Media Challenge for the International Design Team. What fun we all had in creating our spooky surprises for you!

I created a spooky Halloween home decor piece.

I transformed a plain pretty much square paper mache house into a "Haunted Mansion" complete with an added belfry with a widow's walk, rounded turret and spooky front porch.
I transformed a plain pretty much square paper mache house into a "Haunted Mansion" complete with an added belfry with a widow's walk, rounded turret and spooky front porch.
I will share with you the step by step in creating this fun mixed media piece. All of the products used to transform this haunted mansion are DecoArt Media Line products. I LOVE THEM! The Media Fluid Acrylic Paints stay true to color and flow so beautifully on a brush. The Media Modeling Pastes, Texture Sand Paste and Gesso has a wonderful consistency to spread with a palette knife, work through a stencil or brush on. Crafting is easy and you can depend on the quality of DecoArt's Media Line products.
There are lots of pictures and instructional steps for this piece but don't let that scare you! It was tons of fun to make and the more you get into it, the more your imagination takes over! I seriously was creating as I went with this house!
Let's get started .... I will show the steps for the "Haunted Mansion" in the order that I used to create each piece.
Here is your list of supplies:
· DecoArt Media Fluid Acrylics Carbon Black
· DecoArt Media Fluid Acrylics Burnt Umber
· DecoArt Media Fluid Acrylics Dark Grey Value 3
· DecoArt Media Fluid Acrylics Medium Grey Value 6
· DecoArt Media Fluid Acrylics Yellow Ochre
· DecoArt Media Fluid Acrylics Blue Green Light
· DecoArt Media Fluid Acrylics Titan Buff
· DecoArt Media Fluid Acrylics Burnt Sienna
· DecoArt Media Fluid Acrylics Transparent Yellow Iron Oxide
· DecoArt Media Fluid Acrylics Quinacridone Gold
· DecoArt Media Fluid Acrylics Metallic Gold
· DecoArt Media Fluid Acrylics Metallic Silver
· DecoArt Media Matte Medium
· DecoArt Media Black Modeling Paste
· DecoArt Media White Modeling Paste
· DecoArt Media White Gesso
· DecoArt Media Texture Sand Paste
· Glossy Accents
· Sizzix Texture Fade Notebook
· Tim Holtz Stencil Crocodile
· Tim Holtz Stencil Bricked
· Sizzix Bigz Sized Arches
· Sizzix Alterations On The Edge Graveyard
· Sizzix Alterations On The Edge Plaque and Postage
· Sizzix Alterations Iron Gate
· Fiskars Bat Punch
· Paint brushes for painting and dry brushing
· Grungeboard
· Cardstock
· ¼” Scor Tape (double sided adhesive tape)
· Skeletons, skeleton heads, skeleton hands
· Gauzy material (for ghosts)
· Wire
· Spider webs
· Glue Guns and slue sticks
· Mossy grass
· White Signo Uniball permanent pen
· Black Stabilo Pencil
· Wire jewelry head pins (for skeleton skull charms)
· Tracing Paper (for window panes)
· Exacto knife
· Light bulb and cord (to light house)
The Belfry Construction

Create a belfry from chipboard. These belfry walls measured 4 1/2"x 2 1/4" for the back wall, 4"x 2 1/4" for the front wall and a 1/4" miter on either bottom side, 4 7/8" on the long side and 3 5/8" on the short side of the wall x 2 1/8" width. Measure 1/4" from the top of the wall, center the medium Sized Arches arch and die cut it into the wall. Create 8 "structure strips" from a 1" (width) piece of cardstock, scored 1/2" (in the middle) and add a 1/4" piece of Scor Tape to each side of the structure strip. Cut the strips to fit the length of each portion of the walls. (The color of the chipboard and structure strips does not matter. All will be covered up).

Press the structure strips in place on the inside of the walls to join the walls together.

Paint the interior of the belfry with DecoArt Media Fluid Acrylics Carbon Black.

Place the remaining structure strips on the outside walls. Adhere one side of the fourth structure strip to one end. Once the belfry is put together, you will join the ends with the structure strip to hold in place. Place the die cut centers of the arches in place so that you can add "bricks or stone" to the exterior in the next step.

Working on the two exterior ends first, lay Tim Holtz' bricked stencil on top of the chipboard wall. Use a palette knife and scrape DecoArt Media Black Modeling Paste across the stencil, creating a brick or stone embossed exterior. Gently heat set or let air dry and then repeat for the interior walls. Immediately wash the palette knife and stencil after use. Once the walls are dry, you will see areas that need to be painted black to cover all of the chipboard. Simply brush over these areas with DecoArt Media Fluid Acrylics Carbon Black.

Add screens to the arches using rusty mesh and 1/4" Scor Tape. The screens can be cut before or after you add them to the arched windows. Cut the screens and then fold the ends of the cut mesh to the outside, creating an opening. (If the mesh screen needs reinforcing, a little bit of hot glue will also hold the screen in place).

Add accent "stones" around the arches with DecoArt Media White Gesso and a small brush. Heat set and lightly dry brush a light coat of DecoArt Media Fluid Acrylics Medium Grey Value 6 on top of the White Gesso.

Create "stone" caps to go underneath the arched windows by cutting small pieces of chipboard the width of the windows and the desired thickness. The shelf pieces are 1 1/8" long and 1/2" wide. Underneath the shelves are 1 1/8"x 1/4". Paint all of the shelves on both sides and the under pieces on one side with DecoArt Media Texture Sand Paste. When dry, add a very light coat of DecoArt Media Fluid Acrylics Medium Grey Value 6 to the "stone" pieces.

Glue all of the "stone" pieces in place using Glossy Accents. Glue the shelf pieces on first and then attach the underneath pieces. Hold each piece in place for a few seconds while gluing to be sure that they are secure.

Dry brush DecoArt Medium Grey Value 6 over all of the exterior "stone" wall. Use a fairly stiff brush and take small strokes going in all directions when dry brushing. Go over areas to create different depths of color from the dry brushing.

Add even more variation and depth of color to the "stone" walls by dry brushing with DecoArt Media Fluid Acrylics Yellow Ochre followed by Quinacridone Gold. Lightly go back over some areas with the Medium Grey if needed to thoroughly blend the dry brushed colors.
Adding the Widow's Walk To The Top Of The Belfry

Die Cut two of Tim Holtz' Iron Gate die cut out of heavyweight cardstock. Glue them together using DecoArt Media Matte Medium first as a glue to glue them together and then a sealer to seal both sides of the fence. Gently heat set or air dry.

Once dry, brush on a layer of DecoArt Media Fluid Acrylics Metallic Silver followed by a light random coat of DecoArt Media Fluid Acrylics Metallic Gold. Heat set.

To further age and weather the fence, randomly add DecoArt's Fluid Acrylics Burnt Umber then Burnt Sienna to darken and "rust" the fence. Finally add touches of a mixture of DecoArt Fluid Acrylics Titan Buff and Blue Green Light to create a patina metal effect. Gently heat set.

Looking from the inside of the belfry walls, add 1/4" strip of Scor Tape along the top edge of the wall and centering the gate of the fence on the center front wall, adhere the iron fence to the top of the belfry wall. Then paint over the rough edges of the fence with DecoArt Media Fluid Acrylics Carbon Black so that it matches the rest of the interior walls.

Here is a view of the exterior belfry walls with the widow's walk in place. Leave the two edges of the extra fence hanging over the edge of the walls. When the wall is joined together in a box, part of the fence can be overlapped and the rest cut off to join it together as well. And now for the spooky residents of the belfry ...

Create skull charms out of some wire and some store bought little skulls. These are approximately 3/4" long. (I purchased them at Michaels on a Halloween necklace and cut the necklace apart to use the skulls and bones separately). Roll up one end of the wire up so that it will "catch" inside of the bottom hole that is drilled up through the skull. Add a little Glossy Accents to the rolled up section of wire and run the wire up through the skull. The Glossy Accents will adhere the skull to the rolled up end of the wire. Center the skull in the arched window and in the hole cut in the rusty wire mesh. Hot glue the top of the wire in place on the inside of the wall. Do this to all four windows.

Here are the same skulls peering out of the torn mesh windows. See all of the detail that is picked up by the DecoArt Media Fluid Acrylics that have been dry brushed over the DecoArt Media Modeling Paste? I LOVE this technique! It looks like real stone!
Finally, what is a belfry without BATS???

Create the bats and the illusion of them flying around the belfry with wire and a Fiskars Bat Punch. Two bats and one piece of wire create a flying bat. Be sure to cut the wire long enough to allow the bats to fly high and low around the belfry. Roll up one end of the wire a little bit so that when the wire is hot glued in place, it will adhere better to the interior walls of the belfry. You will see the flying bats in later photographs.
The belfry can simply sit on the rooftop of the house so that it can easily be removed for storage or you can permanently glue it into place. I chose not to permanently glue mine to the roof.
Transforming The Simple Paper Mache House Into The Haunted Mansion
The "Tin Roof"

Using heavyweight cardstock, dry emboss the "tin roof" using Tim Holtz' Sizzix Notebook Texture Faces Embossing Folder. Emboss several pieces of cardstock, cut to pretty much fit the width and length of the paper mache roof. Then brush a mixture of DecoArt Media Fluid Acrylics Medium Grey Value 6 and Metallic Silver (about 60% Medium Grey and 40% Metallic Silver) and a bit of water over the entire surface of the embossed cardstock. Heat set.

To create the illusion of a weathered tin roof, mix DecoArt Media Fluid Acrylics with water to create almost a wash, but not quite that watery. Then using a baby wipe, wipe the paint mixture onto the "tin roof". Add more if desired or wipe away excess. Heat set. Then paint the top of the house using DecoArt Media Fluid Acrylics Carbon Black. Make sure that you cover the chimney and the peaks of the roof as those will not be covered with the "tin roof" material. Also paint the peaked walls in the front and sides of the top portion of the house. (Those will later be dry brushed).

Cut the "tin roof" pieces and glue them in place on the roof by attaching them with rows of 1/4" Scor Tape that has been added directly onto the sloped roof. In some cases, if might be easier to create a pattern out of copy paper and then transfer that to the tin roof to cut it out to fit the roof. Completely cover the roof.

Once the roof is covered with the "tin roof" exterior, add even more weathering and aging effects first with DecoArt Media Fluid Acrylics Quinacridone Gold to give a rusty appearance. Then add a mixture of Titan Buff and Blue Green Light for a patina metal effect. Apply all of these paints with an almost dry brush.

Now you can sit the belfry on top of the "tin roof" to see how absolutely amazing they both look together ... thanks to DecoArt's Media Line. What a crazy illusion ... stone and tin roof out of paper!!!
The House Exterior Walls
The house walls are done almost exactly like the walls on the belfry.

Cover each wall with DecoArt media Black Modeling Paste using a palette knife and Tim's Bricked Stencil. You will have to work in sections and either gently heat set or allow the Modeling Paste to dry before covering part of it with the stencil again to work the next section. Be sure to wash the stencil and palette knife right after using.

Paint the areas where the paper mache is showing through with DecoArt Media Fluid Acrylics Carbon Black. Heat set.

To create the "stone" exterior, first dry brush all over the walls with DecoArt Media Fluid Acrylics Medium Grey Value 6. Use a fairly stiff brush and work in small strokes. Change up the direction of your brushing and go over areas where you want to add more color and depth.

To add a more weathered and aged appearance to the "stone" walls, dry brush first with DecoArt Media Fluid Acrylics Yellow Oxide then Quinacridone Gold and finally a bit more Medium Grey Value 6.

Find the center back of the house and using one of the DecoArt Media Fluid Acrylics bottles, draw a circle and cut out the circle with an Exacto Knife. This is the hole where a light bulb will be added at the very end.

Add "windows" to the interior of the large house (and later the turret) by using Tracing Paper. Cut it a bit larger than the length and width of the windows. Add Glossy Accents around the perimeter of the windows, in between the windows and on the interior panes of the windows. Press the Tracing Paper into place. This paper will allow the light to softly shine through the windows without seeing the actual starkness of the light bulb.
I did not get a picture of this but at this point, you will add the front porch overhang to the front of the house. Remove the roof portion of the house and set it to the side. Cut a piece of plain chipboard to fit the width of the house and determine how much of an overhang you want. In this case, the overhang is 5"x 3". Paint the underside of the overhang black. Add a structure strip cut to the long width of the overhang. Leave the other half of the structure strip alone at this point. Apply 1/4" Scor Tape to the top side of the overhang and add the "tin roof" material just as you did on the roof top to completely cover the overhang (hiding half of the structure strip.) Add the aging effects of the DecoArt Media Fluid Acrylics paint, as was done on the "tin roof". Now lay the overhang against the top of the house and secure it in place with the other half of the structure strip pressed over the top and just inside the top of the house opening. Secure with another piece of tape or Glossy Accents.
Now you will still be able to open the roof of the house if you choose to do so.
Now you will still be able to open the roof of the house if you choose to do so.
Creating The Rounded Turret And The Fireplace

Create a fireplace out of chipboard and structure strips for the side of the house. This fireplace flue was created to go between the upper sets of windows on the side of the house.

Using the Bricked Stencil, a Palette Knife and DecoArt Media White Modeling Paste, stencil the "stone" appearance directly onto the fireplace. Gently heat set and add your own stones to the sides of the fireplace using a paint brush. Heat set or let air dry. Set aside.

Using a tube from a cardboard paper towel roll, cut the height that you want for the turret and cut up the center of the paper towel roll. Measure and create an outside "stone" wall for the turret using Heavyweight Cardstock, the Bricked Stencil, a palette knife and DecoArt Media White Modeling Paste. Gently heat set or air dry.

Using a mixture of DecoArt Media Texture Sand Paste and Media Fluid Acrylics Titan Buff, brush over all of the "stone" wall paper and the "stones" on the fireplace. Gently heat set or let air dry. These walls are done in light colors to contrast with the grey walls of the Haunted Mansion.

Create weathered "stone" walls for the turret and fireplace by lightly almost dry brushing first with DecoArt Media Fluid Acrylics Transparent Yellow Iron Oxide then Medium Grey Value 6 and finally touches of Dark Grey Value 3. Be careful not to brush to hard because you want to leave the sandy texture of the wall in tact.

Create three windows in the center of the turret. These windows are approximately 1" tall and 3/4" wide. Apply 1/4" Scor Tape to the front side of the turret paper towel roll and glue the stone wall into place over it.

Using a plain piece of Grungeboard, cut a top for the turret using Tim Holtz' On The Edge Plaque and Postage die cut. As done on the accent stones for the belfry, paint DecoArt Texture Sand Paste over the front side of the die cut. Add a light coat of DecoArt Media Fluid Acrylics Medium Grey Value 6 paint over the Texture Sand Paste. (Also seen in this picture are die cut Grungeboard grave stones that are being painted with the Texture Sand Paste).

Once dry, lightly brush first DecoArt Media Fluid Acrylics Medium Grey Value 6 then Titan Buff then Dark Grey Value 3 to simulate old "stone" headstones. When dry, use a fine point black or dark brown permanent marker and create writings on the headstones. (These headstones were cut from Plain Grungeboard using Tim Holtz' Graveyard On The Edge die cut. I cut two and sometimes three graves and glue them on top of each other to create the illusion of depth. They are glued together with Glossy Accents). I later separated them into three sections by cutting them apart and gluing them around the house.

.
As done on the belfry tower, brush small accent stones around the windows using DecoArt Media Fluid Acrylics Titan Buff. Heat set. Then using a Black Stabilo pencil, add accent marks around the stones. Lightly spray the turret walls with a sealer. Add the "windows" using Tracing Paper and as done on the house.

Paint vines on the turret and fireplace walls using a thin paint brush and DecoArt Media Fluid Acrylics Burnt Umber.

Add structure strips to either long end of the turret. These will be used to glue the turret in place on the right front corner of the house. The sets of windows shown in this picture will be hidden inside of the turret. The left side of the turret will attach at the outside edge of the front right windows. The right side of the turret will attach just to the right of these windows. Add a bead of hot glue down the side of the 1/4" Scor Tape on the structure strip, press the turret wall into place and hold until it is secure.
Cobblestone Front Porch

Create a front porch floor out of a piece of chipboard and cut to match the overhang on the front porch tin roof. Use Tim Holtz' Crocodile Stencil, a palette knife, DecoArt Media Black Modeling Paste and create the cobblestone floor. Gently heat set or let air dry. Once dry, dry brush with DecoArt Media Fluid Acrylics Titan Buff and then Yellow Oxide to create a worn look. Apply a structure strip on the underside of the front porch floor and attach to the house front at the base.
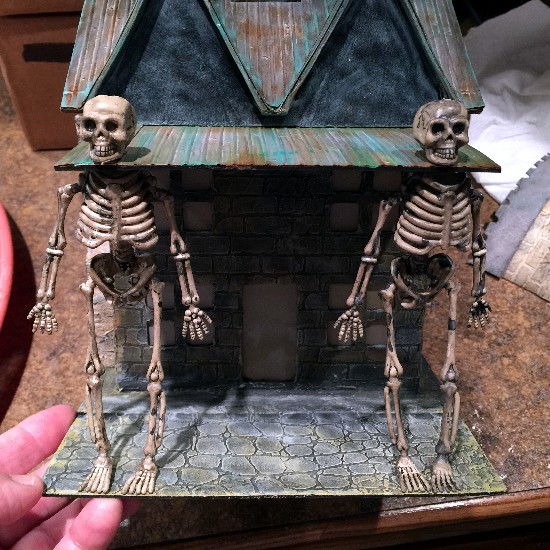
Cut the heads off of two purchased plastic skeletons from a Halloween skeleton garland. Hot glue the feet and press into place until a good seal is made. Then hot glue the tops of the necks and lay the "tin roof" overhang down on top of the necks. Press until a good seal is made. Hot glue the skulls on top of the "tin roof" where the neck, lining them up with the necks. Hold in place until secure.

Hot glue the "stone" fireplace in place on the center of the side of the house. (The vines were painted on while painting vines on the turret). Hot glue the mossy grass on the two sides of the house and then hot glue the gravestones in place on either side of the fireplace.

Hot glue the remaining gravestones on the right side of the turret.

Cut little scraps of chipboard into the size of small "boards" that will be made to hang across the doorway and some windows of the house. To create a faux wood look, paint with a coat of DecoArt Media Fluid Acrylics Burnt Umber. Then almost dry brush some random Titan Buff followed by an almost dry brush of Burnt Sienna. Finally, add a bit more Burnt Umber particularly around the edges of the "board". Then using a permanent white marker, write warnings on the "boards". Hot glue the boards in place.

Create little ghosts for the house by cutting a small piece of gauze. Create a "head" out of some pillow stuffing. Wrap the gauze around it and tie off with a piece of thread. Add a small amount of hot glue to the end of a wire and run the wire up into the head of the ghost. Cut off some lower arm portions of plastic skeleton arms and hot glue to the wire. Add a dot of hot glue under the hands to close the gauze. Draw eyes using a black permament marker and hot glue the ghosts on to the roof of the house.

The Haunted Mansion with Bats in the Belfry

Closeup of the belfry and skeleton guests.

The fireplace side with graveyard and ghostly residents.

The turret side with graveyard.

The front porch.
Install the light bulb in the back hole that has been created in the house, plug it in and enjoy your lighted Haunted Mansion this Halloween! All thanks to DecoArt's Media line products and a little creative imagination!
Create little ghosts for the house by cutting a small piece of gauze. Create a "head" out of some pillow stuffing. Wrap the gauze around it and tie off with a piece of thread. Add a small amount of hot glue to the end of a wire and run the wire up into the head of the ghost. Cut off some lower arm portions of plastic skeleton arms and hot glue to the wire. Add a dot of hot glue under the hands to close the gauze. Draw eyes using a black permament marker and hot glue the ghosts on to the roof of the house.

The Haunted Mansion with Bats in the Belfry
Closeup of the belfry and skeleton guests.
The fireplace side with graveyard and ghostly residents.
The turret side with graveyard.
The front porch.
Install the light bulb in the back hole that has been created in the house, plug it in and enjoy your lighted Haunted Mansion this Halloween! All thanks to DecoArt's Media line products and a little creative imagination!
Utterly outstanding Candy! So much inspiration in one post from bat belfries to a widows walk and the gorgeous little ghosts - your creativity certainly is contagious - I hope!!! LOVE IT❤️ xx
ReplyDeleteIt's absolutely gorgeous...I would love one for my grade three classroom. I especially LOVE the ghost!
ReplyDeleteI absolutely love this haunted house! The addition of the porch, turret, and belfry tower really adds to the project. The grave stones in the back and boarded up door are my favorite parts. The brick and stone textures are incredible. Well done!
ReplyDeleteCandy, you already know how much I love and admire your work and you have made some stunners in the past, but I think this has shot to the top of my 'favourites' list!! I just love the spookiness of it, those ghosts are an absolute delight. You have made the stonework look so realistic it just makes me want to reach out and touch.... Your haunted house is magnificent!! I have gleaned some great tips from your (always) wonderful detailed steps. I LOVE THIS!!!
ReplyDeleteThank you for your lovely comment on my Apothecary Cabinet, you are always so encouraging! Big hugs, Anne xx
Wow this is amazing Candy, what brilliant ideas you have and such a creative mind. Thanks for sharing such a detailed tutorial. Pinned!
ReplyDeletehugs Brenda xx
Wow, absolutely stunning and gorgeous, many thanks for detailed explanations, it's really a fantastic inspiration Candy!!!
ReplyDeleteOMGOSH!!!
ReplyDeleteCandy this is utterly amazing- no that doesn't quite cover it! I truly am speechless!! Your imagination and creativity are boundless! I keep looking and looking and wondering- How long did this take?! And i can't believe you were able to remember to take photos along the way!!
My favorite part(well,one of my fav parts) are the skellies heads through the porch roof!! hhaahaa Cracked me up!
Gorgeous palette throughout- highlighting all of your details and showcasing DecoArts paints!
Outstanding Candy!! xo
Jackie-MAS member
Brilliant step by steps Candy. I adore the stone pieces and the tin roof and laced area, perfect. The ghosts are so adorable and the added belfry is amazing. I love how you lainted on eerie branches too. Those skellies standing at the front and peering through the belfry are fabulous . Love the graveyard too. A very detailed well thought out piece , worth all the time and effort. Fantastic. Tracy x
ReplyDeleteThis is absolutely stunning Candy, wow!!! I just had to stop and have a look twice, I just love all the fabulous details, what a spooky masterpiece!
ReplyDeleteHuGs Kim
Well, not just a "little creative imagination", Candy....giggle.
ReplyDeleteThis is way beyond words and I love love love every detail and texture you have created! Brilliant techniques for creating all the different "materials" (bricks, tin roof,...) and the fact that it is lit too makes it gobsmackingly brilliant! Wow!
Hugs,
Claudia x
Jaw just hit the ground! Candy, your Haunted House home decor project is so full of so many spooky and fun details! Love all the skeletons, skulls and those little gauze ghosts. The entire house is totally magic! Hugs!
ReplyDeleteOh girl, I'm astounded. This haunted masterpiece is right up my alley. You are one clever girl with all the techniques and textures and additions to this basic house form. I think my favorite part, though, are those two skeleton pillars holding up the tin roof. That just cracked me up! Genius!!
ReplyDeleteOH MY GOODNESS ... this is totally amazing... the details OMG just AWESOME, love the textures, that burlap, the ghost, the floor, fireplace, added "dwelling" ... WOW !!!
ReplyDeleteYou never cease to amaze me, Candy! This piece is absolutely brilliant! I LOVE how your mind works. Boy do you ever use those DecoArt Paints well!
ReplyDeleteWow Weee! Candy this is brilliant, love it all. Happy scary crafting, Angela x
ReplyDeleteHoly cow, this is fabulous! Love all the great details and additions to the house. I want one!!!!
ReplyDeleteYou must have had an absolute blast creating this Halloween residence! Wow!
ReplyDeleteI love how all of the stone work turned out. It looks so realistic!
ReplyDeleteWhat a fantastic alteration Candy and a wonderful step by step.....As always I love it xx Amazing details xx
ReplyDeleteTFS Annie xx
Brilliant and a masterpiece!
ReplyDeleteWow. This looks soo cool. I love the way that you took something that looked so borring and turned it into something that looks this cool. Good work.
ReplyDeleteAwesome sauce!!! Love every little detail!!! You are amazing!!!
ReplyDeleteWowsers!!!! You've outdone yourself yet again Candy - this really is SUPERB!!! LOVE all the wonderful detailing and elements. What a labour of love. Brilliant make and no need for that 'keep out' sign - I wouldnt dare step inside!! Nicola x
ReplyDeleteOh, my Goodness! I think I may have hurt myself when I fell out of my chair! Candy, you crafty girl, you! I thought I would come back and have a closer look at your house when I had a few minutes to rub together, but I've been sitting here scrolling up and down for a good 1/2 hour now, and I've barely scratched the surface. Too many awesome details to comment on everyone, but I have to say how durn impressed I am with your building skills! That turret and belfry are amazing in structure and also in aesthetics! What I wouldn't give to have all those DecoArt supplies, but then I couldn't come close to using them to the extreme that you have!
ReplyDeleteYour brick walls, tin roof and front porch floor are so realistic --oh, I've got to get those paints! The sand paste on your headstones just give them the feel and look of the real deal! And your vines are just so well done. Candy, this is going straight into my Pinterest Favorites of all times! (I know those grandkids are going to love this!)
Thank you for your really sweet comment on my blog, but I hang my head humbly in your presence! Your creativity is mind boggling!
PS Exceptionally clever to use the rusted screening in the belfry!
ReplyDeleteMagnificent, Candy... utterly outstanding! The details are incredible, from the fabulous rusted screens to the verdigris balustrade to the vines growing up the building - an absolutely incredible piece of Halloween inspiration. Hats off to you!
ReplyDeleteAlison xx
Candy, I fear I would not be brave enough to ring the door bell of this haunted mansion!!!!
ReplyDeleteLove the texture you achieved and all the incredible details, bringing this house to life!
Wishes
Lynne
This is so spooky cool! What a fabulous detailed spooky house! LOVE it!
ReplyDeleteOh my gosh Candy, that is amazing! What a fabulous and spooky creation, the use of the skeletons to support the porch roof is inspired! A wonderful and detailed tutorial as well, thanks so much for sharing your techniques and inspiring us all. Deb xo
ReplyDeleteOh goodness! This amazing haunted mansion has so many fabulous details that I can't begin to mention them all! It's frightfully fabulous and ghoulish and spooky! I love all the texture you created and all the hidden treasures you tucked in. I could look for hours and find something new every time. But, as the wife of a man who is a roofing contractor, can I just say that your standing seam metal roof knocked my socks off? I was so impressed, I had to call Dale over to look at it. And when I told him it was paper, he said, "Wow...that looks completely real. That girl has skills!" So there you have it, my dear....high praise indeed! I feel all the love and care you poured into this and thank you for sharing it with us!
ReplyDeleteTotally and utterly amazing!!! I'm speechless....
ReplyDeleteincredible and so intricate! thanks for the directions!!
ReplyDeleteOh holy haunted night! This is utterly fantastic and amazeballs! So many gorgeous details to take in and read about. I have re-read this post about 5 times and am mesmerized by everything. What a genius and fantabulous transformation of a plain old house. Your use of layering the DecoArt paints and pastes is inspiring and achieve such wonderous results. Thank you for sharing your process and those little ghosts are genius! Wowzers and wowzers! ~Niki
ReplyDelete