I know it's not even Summer yet and I'm already thinking about Halloween!
I guess since I'm already seeing all of the big box craft stores putting out FALL things already, I think I better get with it!
I bet Christmas items will start appearing in the stores next week! It's ridiculous! But THAT is another blog post subject! (smile)
Anyway.... I wanted to share with you a Halloween frame I just completed. Here it is ...

I absolutely LOVE Andy Skinner's Ministry of Mixology Frames from Tando Creative. The are dimensional, large enough to really have some fun playing and experimenting on the surface and they are sturdy!
A few months back, I got together with some of my friends and we experimented with some different techniques in creating the background for the frame. I didn't take pictures of this process so I can't share the step by step with you. But, I basically I created a lot of texture with old pieces of netting, my fingers and a palette knife and a little Crackle Paste particularly around the edges of the frame. Then I covered the background; working in small sections with modeling paste and stamped into it using various Halloween themed rubber stamps.
After all of that dried, I added my DecoArt Media Fluid Acrylic colors, sticking with the traditional black and orange. The center piece of the frame was done with a little Crackle Paint followed by shades of black and grey. The bolts were all done by using one of several rust techniques and DecoArt Media Fluid Acrylics. I have to admit when the frame was finished, I was less than enamored with it. So, I put it down and figured I'd come back to it sometime and try to rescue it. That day came this week! And now I LOVE the end results!
I rubbed some DecoArt Copper Kettle Metallic Lustre in strategic locations all over the frame and WHAT A DIFFERENCE IT MADE!! It gave "life" to a rather dull background and really popped the stamped images.
So now I can pick up on the step by step as I finished out the frame...

I began by taking some Halloween pieces purchased from a box store: a small plastic-ish skeleton, some little skulls and some creepy hands. I gave them a basecoat of DecoArt Media Fluid Acrylics Titan Buff (a great soft beige color).

Next I made a "dirty wash" of Quinacridone Gold and Paynes Grey mixed with water-about equal parts of each of the paints and more water. I painted that all over the pieces and wiped away the excess. Repeat this step until you have achieved the appearance of a natural bone color.
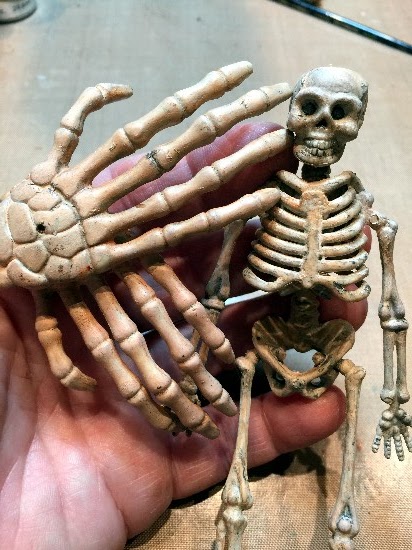
Here is the end result. LOVE IT!

Next I created an eye socket using Paper Clay that would fit into the center section of my frame. That has to dry thoroughly; like overnight.

Next I chained up my skeleton with some old chain I had in my craft room and some jump rings.

I began working on the interior recessed portion of the frame. The sides were covered in DecoArt Media White Gesso using my finger. I love using my fingers much more than a palette knife because you can really get a "feel" for the project.

After that was finished, I scraped DecoArt Media Crackle Paste through a stencil made to look like bricks. Let it dry thoroughly. You do not heat set any of DecoArt's Crackle products. Let them crackle naturally with a normal drying time.

Next I painted over the gesso with Titan Buff then Yellow Oxide followed by Transparent Yellow Iron Oxide and finally a bit of Quinacridone Gold to give a bit more of a rich "brickish" appearance.

To weather the bricks and give them a lot of contrast, I added a layer of DecoArt Media Antiquing Cream in Raw Umber. Simply brush it on and let it dry. Then using a damp cloth, wipe away all of the cream you want to remove. You can also brush on the antiquing cream and immediately wipe away the excess; giving a lighter antiqued look.

Next, using my finger, I added some depth to the brick interior of the frame. I added a little DecoArt Media Fluid Acrylics Burnt Umber primarily around the outside edges of the center; feathering it in toward the center.

I temporarily assembled the frame to placement of my eye socket.

Then I painted the socket using various colors of DecoArt Media Fluid Acrylics to give it a more natural look. I found an eyeball on the internet, sized it to fit my eye socket, printed it, cut it out and mounted it on a piece of chipboard. I brushed over the eyeball with DecoArt Media Gloss Varnish.

I took an old craft brush and sprayed the bristles with DecoArt Media Black Shimmering Spray. After it dried, I cut bristles out of the brush and stuck them in place using a 1/8" piece of double sided adhesive tape that was added to the eye socket. After that dried, I painted over the tape to blend the eyelashes into the eye socket.

Then I simply assembled the center section of the frame in place using double sided adhesive tape and hot glued the hands, skulls and skeleton in place. I also added a bit more chain running across the frame; from the boney hands to the chained skeleton. I love dangling chains and things that move freely on a piece.
I hope you are all taking some time out to play and experiment with your artsy adventures! It's so fun and freeing.
I hope you are all taking some time out to play and experiment with your artsy adventures! It's so fun and freeing.
I love the way it turned out, the crackle bricks are my favorite!
ReplyDeleteThank you Lolo!!!! The eye is a little creepy but it's a Halloween piece! I really like the way the frame ended up, too!!
DeleteFantastic background that crackle is the best in my opinion. Adore that eye and those lashes, oh my . Fantastic textural piece with fantastic detail Candy. Tracy x
ReplyDeleteThank you, Tracy!! You are so sweet.
DeleteAMAZINGLY AWESOME - you have me AWE STRUCK Candy. That eyeball/socket is sooooo CREEPY that it's totally MARVELOUS. Whew!!! And yes - the bricks - the frame - it's BEYOND INCREDIBLE. WOW WOW WOW. Xj.
ReplyDeleteJoi, you are always so sweet with your comments. Thank you so much.
DeleteI have a slight addiction to these frames and also to Halloween (lol) so I have just been sitting here slowly going through the step by steps with you.... the crackled brickwork looks fabulous and I love the colours you achieved on the outside frame. The stamping in the paste creates so much texture and dimension too and the eye - it might be a bit creepy ... but it is fabulous!! I love that you added those eyelashes to it too - so clever!! Anne xx
ReplyDeleteHi Anne. You are so sweet! Thank you for your always positive comments.
DeleteThis is breathtaking - wow!!!
ReplyDeleteHappy weekend Candy!
oxo Susi
Thank you, Susi!!! I appreciate that so much.
DeleteWhat an incredible piece of dark art and a perfect decoration for Halloween. I love all the elements you added to it but that eye just has to be the best bit, socketed and with lashes, it's sooooo spooky. Brilliant piece Candy xxx
ReplyDeleteWhat an amazing project Candy! I just love the crackled brickwork and that EYE !!! - incredible!
ReplyDeleteThank you for leaving such lovely comments on my blog yesterday - it was so lovely of you and I really appreciate it. Have a lovely weekend x
I love this kind of spooky art. Halloween is my favorite holiday. I really like the brick work, the eye, the stamped faces, all the colors and textures, well, I should say, I really really like it ALL!!!! Great ART!!!
ReplyDeleteThank you so much Bonnie!!! :)
DeleteBrilliant Candy! Thank you for sharing such a magical creation. I love everything about this, especially the crackle bricks!
ReplyDeleteI wish you a gorgeous weekend!
Hugs,
Gaby
Hi Gaby! Thank you so much my sweet friend!! :)
DeleteThis is fabulous Candy!!!!!!!
ReplyDeleteI love each and every detail of this fun and stuninng creation. I'm also a lover of Halloween creations, we can do so much on this theme, and this can be so fun and beautiful at the end!
You show us perfectly how much!!!
So happy to have seen this in details today, before being too busy once again to look at your blog and read you! You put big smiles on my face, and I admire the art in it too. Sending hugs! Corinne
Oh Coco...I would imagine that your Halloween decorations are just the best! Your art is amazing! Thank you so much for taking the time to stop by and leave a nice comment.
Deletewow!!! This is so fabulous Candy x The background is amazing with lots of amazing textures and details but the eye OMG ....its awesome right down to the eye lashes !!! Very clever.
ReplyDeleteTotally awesome make and I just love it to bits !!!
Thanks for your recent comment on my blog too
Sending my best wishes to you and yours. Hope Cooper is still creating x
Hugs Annie xx
Hi Annie...my talented friend! Thank you so much for the nice comments. Cooper is still creating. He's quite the little artist with a vivid imagination. Thank you for thinking of him! :)
DeleteHalloween is so much fun and you have done an extraordinary job with this scary creation. I love it. I am saving your post to read over and over!!! Thanks for the tutorial!!!
ReplyDeleteSandy xx
EEEK! That eye looks so real it's creepy! heeheee
ReplyDeleteAmazing how you cn craft and design so well out of season-lol I love this piece- The skellie,the chainand hands, and your textures- oh my! And the stamping into the textures- brilliant Candy!!
You rocked the gruesome! heehee
Love ya,Jackie
One of the most in depth beginner’s review I have seen. Well done.
ReplyDeleteFantastic background that crackle is the best in my opinion,Thanks for sharing nice information with us.
ReplyDeletegoldenslot slot games
gclub casino
gclub
I love your painted finishes! I am a Big Fan of layering techniques but am unfamiliar with all of these products which you've used, so thank you for the introduction and for your demonstration. :)
ReplyDeleteHi Elizabeth! Thank you so much for your kind words and this comment! I love reading things from you. Always so positive and uplifting! I'm so glad you got to see this and are maybe a little more familiar with these products and what they can do now. DecoArt things are really easy to work with and you get great results. Thanks again for your wonderful comment!
Delete