Hello everyone and welcome to my blog and my art project I've made for the
Creative Carte Blanche "Triple Trouble Art Adventure" for March.
For this adventure, I challenged everyone to take three elements that have absolutely NOTHING to do with each other and unify them into an art piece. Those three items were: corrugated paper, lace and metal. Your creation could be whatever your imagination could conjure up. Check out the Creative Carte Blanche blog to see the lovely entries from my creative cohorts as well as our followers who participated. There is everything from beautiful tags to creative art dolls to a gorgeous princess slipper ; all so unique and beautifully done!
I am SO HAPPY that Spring has finally arrived and with it, the warmth of the sun, gentle breezes and the sweet songs of returning birds. I decided to create a new Spring home decor piece.
I incorporated all three elements with a store bought 5x7 frame to create this very vintage shabby chic styled piece.

Let me take you through the steps so that you could make one for yourself. I will provide you with a supply list of the products I used but you can use whatever brands you like. I just have found wonderful results with primarily DecoArt Media Line Products so I tend to use them more frequently.
Supplies needed for this project include:
- 5x7 photo frame (I bought this one at Hobby Lobby)
- A bag of various mosses (also found at Hobby Lobby)
- 5x7 canvas board
- DecoArt Media White Gesso
- Palette Knife
- DecoArt Media White Crackle Paste
- Tim Holtz Flourish Stencil
- Corrugated piece from a cardboard box
- Smaller corrugated piece of special cardstock (for the roof)
- DecoArt Media Fluid Acrylics Paints: Titanium White, Cobalt Teal Hue, Diarylide Yellow, Titan Buff, Metallic Gold, Quinacridone Gold, Paynes Grey, Burnt Umber
- DecoArt Media Antiquing Cream Raw Umber
- Paint Brush
- Paper Towel
- DecoArt Metallic Lustre Copper Kettle
- Distress Inks-Ground Espresso, Hickory Smoke, Gathered Twigs
- Miscellaneous Wire (to form nest)
- Tim Holtz Ideaology-Ornate Plate, Faucet Knob, Mini Plaquette, Wings, Game Spinners, Hitch Fastener top
- Small stick or pole for Game Spinners (weather vane)
- Small eggs
- Various Vintage Laces
- Hot Glue
- DecoArt Matte Medium
- Rusted metal mesh
- Small birds (purchased at Hobby Lobby)
- Metal Corners (purchased at Hobby Lobby)
- Various sticks and yard waste
- Computer generated 2 1/2x 2" sentiment, torn and distressed
- Baby wipes
- Glossy Accents
- A small bag of natural looking feathers to add as accents
- Spray sealer (optional)

Begin by scraping white gesso onto the 5x7 canvas board using a palette knife.

Lay the Flourish stencil in place and scrape crackle paste through the stencil. Do this on both sides of the canvas board but do not worry about the center. Immediately clean the stencil and the palette knife.

While the canvas board is air drying, cut a piece of smaller corrugated special cardstock paper into a 4x3 piece. Fold it in half, lengthwise and paint the surface with Titanium White. Let dry.

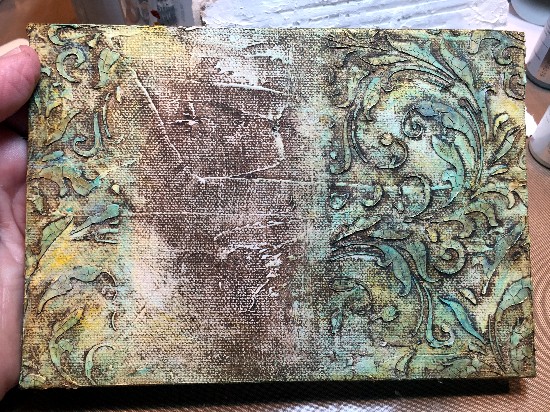
Here is what the canvas board will look like when the gesso and crackle paste have dried.

Combine Titanium White and Cobalt Teal Hue. Using a baby wipe, add the soft blue color to the surface of the canvas board.

Continue mixing colors. This time, Diarylide Yellow and Titan Buff. Using a baby wipe, apply this color randomly to the canvas board.

Apply a third color combination with a baby wipe. This time, Titan Buff and Cobalt Teal Hue.

To add a hint of shine, use a small makeup sponge and lightly tap the random raised areas of the flourishes with Metallic Gold.

Here is what the canvas board will look like at this point. You do not need to worry about the center section as this will be covered with the corrugated "tree bark".

To give the canvas board even more dimension and "age", brush Raw Umber Antiquing Cream over the entire board and let it dry. Once completely dry, use either a damp baby wipe or paper towel and wipe away the excess brown, leaving the antiquing cream in the crevasses and areas you want to be darker. The antiquing cream is water reactive so you might want to use a spray sealer over the canvas board at this point.

To pull out some of the color again, lightly touch the raised areas of the canvas board with a mixture of Titan Buff and Cobalt Teal Hue followed by Metallic Gold.
Here is what the canvas board will look like at this point. I truly LOVE the results I get with this antiquing cream. If I rub off too much; just brush or wipe on more, let it dry and then gently wipe away the excess.

Begin working on the elements that will be used to embellish the canvas board. Begin with the "tree bark". Use a larger piece of a corrugated cardboard box with the paper backing torn away. I first painted the corrugated paper with Titan Buff and then scraped Crackle Paste over the corrugated paper using a palette knife. Let it air dry thoroughly.

While the "tree bark" is drying, paint Quinacridone Gold over the smaller corrugated piece. (The name of the color "Quinacridone Gold" is a bit of misnomer because it really is more of a rusty orange-ish color when applied). When dry, rub Metallic Lustre Copper Kettle over the raised areas of the "roof" with your finger. Buff with a dry rag or paper towel.

When the "tree bark" is dry, add another light coat of Titan Buff, leaving the cracks visible. Let dry.

Use a paper towel and wipe Raw Umber Antiquing Cream over random crackled areas of the "tree bark". (In this instance, I am not brushing on the antiquing cream and letting it dry. I am simply wiping it on and leaving it to distress the crackles).

Further distress the "tree bark" with Distress Ink Ground Espresso and Hickory Smoke.

Highlight the edges of the "tree bark" with Paynes Grey, using your finger to randomly wipe the edges and a few areas on the "tree bark".

Using some rusty wire, fashion a "nest" out of the wire.

Hot glue Spanish Moss in the center of the wire nest and then add other various mosses to the nest to make it look realistic.

Once the "nest" is finished, add various mosses to the bottom of the "tree bark" with the hot glue.

Add a patina effect to the "metal roof" by mixing Titan Buff and Cobalt Teal Hue then using your finger, randomly swipe it onto the "roof". Let it dry.

Alter the Ideaology front door assemblage of the Ornate Plate and the Faucet Knob. Since the knob was distressed silver, I added Metallic Gold and Burnt Umber to alter the silver into an antique gold look. Then I added a combination of Titan Buff and Cobalt Teal Hue swiped on the pieces to give them a patina look.

These wings are also silver and I used the same technique as above to transform them into patina antique gold wings. I also did this to the silver game spinners that will be used for the "weather vane". They were then hot glued onto the outside edges of the patina "metal" roof to create an interesting front view of the roof line above the Ornate Plate front door frame.

I altered some little tan eggs into sweet little teal-ish eggs using a combination of Titan Buff and Cobalt Teal Hue and applying the paint with my finger. Let dry.
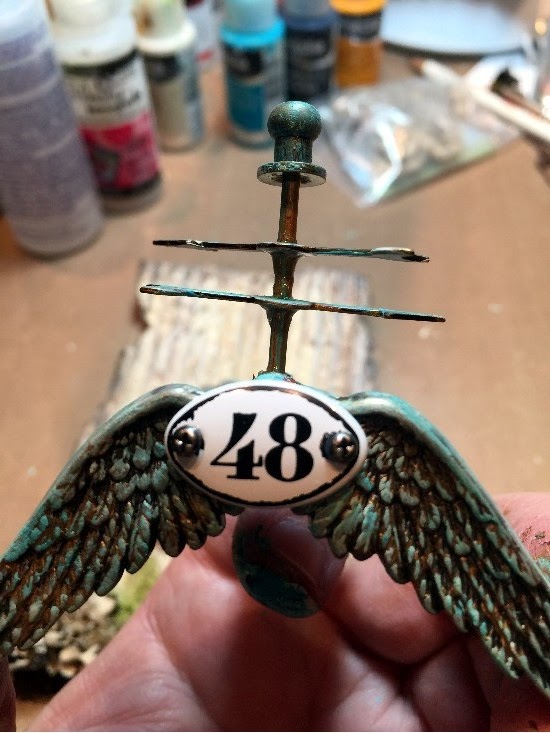
I created a "weather vane" using two Game Spinners, a Hitch Post top, a painted stick. The Game Spinners were added one at a time and held in place using Glossy Accents. I punched a hole in the center of the roof, inserted the stick and secured it with Glossy Accents. In this picture, you can clearly see the enhanced roof line with the patina wings. Finally, I added a Mini Plaquette simply by securing the mini brads with Glossy Accents on the back side and then hot gluing the plaquette to the center of the wings. The roof was then hot glued in place above the Ornate Plate front door frame.

Now it was time to put everything together. I added more lace to the background using DecoArt Matte Medium to first glue and then seal the lace to either side of the background. Matte Medium dries clear and is an excellent glue and sealer. Let air dry.

Here are all of the main elements that I will be adding to the background ... all assembled and ready to simply hot glue into place.

Since the background would be slipped behind the 5x7 frame, I could not add the "tree bark" and more dimensional elements until the background was ready. So after using Matte Medium on the two lace pieces on either side of the background, I added the rusty metal mesh layers on either side. Then I added the sweet lace piece on the right (all hot glued in place-because they would be covered with the "tree bark". Finally, I added a another piece of wire with some lace twisted onto it to sort of mimic a tree branch.

Next, slip the background into place, making sure that the pieces that are to be sticking out above the frame are doing so. Then secure the back of the frame.

I then hot glued the "tree bark" house in place on the frame and began hot gluing various little pieces of moss to the house to add even more dimension. I kept working, adding the nest to the lower right corner, more mosses onto the frame to incorporate even more into the actual scene.


I computer generated this lovely saying by Emily Dickinson so that it would fit perfectly onto my little vintage Spring scene. I tore the edges and distressed the paper using Distress Ink Gathered Twigs followed by Ground Espresso.

And here is it's final appearance as it sits nestled among the mesh, lace and natural elements on the frame.
Finally I hot glued three ornate metal corners in place on the frame to pull everything together. I did not glue a corner underneath the nest as it was already covering the lower right corner. (You can see those in the overall picture of the frame).

Here is a closeup of the little nest made from wire and with Spanish moss and other various touches of moss added. Little bits of lace give a more gentile feel to the nest as Momma bird patiently watches over her eggs.

I created a "weather vane" using two Game Spinners, a Hitch Post top, a painted stick. The Game Spinners were added one at a time and held in place using Glossy Accents. I punched a hole in the center of the roof, inserted the stick and secured it with Glossy Accents. In this picture, you can clearly see the enhanced roof line with the patina wings. Finally, I added a Mini Plaquette simply by securing the mini brads with Glossy Accents on the back side and then hot gluing the plaquette to the center of the wings. The roof was then hot glued in place above the Ornate Plate front door frame.
Now it was time to put everything together. I added more lace to the background using DecoArt Matte Medium to first glue and then seal the lace to either side of the background. Matte Medium dries clear and is an excellent glue and sealer. Let air dry.
Here are all of the main elements that I will be adding to the background ... all assembled and ready to simply hot glue into place.
Since the background would be slipped behind the 5x7 frame, I could not add the "tree bark" and more dimensional elements until the background was ready. So after using Matte Medium on the two lace pieces on either side of the background, I added the rusty metal mesh layers on either side. Then I added the sweet lace piece on the right (all hot glued in place-because they would be covered with the "tree bark". Finally, I added a another piece of wire with some lace twisted onto it to sort of mimic a tree branch.
Next, slip the background into place, making sure that the pieces that are to be sticking out above the frame are doing so. Then secure the back of the frame.
I then hot glued the "tree bark" house in place on the frame and began hot gluing various little pieces of moss to the house to add even more dimension. I kept working, adding the nest to the lower right corner, more mosses onto the frame to incorporate even more into the actual scene.
I found some twigs and an acorn tops in my yard and decided that those things might really be useful to complete my sweet little vintage Spring scene. I was right. I hot glued them to the frame as I was adding the final touches and I really like what they added.
And here is it's final appearance as it sits nestled among the mesh, lace and natural elements on the frame.
Finally I hot glued three ornate metal corners in place on the frame to pull everything together. I did not glue a corner underneath the nest as it was already covering the lower right corner. (You can see those in the overall picture of the frame).
Here is a closeup of the little nest made from wire and with Spanish moss and other various touches of moss added. Little bits of lace give a more gentile feel to the nest as Momma bird patiently watches over her eggs.
Here is a closeup of the welcoming front door with it's fancy patina perch and roof. Mosses, natural twigs and acorn tops and few feathers were added to give an airy and more natural quality to this piece. This photo also gives you a little idea of the dimension of this piece; how it reaches out from beyond the confines of the frame.

Here is a closeup of the little roof of the porch section of the house. It also gives you a better idea of the dimension and texture of this piece.

I wish that this picture could show you the depth and dimension of this piece but unfortunately it really does not do justice to how adorable this piece really is. I just LOVE it and it's sitting in my entry hall to welcome Spring and all of our guests.
Thanks so much for stopping by my blog to check out my Triple Trouble piece using corrugated paper, lace and metal. I hope that my creation and all of the wonderful art done for you by the other Creative Carte Blanche cohorts as well as all of our beautiful entries from our art friends have inspired you.
There are so many different interpretations of this adventure; all very different styles, color choices and themes. And I think everyone's personalities come through in their work...something I truly love.
So thanks so much for sharing your lovely art and a piece of yourself with all of us at Creative Carte Blanche!
Next month Annette Green will be sharing a new art adventure with you. I can't wait to see what her theme will be. No pressure, no certain products you have to use, no online stores you need to plug. Just total carte blance to create whatever your heart desires and share it with this special community of artists.
I hope you'll join us!
Here is a closeup of the little roof of the porch section of the house. It also gives you a better idea of the dimension and texture of this piece.
I wish that this picture could show you the depth and dimension of this piece but unfortunately it really does not do justice to how adorable this piece really is. I just LOVE it and it's sitting in my entry hall to welcome Spring and all of our guests.
Thanks so much for stopping by my blog to check out my Triple Trouble piece using corrugated paper, lace and metal. I hope that my creation and all of the wonderful art done for you by the other Creative Carte Blanche cohorts as well as all of our beautiful entries from our art friends have inspired you.
There are so many different interpretations of this adventure; all very different styles, color choices and themes. And I think everyone's personalities come through in their work...something I truly love.
So thanks so much for sharing your lovely art and a piece of yourself with all of us at Creative Carte Blanche!
Next month Annette Green will be sharing a new art adventure with you. I can't wait to see what her theme will be. No pressure, no certain products you have to use, no online stores you need to plug. Just total carte blance to create whatever your heart desires and share it with this special community of artists.
I hope you'll join us!
How is it possible that you come up with this stuff??? This is incredible and that weather vane should win an academy award or the Nobel Peace Prize or SOMETHING! Seriously, you know I'm a fan. But this might be my all time favorite. Thanks the joy. <3
ReplyDeleteLove the colours and composition of this work, need spell check for FEATHERS
ReplyDeleteI love how you "fashioned a nest " out of wire. Trust me if I fashioned anything out of wire it would never look like a nest, maybe a jumbled mess lol. I love the swirl texture in the backdrop and the colours are gorgeous that you blended over the texture. I adore that sentiment and your whole idea and design. Fantastic step by steps my friend. Beautifully executed piece of art, a real treat to view. Tracy x
ReplyDeleteI'm just speechless Candy. I have been sitting here staring at the white square for 10 minutes between going back to look at this INCREDIBLY OUTSTANDING CREATION. A winged roof, a weather vane, wire nests and well - hello - dear me - it just looks like a living, breathing BIRD WORLD in the spring. I'm just BEYOND ASTOUNDED. WOW WOW WOW..... speechless but in an breathtaking adoring way..... WOW. XXj.
ReplyDeleteWow, wow, wow, a totally stunning assembly! So many creative ideas, just wonderful from start to finish!
ReplyDeleteHands down this is one of my favourites of your amazing creations (and that's saying something as there are some stunners!) and as Cheryl says, it should get some sort of major award!!! INCREDIBLE level of detail, clever paint tricks and that nest, oh, be still my beating heart!!! Candy, you are amazing xx
ReplyDeleteCandy, I have to agree with everyone - this piece is my all-time favorite! I would love to jump into that creative brain of yours and take out some of those ideas! My mouth dropped to the floor when I saw this piece! Wow, wow, wow is right! Awesome!
ReplyDeleteOh please, please, please, I just want to move right on in!!! This is divine Candy! An absolute tonic and a joy to behold. Masterpiece of a creation and as Jenny says it's so hard to choose your very best works but golly this is right up there amongst my faves. Bravo! Nicola x
ReplyDeleteOooww, this is a corker!! It's just so gorgeous I can't stop looking at it. Love all the little extras like the acorn tops, moss etc. You have blown me away Candy X
ReplyDeleteOh my gosh... I love, love, love this!
ReplyDeleteHi Linda! I could not find a way to get ahold of you so hopefully you will see this. I wanted to go Hank you for your comment. It is very much appreciated.
DeleteI love every single thing about this project- the techniques, the patinas, the birds, the rust, all of it is amazing. Wow, just wow!
ReplyDeleteCandy this is just utterly delightful with so many wonderful details. Your use of the decoart products to produce stunning effects and your wonderfully creative imagination just blow me away, I want to sit here and take in every single step again and ponder over every gorgeous creative element to make sure I haven't missed something. This is stunning, absolutely stunning my friend. Xx
ReplyDeleteWonderful presentation of all materials. Thanks for the deets and photo's on how to get the look... appreciated
ReplyDeleteWow,stunning!!! what a fantastic project and such a wonderful nature inspiration, many thanks!!
ReplyDeleteWOW! Candy you did it again! Your work is so very inspirational. Thanks for sharing your amazing talents. Love this piece.
ReplyDeleteI you hear a thud, that is my jaw dropping on the desk... I want to be a little bird so that I can go and live in that divine little house! I love every single little detail but the weather vane has to be one of my favourite bits - how clever are you!!? You have created a piece of art, worthy of display in a gallery. Thank you SO much for the step by step, I love the detail, I just love it all! You are a fantastic artist Candy! Anne xx
ReplyDeleteDear Candy, what a fabulous project, overflowing with so many great creative ideas! Thanks for all the detailed photos on how to get the look. It's always gorgeous to see how your projects come to life! So many wonderful techniques and textures. I especially love the idea to use some rusty wire for the nest, but there are so many other lovely details. I'm absolutely delighted by your work of art. It's brilliant!
ReplyDeleteHugs,
Gaby
Completely fabulous...just exceptional!!!
ReplyDeleteThis is just amazing! So glad you shared all the inky details. Lovely project!
ReplyDeleteOhhh my goodness, Candy...wowwzersss YOU did it again, you completed a MASTERPIECE, love all the colored detaills you have added to the frame love it sweetie, I am blown away by your project, it is full of Spring and I love it loadsss....fabulous project my dear and sweet friend xxx Hugs Terry xxx
ReplyDeleteOMG OMG OMG ...OOOOOOOOWWWWEEEEEEEEEEEE...this is FABTABULOULY STUNNING !!! The background blew me away ... THEN...OMG ( oh I said that already)... the details ornate plate and facet knob, AND WINGS TOO??!! OOOOOWEEEE ...
ReplyDeleteEvery detail is perfection, Candy! I am blown away by your creation - LOVE it!!
ReplyDeleteCandy this is just AMAZING!!! love, love, love xxxx
ReplyDeleteOh I am drooling and crying here at the same time! I love this and wish I could be playing along! Lately I have no time to even blog visit, but had to stop in before we hit the road! All the texture and colors are so beautiful and my favorite is the bird and nest! Such a glorious piece! Hugs!
ReplyDeleteStunning!!! Love all your textures and of course techniques...You brought the corrugated paper to life along with making that sweet bird nest from wire. Bravo, to another beautiful creation.
ReplyDeleteCandy, I know you can't hear me all the way in Missouri, but I am just squealing with delight over this mixed media framed treasure! I'm so sorry I'm late to the party, but that just seems to be the story of my life right now. At least my blogging life...
ReplyDeleteLove the way you have finished your canvas, your corrugated board, the nest and that fantastic weather vane! Absolutely one of my favorites! Big round of applause, and THANK YOU for sharing your process with us!
PS I have a little 3D nod to spring that should be posting in about 6 minutes...wish I had seen yours first so I could have added more class to mine! Hugs!